How to drain water from a UAZ loaf block
Below watch the video about how to drain antifreeze from a UAZ loaf and express your opinion about it in the reviews of the article.
Video quality: FullHDRip
The video was uploaded to the admin from the user Aaron: for immediate viewing on the portal.
To give the correct answer to the question How to drain antifreeze from a UAZ loaf, you need to watch the video. After viewing, you will not need to seek help from specialists. Detailed instructions will help you solve your problems. Enjoy watching.
Humor on topic: When I read the status today: “A young, cool, sexy girl, 14 years old, looking for an unpredictable passionate man, 14-15 years old, for a serious relationship,” I realized that it was basically too late for me to rush around. The old lady was running away, so to speak.
ENGINE COOLING SYSTEM OF UAZ-469 CAR
The engine cooling system (Fig. 43) is liquid, closed, with forced circulation of liquid.
Fill the cooling system with soft fresh water - with a low salt content.
In winter, you can use a liquid with a low freezing point - antifreeze. At temperatures down to minus 40°C, use grade 40 fluid; at lower temperatures, use grade 65. Remember that antifreeze is poisonous.
Maintain the correct engine temperature of 80. 90°C. This reduces engine wear and improves efficiency. Maintain the temperature using blinds
Rice. 43. Diagram of the engine cooling system: 1 - drain edge of the cylinder block; 2— gasket; 5 — cylinder head; 4 - hole in the water distribution pipe; 5 - water distribution pipe; € - thermostat; 7 — exhaust pipe; 8 - bypass channel; 9 — impeller; 10 - drain; 1 - fan; 12 — radiator; 18 — radiator drain valve; 14 — inlet pipe; 15 — cylinder block; 16 — radiator filler neck; 17 — hose; 18 - plug; 19 — expansion tank; 20 — “minimum” label
Rice. 44. Engine cooling pump: I - nut; 2 — roller: 3 — pump housing; 4 - control hole for lubricant outlet; 5 — grease nipple; 6 — spacer sleeve; 7 - sealing washer; 8 — rubber cuff; 9—spring; 10 — impeller; 11 — impeller fastening bolt; 12 — control hole for liquid outlet; 13 — bearings; 14 — fan pulley hub
And the radiator insulation valve. To monitor the coolant temperature, there is a sensor in the water pump bracket, and an electrical indicator on the instrument panel. In addition, a red control light is installed on the instrument panel, which lights up when the liquid temperature rises to 106.109С. The reasons for the increase in fluid temperature may be a low fluid level in the radiator, a loose fan belt, or driving the vehicle with the blinds closed and the radiator insulation valve closed. The warning lamp sensor is installed in the upper radiator tank. If the lamp lights up, immediately eliminate the cause of overheating.
The pump (Fig. 44) is of a centrifugal type, driven by a V-belt from the crankshaft pulley. The pump shaft is sealed using a self-clamping oil seal. Coolant leakage through the inspection hole at the bottom of the pump housing indicates a seal failure. It is impossible to close the inspection hole if liquid leaks from it, as it will get into the ball bearings and can damage them.
The thermostat (Fig. 45) with a solid filler is placed in the outlet pipe. The thermostat valve begins to open at a coolant temperature of 70±2°C, and at a temperature of 83±2°C it opens completely.
The thermostat automatically maintains the required engine coolant temperature by turning the radiator off or on. In cold weather in winter, especially at low engine loads, to avoid freezing the radiator, always keep the shutters closed and only open them slightly when the coolant temperature rises to 90°C. - h
Cooling system maintenance. While operating the vehicle, periodically remove scale and debris from the cooling system, adjust the fan belt tension and lubricate the water pump bearings (see lubrication table), and also flush the radiator from the outside.
Rice. 45. Thermostat operation diagram: 1 - thermostat valve is closed; 5 - thermostat valve is open
Remove scale and debris by rinsing with a strong stream of clean water. Wash the engine and radiator separately so that rust, scale and sediment from the engine cooling jacket do not clog the radiator. Before flushing the engine, remove the thermostat from the pipe.
The direction of the jet should be opposite to the direction of water movement during normal operation of the system (Fig. 47).
It is prohibited to use alkaline solutions to wash the cooling jacket, as they cause corrosion of the engine head and cylinder block.
If there are significant scale deposits in the radiator tubes, do the following:
1. Remove the radiator from the car and pour into it a ten percent solution of sodium hydroxide (caustic soda), preheated to a temperature of 90°C and filtered.
2. After 30 minutes, drain the solution from the radiator.
3. Rinse the radiator with a stream of hot water in the direction opposite to the water circulation in the engine for 30-40 minutes under a pressure of 0.5 kg/cm2 (Fig. 48).
Adjust the fan belt tension by turning the generator. The normal deflection of the belt should be 8.14 mm when pressed with a force of 4 kgf (Fig. 49).
If the fan belt starts to slip, increase the tension.
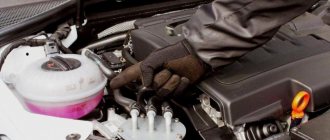
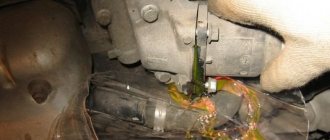
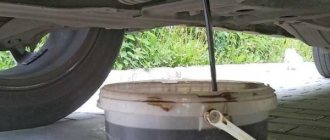
Be sure to drain water from the engine cooling system through two taps. One of them is located on the lower radiator tank, the other on the starting heater boiler or on the cylinder block if there is no boiler. When draining the water, remove the radiator cap, unscrew the filler funnel plug of the starting heater and open the heater tap.
Trimming
There is also a setting called cropping. This procedure strengthens the underbody of the car and provides better protection against rust. In addition, thanks to the enlargement of the wheel arches, the UAZ loaf takes on a more purebred appearance.
Trimming is done as follows:
- The disc is taken at 0.8-1.0 millimeters;
- Careful trimming is carried out strictly along the intended line (it is important not to forget to take measurements). Unevenness is unacceptable when cutting. Remember that a profile pipe is welded onto the prepared surface.
The profile is also welded from the inside. In this case, it is customary to apply 10 mm stitches every 80-100 millimeters.
Source
Many owners of Lada Priora cars often wonder how to drain antifreeze from the engine system. With some knowledge and following the rules, it is not difficult to drain and replace the antifreeze on Priore. However, during the work process it is recommended to be extremely careful and act in stages.
How to change the coolant on a UAZ Patriot yourself?
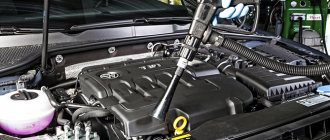
To completely replace the antifreeze in a UAZ Patriot, it is not at all necessary to contact a specialist. This operation is one of the simplest actions that a car owner can perform to maintain his car. Let's figure out what kind of antifreeze there are, which one is suitable for your car and how to replace it with your own hands.
How to drain antifreeze from a UAZ 409 engine
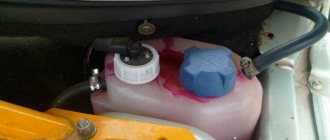
The barely warm air blowing from the cabin stove prompted me to take active action. After googling on the drive, here EVV81 found out that there are several options for the lack of heat in the Patriot. In my case, both the main and additional stoves heated weakly. The thermostat was working properly, this was evident from the movement of the coolant temperature gauge needle. At first it gradually approached the middle of the scale, then, almost reaching the large mark in the middle of the scale, it went back one or two divisions. Taking this opportunity, I would like to convey the rays of diarrhea to the people who came up with NOT putting degrees on these lines, because in the instruction manual the temperature is not indicated in sticks at all! Initially, I decided that the heater radiators were clogged with rust and decay products of antifreeze additives. What to wash with? Nipanyatnaa... I bought two liter packages of special antifreeze for soft washing AGA R30 like this
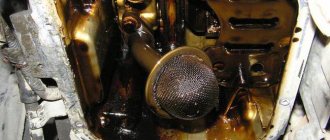
I reached under the hood, looked for the plug and didn’t see it. I crawled under the car and didn’t see anything similar either! I'm starting to get angry - who draws these manuals? 15 minutes of stupidity on the Internet and on the UAZpatriot forum I come across advice to look under the exhaust manifold. I look under the exhaust manifold and there she is!
Communities › UAZ drivers › Blog › Changing the coolant on a Patriot (ZMZ-409) without puddles and dirt
Another photo and video report on replacing Behemoth's technical fluids. Today - cooler. What was poured into the circuit at the moment hardly met any standards of this liquid: something brownish-rusty-brown in color, with a neat foam on the surface.