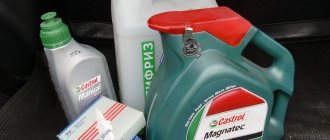
With the arrival of warmer weather, standing in traffic jams/at traffic lights, the fan began to turn on frequently, so I started thinking about why not flush the system. I started to think about it, but now a couple of weeks have passed and I haven’t really done anything, but just when I stopped at the store for some small change I saw antifreeze on offer like two for the price of one (700 rubles), well, I think in general I still shouldn’t buy a new cooler , and now I’ll just switch from antifreeze to antifreeze, even though they say it’s the same thing. I also bought 3 sachets of citric acid, 20 liters of distilled water was found in the garage.
For almost 2 years, I changed the pump, added 5L, blamed the heater radiator, added 5L, the main radiator again added 5L, but Alaska still turned from blue to dark green (which means dog to him), and even with sediment in the expansion tank.
In case of prolonged overheating of the power unit, carbon deposits may form on it. As a result, this prevents the valves from working properly, which leads to burnout of the elements and the occurrence of rust.
Thus, a malfunction of the cooling system leads to engine failure. But systematically replacing antifreeze will avoid this. We’ll talk right now about how this is done, and whether it is necessary to flush the cooling system before replacing antifreeze.
When to replace
First of all, it is important to understand when to perform such a procedure. Most auto mechanics advise replacing antifreeze at least every 24 months. This especially applies to vehicles with a cylinder head and radiator made of aluminum. In addition, the technical documentation indicates the maximum period for the operation of the coolant.
For example, on Ford cars the manufacturer sets 240 thousand km. mileage, on Mercedes - five years, etc. In domestic models, this period is usually 2-3 times less. Long antifreeze service life is achieved through the use of innovative coolants with an improved formula.
In addition, it is necessary to carry out such a procedure if the liquid changes color, becomes cloudy, or a precipitate begins to form. You also need to change the antifreeze after repairing the power unit and adding fresh material there (this prevents its corrosion).
At the same time, it is advisable to use the original composition, so when choosing a product, follow the manufacturers’ instructions.
Is it necessary to flush the system when replacing antifreeze?
Before you get started, you need to understand the answer to the question: “Is it worth flushing the cooling system before replacing antifreeze?” The answer here is clear: yes. This is especially true when the drained mixture contains oil and various contaminants. If the antifreeze is clean, and you change it to a similar composition, then the question is: “Do I need to flush the cooling system when replacing antifreeze?” disappears.
The washing itself is quite easy. We simply fill the system with purified water, after which the power unit is started for about ten minutes. When the system is heavily contaminated, it is worth adding twenty percent of the cooling compound to the water. The procedure is repeated until everything is cleared.
How to replace antifreeze
The question of whether it is necessary to flush the cooling system when replacing antifreeze has been resolved. Now let's proceed to the actual procedure itself.
First, we drain the used composition. It is worth remembering that everything must be done on a cooled engine, because otherwise the temperature of the antifreeze can reach almost a hundred degrees Celsius. There is nothing complicated here, just remove the radiator cap and then unscrew the drain plug (don’t forget to place a large bucket underneath).
Next, it is important to check the cooling system hoses for damage. If cracks or other defects are found, the element should be replaced.
As already mentioned, we flush the system to eliminate corrosion and various contaminants. If necessary, you should use special cleaning chemicals. Fill the system to the brim, then turn on the engine until it warms up to its normal operating temperature. Then turn off the engine. Again, we wait for the engine to cool down, and then drain the water.
Again, pour water into the system, close the lids, and turn on the engine for 15 minutes. When everything has cooled down, drain the liquid. Only when everything is completed do we begin pouring the new composition.
When the purchased antifreeze is in the system, turn on the engine and heater to the maximum level. This allows the coolant to be evenly distributed and also eliminates air bubbles from the system. But it doesn't end there either. After a couple of days, it is important to look at the antifreeze level. If necessary, add more composition.
Remember that before starting such procedures, it is advisable to read the recommendations of the manufacturer. Sometimes it happens that during use the composition changes its shade, and this is quite normal - everything depends on the characteristics of a particular brand.
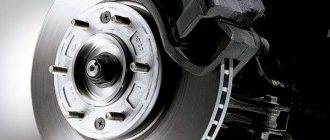
Replacing the axle bearing
The axle shaft is an integral part of the rear axle of the VAZ 2107. The axle shaft itself practically does not break, but the bearing by which it is attached to the axle housing sometimes fails. Its purpose is to rotate the axle shaft smoothly and evenly while the car is moving. Signs of bearing failure are the same as those of the hub elements. If problems occur, it is necessary to dismantle the axle shaft and replace the faulty part.
Bearing removal
Before starting work, you need to prepare the following list of tools:
- set of socket wrenches with a crank;
- hammer;
- flat screwdriver;
- chisel;
- grinder;
- new axle bearing with retaining ring.
To replace, follow these steps:
- Raise the rear wheel using a jack, then remove it, not forgetting to install stops under the front wheels.
- Remove the brake drum.
- Using pliers and a screwdriver, remove the brake pads.
- Use a 17mm socket wrench to unscrew the axle mount.
- Remove the axle shaft from the rear axle stocking.
- Remove the worn bearing by inserting a suitable size wrench and hitting the tool with a hammer. Quite often, to remove the bearing, you have to cut the race with a grinder, since the part sits quite firmly on the axle shaft.
Installing a new part
After removing the bearing, you can immediately begin reassembly:
- Clean the axle shaft from dirt and wipe it with a rag.
- Press the new bearing onto the axle shaft, and then install the retaining ring. To install the latter, it is advisable to heat it up with a blowtorch, which will ensure easier installation and reliable retention after cooling.
- Remove the old axle shaft oil seal from the rear axle stocking using a screwdriver or pliers.
- The new seal is driven in through a fitting of suitable size.
- Mount the axle shaft in place. The nut securing the axle bearing plate is tightened with a torque of 41.6–51.4 Nm.
Video: replacing the axle bearing on a “classic”
Replacing a wheel bearing on a VAZ Seven is not a complicated procedure. To carry it out, you will need to prepare the necessary tools and materials, as well as read the step-by-step instructions. If you choose a quality product and carry out repair work correctly, the bearing will work for a long time without any problems.
Replacing antifreeze with antifreeze in a car cooling system
This option is quite common. For many years, our compatriots knew only one coolant - antifreeze. At the same time, everything is changing, and new formulations have appeared on the market.
You don’t need to think that antifreeze is radically different from antifreeze. In fact, the second is the global name for cooling compounds, while antifreeze is a domestic trademark of such products. As a result, the process of replacing antifreeze with antifreeze must be done exactly as with any other liquid.
So, we figured out when it is necessary to change the fluid, and also whether it is necessary to flush the cooling system when replacing antifreeze with a new one. It is worth noting that the procedure itself is quite easy. So, by following all the necessary rules, you can significantly extend the life of the power unit in your vehicle.
Why do you need to change antifreeze?
Many people mistakenly believe that since the cooling system is closed, that is, it is not in contact with the external environment, the coolant cannot deteriorate on its own, because dirt and debris do not get into it. This is wrong.
Important!
The main reasons for the deterioration of antifreeze qualities are aging and destruction of additives that provide anti-corrosion protection. As a result, metal particles and other substances get into the cooling system, its components become clogged, and it begins to cope with its task worse.
This is why antifreeze needs to be changed regularly. Another question is how often should this be done? It may seem like a logical solution to change the fluid at the first sign of trouble, but we recommend doing this sooner.
What is the difference between antifreeze and antifreeze - historical outline
There is undoubtedly a difference between antifreeze and antifreeze. And we will talk about this throughout our article. Let's start with a little look into the past. There was a time when there were no foreign cars on our roads yet, and the country had a curtain on any import, including consumables for cars. Our industry could produce everything itself; it did not ignore the coolant. Antifreeze is an exclusively Soviet product, and is essentially antifreeze, because it acts in exactly the same way. Only earlier it was a proper name, even an abbreviation, and then it became a common noun and brings discord into the heads of novice car owners.
The difference between antifreeze and antifreeze is visible already at the development stage; their composition was invented independently, although the typical mixture was taken as a basis - alcohol (ethylene glycol) and distilled water. The essence of selecting the main components is simple: alcohol lowers the freezing threshold of water, which allows you to cool the engine even in cold weather, and the upper temperature threshold is determined by the properties of water, i.e. The composition will boil at about 100 degrees. But the set of additives is the main difference. The composition of antifreeze and antifreeze includes additives and dyes of different nature, hence the slightly different properties for each of them.
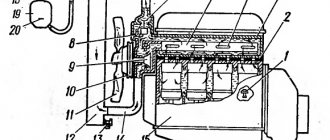
Cylinder block
After the antifreeze has been drained from the radiator, you can move on to the cylinder block. Certain nuances of this procedure may differ for different car models, but the basic principle is the same everywhere. Every car has at least one drain hole.
Many of these holes have two – lower and upper. When trying to drain antifreeze from the block yourself, you can find out their location in different ways:
- from the technical description of the car;
- from more experienced friends or garage neighbors;
- using the Internet.
To quickly and completely drain the antifreeze from the engine, you need to open each of them.
The drain holes of the cylinder block are most often blocked with plugs and bolts. They are easy to identify by the presence of a gap between the bolt head and the surface of the housing.
Sometimes these elements are made of materials resistant to corrosion processes, such as bronze or brass. On early car engines, instead of holes and plugs, there are drain valves that make work easier.
To access the drain plugs of engines of some manufacturers, including AvtoVAZ, it will be necessary to remove the ignition module. Therefore, you will need a certain set of tools.
How to distinguish antifreeze from antifreeze - let's understand the chemistry
The properties of antifreeze and antifreeze are determined by a set of additives. Moreover, even the color of a liquid can tell us a lot about its quality characteristics. The most important difference between additives is their nature; in domestic antifreeze they are inorganic, while in imported antifreeze they are organic. This cannot but affect the service life and quality of the fluid itself and its relationship with the engine cooling system. In addition, this leads to the fact that the boiling point, density of antifreeze and antifreeze are also slightly different.
Let's briefly go through all the indicators. Antifreeze is less perfect than imported antifreeze, therefore it forms an anti-corrosion layer over the entire area of the system so that its aggressive components do not burn the walls, which makes the metal transfer heat worse and reduces the efficiency of the entire process. Because of this, the engine suffers, its wear accelerates, and fuel consumption increases. Antifreeze loses its properties after 35 thousand km. An imported product acts “smarter”. It forms a protective layer only in problem areas, and not over the entire surface, so heat transfer remains at a high level, engine problems become less likely, and the coolant will need to be changed only after 250 thousand km.
The color of the liquid tells us what the boiling point of antifreeze and antifreeze is. This also allows you to avoid confusion when purchasing a new batch of liquid, because you can only mix the same colors.
Replacing antifreeze with antifreeze - how to do it correctly?
It is believed that it is better not to mix dissimilar liquids with each other. Considering the above composition of these liquids, it is clear that you can get anything you want as a result. Although many people believe that antifreeze and antifreeze can be mixed, any chemist will tell you that this will have a very unpredictable effect on your engine. In any case, there is a simple trick that will show you the compatibility of antifreeze with antifreeze. Before pouring them into the car, mix them in some container and make sure that no gel-like or flaky sediment has formed, because it will clog all the channels and ruin the system.
How to replace antifreeze with antifreeze - procedure
Since we agreed that mixing antifreeze and antifreeze is not the best idea, let’s figure out how to properly carry out the replacement. First, you should buy a new composition of proper quality. In the market you will often hear both names used equally, although this is often just a gimmick. After all, antifreeze is indeed antifreeze, but the inverse relationship between the concepts is excluded. And it seems like you came for antifreeze, but they sell you a domestic analogue under its brand name. To know how to determine whether they are trying to sell antifreeze or antifreeze to you, come make a purchase after a quality educational program from experienced motorists or Internet forums . Also study the popular brands of coolant recommended by the car manufacturers themselves; you can find this out on the official websites.
Now let's look at the procedure for changing antifreeze to antifreeze or vice versa. Logic dictates that, first of all, you will need to flush the cooling system. Therefore, you drain the old antifreeze completely (from the cylinder block, radiator and tank), you can put the car on some slope so that the front part tilts down. Next, take distilled water with a small addition of a special cleaning mixture and pour it into the system, close all the plugs, turn on the engine and stove at full power, wait until all the valves open and the liquid runs through all the tubes. The spent composition is drained, and the operation already described is repeated a couple of times.
We managed to clean the system, now we’ll figure out further how to replace antifreeze with antifreeze (or vice versa, if there are such adventurers). We put our car on the same slope, only now we lift the front part up, fill in almost the full volume of antifreeze, but do not close the car’s radiator cap, but start the engine. This is how we expel air pockets from the inside. Then we turn off the engine and add liquid to the top, close the lid. Beginners should also keep in mind that most often we buy antifreeze concentrate, it should be diluted before filling the system, the proportions are indicated on the label.
How to change coolant?
Changing the coolant must be done on a cold engine. Antifreeze is a poisonous liquid, so you should be very careful when handling it.
It is important to prevent liquid from coming into contact with skin, clothing, or paintwork. If this happens, the antifreeze must be washed off with plenty of water.
How to drain?
Before draining the coolant, first unscrew the cap on the expansion tank. In this case, safety precautions must be observed, since hot steam comes out of the tank. To avoid burns when unscrewing, you can cover the neck with a rag. The lid is slowly turned counterclockwise until a hissing sound is heard. When the pressure drops, unscrew the cap completely. If there is protection on the engine, it must be removed. In the area of the pump, under the car, a container is installed for the drained liquid.
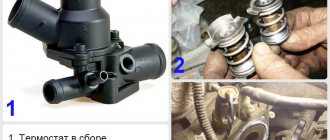
If your car is equipped with power steering, first remove the drive belt from the pump pulley. Then lightly unscrew the bolts holding the pump bracket, then turn it upward so that the thermostat and cooling system pump hoses are accessible.
The lowest element of the cooling system is the pump. Three hoses are attached to it.
Three coolant hoses
The middle hose is too short, it is difficult to remove it without damaging it, so it is not touched. First, remove the clamps from the upper hose to disconnect it and drain the coolant. Then the lower hose going to the radiator is disconnected and the remaining antifreeze is drained. Remove the thermostat flange and the thermostat itself to drain the coolant from the cylinder block.
Thus, most of the liquid is drained from the system. Some of the liquid remains in the heating radiator. To get rid of it, remove the lower hose from the radiator, put on a hose of a suitable diameter and blow into it. Thus, the remaining antifreeze comes out of the radiator and the middle hose of the pump, which was not unscrewed.
Having finished washing, all hoses must be connected in the reverse order and the thermostat must be installed with a new rubber seal. When installing hoses on the pump, you should clean its outlets if there are deposits on them. If necessary, install a new temperature sensor for the Volkswagen Passat B3, two of them are needed.
The clamps must be installed in the same places. The power steering pump, along with the bracket and drive belt, is installed after new coolant has been added to the system.
If you neglected to replace the coolant, the cooling system will work ineffectively due to poor passage of channels clogged with sediment and rust. Therefore, it is advisable to flush the system before adding new fluid. For rinsing, use either clean or distilled water. The engine and radiator are flushed separately.
How to fill?
Before filling, you should prepare the coolant. To do this, antifreeze is diluted with clean or distilled water approximately 50/50. The antifreeze content should not be less than 40%! (MISSING)Before filling in coolant, it is necessary to check the integrity of the hose and the quality of tightening of the clamps. If everything is in order, the cooling system is filled with new coolant. Fill slowly to avoid any air bubbles. The liquid should be poured to a level just below the maximum.
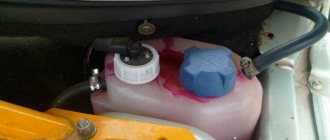
Expansion tank in Volkswagen Passat
After the replacement is completed, it is necessary to check the tightness of the connection between the thermostat and the cooling pump, the hoses with the radiator and the pump. Places where antifreeze leaks are possible are identified by the presence of a white coating. The presence of cracks and the elasticity of the sleeves is checked by squeezing and bending them.
Then install the power steering pump and drive belt. Screw the cap on the expansion tank. After this, you should start the engine and let it run for some time in idle mode at accelerated speed. As soon as the temperature sensor gives a signal to the fan and it turns on, you should turn off the engine and check the coolant level in the tank. At operating temperature, the coolant level should be slightly below the maximum.
After turning off the fan, you should remove the air from the heating radiator. To do this, add speed to medium, in this mode the engine should run for two minutes. When the engine has cooled down, the level is checked again; it should not fall below the minimum. If everything is done correctly, the temperature sensor in operating mode will show a temperature of 80-90 degrees.