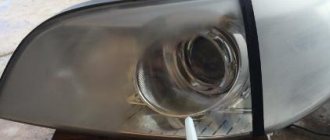
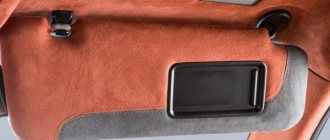
And so, here is our ceiling with longitudinal damage (worms)
and damage from curtains (side airbags).
As the vehicle is used, its interior and, in particular, the ceiling lose their original appearance and functionality. Stubborn stains, scuffs, and holes appear on the upholstery, which spoil the aesthetic perception of the car’s interior. Procedures such as reupholstery, repair or restoration, which are recommended only in specialized automotive studios, help restore the ceiling to its former attractiveness.
Ceiling reupholstery: stages and nuances
First of all, we remove longitudinal damage (worms)
Well, then, we treat the damage from the explosion of the upper curtains
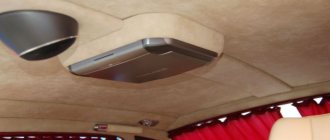
The standard procedure for reupholstering a ceiling involves replacing worn-out material with a more durable analogue. Initially, a fabric suitable in color and technical characteristics is selected, which is most often used artificial leather or Alcantara. Next, using special tools, the ceiling fittings (visors, plugs, etc.) are dismantled, the electrics are turned off and the old upholstery is removed, after which the ceiling matrix is protected from dust, dirt, and foam rubber residues.
Then we apply a special adhesive composition to the restored ceiling
Dismantling an old structure is rightfully considered the most difficult task, requiring special attention from the master. In particular, it is necessary not only to thoroughly clean the ceiling, but also to prepare the matrix for re-upholstery. To do this, use a solvent, a brush, as well as sandpaper (sometimes a dry rag) to clean the protective surface from glue residues, otherwise the adhesion of the new composition will leave much to be desired.
The next step is to try on the new fabric. As a rule, the selected material is measured with a margin of 1-2 cm, and the remaining excess is subsequently removed with a stationery knife. Later, a fixing compound is applied to the ceiling matrix, on top of which the fabric is glued and smoothed. At the final stage, the shelves are attached to the metal frame, holes for the lamps are carefully cut, the electrics are connected and decorative plugs are inserted.
Ceiling repair after airbag deployment
Carefully and without folds we lay out and glue new material from the “ceiling collection”, or an option with Alcantora is possible
In the event of a serious accident, the vehicle's overhead airbags will inevitably deploy, after which the trim will be torn and lose its attractive appearance. Restoring the presented element requires sequential adherence to the following steps:
- selection of functional material;
- fitting and cutting of fabric taking into account repair dimensions;
- installation of sheathing in compliance with optimal installation technology.
Removing the headliner
To properly repair a car's ceiling trim, it must be dismantled. To do this, you need to remove all the plastic trim parts that are adjacent to the ceiling trim and interfere with its removal. It is also necessary to remove the interior lighting lamps (in the front part), sun shields, plastic handles and all the clips that hold the trim. The lampshade, which is located in the middle part, should be removed last, as it will keep the casing from falling down while you unscrew and dismantle all other parts. Each car has its own characteristics of removing various elements, so if difficulty arises, it is better not to apply excessive force, but to find instructions on the Internet. Sometimes it is enough to know in which place you need to insert a flat-head screwdriver to make the part give way.
To retighten or not: why is this operation necessary?
And first, let’s determine why the constriction is needed in general:
- Pollution. Very often, passengers' heads touch the ceiling, so surface wear is a regular occurrence. Especially when it comes to light materials. You can add to this dust, dirt from the road, and smoke from a cigarette. In short, there is enough negative influence.
- Wear. Since the impact on the ceiling is obvious, it has to be washed more often, which means more wear and tear.
- To change the design of the car interior. Although few are capable of such an act, there are car owners who simply want to change the design, making their car close to ideal. And then you need to re-tighten the ceiling.
- You can make it tight just for a change of scenery if you have to stay in the car for a long time.
- In addition, it is much more pleasant to be in a clean and well-maintained car in a pleasant color.
Glue selection
You should not use universal glue, as this can lead to toxic emissions into the interior when exposed to sunlight. Therefore, you can use aerosol glue, it spreads well and dries quickly. You must act strictly according to the instructions.
Color selection
It is best to choose pastel colors, as they create a calm and pleasant atmosphere in the car interior. It is better to exclude white, since problems with frequent contamination can occur on the very first day after repair.
In use, discreet shades work best. But bright colors are not only unpleasant during a long stay in such a cabin, but also dangerous, since they can cause fatigue and even irritate the driver, and this is unacceptable.
Material selection
To reupholster a ceiling to a high standard, you should not only determine its future color, but also the material itself. And this could be:
- carpet;
- Alcantara;
- car vinyl;
- leatherette;
- leather.
There is also such a material as auto velor. It creates a special atmosphere and looks attractive. And the choice of such material is huge.
Autocarpet
The material is available, has the texture of non-woven fabric, is rich in shades and is easy to install. Most often it is used for covering audio systems, but it is also suitable for ceilings. It stretches perfectly, acquiring the desired shape. Autocarpet has a wide range of colors, and there are waterproof products.
Alcantara
It is created not only using textile, but also chemical processes. This adds durability and strength to the material. It turns out to be silky, soft and dirt-repellent, easy to care for, and inexpensive.
Alcantara is suitable for intensive use.
Leatherette
Inexpensive material, but has a number of disadvantages:
- too elastic;
- subject to minor damage;
- may emit a pungent odor;
- absorbs odors.
But leatherette looks pretty good, although it can wrinkle and is not strong enough. Therefore, the material is not suitable for intensive use.
Sheathing procedure
First you will have to remove the old ceiling. However, you should not believe the myths that you will have to remove the windshield. You only need to remove the front passenger seat to get the material through the rear door of the car, as shown in the photo.
Next you need to start removing the old coating. To remove the glue, use a stiff sponge and white spirit. After this, it is recommended to sand the surface to remove any unevenness.
By its principle, replacing the ceiling means gluing the material onto the matrix after removing the old coating. This is not as easy as wallpapering, since the material is slightly different. It’s better to do the gluing together together.
First, we apply glue in the center of the matrix - a thin strip 10 cm long. Then we apply glue every 10 cm of the matrix to properly glue the fabric. This is done by one person, and an assistant pulls the material on the sides. It needs to be smoothed from the center. You need to work with gloves.
The edges of the material are wrapped and glued to the base. If necessary, excess material can be trimmed using a sharp knife.
Next we make holes for the fasteners. All that remains is to install the matrix in the car.
Important Tips
- Fabric must be purchased not just in sufficient quantities, but with a reserve.
- It is worth taking care of the availability of additional tools in advance. If you use auto velor, then you only need glue, fabric, a leather roller and a hair dryer.
Need to start small
Finally, we note that reading the instructions and watching the video is not enough
It is important to practice if you have not had such experience in your practice. Therefore, you can try to cover a small element first
And only when the process is clear, everything will work out, you can move on to the main task - reupholstering the ceiling.
Installing the ceiling trim in the interior
It is better to reinstall the casing after a few hours or the next day. It's better to have an assistant, but you can do it alone. It needs to be pushed back into the cabin and attached to the ceiling in the opposite order of removal.
p, blockquote 10,0,0,0,0 —>
When reassembling, be sure to reconnect any plugs that were disconnected.
p, blockquote 11,0,0,0,0 —>
If everything is done correctly, such repairs can last at least 5–10 years.
p, blockquote 12,0,0,0,0 —> p, blockquote 13,0,0,0,1 —>
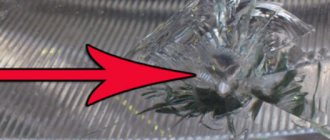
The owner of a Chevrolet Niva, who made the “ears,” contacted us. The ceiling of the car was damaged during the accident. There were creases and cracks on it. First, we restored the integrity of the ceiling panel itself using metal staples and fiberglass.
What kind of glue should be used for re-upholstering the ceiling?
What to do if you feel sick in the car
Sheathing material plays an important role. It is necessary to glue the ceiling lining with a high-quality compound. The glue must meet the requirements:
- Non-toxic. Toxic fumes accumulate in a confined space and can harm the body.
- Connect materials tightly.
- Easily and evenly distributed across materials.
- Don't leave streaks. It is not recommended to glue a black ceiling with white compounds.
The choice should be taken responsibly.
Based on polychloroprene
Craftsmen recommend using polychloroprene-based glue. The product is applied to two surfaces. The chemical composition contains a solvent, which upon contact gradually evaporates. The result is a strong bond. The adhesive base may contain resins or metal oxides that increase joint strength and resistance to temperature changes.
The ceiling upholstery in the car interior is characterized by activation of properties under the influence of high temperature on the area of application. Above 60 degrees, the chemical composition begins to melt and release vapors. After pressing the surfaces, the exposure to temperature is stopped. During the cooling process, the cladding material is firmly fixed to the ceiling. The advantage is the ability to operate the vehicle 30 minutes after completion of work.
Noteworthy ceiling adhesives from the following manufacturers:
- Glue-88 is universal, has a wide range of applications, and tolerates high air humidity. Disadvantages – strong chemical smell, characterized by low fixing properties.
- GTA Boterm is a Polish manufacturer. Requires exposure to high temperature to activate. During vehicle operation, high resistance to temperature changes and high humidity was observed.
- Mah is a German manufacturer. In many respects it is considered the best glue. Tolerates loads without losing fixation, heat-resistant, moisture-resistant.
The first two adhesives are most often used when covering the ceiling with your own hands. Mah is preferred by professionals who make money reupholstering interiors.
Polyurethane based
Craftsmen recommend gluing the ceiling to the car using polyurethane glue. The composition has a minimum of components that make the glue universal and the fixation strong. It is characterized by a long hardening time, which makes work easier. Easy to use for beginners. They are not inferior to other types of glue in strength.
Polyurethane compounds include:
- Moment is a popular brand. It has disadvantages - it takes a long time to dry, is toxic, liquid, and difficult to work with. Car owners choose to reupholster themselves, as it firmly fixes surfaces and is sold at affordable prices. This remedy is best used only as a last resort.
- Kaiflex K414 - insulates heat and has a high degree of fixation. Lots of positive feedback.
- Titanium is a universal product and is widely used in everyday life. Craftsmen do not recommend using it to reupholster the interior, since the composition does not allow for strong adhesion of surfaces and does not withstand heat.
- Demoskol is a brand that is resistant to high temperatures, moisture resistant, and does not react to temperature changes.
Each brand has pros and cons
It is recommended to pay attention to products that are sold in auto supply stores.
These formulations are produced in liquid form.
Other options
Convenient for finishing car interiors with adhesive in aerosol form. These are used in car dealerships by professionals. Have characteristics:
- Easy to use, do not stain surfaces, do not leak.
- Evenly distributed in a thin layer on the surface.
- They do not form lumps, the fabric is smoothed evenly.
- Dries in a short time.
- Do not penetrate fabric and leave no marks.
They are used for covering dashboard panels and other interior elements.
Adhesive-based cladding has appeared on the market. Self-adhesive fabric is convenient to use. For beginners, it is recommended to test the material. There is no need to use glue.
We recommend that you look at the criteria for choosing adhesive:
https://youtube.com/watch?v=0Ac5QD8vYlY
see also
Comments 21
The work was done in a heap, now I’m faced with a slack ceiling, I reinforced all the kinks with fiberglass, in some places I simply impregnated it with epoxy, in others I putty. But in general, after all the procedures, small unevenness or waves appeared on the surface, I’m afraid that this will appear after pasting with Alcantara, what do you recommend? Should I idealize everything with putties or glue the intermediate layer with, for example, 5mm paralon?
how much fiberglass is needed per 1 square meter? Then do you coat the fabric with resin?
Also a solution. But I puttyed it and covered it with Horn fabric. The effect is the same. Just more dust.
Tell me how to restore the ceiling. They say it’s better to use carpet, but I don’t like it.
Do-it-yourself car ceiling reupholstery: video
What should you do if your car battery runs out quickly?
After reupholstering, the car will definitely become more comfortable. To see how to glue new fabric, we recommend watching the video below.
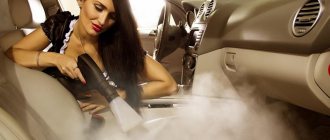
My original ceiling is light. Over time, it darkened and turned into a dirty gray rag. At the same time, under the sun visors it was still pristine, so every time they lowered it suggested the need to do something. After browsing through the forums, I chose “Dry dry cleaning” among the products most used by people. The instructions say: “... apply foam to the fabric, wait 5 minutes until the product displaces dirt to the surface and wipe with a damp sponge.” However, after 5 minutes the ceiling “moved away” from the base and sagged. As it turned out, the ceiling is a textolite matrix (like half a soap dish) covered with auto velor. Auto velor is a fabric with thin (about 5 mm) foam rubber applied to the back side. Auto velor is attached to the matrix using glue. After I treated the ceiling with foam, the fabric peeled off from the foam rubber, and the latter remained glued to the matrix. This is what it looks like
Thus, the need arose to reupholster the ceiling, which, as practice has shown, is no more difficult than hanging wallpaper. The hardest part is removing the ceiling. For those who don’t mind this, here’s my photo report. I’ll immediately refute the popular opinion on forums that the ceiling can be removed only after removing the windshield or rear window. It goes out through the rear door opening without any problems, but to fully use it, you need to remove one of the front seats (preferably the passenger one, because when removing the front seat through the driver's side, the steering wheel will create inconvenience). After removing the fabric from the ceiling, I peeled off the remaining foam rubber by hand.
At the same time, the ceiling matrix was sticky to the touch from the remaining glue. I removed the remnants of the old glue with a solvent - dipped a hard brush into the solvent, intensively rubbed a small area with it, then peeled off the remaining glue with a dry cloth. After removing the old glue and drying the matrix, I walked over it with fine sandpaper (so that the glue would stick better when re-upholstering). This is what the prepared ceiling matrix looks like.
Auto velor is glued to the matrix 88 with glue.
Because I have black elements in the interior, as well as 3D carbon film trim, so I decided to reupholster the ceiling with this particular material. As it turned out later, this is very practical - you can even hit mosquitoes on it with a newspaper without problems, and if someone rests their feet on such a ceiling, also without negative consequences. When gluing, I smoothed the fabric with my bare hands and without consequences, whereas when gluing a light ceiling, you need to work in white cotton gloves (if you put a stain, it is almost impossible to remove it). It takes two people to glue. First, spread a strip about 10 cm wide in the middle of the ceiling and glue the middle of your piece of fabric to it. Then alternately glue both halves in different directions from the middle of the ceiling. Lubricate a 10 cm strip with glue (the best option for drying the glue), then an assistant takes the fabric from one side and pulls it towards you away from the already glued middle. At this time, you begin to smooth the fabric from the middle to the edges (as when gluing wallpaper). Moving in this way in 10 cm increments, alternately glue both edges of the ceiling. Carefully glue the recesses under the sun visors and ceiling handles. In front and behind the ceiling, the fabric is wrapped behind the ceiling and also glued. There is no need to wrap the sides, because they are covered with plastic body covers. Trim off the excess fabric. Also cut all existing holes.
For some, cars are a means of transportation, while for others, they are a means of self-expression. The reasons why you decide to reupholster the ceiling can be different: the desire to change the interior to your liking, a coating that has become unusable, persistent dirt, an accident and expelled airbags, loss of shape, peeling of fabric. Before deciding to reupholster the interior, it is advisable to understand in detail the issues of technology and choice of materials. At first glance, there is nothing complicated about reupholstery, but there are a number of features that need to be taken into account. If you decide to entrust this operation to a professional, then knowledge of the nuances will help you control the work of the master.
Reupholstering the interior at home - step-by-step photo report
1. First of all, you need to remove the ceiling from the interior. In some cars, you even have to remove the windshield to do this. This option is definitely not suitable for me, so I didn’t even think about it and tried to get it that way. I took it out through the back door, having first removed the passenger seat, and after a little torment I managed to get it out.
2. The frame of the ceiling of my car is a matrix onto which glass mat was sprayed, after which epoxy was applied. I tear off the remnants of velor and foam rubber and prepare the surface for gluing a new one.
3. Using a metal brush, a knife, a dishwashing knife and other sharp cutting tools, we remove the remnants of the old glue. Finally, the surface must be “sanded” with sandpaper of the smallest possible grit. This will make the surface smoother and improve the adhesion of the glue and material.
To glue the fabric, I used glue “88”; you can use another glue with similar characteristics.
4. The fabric for the ceiling is also up to you personally; there is a large selection of different options in stores. Personally, I chose black fabric with large grain and expressive structure. It looks beautiful and is pleasant to the touch, and besides, there will be no stains or other marks that remain on white velor.
5. In fact, the ceiling reupholstery can be safely called gluing, because the fabric is glued and not stretched using rivets and staples. It’s better to call an assistant for gluing, so the quality of the work will be higher and the work itself will end much faster and more fun.
6. Sticking. Apply a thin line of glue about 10 centimeters in the center of the ceiling frame, then apply the center of the fabric to it.
7. Next, slowly, gradually glue each side, starting from the center of the ceiling. Everything is about the same, 10-15 cm each. An assistant should pull the fabric from the glued center, while you should gradually smooth the fabric with your hands (wear mittens or cellophane gloves) from the center to the edges. If your fabric is light-colored, your hands may leave marks, so gloves are a must.
8. Carefully watch the edges, corners and bends, do not be lazy to properly tuck the fabric in the corners and press it in the recesses, you should not have sagging or un-glued places, the future service of your ceiling depends on this. The edges of the fabric must be folded and glued, and the excess can be carefully trimmed if necessary.
9. We make holes for fastenings, after which you can begin installing the finished laminated ceiling at the place of further service.
The result is visible in the photo. It seems to me that it turned out pretty well. When I first decided to reupholster the ceiling with my own hands, I didn’t even imagine that it would turn out so well. Over time, I even began to catch myself thinking that I was even glad that the old ceiling had become unusable, since I liked the new one much better.
Current:
- Self-upholstery of the steering wheel with leather or a leather steering wheel with your own hands
- What is carbon film? DIY carbon fiber pasting
Operating rules
Before starting reupholstery, it is important to remove the ceiling. The old tissue is completely removed. Dismantling is carried out through the passenger compartment door. For convenience, the seat is removed. Technicians often recommend removing the windshield.
Before removing the ceiling, the elements are dismantled - handles, canopies, lampshades, plugs, etc. The old coating, remnants of glued decor, and foam rubber are removed. Small contaminants are washed out with a soap solution using an abrasive sponge. The surface is carefully treated with a solvent, removing any remaining adhesive. It is recommended to sand the ceiling.
Apply glue along the central part of the ceiling with a short length of 10 cm. Press down the material and move to the sides, retreating 10 cm, to apply the glue. Pay special attention to the curves of the ceiling, carefully attach the fabric. Poorly treated areas will sag and peel off over time.
It is recommended to glue the fabric with an assistant. For better adhesion, one person pulls the material, while the other smooths out the folds and presses it to the surface. Any unevenness in the ceiling must be ironed out more actively. Along the edges, the material is folded under the ceiling, glued, and the extra centimeters are cut off.
At the final stage, special holes are made for bolts for fastening the interior elements. Upon completion of the work, the ceiling is returned to its place.
Material selection
Re-upholstering the roof of a car with your own hands is one thing, but what to choose for the top of the cabin? This is the most important stage of the upcoming work. On the one hand, choosing the right material is not difficult - many stores have a whole range of fabrics, different in color, texture, cost and other parameters. But on the other hand, such diversity literally makes one’s eyes run wild, and sometimes it becomes clear that the choice can be difficult.
The most common materials:
Reupholstering the ceiling will update the appearance of the car. You just need to first get acquainted with the features of a particular material in order to avoid some problems. The selected fabric must meet certain requirements and have the necessary qualities. Otherwise, the material will not stand the test of time.
Repairing burns in the ceiling of a car is no less troublesome, so you should initially choose a good option and then be careful.
Automotive leather
Natural material is, first of all, a sign of good taste. The material is expensive, but the price is completely justified, because it is durable. Its quality is high, it is resistant to moisture, fire, and can also withstand temperature changes. The leather will not be destroyed by the chemicals used to clean the interior.
Unfortunately, such material is not widely used among many car enthusiasts, which is precisely due to its high cost. For this reason, they buy an artificial analogue or eco-leather. In terms of its qualities, it is not inferior to natural material, but in terms of cost it is more preferable.
Artificial analogue
This material is also able to withstand high and low temperatures, has increased moisture resistance and is easy to clean. For example, to remove oil stains, just moisten a swab in ethyl or ammonia and walk over the stains. The material does not wear out over a long period of vehicle operation.
But there are some drawbacks:
The only thing that can please us is the price. Moreover, purchasing colored eco-leather (if necessary) will cost much less than dyeing natural material.
Carpet
An affordable, economical synthetic fabric that has wear resistance, noise and heat insulation properties and does not fade. In addition, mold does not form on it. The most common shade of the material is black. This color would be a good choice, since dirt will not be so noticeable. In addition, many cars have a dark interior, so this material would be quite appropriate. Although a light color scheme is not a practical option, this option is also suitable.
Carpet ceiling upholstery
But if you buy a fabric for the ceiling of a car in a bright color, then such a finish will tire the eyes. The exception is those cases when the interior is the same shade. Therefore, you should use black material for coating or pay attention to pastel colors.
Velours
Today, most cars come to the market already with this trim. And if the car enthusiast is not inclined to experiment, then all that remains is to change the old casing. Velor has a pleasant texture and attractiveness. Only when choosing this fabric is it important to consider which manufacturer offers the product, since obviously cheap materials have a low level of quality.
It should be borne in mind that even expensive velor, unlike leather, cannot withstand mechanical stress - the material is easily scratched or torn. The advantage is a simple cleaning procedure without the use of chemicals.
Another inexpensive option for the interior ceiling in your vehicle. Only many motorists rarely resort to it when they decide to reupholster the ceiling on their own. Unlike other materials, flock requires a more complex procedure. Here you can’t get away with simple gluing; flocking is necessary. This procedure consists of several stages:
Only after this the ceiling covering will be strong and durable. Although the prices are low, few can undertake such work, which takes a lot of time. In addition, little effort will simply negate all the efforts made!
But for the sake of the advantages of the material, it is difficult to refuse - originality, a wide range of colors, good noise absorption.
Alcantara
Covering the car ceiling with Alcantara will also appeal to your taste, because this material is more reminiscent of suede, only it is of artificial origin. Its basis is the finest fibers, of which there are a lot. Thanks to this, the fabric is strong, elastic, and wear-resistant. She is not afraid of either moisture or exposure to the sun.
The main quality of the fabric is the ability to “breathe” - air passes through the material freely!
Other invaluable advantages of Alcantara:
Alcantara headliner
All these advantages make Alcantara the optimal choice for car ceiling coverings.