Winter is on the doorstep, and with it all the accompanying joys await us, car enthusiasts - dirt and slush on the road, chemicals and reagents that corrode everything and everyone, insane cold and an eternally gloomy sky. In such situations, you often catch yourself thinking that you simply don’t want to get out of the car. Yes, in general, you don’t need to - if you get some accessories for your car that will make your stay here more comfortable and convenient. As you understand, today we’ll talk about how to make your car cozy in the upcoming frosty season.
Practicality and comfort
One way or another, you still have to get out of the warm and cozy car into the outside world from time to time. Moreover, when you get out, you will definitely step into either ankle-deep snow, or, even worse, into dirty, icy slurry. Well, of course, all this dirt, richly seasoned with road salts, returns to the car. And although everyone is accustomed to using rubber mats in winter, modern technologies allow us to take a different look at these accessories for the car interior.
Firstly, a constant puddle underfoot or, even worse, an ice crust that forms on rubber mats does not add any comfort at all, and in some situations can lead to an accident. And secondly, there are also combined mats on the market, for example, those that combine the best features of pile mats and rubber inserts, like this one:
These mats perfectly absorb moisture without letting it pass further, and for ease of control there is a rubber insert.
There are also even more stylish accessories for cars - these mats are fundamentally different from the black rubber models we are used to:
You can choose these and other original mats for your car at.
How to make a car cozy
If you ask this question to a woman, then, probably, in four cases out of five you will hear: “More of everything soft and fluffy.” And, oddly enough, there is a grain of truth in this approach. And if you focus on the functionality of a soft accessory for the car interior, then coziness can easily turn into comfort for both the driver and passengers.
After all, for example, the same pillows can become not only a decorative element, but also an excellent support for the driver’s lower back:
And the cute headrests, available in a thousand different shapes and colors, will allow you to comfortably hold your head and neck on the road:
You can buy these pillows and headrests at.
But in general, there are a lot of options on how to make a car cozy on the Chinese trading platform - all kinds of organizers for the correct placement of things in the cabin, and ergonomic holders for mobile gadgets, and a variety of seat covers. Just don’t clutter the interior - all car accessories should be strictly in their place and preferably secured.
Thermal mugs
And, of course, in the coming winter, with trips out of town and into nature - to go downhill on a snowboard or ski, you cannot do without ultra-convenient, practical, and most importantly, very necessary 12-volt devices. Today, these electrical accessories for cars are presented in a very wide range - from windshield heaters to kettles and coffee makers, and, of course, thermal mugs.
Hot tea, coffee and other warming liquids - nothing will give you more comfort in any bad weather. And most importantly, this can be done very quickly and conveniently - plug it into the cigarette lighter, five minutes and you're done. Well, you can also choose a suitable model on Taobao, such as this one:
Or a thermos with heating function:
Well, you can also choose these stylish mugs with a temperature sensor - especially for green tea lovers.
There are many ways to transform the interior of your car. And this is done primarily not to give originality, uniqueness and individuality to the car, not to stand out from the crowd, but to provide additional convenience and comfort during the trip.
This is exactly what internal tuning is for. Specialized centers are engaged in interior modernization: replacement of trim, painting, reupholstery, as well as installation of additional equipment. But this can cost a pretty penny, and not every driver can afford it. If you want, you can improve the interior with your own hands if you follow some rules.
Before you start work, you need to decide which interior elements require improvement, and what results you expect from the modernization. Creaking trim, a vibrating dashboard, insufficient lighting - all this is annoying, disturbing and causes additional negative emotions among the driver and passengers. To ensure that trips bring only pleasure and not irritation, we begin to transform the interior.
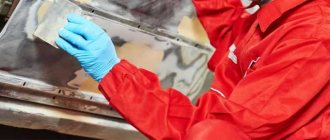
Noise insulation
Extraneous noise arising from the operation of the engine or suspension disturbs the driver and negatively affects concentration. There are many car soundproofing materials on the market, but we not only need to reduce noise, but also eliminate vibration. Therefore, you will have to buy not only soundproofing material, but also vibroplast. An alternative would be to purchase a universal, more expensive 3-in-1 material that combines the necessary qualities. Glue this material all over the cabin, and also pay attention to the floor, the partition between the engine compartment, and the wheel arches. Using a hair dryer will make your work easier. When the work on soundproofing is completed, you can think about music. It's time to improve the quality of your speaker system if you have any complaints about it. This must be done before changing the casing, because later it will be quite problematic.
Interior trim
A cozy and comfortable interior is the secret of the popularity of luxury cars. Once inside such a car, you forget everything in the world and dissolve in an ocean of bliss. You can spend hours admiring the shine of the parts and interior trim. The materials are so pleasant to the touch that you want to touch them all the time. Do you want such comfort? This is quite possible, and you don’t need to buy a premium car at all; you just need to change the interior trim. Even the most broken interior will be transformed and become attractive and cozy again. Reupholstering the interior gives amazing results, especially if it is leather, Alcantara or suede. Alcantara is a new popular synthetic material, very interesting, reminiscent of suede in appearance and feel. In addition, this material is much cheaper than suede and leather, but in quality it is absolutely not inferior to them. Denim, velor, velvet, and silk are considered very beautiful and high-quality materials, but they are not very practical to use for lining; it is best to leave them for bells and whistles.
The presence of extraneous creaks on the side of the casing may be a consequence of the gap between the casing and the metal body. This can be easily eliminated by placing a five-millimeter layer of foam rubber between them. The same can be done when installing a torpedo, the main thing is to clearly fix and tighten all the fasteners.
Steering wheel reupholstery
They cover the material with a food-grade film “it is needed to make it easier to remove the tape”, glue on masking tape “if you want to save money, you can glue the tape with a “mesh” in the area of the planned seams and glue a few additional strips of tape.”
Using a marker, mark the zones using a stationery knife and make a cut along the drawn lines.
Remove the resulting elements and transfer them to special paper 1:1. Cut out a paper template, apply it to the material, circle and mark a dotted line at a distance of six millimeters from the template.
They stitch the materials, and also, if desired, bend the edges and make stitching or, as mentioned earlier, make a recess.
Place the blank on the steering wheel.
Apply glue to the material and the steering wheel.
In the joint area, mark with a marker and pierce holes with an awl at a distance of five millimeters between them. The same distance to the joint. Hand stitches are made
Pillow reupholstery
In this case, all procedures are performed similarly to the seventh section of the article, which describes seamless waisting. That is, all the operations performed are excellent for the pillow.
Quite a lot of people are concerned about whether the airbag will work properly and whether the materials can rip? When the element in question is triggered, a strong pyrotechnic charge is triggered. The thickness of the pillow's plastic is about three millimeters, everything depends on this or that manufacturer. The force of the explosion will be significant, because the material will simply be torn apart. This is not an obstacle for the pillow.
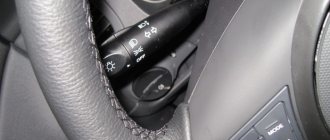
Interior lighting
The problem with many cars is insufficient interior lighting. Moreover, this is a disadvantage not only of middle and economy class cars, but also of some expensive models. But don't be upset! This can be fixed. If you are comfortable with soldering accessories, you can easily change the lighting yourself: replace the standard lamps with LED ones. And in the dark the cabin will be much lighter!
Drivers often don’t like dashboard lighting; it can also be replaced with LEDs. The work is not difficult, even a non-professional can do, but it will require concentration and special care. When choosing LED lighting, think about what color it will be? Of course, you want the interior to be bright and light, but at night, a person’s eyes are very sensitive to bright colors. Therefore, try to avoid particularly bright shades; experts recommend taking a closer look at green or dark red.
Upgrading the interior is, of course, not the first necessity, but, you see, driving in comfort is much more pleasant. Especially if you spend a lot of time on the road. And a masterfully finished interior with your own hands allows you to be proud of yourself and your car. Comfort, coziness and pleasure, not stress and tension, should accompany you on your journey. After upgrading your salon, you will feel right at home. A little effort, determination and these tips will help transform the inside of your car, and the result will be worth all the money spent.
Tuning is a common concept among owners of domestic vehicle models. Such cars are distinguished by a budget interior, which is not particularly comfortable or sophisticated. Budget panels and not very comfortable seats depress the driver while driving.
If you want to create additional comfort in your car or emphasize your status, then you can do interior tuning
Of course, you can turn to professionals who can tune the vehicle’s interior taking into account your wishes and modern design solutions, however, such a pleasure will not be very cheap. If you have the opportunity, free time and desire, then you can do the tuning yourself, without the help of specialists, and at the same time save money. Let's look at how to do tuning in this article.
Update the interior of the bus... (lots of photos)
Sergey, if I wanted to go alone, I would go exactly like this, just for fun:
no, well... I already have, one might say, colossal experience of driving in this state. At the same time, I removed the office chair on the right side... a friend came to see me from Rostov...
And to go to Tula like that... the whole oppupaya was started precisely for the purpose of going with the family, and perhaps with friends. And it is much more spartan than in the An-12 transport plane... There are wires, iron, screws all around. My boy would definitely have climbed somewhere. Well, I can’t do a blunder-on-snot thing either. So I freaked out and stayed at home with my family for the weekend. With Kolya RTFM we fixed the sofa so that we could at least go to the nearest lake. I thought that the most difficult part had already been overcome, but no... I didn’t underestimate the hassle of determining how to attach the swag, which 97% of the time I didn’t remove.
So yes, to say that I was very upset that I broke up with Tula is an understatement...
Okay, on topic...
Friday, the day before the expected departure, didn’t go well for me at all. As luck would have it... Last night we ran out of staples for the stapler. I stayed asleep in the garage, with the goal of getting out early to the nearest construction store to purchase them... Damn it, you won’t believe it, I was looking for these staples from half past eleven in the morning until four in the evening... Damn... It turned out that it was not possible to buy staples four millimeters high. Totally unrealistic!!! The package that I bought the day before for testing and determining the optimal caliber was purchased purely by accident! Like a donkey, I drove a quarter of the east of the Moscow Region, stopping at every store in which they might seem to be. But, stsuko, this is not a hot product, “we don’t order them, they don’t ask us for them”... from 10:30 to 16:00 in traffic jams in search of a package of staples, the price of which is two hundred rubles!!! How so? I looked in Kupavna, in Zheleznodorozhny, in Monino... I found it in Shchelkovo...
Okay, I found it... that's good. Returned to the garage. Nikolai called and offered to help, I was forced to agree. Everything seems to be fine, I almost have time to finish and prepare the main interior panels for installation (the walls and ceiling, which I left for the best part). Kolya arrived during Friday traffic and started covering the seats. My stapler refuses to work... I have staples, but there’s nothing to hammer them in with... yay... I almost had a nervous breakdown (or did I? Kolya, how?)
The time is such that there is really nowhere to buy a new one. All the dances around the old things didn’t work out... That’s it... It will only get worse... Tula, I’m sorry, but I did everything I could...
They brought the ready and unready items into the box, closed them, and left. Kolyan is in Tula, I’m home, my nerves are uneasy... not the same anymore...
Okay, so it’s me.. No one is interested in this. If anything is interesting, it’s only what I’ve done so far.
So…
I understood the purpose of the “superstructures” on the ceiling of the front part of the cabin. I had to redo it a little.
...covered it with fabric, inserted a lampshade:
Almost finished the door cards. I started with the back doors, because it’s easier...
I covered the speaker holes with the already familiar mosquito net. I think the upholstery fabric will fall less into these rather large holes:
I covered it with a rag and put it together with an old, washed pocket. It didn’t seem very provocative:
The side and front doors... I had to think about it... Initially, the bottom of the cards had stripes of carpet. At the same time, the upholstery fabric and carpet were sewn together... I confess, at first there were thoughts of doing the upholstery without carpet at all, to simplify the process, so... But, a couple of mugs of coffee, half an hour of reflection, and... Let's try...
Here I did not cover the entire card with fabric, thinking to save money... I covered the next samples completely with fabric, because it seemed to me that it would be faster, and saving time was more important for me. Important: do not forget to tuck the caps into their places in time. This will be impossible with a nailed rag!
From the remains of the floor covering, we extract a suitable sheet, draw a straight line on it, place this straight line on the map with the back side of the carpet at the desired level from the bottom edge of the map (I figured a centimeter below the old level for the side doors, and a centimeter higher for the front ones, so as not to finish off the plywood that is already tired of staples). We will “scrape” it along this line, and then bend it...
cut off the excess, bend it, nail it (a little more difficult, as it turned out, than with an upholstery rag):
(I took the first piece of wood that came across, for clarity. Therefore, it’s not the size...)
We invent the missing piece, and do the same with the second card.
I'm putting together Tetris and, if possible, strengthening the frame of the side walls of the cabin:
screws feat. brackets )
Since all the rubber seals for the doorways and the insert into the roof edging were a large cube, which, it seems, was not only walked on but also driven on, further difficulties arose. They really became shapeless, haphazardly bent and twisted in the most bizarre way. I don’t know yet what to do with the seals of the openings. With the insertion I decided like this:
I folded it in half, attached a dumbbell to the ends... To be sure, I loaded it with the head of a five-kilogram sledgehammer... (there is only one dumbbell in the photo). I pulled it on top of the old wheel, to avoid bending, along the radius. I left it hanging for a day. According to the theory, in the sun this tape will heat up, become softer, stretch out and straighten. I'll take a picture tomorrow and see how it works in practice.
What else... Plastic window openings. As you remember, he was in a deplorable state. The repair began with gluing the reverse side with mesh reinforcement. Today I continued to mock them. I pre-dissolved plastic of a suitable color, crushed into small pieces, in dichloroethane. (...and the smell! The smell! Like from childhood...) It turned out that we have a substance with the consistency of sour cream of approximately the desired shade. We get the test subject...
We scratch out the cracks with a suitable tool to obtain “chamfers”, and begin to carefully cover the resulting groove with the resulting glue.
Main character:
Well, the process itself was:
became (in several approaches):
“not a fountain”, but already something... will need to be finalized with a file...
We similarly repair the door handle frame. Their “holes for fastening” are practically torn off...
That's all for now... A forced pause is coming.
I'm going to the hospital for examination. I need to get some treatment myself... Once I’m released, I’ll continue. Modified on June 19, 2013 by Gavrik (see edit history)
Do-it-yourself car soundproofing
Modernizing the interior of a vehicle includes a huge number of changes. Before starting work, it is important to understand exactly what result you want to achieve and decide on the color scheme of the interior. This will help you figure it out for work. If you are the owner of a domestic car and want to do a complete tuning of the car’s interior, then, according to the advice of experts, you need to start working with sound insulation and vibration insulation of the interior.
To do this, you need to purchase insulation materials in special stores. You need to start work by completely disassembling the interior, cleaning it from dust and dirt. The remains of the old upholstery are completely removed from the interior. To obtain a high-quality result, it is necessary to initially glue one or two layers of vibration-proofing material, which will reduce the level of vibration in the car while driving. The next step will be gluing the soundproofing material in one or two layers. This will reduce the level of noise and squeaking in the car while driving. The material must be glued over the entire interior surface of the cabin, paying special attention to hard-to-reach places. To improve the result, you can use a hair dryer to heat shrink the materials.
Then you can start assembling the interior. For a tighter fit of the sheathing elements, seals are used. If you are going to tune the interior trim, then it will be easier for you to cope with this task disassembled and put the already tuned elements in place.
Manual process of reupholstering complex elements
- Repeat the first two points of the seventh section.
- They cover the material with a food-grade film “it is needed to make it easier to remove the tape”, glue on masking tape “if you want to save money, you can glue the tape with a “mesh” in the area of the planned seams and glue a few additional strips of tape.”
- Using a marker, mark the zones using a stationery knife and make a cut along the drawn lines.
- Remove the formed parts for transfer and move them to the material and cutout of the pattern. You can start by transferring the elements onto special paper, but since this method does not involve machine stitching, and there is no need for stock, you can do without it. It is worth taking into account small irregularities in the case of applying and cutting out the planned elements with a knife, and in the case of transferring, take into account the factors and remove the irregularities.
- Glue the patterns as described above. There is no need to apply glue to the future seam; you need to make an indent of no more than 20 millimeters from the edge. The indentation is important for the contraction of the material during the stitching process.
- In the joint area, mark with a marker and pierce holes with an awl at a distance of five millimeters between them. The same distance to the joint.
- Hand stitches are made.
- Bend the material as already described above.
Working with complex elements and machine seams
- Based on the first three points of the previous section, prepare the surface and perform the elements using a template.
- They remove the completed elements, transfer them to special paper one by one, cut out the paper template, apply it to the material for tracing and mark dotted segments at a distance of about a centimeter from the template, cutting along the drawn dotted line.
- Sew the material along the completed line.
- Fold the remaining material and stitch with a distance of no more than seven millimeters from the seam. In order for the seam to be even, you need to use a special foot when stitching.
- At the end of the above step, you need to trim off the remains, and as close as possible to the seam.
- According to the points of the seventh section, glue is carefully applied so that the pattern sticks to the product. It is also important to note that it is of paramount importance to align the seams on the surface and glue the materials in the area of the seams so that they do not move out. Swelling and folds, floating lines are very noticeable, so it is important to deal with them.
Experienced craftsmen sew semi-synthetic strips on the back areas so that the glue does not pass through the holes to the outside. Strips of this type are also trimmed, as described in the current section.
To prevent the seam from bulging, the overstretched surface of the material can be glued around the perimeter and beaten with a hammer using a board so that the surface is not damaged, only then the stitching is done. As an alternative, on the surface to be covered with glue, it is necessary to mark the area in which the seam will be placed, and a small depression is made there. It must be extremely even and neat; this can be done using special equipment. The seam will be placed in the recess.
In the case of skin, a needle with a so-called spatula is used so that the skin can be cut without problems, facilitating the penetration process. The needles used can be left-handed or right-handed.
After the main part has been glued, the unnecessary parts of the material are cut off, leaving two centimeters for bending. Two or three cuts are made in the corners in the form of a triangle with sharp corners, so that the material does not wrinkle, but obediently fits into the intended place.
Do-it-yourself tuning of smooth car interior surfaces
Most often, the internal smooth parts of the car are made of cheap plastic and have an unpresentable appearance. There are several ways to modernize the dashboard, door cards and other plastic elements.
The easiest way to tuning a car's interior is to cover products with carbon or carbon-look vinyl film. This is not a very labor-intensive process, although it requires extreme care and careful measurement of details. The film is applied quite simply: you need to clean and degrease the surface to be treated, glue the film, straightening it from the center to the edges of the part using a spatula with a soft tip. For a tighter fit, heat treatment must be carried out in parallel using a hair dryer. It is more convenient to do this work together. Carbon film is sold in different colors, so you can combine colors for a more original look. For example, highlight the handles of a vehicle or dashboard in a different shade and in an individual style. It all depends on the flight of your imagination.
A more expensive option for tuning a car interior is to trim the interior elements using leather or Alcantara - artificial suede. Reupholstering the interior of a vehicle with leather is a very expensive proposition. To do this, you need special automotive leather, which is fire-resistant, durable and wear-resistant. A slightly more economical option is to reupholster parts using artificial suede, which gives the interior comfort and warmth. Working with such materials requires considerable diligence and care and can take a week or even more.
If you are tired of your ugly smooth plastic surfaces, then you can always replace them with leather or rare woods
The most economical and popular option for tuning smooth interior surfaces is flocking. This is a do-it-yourself way to decorate a car's interior using flock, a chemically treated textile. Before flocking, it is necessary to degrease the surface of the product, work it with a primer and fine sandpaper. The next step is to apply an even layer of glue and finish the surface with flock. To do this, it is advisable to have a flocker - a machine for applying it, which will quickly help you cope with the task in even hard-to-reach places. Use a hairdryer to blow off excess material. The parts are left to dry for several hours. You get interior elements that have a pleasant fabric effect to the touch, are resistant to fading and wet cleaning, and also add individuality and comfort to your car.
The process of re-upholstering the visors
- Cover the material with food-grade film and stick with masking tape. Using a marker, mark the zones using a stationery knife and make a cut along the drawn lines.
- They remove the completed elements, transfer them to special paper, and make an indent of about three millimeters. This is necessary in order to avoid sagging, and the visor fits tightly; the distance is chosen taking into account the elasticity of the material. Cut out a paper template, apply it to the material, trace and mark a line at a distance of six millimeters, cut it out.
- Sew the material along the line on three sides. There is no need to sew anything on the reverse side “where the visor is attached.” Make separate lines at a distance of four millimeters from the edge.
- In the corners, in order to obtain a smooth bend, you need to make about ten compact cuts in the form of triangles with sharp corners in order to avoid unevenness and other defects.
- The “cover” is turned inside out, and the visor is inserted into the completed “bag”. So that each end is smooth, and it does not turn out that one of the parts is bent in one direction, and the other in the other direction, you can apply unstitched elements to the material itself, or not suffer and resort to a ruler that can somewhat improve the current situation.
- Pull the fourth side together.
DIY car ceiling tuning
An important point when completely tuning the interior is modernization. Most often, manufacturers produce cars with white trim on the ceiling. And no matter how much the owner takes care of his car, over time the ceiling fades and fades, acquiring a reddish tint. To reupholster the ceiling, carpet is most often used - an inexpensive and widespread material.
It is necessary to begin the modernization by removing the ceiling upholstery, it is advisable to do this carefully in order to use it for cutting from new material. Next, you should clean and degrease the ceiling and secure the prepared pattern to it using standard clamps. To be on the safe side, you can pre-treat the ceiling with glue. This will ensure a more secure fastening.
To give a more presentable look, flocking can also be used for the ceiling.
Do-it-yourself car seat upgrades
Tuning car seats is an important component of modernizing the vehicle interior. In order to improve the appearance of the seats, you can buy new car covers and thus transform them. And also to improve the appearance of your car, you can replace the old seats with seats from a good foreign car.
If you want to get a truly unique result, then it is better to reupholster the car seats yourself.
Most often, eco-leather is used for upholstery. This is not a very expensive material that has good elasticity and a presentable appearance. More expensive options include making covers from automotive leather and Alcantara. These materials have a longer service life.
Having decided on the material and its color, you can start working. Before covering the seats, be sure to remove them from the car. You need to very carefully remove the upholstery from the seats, as it will serve as a pattern for you, then you need to make markings using a marker and old car covers on the new material and cut out all the elements of the pattern. The inside is glued with foam rubber.
To give your car seats a more dignified look, try upholstering them with leather and embroidering beautiful designs.
All that remains is to sew the prepared elements using strong reinforced threads. In order for car covers to have a presentable appearance, it is necessary to straighten the internal seams, cut off the foam rubber from them and glue them with regular glue. After drying, the covers are steamed using a hairdryer or iron and put on the seats.
Advantages of reupholstering car seats in a studio
If you need to update the seats in a short time and the money issue is not of decisive importance, then it is best to contact a specialized sewing studio.
We recommend: DIY installation of xenon and bi-xenon lenses in headlights
Among the main advantages of reupholstering seats in a workshop are:
- work performed by qualified specialists with many years of experience,
- use of proven quality materials,
- choosing the preferred option,
- providing a guarantee for the service,
- Minimum turnaround time for reupholstery.
But all these advantages of reupholstering in a workshop can be reduced to zero due to the high cost of the service, which may not be affordable for a simple car enthusiast.
And a few more important points
Almost all elements of the car's interior have undergone tuning modernization. There are a few details left that will add uniqueness to the interior of your car.
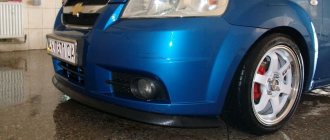
For a more efficient look, you need to improve your car's steering wheel. You can give it a more presentable look by covering it with car leather. A tuned steering wheel will look more expensive, it will feel more pleasant to the touch, and thanks to car leather that breathes, your hands will not sweat and slip on the steering wheel.
Also, the appearance of a tuned interior can be ruined by old factory floor mats, which look unpresentable and poor. You can either buy new car mats that you like, or you can make them yourself from rubberized carpet. This will be an ideal solution to the issue; you will be able to choose a color and quality that will completely fit into the interior of your updated salon. To do this, we use an old mat instead of a model and cut out tuning mats for our car according to its dimensions.
Alternatively, you can add personality to the interior with additional lighting elements. LED strips on the instrument panels and dashboard can be a stylish accessory for your car.
Let's sum it up
As you can see, tuning the interior with your own hands is a real task. You can decorate all elements of the car interior without exception. Come up with your own individual style and interior and act. This will give you a lot of positive emotions and the envy of others.
Everyone has individual tastes, and the desire to customize everything to suit them is quite natural. Our personal vehicles are no exception, so tuning the car interior is very popular among many owners.
Tuning inside the car: where to start?
Of course, the appearance of the car is of great importance, but both the driver and passengers spend most of their time in the cabin. Thus, there is a need to provide greater comfort through improvement and comprehensive modification of the entire car. In addition, the combination of the appearance of the vehicle with its technical equipment is also important. This is what is called tuning.
At the same time, reincarnation can be of a very different nature, and no one can accurately calculate the cost of it. After all, for some motorists it will be enough to install some kind of sports accessory in the cabin, for example, a steering wheel. And for others, it is important to completely replay the style and design of their “iron horse”. In the latter case, of course, you will hardly be able to limit yourself only to your own efforts and will have to turn to professionals. So material costs will be an order of magnitude higher.
Interior refurbishment: what, how, why?
As already mentioned, many specialized companies are engaged in the conversion of cargo vans into minibuses. The most budget option will cost approximately 100 thousand rubles; naturally, the more technical stuff you put into your minibus, the more it will cost. What can you do with a cargo van to convert it into a minibus? Yes, everything your heart desires.
Body work . Windows (double-glazed windows), ventilation and (or) emergency hatches are cut into the cargo compartment, sliding doors are installed, a load-bearing frame is mounted in the body, and compartments for luggage are made in the body. If you wish, you can slightly tune the appearance of the truck: replace the bumper, install spoilers, skirts and body kits, apply film to the body.
Interior refurbishment . A podium is installed inside (it can be additionally illuminated), steps for comfortable entry, and guide rails can be installed on the floor, which helps regulate the number of seats. The floor is covered with both linoleum and carpet. The interior is covered with special fabric, leather or leatherette. Shelves for things are installed under the roof; additional lighting can be installed on them.
Tuning the car interior - choosing a method
Today, there are several main types of tuning, and the most popular among them is flocking, which implies the creation of a velvet surface. The first cars with a similar design were created in the USA, but over time, Switzerland took the reins from the Americans, and now it is the country that is leading in this area.
It is also worth paying attention to the carbon fiber trim of the interior. This fabric is created from carbon fibers and coated with epoxy resin on top. Its main advantages include its impeccable appearance, excellent strength characteristics despite its rather low weight, and the ability to create a unique interior, since with its help you can easily recreate any design.
In addition, you can add zest to your personal vehicle, while emphasizing all its significance and solidity, through veneering. Such finishing will also speak of the impeccable taste of the owner, because natural wood has always been, is and will be in price. True, it is almost impossible to carry out such work on your own, unless, of course, you are a furniture maker. You can make an impression on passengers with an original one, but even here you will have to work hard.
Main purposes
Flavorings not only eliminate odors, but also affect the nervous system, and can even please the eye with their exquisite or unusual shape. In addition, they come in different types:
- cardboard ones are produced in the form of different animals, plants or geometric shapes. Their layers are impregnated with aromatic substances that fill the car interior with pleasant odors within two weeks. They are convenient because they can be changed frequently, especially since the fastening is very simple;
- plastic jars and bags are used to fill with aromatic gel or dry granules, powder, salt. The aroma is supplied in equal portions to the cabin. Gel ones will last up to two months, because they have the ability to evaporate, while chalk ones will give you the mood for much longer;
- decorative bags with granules (purse-string aromas) emit the most unique smells and will last for quite a long time. Inside there may be natural spices, grains or aroma-infused pads. Their price is quite high;
- bottles with a fragrant liquid filler, equipped with a special valve that allows you to regulate the intensity of the aroma. This makes it possible not only to select the most suitable air freshening mode, but also to use the substance economically;
- scented toys that are pleasing to the eye, but can be distracting.
To keep the smell secret, models have been created with Velcro, which are attached under the seat or in another convenient and inconspicuous place. Among the special design developments is a spray that works on the principle of an air freshener. Although it is not cheap, it will last a long time.
For salons where an ashtray is actively used, a good choice would be special aromatic granules, which, when mixed with ashes, kill the smell of tobacco. A variety of scents allows you to choose the one that best suits the car owner. We must remember the effect of odors on the human body.
Among the manufacturers of this accessory, the following companies should be noted: Areon, Car Fresh, Eikosha, DIAX, Carmate, MEDO.
We make unique dashboard tuning ourselves
In principle, good quality tuning of the dashboard and car interior can be done in specialized companies. But if you want to personally take part in creating the design of your transport, then there is no problem in carrying out this procedure yourself. At the same time, you will be able to significantly save your money, because the services of professionals are not a cheap pleasure.
To do this, you will need the following tools: a flock machine, a car primer, a paint brush, a paint brush and, of course, the special composition itself. Having collected all the above items, you can begin active actions. First of all, you should remove the part being restored and pull it out of the cabin. At the same time, immediately think about how it will get back up, because after tuning it should not be bent under any circumstances
. Then, having cleaned the surface, we cover it with three layers of soil, and each layer should dry thoroughly.
In order for the resulting velvet layer to be even, the surface should be thoroughly polished before applying all of the above.
After completing all the preparatory work, you can freely proceed directly to the flocking itself; to do this, you need to carefully read the instructions included with the device. Usually, before this, a layer of glue is also applied to the surface, and then it is processed with a machine. Those particles that do not stick are blown off with a hairdryer, but only with cold air. And the layers need to be dried naturally in a well-heated room.
As for the carbon fiber trim, in this matter everything is as simple as shelling pears. The main thing is to thoroughly clean the surface of the workpiece and apply a base coat to it. Remember that it must dry for at least two and a half hours. During this time, the resin should be in such a state that when touched it sticks, but leaves no traces. Next, carefully apply the carbon fabric. Its edges need to be trimmed a little to excess and, bending them, attached with masking tape. Then let the parts dry for six hours.
The American popular magazine Ward's Auto revealed its 2014 model. The top ten were selected from 41 new car models. Considering how much time we have begun to spend in our cars, we think many of us will be interested to know which cars in 2014 have the most beautiful interiors.
Let us remind you that the publication annually awards various awards to cars for certain achievements. The most famous worldwide competitions of the publication are “Top 10 Best Engines” and “Top 10 Best Automotive Interiors”.
How do specialists and journalists of the publication choose the best car interiors?
In order to select the best ten, from the cars admitted to the competition, the best are selected according to the following criteria: ergonomics, ease of perception, quality and style of decoration, materials used in the interior, cost of the car, safety, comfort, harmony of design, etc.
We invite you to check out these hot ten cars with the best interiors. This year's ranking includes a variety of cars, ranging from cheap affordable cars to the luxurious Rolls-Royce Wraith.
Torpedo hauling
- Everything is done similarly to the seventh section of the article.
- The glue begins to be applied from the smoothest surface, usually in the upper part of 200-300 millimeters.
- Due to the complexity of the geometry, solid folds are formed. The problem is that in order to properly distribute the material over the surface and, as a result, each fold accumulates in the central area.
In the case of excess folds formed, the material must be cut and a joint made.
The first of the joints is located in the lower area of the torpedo in the center near the ashtray. Don't be upset, because there's nothing that catches your eye anyway. But with the second joint it is not very pleasant, because it is in an area accessible to the eye. It is located in the air duct area on the driver's side.
The blown areas and excess are trimmed.
The material is folded in the same way as the seventh stage, which described the seamless waisting of complex elements.