- home
- Car brake system
- …
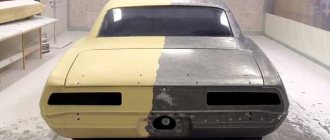
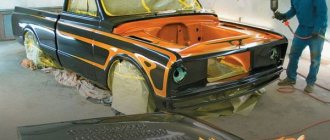
Recently I told you how to paint rear brake drums , we were talking about cast iron options because aluminum ones do not need to be painted. Today I want to talk about painting the front calipers, the process is similar, but I decided not to put it in “one basket”, the processes are still a little different. Here we preferably need to remove the braking device, but we don’t have to disconnect it from the main line...
Before painting we have several questions:
- Should I remove the caliper or not?
- Which paint to choose?
- Which color should I choose?
- How to paint it yourself?
I will try to answer all these questions, and I had experience in real painting, but really on previous cars. First, let's think about what we need.
How to paint it yourself
The process itself is not complicated, but it can also be different.
However, guys, I would like to note that before painting, if you want the paint to last a long time, you need to prime the surface, that is, apply a layer of primer. So: Painting with a brush. Of course, this is a “collective farm”, brush marks will be visible. But this method is quite realistic, and sometimes you don’t even need to seal the bolts and threaded holes; you can paint over everything carefully.
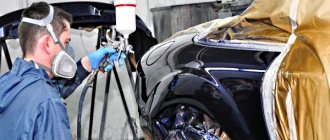
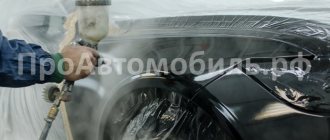
Spray painting. Here the paint will lie smoothly, without any problems, only if you do everything correctly. We cover in several layers, usually two or three.
Well, let's move on to the process itself, as you guessed, we will use the second method (using a spray can).
We lift and remove the wheel, it is advisable to put safety elements under the suspension or body, maybe wooden “stumps” or “blocks”.
We have a support in front of us. Of course, if you do not remove it, you can clean it right on the spot with a brush. But if you remove it, then cleaning can be done away from the car. By the way, if the removal occurs completely, that is, you will then change the brake fluid and repair the calipers (in particular, change or clean the working pistons and rubber bands) - it is advisable to put them in a citric acid solution (50 grams per liter of water) for a day, after for 10 - 20 minutes in a soda solution to neutralize the acid.
- If you don’t bother so much, just remove the caliper without disconnecting it from the brake hose, clean it with a brush, then you can clean everything with solvent or white spirit.
- We seal all holes or bolt studs, as well as all untreated surfaces with masking tape.
- We apply primer. With sweeping movements from right to left, we do not stop in one place so that there are no smudges. One or two thin layers is enough. Drying interval between layers is from 30 to 60 minutes. It all depends on the ambient temperature, if it’s hot then half an hour is enough.
- Then you need to apply the paint itself. Apply also with light movements from right to left, do not stop for a long time in one place, because there will be smudges. Drying between layers is also from 30 minutes to an hour. Here you need to apply two to three layers. It's no longer worth it, many layers don't hold up as well.
Then we assemble the calipers, put on the wheels and enjoy the result. Actually nothing complicated.
Now let's watch a short video.
https://youtube.com/watch?v=zaZtO7Ut9Hs
This is how the article turned out, I think it was useful, sincerely yours, AUTOBLOGGER.
How to paint calipers - choice of paint
What solvents can be used to dilute different types of paints?
As noted above, it is important to choose heat-resistant paint for painting the caliper, since during operation its temperature can reach up to 150 degrees Celsius, and in some cases exceed it. If the paint is not ready for such loads, it will quickly “fall off”, which is why the appearance of the caliper will be far from ideal
Important: Do not use enamels to paint the caliper. There are two options for how to paint the calipers:
There are two options for how to paint the calipers:
With a brush. This is the so-called “collective farm” method. When painting a caliper with paint using a brush, it will not be possible to lay the layers evenly, and there is also a high risk that stains will remain visible. This method makes sense to use if the work is carried out without removing the caliper; you don’t even have to cover the bolts and holes;
With a spray can. When painting with a spray can, the surface will be covered with paint evenly if the work is done correctly.
It is important to cover in several layers - two, three.
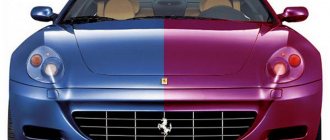
As for the choice of color for painting, everything is individual. You can study on the Internet on forums which color is best suited specifically for your car, taking into account the color of its body.
The most common colors when painting a caliper are neutral - black, gray, white. You can choose brighter and more eye-catching options, for example, purple, red, blue, yellow, green and so on. First of all, when choosing a color for the caliper, focus on the color of the car body.
Color options using BMW as an example. Video
Many car owners are wondering how to paint their calipers in an interesting, unusual color scheme, trying to make their car stand out from the crowd, make it noticeable and recognizable. Along with this, owners of BMWs and black cars try to give the calipers a sedate and noble appearance. Black calipers on it will “get lost”, red ones will look vulgar. Painting BMW calipers in silver or titanium colors will improve the appearance of the car, it will look advantageous, harmonious and, at the same time, stand out.
How to organize your own painting of car brake calipers
Sealant for muffler types, DIY repair instructions
Painting activities can be carried out both on the removed unit and directly on the standard place of its attachment. Both methods have their advantages and disadvantages. Naturally, it is more convenient to process and paint a separate part, but after the installation procedure you will have to bleed the brake system.
For many, dismantling and its consequences become a serious obstacle; we will not consider this method either. Car enthusiasts who have spray painted can also handle painting all the brake calipers of their car.
Preparatory stage
Only after thorough preparation of the surface of the part should you begin to work. The quality of the paintwork directly depends on the responsibility with which the car owner approaches cleaning the unit from dirt and corrosion. The preparatory stage consists of the following points:
- Using a wheelbrace, loosen the wheel bolts on the side to be prepared.
- Raise the car with a jack, unscrew the wheel mounting bolts and remove it.
- Clean the caliper from dirt and rust using a wire brush or power tool with special attachments.
- Finish the surface of the part using sandpaper. The surface of the node should be smooth and shiny.
- Degrease the surface with anti-silicone or white spirit.
- Using newspapers, PET film and masking tape, cover the elements that do not need painting.
Painting procedure
The working color mixture must be prepared a few minutes before application. The paint or primer in the can is prepared by shaking. There are several methods for applying paintwork:
- brush;
- tampon;
- spray gun;
- with a spray can.
During the process, you need to avoid excess paint to avoid drips. Usually 2-3 layers are applied with intermediate drying stages of 20-30 minutes. Complete drying lasts 24 hours, even if the paint is heat-resistant, gentle operation is recommended for several days.
Among car enthusiasts who have painted calipers with their own hands, aerosol cans of paint are very popular. The working techniques are well shown in the video with Foliatec paint.
The technology for working with spray cans is available to almost all motorists:
- Apply a layer of primer to the part and let it dry.
- Keep the can above the surface to be painted no higher than 250-300 mm.
- After applying the first layer, let it dry for 20-30 minutes, then paint again. The layers must be applied perpendicular to each other.
If you decide to remove the caliper, then it makes sense to sandblast them, but, again, all this requires time and financial investment. In any case, only recommendations are given here, and the final decision will be made by the owner himself, guided by the feasibility of a particular operation.
Do-it-yourself painting of calipers: process technology
Painting process
After completing all the preparatory work and determining what color the calipers will be painted, it is worth choosing a painting method. The following methods are distinguished:
- with a brush - the layer thickness should be minimal, and no streaks or fluff should be visible on the surface;
- tampon – the surface of the tampon is wetted with paint and placed against the support;
- from a spray can - painting is carried out at a distance of 30 cm at a uniform speed;
- spray gun.
When painting, avoid using excessive amounts to avoid smudges. You can watch a video about painting calipers at the end of the article.
If powder paint is used, the working mixture must be prepared immediately before applying it to the caliper. You will need a plastic container in which the powder is mixed with the hardener in the proportion specified in the instructions.
The surface is painted in two layers. In this case, after applying one layer, you must wait 20 minutes and apply the second layer. When applying another layer, movements should be made in a perpendicular direction, which will eliminate the appearance of visible lines or stripes.
Over the next few days after painting, even if it is heat-resistant paint, a gentle regime is recommended with the cancellation of trips over long distances. You can clearly understand how to paint calipers from the video.
Without removal or with removal
All about sedansWhat is Gravitex, its types, body treatment with GravitexMore on the topicComments
You know, I only painted it twice, removed it once, not the other. So, you can paint it differently and it won’t be a mistake. However, if we don’t remove it, the paint application will not be uniform, and you may catch something that is not needed (discs, wing surface, etc.), the surface on top will of course be covered with the desired color, but on the sides, behind and below, the coating will be POOR QUALITY . In general, if you clarify, after I painted it without removing it, after six months I repainted it, but already removing it, this thought simply gnawed at me.
YES, and you don’t have to completely disconnect it from the brake hose, you can just bend it back and paint the entire insides. The MAIN thing is to seal the working caliper piston with tape.
So here the choice is yours, less problematic, but collective farm - a method without removal. Correct, but there is a problem with removal.
Color selection
Brake drums and calipers can be painted in absolutely any tone - the decision is made only by the owner of the car. The choice of shades of paints and varnishes is huge; there are both classic and the most non-standard paint colors on sale. Some car enthusiasts prefer to paint products in inconspicuous, practical colors - black, gray, brown, dark blue. Others choose bright colors - red, green, light green, yellow, orange.
When choosing paint for calipers, you should take into account the main color of the car, canopies, and rims. If you make the details green with a red body, it will look ugly and pretentious. It is better to consider a monochrome palette or find a successful contrasting combination:
- black body - white or red calipers;
- dark blue body - terracotta, light blue;
- green body - yellow, etc.
Nowadays, juicy, acidic shades with the addition of fluorescent pigments are in fashion - fuchsia, lime, ultramarine and others. They must be used carefully and only taking into account the overall concept of the car.
Materials and tools
Actually, as usual, we need to clean the surface to be painted, degrease it, then prime it and then paint it. That's why:
We need a metal brush (regular with a handle) or a drill attachment
- We most likely won’t need a solvent or “white spirit” for degreasing or a rust converter here, because various aluminum alloys are used.
- PREFERABLY a primer that is also heat-resistant.
- Special heat-resistant paint that can withstand temperatures of 120 - 150 degrees Celsius.
- Paper tape, or cellophane or newspaper, to cover the untreated surface, as well as studs or bolt holes.
- Tools for removing the caliper if we decide that it needs to be removed. If we paint without removing, then we don’t need them.
Actually, all the tools, it is advisable to prepare them before the process. What else I would like to note is that it is advisable to paint indoors, where there are no gusts of wind and dust (it is advisable to clean up before the process). Because when painting, dust can settle on the surface, which we don’t want.
Remove the calipers or leave them on the car
As with any painting, the best option is to remove the part to be painted. Dismantled calipers will be easier to clean and paint from different angles. With complete dismantling, it becomes necessary to disconnect the brake hoses, which will entail the entry of air into the system and the further need to bleed the brake system. Therefore, a more suitable option for most car enthusiasts would be to paint the calipers without removing them. To do this, you need to cover all parts adjacent to the caliper that are not subject to painting. Another option would be to remove the calipers, but not disconnect them from the brake hoses. They will need to be placed on some kind of stand so that they do not hang on the hoses.
What paint and what color to choose
I already wrote about paint - you need to choose the so-called “heat-resistant”. What it is? This composition is able to withstand high temperatures from approximately 120 to 150 degrees (the caliper can easily heat up to these temperatures), it does not flow and does not burn like conventional compounds. And therefore the original appearance will remain much longer. Ordinary enamels are not designed for this, and I categorically do not recommend using them.
I also advise everyone to take paint in a can (so you can spray it), because it will go on better and smoother than paint from a can + brush.
Which color should I choose? This is where there are whole battles on the forums
Guys, in fact, this is a personal matter for everyone, there are neutral colors - black, white and silver, they are suitable for all cars, no matter what color you have.
There are brighter colors - blue, red, green and yellow (there are just a ton of options). Moreover, as usual, they are taken in acidic shades in order to highlight the calipers and drums. But it’s worth remembering about the body color, that sometimes green calipers don’t go well with a red body! Catch the harmony! Let’s just say that red color can still be used on all cars, it hints at the “sportiness” of the car, and it harmonizes with the red taillights. BUT the yellow, green, blue colors MUST FIT THE BODY EXACTLY! This is my personal opinion.
"Abro"
And this company is better known to car enthusiasts for its sealants. But the company also produces paint for calipers. A cylinder with a volume of 400 milliliters can be purchased for 260 rubles. This is one of the most affordable enamels in this category - reviews note. The manufacturer adds ceramic polymers to the composition. This allows you to create a strong and durable coating that will withstand high temperature changes. As reviews note, the paint does not overheat and does not peel off.
The manufacturer claims that the enamel can withstand temperature loads up to +260 degrees Celsius. Suitable not only for machining calipers, but also for brake drums, as well as discs and springs.
What conclusion can you draw about this product? The enamel is quite cheap, but pleases with its technical characteristics. Many car owners advise purchasing this particular product.
Preparing the calipers
To begin with, we can advise you not to rush and allocate enough time for preparing and painting the calipers. It may take at least one day to do everything thoroughly.
Start by removing the wheels for easy access to the calipers. It's better to start by jacking up and removing both wheels. That is, it is better to prepare both calipers at once. This will take less time.
The importance of surface preparation cannot be overstated. Cleaning is an important part of painting calipers. This will determine how well the paint will adhere. They contain various contaminants, including dust from brake pads and oil. Poorly washed dirt can cause paint to peel off a couple of months after painting, and sometimes even earlier. It is necessary to achieve an immaculately clean surface of the calipers. The best option would be to sandblast the calipers before painting, but this option is not always available.
Hardened stains are not easy to remove. Start by cleaning the calipers using a wire brush. Take the wire bit on your drill and clean the entire outside surface of the calipers. Be careful not to damage the rubber boot on the caliper with the attachment.
If you notice any stubborn stains, especially in areas where brushing is not possible, you can use sandpaper or Scotch Brite wrapped around your finger. The wire nozzle must not be used immediately after using flammable cleaning agents. Using the nozzle may cause sparks. In addition to a wire drill, you can use an engraver for more thorough cleaning.
Next, you need to treat the calipers with a special cleaner. It is also advisable to pre-close adjacent parts. A special cleaner from a can can ricochet and land on rubber boots and hoses, having a destructive effect on them.
Once dry, sand them with P240 sandpaper. The next step is to use 600-grit sandpaper. Next, you need to spray the special cleaner on the caliper again. Finally, you need to wipe the caliper with isopropyl alcohol. The alcohol will remove any remaining dirt and degrease the surface.
The next step is to cover all areas not to be painted. To do this, use newspapers and masking tape.
Sanding with coarse abrasive to obtain a smooth surface
If you want to get a smooth surface of the calipers, you need to grind them with abrasives of 60 and 120. To grind hard-to-reach places, you need to use a grinder with an attachment with an abrasive of the same gradation.
powder paint and other methods
A beautiful car should be attractive in every way. You can use various options to improve the appearance of your car, but it is not always possible to achieve the desired results. The caliper often spoils the appearance of the entire car if it has a rusty surface. At the same time, alloy wheels often expose these elements of the braking system. Painting this element will help solve appearance problems. To ensure successful painting of brake calipers, you should select good materials and proven technologies.
Also, do not use untested options for finishing the caliper yourself. This may result in brake parts having to be replaced. On many BMW cars, after tuning, the elements of the braking system acquire a bright contrasting color. It looks great and appropriate. But not every car will have a good solution for highlighting this detail. Before painting this element, it is worth imagining its future appearance.
Preparing the caliper for painting work
For painting to be successful, it is important to properly prepare the part for painting tasks. You can complete this task with your own hands quite simply if you have experience in assembling and disassembling suspension elements
A person who has ever changed the pads will be able to carry out all the work on the car in this case independently. Painting calipers with your own hands begins with high-quality preparation of all parts. To do this, the following processes are performed:
Applying paint and varnish materials to caliper parts
If you chose to powder coat the calipers, you will have to sandblast them. This way you will get rid of corrosion and will be able to completely protect the part from all potential problems. But with the help of powder painting it is impossible to achieve the desired shine and the necessary visual parameters. The powder has a matte tint; the polymers smear very quickly during equipment operation. Conventional paints can be applied as follows:
https://youtube.com/watch?v=zaZtO7Ut9Hs
You can do this kind of car tuning with your own hands if you have all the tools and materials at hand. If you don't have anything in stock, you shouldn't buy everything you need for it. It is better to turn to specialists if you have no experience doing this work at all. The painting may not be professional; imperfections are not so noticeable on these parts. But it is better to choose the most worthy materials. Low prices do not do paint and varnish products any credit.
Is it possible to paint without removing parts from the car?
But this only gives a basic understanding of how to paint calipers without removing them from the car. It must also be remembered that this method will not always be acceptable in terms of quality and required technical parameters. In this case, the paintwork layer may turn out to be defective and wear out quickly. You should always use only the most effective solutions that will last a long time.
Painting with a brush is unlikely to be a good solution for expensive luxury cars. In this case, it is better to overpay for the services of specialists and get maximum benefits in appearance.
Let's sum it up
In order for the painting of calipers to be successful, you need to remember the need for high-quality preparatory work. If these tasks are not performed properly, you will not be able to ensure the longevity and attractiveness of the equipment. Painting work can be carried out using an aerosol can, powder spraying, compressor classic painting, or using a brush. It is better to give preference to professional methods. They guarantee durability and high quality.
Preparatory processes depend on the method chosen, but often when preparing the device you will need to remove it from the machine. This way you will be able to remove all rust and dirt. Painting work will be completed efficiently only if the surface is properly prepared. Visual results also depend entirely on the paint options chosen. The more expensive the technology, the greater the durability and higher quality of the coating. If you don’t have experience working with your car’s paintwork yourself, it’s better to entrust the services to professionals and get the maximum benefits.
Which is better to buy heat-resistant paint for metal: choice of composition
To select the optimal dye, it is necessary to take into account the main criteria put forward for materials of this type:
- heat resistance level;
- manufacturer's recommended dyeing temperature;
- time until complete drying (no more than 3 days);
- technical characteristics of the composition.
Dyes with varying degrees of heat resistance are available on sale - from 120 to 1000°C. This indicator is selected taking into account the conditions in which it will be operated. The highest heating is characterized by a metal stove (800°C), the maximum limit for heating radiators installed in apartments is 90°C.
Helpful advice! If you add organic resin to the heat-resistant metal barbecue paint, you can speed up the drying time of the coating, as well as increase its ductility and adhesive properties.
The quality of the coloring result depends on whether all the requirements of the application technology are supported. These requirements include preliminary preparation of the surface, a scheme for applying the material, and a temperature regime that should be adhered to during work. In most cases, experts recommend painting metal surfaces at an air temperature of -30 to 40°C. Subsequent operation and service life of the coating depend on this.
What paint to paint a metal grill: heat-resistant, heat-resistant and fire-resistant compounds
Metal surfaces that are exposed to strong heat during operation are coated with fire-resistant, heat-resistant or heat-resistant dyes. Heat-resistant finishing options are recommended for covering structures whose temperature does not rise above 600°C. Metal surfaces exposed to high temperatures must be coated with heat-resistant paints
It is allowed to use such dyes for processing metal parts of a brick oven or structures made entirely of this material, including barbecues. At the same time, you should not apply a heat-resistant composition to the surface of the equipment installed in the bathhouse. Most often, such ovens heat up to 800°C. Therefore, it is better to use heat-resistant dyes for these purposes.
Fire-resistant finishes are designed for painting items that are in close proximity to or in contact with open flames. This is the best option for grills and barbecues. The use of such dyes for processing other objects will be impractical and will entail unjustified costs.
For products that are subject to heating of no more than 200ºC, it is best to buy heat-resistant metal paint in a can. High-temperature compounds are used for painting radiators and elements of heating systems in apartments and houses, parts of automobile engines, as well as seams and masonry of stoves made of bricks. For low temperature conditions, heat-resistant varnishes that can withstand heating of 250-300ºC are also suitable.
For painting individual elements of a stove or fireplace that are not exposed to direct heat, paint with a low level of heat resistance is suitable.
Note! Do not confuse fire-resistant compounds with fire-retardant dyes. When exposed to extreme heat, such materials can swell, become blistered, and block oxygen from reaching the surface, preventing it from deteriorating.
Recommendations for choosing the optimal heat-resistant paint for stoves
If you coat a metal stove with regular dye, the coating will very quickly turn black and become a source of smoke and unpleasant odors. The composition must match the type of surface to which it will be applied. The scope of application is always indicated by the manufacturer on the packaging. If the composition is intended to process different materials, all this information can be found in smaller print on the can. If this data, as well as the brand name, is missing, you should refuse to purchase. Such dubious dyes can be of poor quality and hazardous to health.
Decorative qualities are also important. Most often, the buyer is faced with a choice between gray or black heat-resistant silver paint for metal. There are also other shades on sale, although they are more difficult to find, for example, red, blue, white, green. Manufacturers offer dyes that can be used to create a matte or glossy finish. In this case, gloss can have varying degrees of gloss.
Manufacturers of heat-resistant paints offer a wide selection of color options in matte and glossy shades
Features of heat-resistant paint for calipers and mufflers
Heat-resistant dyes are used to process car parts made of metal. Moreover, the coating performs not only a decorative function.
The use of heat-resistant paint for the muffler, drums, calipers and other elements provides additional protection and also improves the performance of the machine. In large cities, in winter, roads are sprinkled with reagents aimed at combating ice. Such aggressive substances can cause corrosion of metal parts of the car that come into contact with snow or water.
Thanks to the dye, the heat transfer of the machine's calipers increases. The fact is that these elements have a porous surface, where dirt inevitably accumulates. As a result, the cooling time increases significantly. In addition, the process of cleaning the unit without removing the wheels is difficult. After processing the parts with heat-resistant dye, a smooth coating is formed on the surface, improving heat exchange and preventing the accumulation of dirt. And the process of cleaning the unit can be easily accomplished with a small stream of water.
Dyes for treating metal car parts come in three forms:
1.Can (aerosol spray)
2.Jar.
3.Kit.
Helpful advice! Do not completely remove the calipers for painting. This will not only incur additional costs, but will also cause problems with the brake system.
Selection of paint for calipers and application technology
Despite the popularity of heat-resistant paint for metal in cans due to its low cost, this finishing option cannot be called the best. Most often, 1 can barely covers the surface of 2 drums. In addition, the technology requires carefully covering other parts of the car so as not to stain them during spraying.
The dye in a jar costs a little more than an aerosol can. This mixture allows you to get a clean and high-quality coating with a brush. This does not require removing the brake system from the discs. The disadvantages of the compositions in the jar include the long time spent on coloring.
Applying paint using an aerosol can allows you to use the material evenly and economically
Sets of heat-resistant dyes contain a complete set of products designed for complete coloring of metal parts of a car.
Typically, the kit includes the following components:
- a container with liquid for cleaning the surface;
- heat-resistant dye;
- primer composition;
- auxiliary devices (brush with stiff bristles, protective gloves).
On average, the painting process, including waiting for the paint to dry, lasts about 2 hours.
The dye is applied in the following order:
- The car wheels are removed.
- The calipers are cleaned of rust and dirt.
- The dye is applied to the calipers in two layers.
The calipers are thoroughly cleaned beforehand, after which paint is applied.
Before applying the second layer of material, you must wait at least 35 minutes. The most popular and in demand dyes in this segment are OMP, Kerry, Motip, Foliatec and Kudo.
Choosing heat-resistant paint for a barbecue or stove: popular manufacturers
Most consumers prefer to buy Certa coloring compositions from the Spectrum company. This type of finishing material is in high demand due to its optimal technical parameters. The coating can withstand temperatures ranging from -65 to 900°C. The manufacturer offers an extensive color palette, including 25 shades.
Note! Each shade of Certa heat-resistant paint has its own temperature limit. Therefore, when choosing a color, you need to take into account the operating conditions recommended by the manufacturer.
Temperature range of Certa dyes
| Paint shade | Temperature indicator, °C |
| black | 900 |
| gold, copper, white, green, blue, turquoise, light blue, brown | 700-750 |
| yellow and other colors of the palette | 400-500 |
Alkyd dye Thermal from the Tikkurila brand forms a coating on the surface of the material that does not crumble for 3 years. Even if the metal heats up to a red glow, the dye will retain its properties and attractive appearance. The material has one specific feature. The polymerization process of the composition is possible only if the treated surface is heated to 230°C for 1 hour
The following types of paints are considered no less high quality: Hansa, Kudo, Bosny, Hammerite, Elkon. The recommended number of layers, application temperature parameters and requirements for the painting process are different for each manufacturer
To get a quality result, it is very important to follow the instructions on the package.
How to paint it yourself
Before painting the caliper, you should also check its technical condition.
Coloring methods:
- with dismantling the caliper - it is more convenient to paint, the part is evenly painted both from the outside and from the inside, but the system will have to be pumped after installing the painted unit;
- without dismantling the part - it is inconvenient to paint, you need to carefully close the adjacent parts, the sides and inside of the caliper will be painted unevenly.
You can paint the discs and calipers the same color to make the elements look harmonious.
Below are detailed instructions on how to correctly and correctly paint the calipers with a brush and a spray can.
The car is jacked up and secured using strong latches to ensure safety. Then the wheels are unscrewed. Check the technical condition of the caliper by visually inspecting it. Then the part is removed. It is attached to two bolts, they are unscrewed. If they do not give in, you need to fill them with WD-40 or tap them. If this method does not work, heating the unit in an oven should help.
If you are sure that the assembly is in good condition, it is not necessary to remove it for painting. If the calipers will be painted only on the outside, it is enough to remove only the wheel rims.
Before painting the calipers, they need to be properly prepared for painting. All traces of corrosion must be removed from the surface of metal elements. Use a rust converter and metal brushes. The process can be mechanized by purchasing an appropriate attachment for a drill or using sandblasting (sandblasting is used to clean a dismantled caliper).
Rubber parts (anthers) are cleaned of dust. The pistons are treated gently using fine sandpaper. Moreover, they should not be removed completely, otherwise the brake fluid will leak out. For finishing, the elements are sanded with fine-grained sandpaper.
If no corrosion is observed, clean the surface with sandpaper. Then it is treated with a degreaser.
When painting calipers, it is important to isolate all moving working elements with masking tape: under the influence of high temperature, the paint acts as a lubricant. If it gets on the brake disc, you simply won’t be able to brake.
Masking tape is used to cover the supply hoses and all other parts that should not be painted.
Work should be carried out in a well-ventilated area with sufficient bright light sources. The room itself is wet cleaned to eliminate dust. The air in the room should be relatively dry.
Prepare a brush for work.
The container with paint is uncorked immediately before starting work. A hardener is added to the composition in the amount specified in the instructions and mixed.
After 20 minutes, the paint must be mixed again. The paint is applied in 2-3 layers with a break (about 30-40 minutes each). They paint neatly and smoothly, without drips.
You can drive the car within a day, but it is better to wait a few days until the paint is completely dry.
When working with a spray can:
- Cover the body with two layers of primer, making wide movements with the brush. The second layer is applied approximately an hour after the first.
- The can is kept at a distance of 25-30 cm from the caliper.
- They try to apply the second layer at an angle of 90 degrees to the previous one to eliminate streaks.
Brake system calipers and drums lose their aesthetic appearance during operation. However, with the help of painting, they not only restore a presentable appearance to the elements of the brake system, but also protect them from environmental influences.
Making your own sprayer
You can build a device for spraying on a car surface or any other surface with your own hands. In this case, you should make sure that the selected vacuum cleaner model is optimally suited for use as a compressor. The ideal option would be household vacuum cleaners with a reverse blowing mode, which allows you to connect the hose to the other side of the vacuum cleaner. Such features are typical for old Soviet vacuum cleaners: “Whirlwind”, “Rocket”
It is important that the vacuum cleaner has pressure at the required high level, and upon completion of the work or in case of malfunctions it can be repaired quite easily
Old-fashioned models of vacuum cleaners come with their own attachments, changing which allows for effective spraying. Converted vacuum cleaners can do a great job of DIY car painting.
By following simple recommendations for transforming an old vacuum cleaner, you can not only make the necessary device with your own hands, but also perform a whole range of finishing or repair work:
- You need a blank made from a small piece of polystyrene foam, which is given the desired shape.
- The shape of the foam piece and the neck of the liquid container must match.
- Holes are drilled in the foam, one of which should be made on top of the workpiece, where the rod will be placed. It is permissible to use a plastic pen body as a rod.
- A horizontal hole is also made and drilled where the rod is installed.
- Bottle caps are used as a stop in the vertical hole.
A paint spraying tool made using a vacuum cleaner is not intended for large-scale work and prolonged manipulation. You can paint car parts or other small objects.
By acquiring such a tool at home, you can quite easily carry out paint manipulations, ordinary painting work, and cope with other tasks that go beyond the scope of repair procedures with your own hands.
A worthy alternative to brushes and rollers was the development and production of spray guns. Now the painting process can be performed more efficiently and quickly. The device is a container equipped with a mechanical part that supplies the working fluid through a hose under pressure.
As a result of surface treatment, a uniform coating is formed, creating a thin layer. Using a spray gun prevents overuse of emulsion and thick buildup. Several types of tools are available, each of which has its own advantages and disadvantages. To choose the appropriate spray gun model, you must first familiarize yourself with the technical characteristics and functionality of existing types.
Instructions for use
The Foliatec paint packaging contains the following elements:
- 1 bottle of cleaner with a capacity of 400 ml;
- 1 can (metal) of paint and varnish material for brake calipers with a capacity of 150 grams;
- 1 metal can of specialized hardener with a capacity of 50 grams.
For proper paint application, manufacturers recommend having:
- container where the hardener will be mixed with paint. It doesn't have to be plastic;
- a stick with which to mix two materials (hardener and paint);
- a brush with which to paint. It is recommended to select a model with a width of less than 15 mm;
- masking adhesive tape, which will be used to cover the unpainted surface to prevent paint from getting in;
- a brush with steel bristles to clean the surface from dirt and rust;
- a piece of clean cotton cloth for wiping the cleaned surface.
The manufacturer recommends opening the cans immediately before starting painting. In this case, the room temperature should be no less than +15 degrees. Calipers should be painted in a room with good ventilation and minimal dust.
For the painting process it is not necessary to dismantle the calipers along with the brake discs. You just need to remove the wheel rims of your car. Although, if you are going to paint both the outside and inside of the caliper with Foliatec, you will still have to dismantle it.
Before applying the paint, you need to prepare the surface (clean off dirt, rust using a steel brush, as well as the cleaner provided in the kit). You also need to cover with tape the surfaces that will not be painted. Only after this work has been completed can you begin painting the calipers by mixing the paint with the hardener.
Do I need to remove the calipers when painting?
Opinions differ on this issue. If you paint a caliper at a service center, the technicians will definitely remove it.
There are several reasons why it is important to remove the caliper when painting:
- Firstly, with the caliper removed, there is a minimal chance that parts that should not be painted will be touched by paint - these are discs, wing elements, and so on;
- Secondly, only with the caliper removed can it be evenly coated with paint on all sides, and not just the front side. If you do not remove the caliper, the paint on the bottom, back and sides will not be as good as the front.
Painting without stripping has a clear advantage - saving time. Removing the caliper is a rather complicated procedure, but we note one nuance: it is not necessary to remove it completely for painting. It is quite possible to paint the caliper if you bend the brake hose and cover the working piston of the caliper with masking tape so that no paint gets on it.
Let's sum it up
You can use different paint options and different technologies to finish the elements of your car. But the caliper is an important functional part, so there is no point in experimenting in this case. Simple paints without special preparation are not suitable for such situations. Motip or Foliatec are a better choice if you want to do the job yourself.
Many people use the classic methods of opening with powder paint, but you will have to pay a lot for this. The visual result in the latter version will be the least noticeable. Whatever materials you choose, it is important to carry out proper preparation and fulfill all the conditions for normal painting of these parts. It is not worth pursuing the low cost of this process, otherwise you can reduce the potential effectiveness of the results.
What types of paints are there for calipers?
Of course, to treat the brake discs of your car you need to use only heat-resistant paint. The thing is that these parts heat up quickly. Material that is not prepared for high temperatures will simply peel off after a few months. Manufacturers now offer several types of heat-resistant substances for calipers:
- aerosols. This heat-resistant foliatec paint for calipers is sold in cans. It is very easy to use, so even a novice driver can process parts with it. In addition, you do not need to spend a lot of time painting brake discs. Another feature of this material is its cost. Spray paint for calipers costs several times less than its counterpart in a can or kit. Unfortunately, this material has a significant drawback: it runs out very quickly. One can is unlikely to be enough for you to treat both sides of the drums. If you consider that it is often necessary to paint four brake discs, then the uneconomical nature of this substance becomes obvious. In addition, some car enthusiasts are confused by the need to very carefully protect those parts of the car that should not be exposed to the substance;
- banks. Of course, such material for brake discs is somewhat more expensive than aerosol, but it has a number of advantages. Firstly, the cleanliness of the work. The fact is that the substance is applied only to the disc, and you do not need to cover the remaining parts of the car as carefully as in the case of spray cans. Secondly, ease of application. The calipers are treated with a special brush, and there is no need to remove the brake from the discs. Thirdly, durability. According to statistics, this heat-resistant paint lasts on parts several times longer than an aerosol. True, some car enthusiasts are embarrassed by the long time that needs to be spent on processing. Due to the fact that the material is applied with a brush rather than sprayed from a can, painting will take a little longer;
- kits. Many manufacturers produce brake disc material as a kit. As a rule, the kit consists of a can of cleaning fluid, paint for the calipers, a can of hardener, primer, brushes, a stiff brush and gloves. This type of material is the most profitable and acceptable. The fact is that one kit is definitely enough to paint four calipers. In addition, this heat-resistant paint is durable. If you treat the parts of your car with this, you will not think about repainting for the next five years.
The need to paint parts
Painting brake calipers is especially popular among sports car owners. Such vehicles have light alloy wheels, through which all parts of the braking system are clearly visible. If you paint them to match the body tone or another bright color, this will give the car additional style, enhance the impression of luxury and bring it closer to the appearance of racing cars.
Painting calipers also has a functional purpose. These parts have a porous structure; moreover, they are not covered with casings and are in contact with the external environment. As a result, dirt constantly accumulates on the calipers, dust mixed with technical fluids and road surface reagents accumulates.
Due to the difficulties of cleaning and washing due to inconvenient access, the following consequences arise:
- the cooling time of parts increases;
- heat exchange in the brake system deteriorates;
- the metal surface suffers from corrosion.
Painting brake discs and calipers creates a durable film on their surface that literally repels dirt and prevents it from penetrating into the pores. In this case, keeping the calipers clean is easy, and heat transfer in the system is optimized. The coating protects products from rust and mechanical damage from small stones. Only special heat-resistant paint is suitable for the job, because regular paint will crack and peel off in a couple of months when the calipers heat up.