What to do if the clutch slips?
If the clutch mechanism has been working for a long time and is very old, you are convinced that it is time to change it, then buy a new set of discs and other spare parts and get ready to completely replace it.
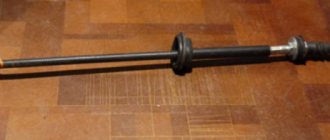
During normal, proper operation of the vehicle, clutch discs are designed to last 100 thousand km. mileage The picture shows the clutch cable sheath with adjusting nuts
Driven disk (ferodo)
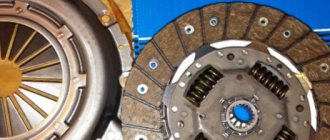
The most common malfunction is wear and damage to the driven disk linings. Rubber pads are the most vulnerable link in the clutch. They are made of rubber or composite heat-resistant material and are built into the metal of the disk. When chips or cracks form on them, they cannot be replaced separately from the disk. When the linings wear out or change their original shape, the entire driven mechanism has to be changed. The passive drive must also be replaced in the following cases:
- If the disk itself is deformed;
- Damper springs broke due to overheating;
- The splines in the hub have worn out.
When oiling the friction linings with ferodo, it is enough to wash them with kerosene, lightly sand them with zero to create roughness, and they will still work.
Clutch basket
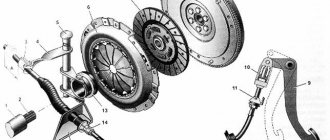
The clutch basket presses the passive disc against the flywheel. It consists of a pressure plate, a diaphragm spring and a casing. The clutch can also slip when the elements of the basket are faulty. Symptoms of failure of the basket are the same as when the driven disk fails
So, if inspection of the ferodo does not reveal obvious defects, you should pay attention to the next block of parts. It is when there is a problem with the basket that the gears stop shifting
But to make sure that it is the basket that is to blame for clutch problems, you will have to dismantle and diagnose this unit. Basket malfunctions include weakening or breakage of the diaphragm spring, breakage of the release bearing (13). The diaphragm spring wears out faster and more often. Due to constant temperature changes, its petals lose their springy properties and become fragile. With frequent overheating, blue burn spots appear on the petals. And since the cause of overheating is poor operation of the mechanism release clutch (13), it should also be diagnosed. The petals themselves are deformed and do not lie in one plane. The appearance of cracks and mechanical damage on the spring indicates the need to replace it. The basket must be completely replaced even if the curvature of the pressure plate exceeds 0.8 mm. The disc is placed on its edge, and the curvature is measured with a ruler.
Flywheel
This unit also wears out during operation of the VAZ 2114. The following signs indicate flywheel wear:
Strong vibration in the floor when you depress the clutch pedal,
Burnt smell;
- Inability of the gearbox to shift to the next gear, i.e. gear slipping.
- Sometimes you hear grinding gears when changing gears.
Inspection and diagnostics of the angles will show why the clutch on the VAZ 2114 is slipping, whether a complete replacement of all parts of the clutch system is necessary, or whether you can limit yourself to adjusting and replacing individual elements. Let us remind you that if the clutch has exhausted its service life, it is useless to patch it; it is better to change the entire system.
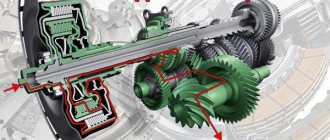
Design
How to properly adjust the clutch on a Priora
The mechanical type drive on the VAZ-2114, despite the fact that it has the least simple design, is in no way inferior in reliability to its hydraulic counterpart. Its system consists of a cable adjustable in length, sealed in a special anti-corrosion sheath, and the clutch pedal itself located in the car's interior, which, through free movement, is designed to transmit the pressing force to the clutch fork.
Despite the fact that such a scheme is simple, in general it is quite reliable.
Clutch diagram
A new product in the form of a clutch cable for VAZ-2114 cars helped to avoid all the problems that all owners of classics encounter. First of all, this refers to the leakage of hydraulic fluid from the system, and as a result, loss of control over the car. It would also require work to remove air from the clutch system after repair.
At the same time, periodic checking and adjustment of the clutch pedal has remained the same.
Why is it necessary to adjust the cable travel?
This procedure is necessary so that when the pedal, and with it the clutch cable, reaches certain values, the most squat pressing of the flywheel with the basket to the driven disk is made, at the moment when its operation is necessary. At the same time, thanks to the precise adjustment of this drive, the clutch is released at the moment the clutch pedal is released.
Note! During operation of this system, when the lever is in the neutral position, or when it is turned on, no extraneous sounds or crackles should come from the gearbox housing. You can monitor the condition of the clutch, preventing such a situation from occurring, visually by positioning the clutch pedal relative to the floor of the car, using only a ruler
You can monitor the condition of the clutch, preventing such a situation from occurring, visually by positioning the clutch pedal relative to the floor of the car, using only a ruler.
Values
The optimal values should be from 125 to 140 mm, when measuring readings first with the pedal pressed and then with the pedal released. The maximum value that is allowed when measuring such indicators is 160 mm, and if they exceed these values, then this will mean severe wear of the friction linings, and therefore, after adjusting it, the clutch itself may soon need to be replaced.
We measure the result along the bottom edge of the pedal - in the photo the result is normal.
When is it necessary to adjust the Lada Samara clutch drive?
As practice shows, the culprits of clutch failures are most often the car owners themselves. A sharp start with “slipping”, as well as prolonged holding of the pedal in a depressed state, negatively affects the performance of the mechanism. The presence of noise or vibration when shifting gears indicates a problem in the transmission line. Below are a few signs that may require adjustment:
- Loss of power due to “slipping”, i.e. unreliable connection between the disk and the flywheel.
- Difficulty changing gears.
- Changing the travel distance of the clutch pedal (the norm is from 125 to 135 mm ).
- Jerking or sticking when pressing the pedal.
Motorists who know which clutch to choose for the Lada 2114 will most likely install it together with a cable. Replacing any element of the clutch should end with adjusting the drive, as well as changing the pedal stroke.
The pedal stroke is measured with a ruler, which is pressed against the floor. The distance between the lower and upper points of the pedal position should be within 125-135 mm. The maximum permissible value is 160 mm. If the pedal stroke goes beyond these parameters, then we can talk about wear of the friction linings of the driven disk.
Which cable to choose?
How to properly adjust the clutch on a VAZ 2114
Operating a vehicle with a faulty clutch cable is not prohibited by law. But this defect makes driving the car inconvenient and uncomfortable. A part may suddenly break at the most inopportune moment. And then driving will become almost impossible. There is also a high risk of an emergency if an element breaks. Therefore, if a malfunction is detected in the operation of a part or its external damage, it is necessary to replace it within a reasonable time. You should contact a specialist for this only as a last resort, when you were unable to carry out the replacement yourself.
Analogs are also sold in auto stores and on the Internet. They are often cheaper, but the quality is in no way inferior to the original. The average cost of such spare parts is 350 – 400 rubles. They are produced by many Russian manufacturers. The products of the DAAZ brand have proven themselves well. Sometimes on the Internet you can find offers for the sale of used items. It is not worth buying such used parts. It may be dangerous. After all, it is very difficult to assess their condition from photos. An unexpected breakage of a part while driving can lead to dire consequences. And a new spare part is inexpensive. Therefore, such dubious savings are undesirable.
Briefly about the design of a friction clutch and its purpose
Any self-respecting motorist will study the design of the unit before adjusting the clutch on a VAZ 2114. This will help you approach the issue wisely and avoid mistakes.
The mechanical drive design is simple and reliable. Compared to hydraulics, the cable requires minimal maintenance, and changing it is not labor-intensive. The mechanical drive consists of the following elements:
- Adjustable sheathed cable.
- Control pedal.
- Clutch release fork lever.
- Bracket for fastening the end of the cable sheath.
- Brake and clutch pedal bracket.
The mechanism serves to transmit force from the pedal to the release fork, which, in turn, removes the friction disc from the flywheel. Using a cable drive avoids major problems such as fluid leaks and periodic bleeding of air from the clutch control system. The weakest link in this chain is the cable, the quality of which at times leaves much to be desired. Therefore, replacing a cable on a Samara is a fairly common occurrence.
Meanwhile, the question of how to adjust the clutch on a VAZ 2114 car remains relevant for the cable mechanism. Setting standard values guarantees optimal tightness of the driven disk to the plane of the flywheel and basket when the clutch is engaged. The design also ensures complete separation (switching off) of the above parts from the passenger compartment through the pedal.
Clutch adjustment
How to tighten and adjust the handbrake on a Renault Logan: video and photos
Domestic VAZ-2114 cars are far from ideal, but in terms of quality they can compete with many modern economy class cars.
Due to the low price, availability of parts and simplicity of design, this vehicle is very popular among car enthusiasts.
Below we will try to consider in detail the issue of setting up the clutch system, we will study the main problems and nuances that arise during this event.
Adjusting the VAZ-2114 clutch is a fairly simple procedure, the implementation of which guarantees efficient operation and safety. In the latter case, failure of this mechanism can lead to fatal consequences.
As a rule, the main symptom requiring clutch adjustment is a change in pedal travel. This parameter is specified in the technical documentation of the transport. If you notice deviations from the established norm, you need to quickly begin to solve the problem.
The clutch system of front-wheel drive cars of the VAZ family has some differences from classic cars of this brand. The stroke of the clutch fork is controlled using a cable.
Next, we will look at how the VAZ-2114 clutch is adjusted, as well as the main signs that require this procedure.
Clutch system malfunctions
All mechanisms and components of the car have a limited service life. Unfortunately, the manufacturer does not give exact deadlines after which it is necessary to replace and adjust all parts of the clutch system.
Long-term operation without regular diagnostics can lead to certain mechanisms failing at the most inopportune moment.
The most obvious symptoms that require adjustment of the clutch system are problems with gear engagement, extraneous sounds when depressing the corresponding pedal, poor traction, partial engagement of the clutch, and so on. Most often, the situation can be corrected by adjusting the pedal.
Clutch diagnostics
Diagnostics must be carried out on all cars without exception. Regular implementation of this procedure allows you to minimize the likelihood of breakdowns of all kinds. It makes it possible to detect failures and problems at an early stage.
Thanks to this, repair work is carried out with minimal time and financial costs. Certain diagnostic procedures require special equipment. It can be found at any car service center. It is not recommended to buy them yourself due to the fairly high price of these devices.
Below are operations that you can perform independently without special technical devices.
Diagnostics of the VAZ-2114 clutch is carried out in several stages:
You also need to pay attention to the pedal travel. It should not be accompanied by any jerks or interruptions
The lowering and raising of the lever should be smooth. If the pedal jerks or sticks, you need to check the clutch adjustment.
Using a ruler, check the distance from the car floor to the outside of the pedal. The exact required value is indicated in the technical documentation of the VAZ-2114.
Press the pedal all the way, then release it and measure the distance; if it does not correspond to the stated distance, it is necessary to adjust the pedal.
How to adjust the clutch on a VAZ-2114
The essence of this procedure is to change the length of the cable sheath relative to the control unit for this function. Thanks to this action, the pedal stroke can be reduced or increased.
How to properly adjust the clutch on a VAZ 2114
Adjusting the clutch of the VAZ 2114 is one of the most important of the car. It allows you to achieve the most accurate operation of the system, which has a positive effect on the control process and driving comfort of the car. To implement this event, no in-depth knowledge, high qualifications or special professional tools are required. Any car enthusiast can handle this with the help of standard tools that come with the vehicle. In this article we will take a detailed look at clutch adjustment for one of the most popular car models, the “fourteenth”
How to change and adjust the cable yourself?
We figured out why the pedal creaks, now let's talk about adjusting the clutch on the VAZ 2114.
When there are problems in the functioning of the system, they must be eliminated. One of the most common problems is a broken cable. Therefore, if the pedal fails, then before properly adjusting and tightening the cable, it must be changed.
Read also: Which tank will be filled first? Answer: 90 Americans
If you are experiencing problems with your pedal squeaking, check out the video that demonstrates the procedure for lubricating the device. Filmed by VikiNow.
Required Tools
To adjust the tension and replace the cable, you will need the following devices and tools:
- the cable itself;
- Litol lubricant;
- set of open-end wrenches;
- ruler;
- pliers.
How to replace it correctly?
To repair the cable, you need an assistant:
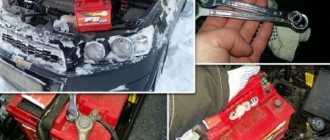
- Open the hood of the car and remove the bolts securing the battery terminals.
- You need to disconnect the connected cable from the pedal itself. Using a 17mm wrench, unscrew the nuts securing the bottom of the product. Then remove it from the retainer and remove it from the plug installed in the engine compartment.
- Further steps are carried out in the car interior. Move the carpet away from the driver's seat. There is carpet under the pedals, it needs to be removed. This will allow you to find the place where the cable is attached to the pedal; the clamp must be disconnected from it. There will be no problems, since this element is simply removed from the hook.
- After which the cable itself is removed from the seat. To do this, the device must be pushed away from you towards the engine compartment. When the product is difficult to push out, most likely its fastening has soured. Then lubricate the retainer with WD-40 and work it out a little, moving it in different directions. If you have an assistant, while you are developing the cable, he can pull it from the side of the engine compartment, this will speed up the procedure.
- After dismantling the product, a new one is installed. Before this, the bushing that secures the cable is removed from the clutch pedal. If its condition is poor, it is worn out, it is advisable to replace the bushing. The retainer itself is lubricated with Litol before installation.
Channel Sdelaj Sam! Pljus interesting! A video has been released showing the procedure for replacing a product with your own hands.
How to adjust free play?
After repairs, the cable is adjusted in height. If you do not adjust the stroke adjustment and adjust it, you will have difficulty changing gears. Before tensioning and adjusting the cable, it is recommended to test drive the machine. It will allow you to figure out how to properly tighten the pedal - raise or lower it.
Position tension diagram:
- If the car begins to move at the end of the pedal stroke, open the hood and locate the cable attachment location. There are two nuts here that can be unscrewed with a 17mm wrench. To reduce the free play of the pedal, that is, lower it, the bolt located inside the bracket is unscrewed. The outer screw must be tightened with a wrench.
- If, when starting to move, you realized that the free play should be increased, that is, raise the pedal, then the inner screw on the metal clamp should be tightened, and the outer one should be loosened. If there is rust on the free play adjustment nuts, it must be removed using WD-40. If there is no fluid, motor oil or brake fluid is used.
- If the adjustment is successful, check the free play with a ruler. If the actions are performed correctly, its length will be from 12.5 to 13.5 cm. This distance will be directly from the pedal itself in the car to the floor.
The VikiNow channel published a video showing the process of changing the cable and further adjusting its free play.
Checking work
If everything was done correctly, then you should make sure that the task was completed correctly. To do this, you need to press the pedal all the way several times, then measure the free play again. After pressing, it may go astray. If this happens, adjust the stroke again. Ideally, the clutch should engage in the middle.
How to check whether all actions were performed correctly:
- The VAZ 2114 car is installed on a flat horizontal surface.
- The handbrake lever is activated.
- The machine engine starts, the shift lever is moved to the first gear position.
- Try to start, but don't press the pedal. When all the setup steps have been completed correctly, the machine’s engine will stall. If the car starts to move, the mechanism needs to be re-adjusted. In this case, all the steps described above are performed again.
When adjustment is required
Adjusting the VAZ 2114 clutch may be required in the following situations:
- The clutch has been completely replaced.
- The clutch was repaired and its individual elements were replaced.
- The clutch travel is too large or, conversely, insufficient.
If everything is clear with the first two reasons, then in the latter case simple measurements should be performed. To do this, you need to measure the distance between the minimum and maximum positions of the pedal (that is, in situations when the pedal is pressed to the floor and when the pedal is freely released). The optimal value of this distance is in the range from 12 to 13.5 cm. If in fact it turns out to be larger or smaller than the specified dimensions, it is recommended to make an adjustment.
If the clutch travel exceeds 16 cm, then you should immediately stop all driving and make adjustments as soon as possible.
In addition, in some cases, too much stroke may indicate severe wear of the friction linings located on the driven disk, as well as the need to replace them.
Clutch VAZ 2115
- Phillips screwdriver or No. 8 head;
- set of open-end wrenches for 13 and 17;
- WD 40 or similar product;
- ruler/construction tape measure/other measuring instrument.
Replacement
a set of serviceable clutch parts for VAZ 2114; sets of spanner and socket wrenches; mandrel; jack.
Let's move on to replacement.
Remove the front wheels.
Disconnect the ground wire, drive and speedometer cables from the gearbox. It is not necessary to disconnect the cables, but it is worth doing for convenience.
We also disconnect the gear shift drive and the support from the gearbox side.
Use your hands to unscrew the lower casing that protects the flywheel. Inspect the condition of the flywheel. If we notice significant cracks and other defects on its surface, it means it is faulty. Remove (by hand).
Using a size 7 spanner, unscrew the bolts that secure the ball joints. As a rule, there are only 3 of them.
If we are making a complete, rather than selective, replacement, we disconnect the drive shafts from the gearbox and drain the oil. After which you can carefully remove the gearbox.
Using a size 8 spanner, unscrew the bolts securing the pressure plate to the flywheel.
Remove the pressure and driven discs. The pressure plate is also called the basket. At this stage, you need to make sure that it is working properly. Otherwise, replacement will be required. The working surface should not have cracks or large gaps.
We pry up the ends of the return spring that secures the release bearing.
Remove the clutch, bearing and return spring. We inspect each of the parts in order to understand which ones should be replaced. We twist the bearing in our hand. If you hear a crunching or noise, the bearing is bad, we are preparing a new one for replacement.
Remove the switch plug. We treat the parts with kerosene; if any of the parts are in good condition and do not need to be replaced, we carry out a selective replacement rather than a complete one.
We return (or attach a new one) the release bearing, clutch and return spring.
To center the crankshaft, insert a mandrel into its hole. Then we install the driven disk on the mandrel.
We screw it with bolts (with a spanner onto the pressure plate (basket) into the flywheel.
Adjustment
Initially, it is worth measuring the pedal deviation from the norm. To do this, you need to push the drive to the maximum, then release it. It is necessary to measure the stroke length - the distance from the center of the pedal pad in its lower position, when it is resting on the floor, and in its upper position. If the deviation from the normal length is significant, the pedal should be adjusted.
Deviations from the norm can be detected without measurements. To do this, you need to place the car on a flat horizontal surface, engage first gear and, smoothly releasing the drive, start moving. If the car starts moving only at the end of pressing the pedal, debugging is necessary.
In order to adjust the drive of the VAZ 2115, it is necessary to change the length of the cable jacket. To do this, you need to loosen or tighten the two nuts with which it is attached to the bracket.
Open the hood. Remove the air filter. We find the cable and nuts that secure it to the bracket. They are located on its threaded part. Unfortunately, on the VAZ 2115 these parts are located inconveniently. When manipulating the nuts, the length of the cable jacket changes. In order to reduce the stroke, loosen the nut located inside the bracket and tighten the nut outside, and vice versa, if you need to increase it.
If the threads are rusty, you can use liquid to make the threads easier to remove. If there is none, you can use engine oil or brake fluid.
After debugging, you should check changes in the operation of the node. This should be done in the same way as during the initial check for deviation from the norm. After correct adjustment, the stroke does not exceed 135 mm. If the procedure does not lead to anything and the clutch of your VAZ 2115 continues to slip, then the element has become unusable and needs to be replaced.
As a vehicle ages, all its main components and mechanisms also wear out.
For this reason, it is extremely important to periodically inspect the machine - this will allow you to identify the problem in time and fix it before it leads to a more serious breakdown.
Timely adjustment and inspection of the clutch on the VAZ-2115 will avoid failure of this unit and eliminate the need to replace it. In a car service, as you know, this procedure is not cheap, and it takes a lot of time.
In this material we will tell you in detail exactly how to correctly perform this operation and the sequence in which to perform all the necessary actions.
How to install the clutch disc correctly on a VAZ 2109
The clutch in a car serves as the connector between the engine and transmission. This unit takes on all the load that occurs when changing gears. Accordingly, the part can rightfully be considered a consumable item, because car owners regularly face the need to replace it or schedule maintenance.
It is almost impossible to influence the degree of wear of this unit. Therefore, after the clutch has exhausted its service life, it must be replaced partially or completely (in case of serious malfunctions).
When is it necessary to change the unit?
The mechanism requires servicing in the following situations:
- The clutch "drives". Motor power drops.
- The unit slips or incomplete activation occurs.
- Clicking noises are heard when changing gears.
- The clutch disengages automatically.
- Vibration is noticed when the clutch pedal is pressed.
Nuances of the work
Following all the recommendations from the automaker's manual does not guarantee that everything is done simply and quickly. Not every car owner has the opportunity to drive the car onto a pit or overpass. A lift is perfect for carrying out work, but not everyone has one either.
When you contact any service, the replacement will be made within a couple of hours, but for such a service you will need to pay a considerable amount. It may take a whole day to do the work yourself. Maybe more if you don't have experience in car repairs.
Most of the time is spent on disassembly and assembly. The operation to replace the node will take you no more than half an hour. Later in the article we will look at the process of replacing a clutch without a pit/lift.
Before starting work
Almost every car owner is interested in the question: is it possible to perform a replacement without dismantling the gearbox? You are unlikely to find a definite answer, but the procedure is quite feasible. First of all, find several large stumps up to 40 cm high, and also get a few additional bars. To prevent the car from simply falling during the work, take care to install a pair of regular wheels under the car.
Whether to remove the gearbox or not - you will have to answer this question specifically. Because if you act carelessly, the gearbox may simply fall to the ground, and lifting it from under the car will be very problematic.
Initially, disconnect the battery so that the machine's electrical system is de-energized. You can then proceed to the process shown in the following list:
- Remove the wheels and move them away from the car.
- Remove the steering ends and free the racks.
- Unscrew the ball joint mounting bolts.
- Remove the engine protection using the cable.
- The next step is to drain the oil from the box.
- Loosen the rocker nut and remove it.
- Unscrew the nuts on the two pillows.
- Place a jack or other support under the engine.
- Disable the reverse sensor.
- Disconnect the wires from the starter, unscrew the nuts and dismantle it.
- Unscrew the nuts on the flywheel guard and fork.
- In this step, remove the CV joint on the right side. The left side should not be dismantled.
- Unscrew the fixing bolts to the gearbox block.
- In the last step, unscrew the nuts that are located above the right CV joint.
Clutch replacement
After the preparatory work has been completed, you can remove the box. However, don't rush. To continue the process, take the two bolts from the upper arm. These elements have a thread suitable for our situation. Screw them in from above and you can begin to separate the units using a crowbar. This clutch replacement scheme is very labor-intensive. Remove the release bearing through the gap and unscrew the basket bolts. Compared to the instruction manual, the replacement process is slightly different. The new release bearing is installed in its place. Next, the disk is placed on the flywheel, and only then the basket is put on top.
The bolts need to be tightened approximately two turns. They should not be over-tightened.
In the next step, with extreme caution, begin to slide the input shaft onto the disc splines.
During the replacement process, pay attention to the petals of the basket. These elements have an insignificant operating life
Therefore, if necessary, they should also be replaced.
After carrying out operations to replace the clutch, reassemble the car in the reverse order. At this point we can consider that the repair is completed.
To summarize, we note that from the article you learned how to replace the clutch on a VAZ-2109 with your own hands. If you feel a lack of experience in car repairs, then the best way out of the situation is to contact a service station. In this case, you will save a lot of time, nerves and money.
Important points
When replacing the clutch, it is necessary to pay close attention not only to the condition of the discs, but also to the condition of the release bearing, which was mentioned above. After removing it, you need to turn it several times by hand.
If rotation is difficult or a creaking or crackling sound is heard during scrolling, then the bearing needs to be replaced. If this is not done, all the work on replacing the clutch discs will be useless, since they will again become unusable. The gearbox shaft and adjacent parts should be cleaned of dirt very carefully; it is best to wash everything with kerosene and wipe dry with a clean rag. The above is a method for replacing the clutch with complete removal of the gearbox. But sometimes car enthusiasts do without removal. To do this, the bolts that secure the box to the engine are carefully unscrewed (one at a time). In their place, studs are installed, which are slightly thinner and at least three times longer than the mounting bolts. These pins serve as guides along which the box can be moved slightly to the side. This creates a gap between the engine and the gearbox, through which the clutch discs are removed. This method is less labor-intensive, but it has its drawbacks: it will be impossible to get to the release bearing and it will not be possible to thoroughly clean the gearbox shaft from dirt.
As you can see from this article, replacing a clutch is a very labor-intensive operation. Therefore, it is necessary to follow the proposed instructions exactly. You should also not forget about safety precautions, especially when it comes to removing the gearbox. This is a very heavy unit and you should be extremely careful when handling it.
This is interesting: Robot gearbox
Copywriter with five years of experience.
Clutch adjustment on different brands of cars
For different cars, the distance for the combined pedal stroke may be different and this point must be clarified using the operating instructions. Let's look at the step-by-step adjustment procedure for different models.
VAZ-2108, 2109, 2199
The clutch adjustment procedure is as follows.
- Measure the distance between the bottom edge of the pedal and the floor with the pedal fully depressed. The optimal distance for these models is 18 - 20 cm.
- Press the pedal all the way with your hand and measure the distance from the floor to the bottom edge. The optimal value is 6 - 7 cm.
- Subtract the result of the second measurement from the first, in the end you should get 13 - 14 cm.
- Loosening or tightening the clutch is advisable if the value obtained by subtraction does not correspond to the norm.
- Hold the adjusting nut with one wrench and loosen the locknut with a second. Rotate the adjusting nut clockwise to increase pedal travel. The latter should move down.
- Take control measurements and tighten the locknut if you have achieved the required distance.
How to find out that the VAZ 2109 electrical circuit is faulty? Read about this in our author’s detailed and informative material.
"Lada Kalina"
The adjustment occurs as follows:
- Open the hood and unscrew the air filter housing bolts to remove it.
- Disconnect the mass air flow sensor and unscrew the clamp.
- Remove the cable as far as possible, holding it by the threaded end. Be prepared to overcome the resistance that the spring attached to the clutch pedal will provide.
- Use a caliper to measure the distance between the fork arm and the plastic leader. The resulting measurements should correspond to 2.7 cm.
- Use an open-end wrench to loosen or tighten the nut if you get a different result.
- Take repeated measurements by pressing the appropriate pedal.
- Reinstall the air filter.
VAZ-2107
Adjustment in this case requires the use of an overpass or pit. As a last resort, you can install the vehicle on supports using a jack:
- After adjusting the free play, you need to achieve a distance of 0.4-2 mm between the top position of the pedal and the stop. To adjust, if necessary, use a 10mm wrench and lightly unscrew the nut locking the limiter using rotational movements.
- The need to remove the protective shield arises if the engine system involves fuel injection.
- Clean the tappet threads of any dirt before applying the lubricant mixture.
- Check the stroke of the pusher as it affects the stroke of the release bearing. Push the fork back to the very end and measure the distance of the pusher stroke (4 - 5 mm). It is better to disconnect the spring from the lever in advance, otherwise you will have to apply force.
- Use a 17" wrench to adjust the pusher stroke. At the same time, hold the adjusting nut from turning. To loosen the locknut, use a 13mm wrench.
- Use the “8” key to fix the pusher and set the required distance to 4 - 5 mm using the “17” key.
- Lock the locknut and check the pedal travel. The distance between the moment of shutdown and its upper position should be 3 cm.
"Lada Priora"
In the case of the Lada Priora, you can use two methods to measure the position of the cable. In the first case, the reference point should be the clutch pedal travel (123 - 125 mm). In the second case, you can measure the length of the cable that exits the casing. 2.7 cm should be in the released state. In the vast majority of cases, drivers prefer the first method because it is more reliable.
VAZ-2114, 2115
For these models, the clutch adjustment is as follows:
- tighten the handbrake and remove the battery for maximum safety;
- locate the clutch cable in the engine compartment;
- loosen the cable end fixing nuts using two wrenches;
- achieve a distance of 125 - 135 mm by loosening or tightening the nuts;
- take the driver's seat and press the clutch pedal all the way at least three times;
- re-measure and adjust the clutch again if necessary.
Checking the working stroke of the clutch pedal VAZ 2114
Let's measure the travel of the car's clutch pedal. Before doing this, we move the carpet on the floor of the car back so that the measurements are more accurate.
- Using a tape measure, measure the distance from the floor of the car to the bottom edge of the clutch pedal
- The image shows how best to do this.
- It should be approximately 18-20 cm.
- Press the clutch pedal all the way with your hand and measure the distance from the floor to the bottom edge of the pedal.
- It should be 6-7 cm
- Subtract from 18-20, 6-7, it turns out 13-14 cm
This is the norm for the full travel of the clutch pedal of VAZ 2108, 2109, 21099 cars and their modifications. Many repair manuals indicate a working stroke size of 12.5-13.5 cm, which is also very close to our measurement.
If the clutch pedal travel differs more or less, it is necessary to adjust the clutch drive.
Pedal travel adjustment
Now a little more detail:
- 1. If the vehicle begins to move towards the end of the pedal stroke, a small adjustment will be required. Under the hood of the VAZ 2114 there are the already familiar two nuts securing the cable holder. To reduce the pedal stroke, you need to unscrew the inner screw and tighten the outer one a little. To increase the stroke, you will have to do the opposite with the screws, that is, tighten the inner one and loosen the outer one. Before tightening the locknuts, it is advisable to treat the threaded connection with a rust converter;
- 2. After all the settings, you need to check the operation of the clutch. As a result of correctly performed work, the pedal travel should be from 125 to 135 millimeters. We measure with a ruler. This is exactly the gap that should be from the floor to the pedal on a VAZ 2114.
If after replacement there are no changes in the operation of the mechanism, then a complete repair of the mechanism will be required. This procedure is quite labor-intensive, requires dismantling the gearbox, and an inexperienced owner would be best advised to seek the help of a car service center.
When is it necessary to adjust the Lada Samara clutch drive?
As practice shows, the culprits of clutch failures are most often the car owners themselves. A sharp start with “slipping”, as well as prolonged holding of the pedal in a depressed state, negatively affects the performance of the mechanism. The presence of noise or vibration when shifting gears indicates a problem in the transmission line. Below are a few signs that may require adjustment:
- Loss of power due to “slipping”, i.e. unreliable connection between the disk and the flywheel.
- Difficulty changing gears.
- Changing the travel distance of the clutch pedal (the norm is from 125 to 135 mm ).
- Jerking or sticking when pressing the pedal.
Motorists who know which clutch to choose for the Lada 2114 will most likely install it together with a cable. Replacing any element of the clutch should end with adjusting the drive, as well as changing the pedal stroke.
The pedal stroke is measured with a ruler, which is pressed against the floor. The distance between the lower and upper points of the pedal position should be within 125-135 mm. The maximum permissible value is 160 mm. If the pedal stroke goes beyond these parameters, then we can talk about wear of the friction linings of the driven disk.