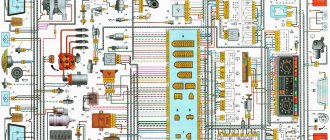
Any domestic VAZ-2109 has a fuse box; as a rule, both older and newer models are equipped with such a system. Thanks to such a system, all electrical wiring is combined together. The functioning of the power supply allows you to prevent damage to the electrical equipment provided in the car.
Fan connection 2108, 2109, 21099
Until 1998, on vehicles with the old fuse block 17.3722 (finger fuses), the fan circuit included a relay 113.3747. After 1998 there was no such relay.
Also, before 1998, the TM-108 switching sensor was used (the closing temperature of its contacts is 99 ± 3 ° C, the opening temperature is 94 ± 3 ° C), after 1998 the TM-108-10 with similar temperature ranges or its analogues from different manufacturers . The TM-108 sensor only works in conjunction with a relay amplified for high current. TM-108-10 can work with or without relay.
Scheme for switching on the engine cooling fan on a VAZ 2109 with mounting block 17.3722
K9. fan motor start relay. A. To terminal “30” of the generator
Scheme for switching on the engine cooling fan on a VAZ 2109 with mounting block 2114-3722010-60
A. To terminal “30” of the generator
https://youtu.be/https://youtu.be/QvhxE6j6iz4
_
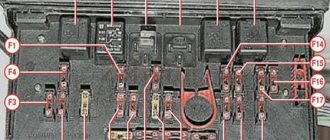
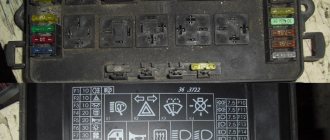
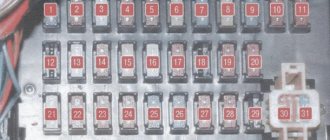
Location of relays and fuses in the old-style VAZ 2108 block
Since 1998, on some cars, instead of block 17.3722, mounting blocks 2114-3722010-60 or 2114-3722010-10, 2114-3722010-18 with blade fuses have been installed. The new units differ from the old ones in the rating and designation of fuses, the designation of relays and connectors (letter X instead of Ш), as well as the absence of a rear window washer time relay and a relay for the electric motor of the engine cooling system fan (a new type of sensor-switch is installed on these cars, its contacts are designed for high current, so there is no need for a relay). To distinguish the block 2114-3722010-60 for the VAZ-2108 family (resistors and a diode are included in the power supply circuit of the generator excitation winding) from the outwardly similar block for the VAZ-2115, it has a white mark near connector XII.
Prior to 1986, the rear fog light bulbs and the fog light warning light were protected by the No. 15 mounting block fuse. Since 1986, they have been protected by a separate fuse located in the wiring harness near the fog light switch. This fuse is rated for 8 A and is housed in a separate plastic housing.
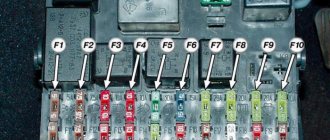
Old model VAZ 2109 fuse box diagram
| № | A | Purpose |
| 1 | 8 | Right fog lamp |
| 2 | 8 | Left fog lamp |
| 3 | 8 | Headlight cleaners (at the moment of switching on) Headlight wiper switch relay (contacts) Headlight washer switch valve |
| 4 | 16 | Headlight wiper motor Headlight wiper relay (winding) Heater motor Window washer motor Rear window wiper motor Rear window washer timing relay Windshield and rear window washer activation valve Cooling system electric fan relay relay coil Coil of the rear window heating relay coil Rear window heating control lamp Wardrobe lighting lamp box |
| 5 | 8 | Turn indicators in turn signal mode and the corresponding indicator lamp Rear lights (reversing lamps) Indicator lamp for fuel reserve, oil pressure, parking brake, brake fluid level, carburetor choke Voltmeter and indicator lamp for charging the battery Gearmotor and windshield wiper switch relay Generator excitation winding (at start-up) “STOP” indicator lamp Coolant temperature and fuel level indicators |
| 6 | 8 | Rear lights (brake lights) Body interior light Power windows and power window relay |
| 7 | 8 | License plate lights Engine compartment lamp Indicator lamp for turning on side lighting Instrument lighting lamp and cigarette lighter lamp Heater lever illumination panel |
| 8 | 16 | Engine cooling fan electric motor and its activation relay (contacts) Sound signal and its activation relay |
| 9 | 8 | Left headlight (side light) Left rear light (side light) |
| 10 | 8 | Right headlight (side light) Right rear light (side light) |
| 11 | 8 | Direction indicators and hazard warning relay (in hazard mode) Hazard warning lamp |
| 12 | 16 | Heated rear window element and heating relay lighter Socket for portable lamp |
| 13 | 8 | Right headlight (high beam) |
| 14 | 8 | Left headlight (high beam) High beam indicator lamp |
| 15 | 8 | Left headlight (low beam) |
| 16 | 8 | Right headlight (low beam) |
| Relay | ||
| K1 | Rear window washer time relay (451.3747 / 2108-3747110, 2108-3747110-06) | |
| K2 | Relay-breaker for direction indicators and hazard warning lights (493.3747 / 2108-3747010-02) | |
| K3 | Windshield wiper relay breaker (522.3747 / 2108-3747710) | |
| K4 | Contact jumpers in place of the lamp integrity monitoring relay. Lamp integrity monitoring relay (4402.3747 / 21083-3747410, 21083-3747410-06) | |
| K5 | Headlight high beam relay (113.3747 / 2105-3747210-10, 2105-3747210-12) | |
| K6 | Headlight cleaner relay (112.3747 / 2105-3747210, 2105-3747210-02) | |
| K7 | Power window relay (13.3747 / 2105-3747210-10, 2105-3747210-12) | |
| K8 | Relay for turning on sound signals (13.3747 / 2105-3747210-10, 2105-3747210-12) | |
| K9 | Relay for turning on the electric cooling fan (13.3747 / 2105-3747210-10, 2105-3747210-12) | |
| K10 | Relay for turning on the heated rear window (13.3747 / 2105-3747210-10, 2105-3747210-12) | |
| K11 | Relay for low beam headlights (13.3747 / 2105-3747210-10, 2105-3747210-12) | |
If the cooling fan does not work
To drive the fan, a DC electric motor with permanent magnetic excitation ME-272 or similar is installed. Technical data of the electric fan and fan switch sensor:
The cooling fan may not turn on due to:
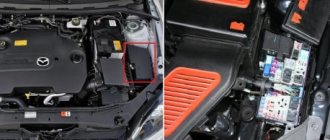
Fuse VO is located in the mounting block of the car's engine compartment and is marked F7 (20 A). The test is carried out using self-diagnosis included in the probe mode.
New model power supply
Here the mounting block diagram is arranged a little differently, but it is more relevant for owners of the VAZ 2109, since most of the nines that have survived to this day are modernized versions.
The scheme is relevant for both carburetor and injection types of engines.
Fuse number
Rated current
The electrical circuit for which it is responsible
Radiator fan relay winding, electrical circuit of switch and heater motor
Hazard warning switch in turn signal mode, turn signal switch, turn signal switch, turn signal warning light, turn signal warning light, reverse optics switch, reverse lights, tachometer, voltmeter, gasoline level indicator, gasoline level sensor, gasoline level warning light, pointer coolant temperature, temperature sensor, warning lamp and emergency oil pressure sensor, brake emergency lamp, brake system hydraulic switch, hand brake switch
Brake light switch and bulbs, interior lighting
Room lighting lamps, indicator lamp for switching on the dimensions, lamp for illuminating the heater and cigarette lighter handles, glove compartment lamp, switch and lamp for instrument panel illumination
Horn, horn switch, radiator fan motor
Left side lamp, left rear side lamp
Right side lamp, right rear side lamp, fog light switch, fog light indicator light
Turn signal switch and breaker, turn signal lamps, warning lamp in emergency mode
Cigarette lighter, socket for carrying lamp
VAZ cooling fan connection diagram
All basic electrical diagrams and modifications for connecting the liquid cooling fan (CO) in VAZ cars of various models are given. What is the essence of VO’s work? The electric motor with an impeller on the shaft is installed in a rectangular metal frame, with which it is attached to the rear of the radiator. When voltage (12V) is applied to the actuator contacts, it begins to work, rotating the blades and creating a directed air flow that actually cools the antifreeze or antifreeze.
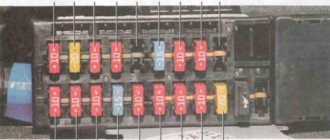
Heating unit fuses installed in an old car
As was said a little earlier, the circuit of the mounting block, which is installed in new cars, is different from its prototype. As practice shows, the described arrangement of parts works on all types of motors.
To understand how the VAZ-2109 heater control unit works, you should pay attention to several important elements. For example, fuse number 4 with a current strength of 16 A is responsible for the radiator fan relay winding, as well as for the functionality of the electrical circuit of the electric motor of the heater. The seventh power supply element with a current of 8 A is capable of preventing the failure of the lamp, through which the handles of the stove and cigarette lighter are illuminated, the eighth - with a current of 16 A is responsible for the electric motor of the radiator fan.
Replacing an electric fan in a car
Checking the cooling system
What to do if the VAZ 21099 carburetor cooling fan does not work? As soon as the car owner noticed the first signs of overheating, i.e. the temperature sensor arrow has approached the red zone, but the carburetor has not yet started pouring smoke from under the hood of the VAZ 21099, you need to check the cooling system.
Check all wire connections
Step-by-step instructions for checking the cooling system.
READ How to Remove the Front Panel on a VAZ 2109
Scheme for switching on the cooling fan of a VAZ 2110 carburetor engine.
The circuit diagram for switching on the VAZ 2110 cooling fan to the carburetor and injection is different. On cars with a carburetor engine, a thermobiometallic sensor TM-108 is used, and on cars with an injection engine, the controller is controlled.
When the fan is controlled by a sensor, the switching temperature depends on the sensor installation temperature, which is indicated on the housing. If the fan does not turn on when the temperature rises to the operating temperature of the sensor, you need to check from the very beginning whether the sensor is working correctly. To check, it is enough to close the contacts on the sensor, and if it is triggered, you must replace the sensor. If the fan does not work after shorting the terminals, check the cooling fan
and fuse integrity.
Fan control
If a VAZ 2109 car is equipped with an engine with distributed injection and an injector , then the sensor-switch familiar to the owners of the carburetor model does not exist. The fan is turned on and off by the ECU controller. This controller receives information from the coolant temperature sensor (CTS), which is installed in the outlet pipe between the thermostat and the cylinder head. The sensor is used to monitor not only the operation of the fan, but also the engine. Including:
To determine the temperature of the VAZ 2109 DTOZH, a thermistor is used in the injector. a resistor whose resistance depends on temperature. VAZ 2109 uses a thermistor with a negative temperature coefficient. This means that as the temperature increases, its resistance decreases.
Where is the Fan Relay for VAZ 2109 Injector?
VAZ 2110 cooling fan switching diagram
To maintain the engine temperature, the VAZ 2110 fan cooling circuit is used. The fan motor turns on and off automatically.
Heater fuses installed in an old-style car
If a motorist wants to find out which fuse is responsible for the VAZ-2109 stove in an old-style car, he must find number F7 among the entire list of component wires and elements; the current strength on such a part is only 30 A. On this fuse there is a circuit consisting of an electrical heater fan motor, electric windshield washer motor, as well as a relay for turning on the electric radiator fan.
General characteristics of the model
90s dream car
The dimensions of the car have changed slightly due to the lengthening of the wing and enlargement of the hood. In addition, there is a completely new, improved VAZ radiator grille and, of course, an updated instrument panel. The length of the VAZ 21099 compared to other cars in this group has increased by 20 cm.
The VAZ 21099, like other models of this family, has many advantages:
- has excellent controllability when driving;
- Stable on completely different types of roads.
In 2004, production of this car model was discontinued, but production in Ukraine continues.
VAZ 21099 cars come in two types.
The VAZ 21099 has a carburetor, as in the injectors of the VAZ 21099, the layout of the fuel supply system is almost the same.
Quite often, the owners of this car are faced with one problem: the VAZ 21099 carburetor cooling fan does not work.
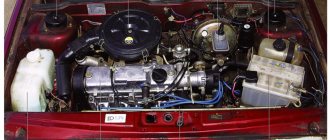
Cooling system VAZ 2109
The liquid cooling system of the injector of the VAZ 2109 automobile engine is a closed-cycle system with forced circulation of coolant (coolant). The system consists of the following blocks:
Fan operation is critical in hot weather when filming in slow motion. Under these conditions, engine overheating is especially likely, and, accordingly, high-quality fan operation is required. The cooling air flow must be directed correctly to the radiator. If the VAZ 2109 injector cooling fan does not work, the cooling system may “boil”.
Fan diagnostics
In order to check the operation of the unit, you will need a one and a half meter wire, preferably with “crocodiles” at the ends. With the engine off, connect the positive terminal of the battery directly to the fan terminal. The working unit should begin to rotate. If not, then this is a malfunction. If the cooling fan does not turn on when the engine overheats, although diagnostics show that they are working, you should check the DTOZH.
During the test, you will need an ohmmeter to measure the resistance of the sensor. An ohmmeter is included in any, even the simplest portable digital multimeter. The procedure is as follows:
READ Where is the VAZ 2107 Fuse Box located?
If for some reason the sensor resistance is not normal, the part must be replaced. And if this is the case, but the unit does not turn on, something is not working in the electronic engine control unit. You should contact a service station. You will need special equipment to diagnose and flash your computer.
Differences between VAZ fuse mounting blocks
The catalog number of the mounting block of the old model is 17.3722. The main difference from the more modern unit with catalog number 2114-3722010-60 is poorer protection from moisture, which is why the life of the device is several times lower.
After all, the mounting block is located in a niche in the engine compartment, where rainwater or washer fluid often gets in. The new mounting block does not have relays for turning on the fan and rear window washer. This is caused by changing the vehicle's electrical circuit and installing these relays in different locations.
Another difference is that the new model of the mounting block uses a different type of fuses, which are more resistant to moisture. To distinguish one block from another, you need to read the inscription on the cover; the model number is indicated there. If for some reason you cannot read the text on the cover, remove it and compare the blocks with the photographs from this article.
Causes of fan malfunction
There are times when the radiator cooling fan runs constantly. This is also wrong. What to do in this case? What is the cause of the problem?
The temperature sensor may be damaged. This is indicated by a constantly burning light sensor. In this case, simply replace the temperature sensor or injection system unit. The relay may need to be replaced. Also, the contacts on the radiator switches that trigger the relay may not open. To solve the problem, you will need to replace the thermal relay.
You will need to remove it to determine the cause of the fan failure.
90 degrees and remove it.
Fan motor connection diagram
If your car breaks down, regardless of whether the fan or something else stops working, you should contact a specialized workshop. Experienced technicians will always find the cause of the problem, select the necessary spare parts, sensors and carry out repairs.
Of course, many car owners want to repair their cars themselves; it gives them great pleasure and requires minimal costs. But in this case, there is a risk of making a mistake in choosing parts and making the correct diagnosis. A car enthusiast can spend a lot of time and effort, but as a result do not get the desired result. To prevent this from happening, it is better to contact a specialist.
The car is installed on a VAZ-2109. two fans
.
The first, more powerful one, is installed in the engine cooling
to increase air flow through the radiator core.
fan is installed in front of the heater radiator (“furnace”)
, its task is to pump heated or unheated air into the car. Both fans are driven by DC motors.
The fan, which is installed in a hole in the housing covering the radiator core, has a sensor for automatically turning on the engine in the electrical connection circuit. This sensor is screwed into a threaded hole located in the right radiator reservoir because the coolant temperature will be at its highest when the thermostat is activated. The fan turns on without a driver. The sensor should operate when the operating temperature of the antifreeze exceeds 90-95 degrees and send a signal to the relay to turn on the engine located in the mounting block. The electrical circuit for turning on the electric motor is protected by fuses No. 4 and No. 8 on mounting blocks of type 17. 3722.
If your VAZ-2109 car has a mounting block of type 2114-3722010-60, then the fan motor is turned on directly from the power sensor, without the participation of a relay. It's just not in the mounting block at all. The electrical circuit is protected by a fuse marked No. 5. If these electrical circuits are faulty, the fan will not turn on. The driver will determine this by reading the coolant temperature gauge. The arrow of this pointer will point to the red area of the scale. In this case, it is necessary to reduce the load on the engine to idle speed, turn on the interior heater fan and open the tap, supply coolant to the stove radiator, start driving until it stops completely, and eliminate the malfunction. reasons for the malfunction.
You should start looking for the causes of malfunctions with the engine start sensor
fan. To do this, open the hood and disconnect the terminal from the sensor. To further test the sensor, you will need a piece of wire to short the two wires going to the terminal. Wrap the jumper with electrical tape to prevent it from touching the weight of the vehicle. Turn the ignition on and if everything else is fine, the fan will start. Moreover, in this case, it will work, it will work continuously as long as the ignition is on.
If the fan on the VAZ 2109 does not work, open the cover of the mounting block and check the serviceability of fuses No. 5 on block 2114-3722010-60 and No. 4, No. 8 on block 17. 3722. Look for the fuse number markings at the top of the cover. After making sure that the fuses are good and the fan is still not working, you need to check its motor.
To do this, you will need two insulated wires to connect the fan motor terminals directly to the battery. If the fan starts to operate, make sure that the air flow is under the hood of the car, and not vice versa. If the connection is incorrect, change the polarity of the wires connected to the battery. This can help you get to the repair site, and you can turn off the fan motor only by disconnecting the wires from the battery. In this case, the reason that the fan does not turn on will be either a faulty relay or faulty wiring.
Prolonged driving on an overheated engine when the VAZ 2109 injector cooling fan is not working is fraught with serious consequences. The engine may knock or jam, and then major repairs will be necessary. Therefore, if the temperature gauge needle moves steadily into the red zone, immediately turn on the heater at full power, stop in a safe place and allow the engine to cool. Do not open the expansion tank cap on a hot engine; overheated antifreeze may spill.
Sources:
https://avtoblokrele.ru/vaz/blok-predohranitelej-vaz-2109-2108-21099.html https://litezona.ru/rele-ventiljatora-vaz-2109-inzhektor-gde/
Relay for low beam headlights VAZ 21083 (21093, 21099)
Detailed information about the low beam headlight relay for the VAZ 21083 (21093, 21099).
Purpose of the low beam headlight relay in the electrical equipment of a VAZ 21083 car
The electromagnetic relay in the electrical circuit of the low beam headlights is designed to control its on and off, as well as to reduce the load on the contacts of the switch (switch) and circuit elements (wires).
Where is the low beam headlight relay located on the VAZ 21083?
On a VAZ 21083 (21093, 21099) car, the headlight low beam relay is located in the relay and fuse mounting block. For mounting block 17.3722 this is relay K11.
Relay K11 - low beam headlight relay in mounting block 17.3722
For mounting block 2114 this is relay K9.
How does the low beam headlight relay work?
The low beam headlight relay is small-sized. It is an electromagnet with several contacts, enclosed in a housing.
Characteristics of the low beam headlight relay
Nominal voltage 12 V
Trigger voltage 8 V
Release voltage 1.5-5.5 V
Load current 20/30 A
Winding resistance 85±5 Ohm
How does the low beam headlight relay work?
Constant minus pin “86” of the relay, constant plus “30”. From the steering column switch, current is supplied to terminal “85”, energizing the electromagnet. It is triggered and closes contacts “86” and “87”. From contact “87” the current went to the low beam filament in the headlight lamp.
Faulty low beam headlight relay
Oxidation of relay contacts
The relay is inserted with contacts into holes in the mounting block. This connection is susceptible to moisture since the mounting block is installed in front of the windshield. Over time, the relay contacts oxidize, breaking the electrical circuit and stopping the normal operation of the relay; the low beam does not turn on.
Electromagnet failure
During prolonged use, the electromagnet may stop working and the low beam may stop turning on. Or it burns out after a short circuit.
To check the functionality of the relay, you need to remove and insert the relay several times (so that the contacts are cleaned). If this does not help, replace the relay with a new one or a similar one, you can use a relay from the same mounting block).
Features of removal and installation
The relay is removed by pulling it up from the holes in the mounting block by hand. If the relay has not been removed for a long time, the contacts may become sour. In this case, pull it up, slightly swaying from side to side.
Applicability of the low beam headlight relay on VAZ 21083 (21093, 21099) cars
In the electrical circuit of the low beam headlights of the VAZ 21083 (21093, 21099) car, a continuous-action electromagnetic relay 113.3747 is used.
Notes and additions
The service life of the low beam headlight relay is up to 300 thousand km of vehicle mileage or from 25 to 200 thousand starts.
In addition to the relay, there are fuses in the low beam headlight electrical circuit. This is No. 15 (8A) - left headlight and No. 16 (8A) - right for mounting block 17.3722 with finger fuses. F13()7.5A - left headlight, F12()7.5A - right headlight for varieties of mounting block 2114.
Twokarburators VK - More information on the topic in our VKontakte group, in Odnoklassniki - Twokarburators OK and in Yandex Zen - Twokarburators DZ
More articles on electrical equipment of VAZ 21083, 21093, 21099 cars
— Relay for turning on the direction indicators VAZ 2108, 2109, 21099
— Mounting block 2114, fuses and relays
— Wires for headlights VAZ 2108, 2109, 21099
— The low or high beam headlights of VAZ 2108, 2109, 21099 do not light up
— Connection diagram for low and high beam headlights VAZ 2108, 2109, 21099
— How to remove the headlight of a VAZ 2108, 2109, 21099 car
— Headlights are dim, causes of malfunction