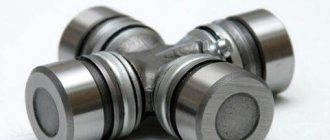
The vehicle control system is responsible for the direction of its movement, as well as, to a large extent, for the safety of the driver and passengers. One of the most important elements of this system is the steering rack. Its role is to transfer force from the steering wheel to the rods, which, in turn, force the steered wheels to turn in one direction or another.
With the exception of the latest versions in VAZ-2110 cars, the steering rack is not equipped with a power amplifier, but this does not mean that its mechanical design will last forever. Like any other moving mechanism, it sometimes fails. We will talk about what the VAZ-2110 steering rack is and what problems happen with it in this article. In addition, we will figure out how to repair or replace it yourself.
Design and role of the steering rack in the control system
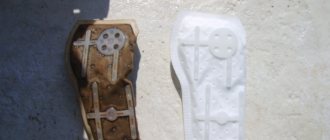
The VAZ-2110 steering rack is a steel form, one side of which has teeth that mesh with the teeth of the drive gear. The latter is driven by the steering wheel through the shaft and its cardan. In VAZ-2110 cars, the steering rack is located in a column, which is mounted on the partition between the engine compartment and the passenger compartment.
Its upper part has a mount for two rods, which are connected to the shock absorber struts through the tips and their fingers.
How to eliminate backlash?
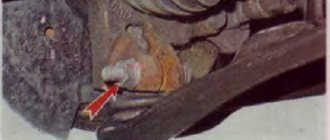
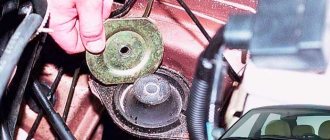
If you identify signs of a malfunction, do not despair; perhaps everything will cost you with minor repairs, especially since the rack itself very rarely fails. First, let's figure out whether there is play in the steering wheel and how to tighten the steering rack on a VAZ-2110 to get rid of it. First of all, open the hood and find the location of the column. We dismantle the engine elements that interfere with free access to it (air filter, air duct). Holding the steering rods with both hands, try to move the rack left and right. If play is detected, we get rid of it by adjusting the thrust nut.
Adjusting the VAZ-2110 steering rack is a fairly simple process, but this will require a special 17mm wrench with an octagonal head. Without this tool, work can not begin. If the key is at hand, go under the car and remove the engine protection. After this, move under the front of the car and find the location of the column. Remove the plastic plug from the thrust nut. Further adjustment of the VAZ-2110 steering rack is carried out by tightening this nut inside the column body. Rotate it 10-15 degrees, then check the amount of play. If necessary, repeat the procedure. It is important not to overtighten the thrust nut, otherwise the steering shaft will be difficult to rotate.
In addition, check the reliability of the tie rods. If necessary, tighten their fastening bolts.
Removing the steering column
If after adjustment the problem with the rack does not disappear, you will have to disassemble and repair it. But to do this it needs to be removed. There are two methods of dismantling: with and without tie rods. The latter method is preferable as it requires much less time. Before removing the steering rack on a VAZ-2110, the front part of the car needs to be jacked up on both sides. This is necessary in order to unload the traction.
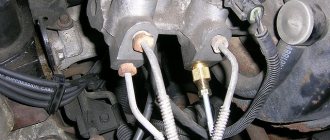
In the cabin, in the area of the pedal block, you need to unscrew the steering shaft cardan bolt. After this, we go to the engine compartment and unscrew the 2 bolts securing the rods, having previously bent the locking plate. Then you need to unscrew the 4 bolts securing the steering column to the car body. When this is done, remove the column and remove it through the opening of the left wheel arch.
Replacing the steering column bearing of a VAZ 2110
There has long been a slight play in the steering shaft. I even bought two bearings, but never got around to replacing them. And the backlash did not increase and was barely noticeable. And the other day the play increased sharply and the steering shaft dangled like a pencil in a glass. I even made a video before the analysis:
The hardest part was removing the steering wheel. I didn't want to come off the splines. And a small instruction: it’s clear that we remove the steering wheel, the casing, the steering column switches, and disconnect the wiring from the ignition switch. The most important thing is to leave the lock in the lock and turn it to the first position so that the shaft is unlocked. And then you need to unscrew the two nuts and two bolts that secure the steering column to the body. There are no problems with the nuts, but the bolts are installed with shear heads, i.e. After tightening, the wrench head comes off and a spherical head remains. I moved them out of place with a chisel and unscrewed them with pliers. I unscrewed the steering shaft at the first crosspiece - there is one bolt there. And that's it, the column is free. And the reason for this play is a worn nylon bushing, which is pressed into the bearing and is located between the bearing race and the steering shaft. For me it completely popped out and the steering shaft was simply hanging in the bearing race. I replaced both bearings one by one. And at this moment the main thing is to position the steering wheel correctly. So that it is blocked by the ignition switch. By moving the steering shaft up/down in the column, I achieved the ideal position of the shaft relative to the lock. And then assembly in reverse order. Yes, and I installed the bolts with break-off heads, and not simple ones)) I didn’t take any photos, I’m posting what I have))
If the steering column on your car is not working properly, we offer you detailed instructions on how to remove and install the steering wheel.
1. First of all, disconnect the wire from the “-” terminal on your battery. 2. The wheels are set to the position where the vehicle is moving in a straight line.
Steering column bearings VAZ 2110 | VAZ 2111 | VAZ 2112 - replacement
Procedure for removing steering column bearings
1. Remove the steering column assembly (see Steering column assembly - removal, installation, replacement). 2. Install the steering column in a vice. 3. Using a 13 mm open-end wrench, hold the head of the coupling bolt of the cross flange, and use a 13 mm socket wrench to unscrew its nut.
4. We take out the coupling bolt and remove the flange of the intermediate steering shaft crosspiece from the splines of the upper shaft. 5. Remove the thrust bushing.
6. In order to return the steering shaft to its previous position when pressing, use a marker to mark the position of the lower end of the steering shaft on the bracket. 7. Insert the key into the ignition switch and turn it to position “I”. In this position, the anti-theft device latch is retracted into the ignition switch housing and ceases to hold the steering shaft from turning.
What is a do-it-yourself VAZ-2110 steering rack repair?
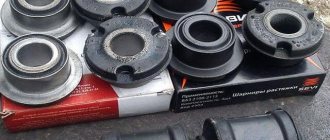
Take care of your tools in advance. Here you will need two special keys: a 17 octagon and a 24 octagon, as well as bearing pullers. It is worth noting that repairing the VAZ-2110 steering rack involves replacing parts that are most susceptible to wear. These are bearings and a drive gear boot, a stop, retaining rings, a support sleeve, and seals. All these elements can be purchased as a set. There are three types of repair kits on sale:
- minimal, including a support sleeve, boot, retaining rings and seals;
- standard, which in addition to the listed parts includes bearings;
- complete, which also includes a new rack.
It is recommended to buy a repair kit only after you remove the column, write down its markings (different versions of the VAZ-2110 may have different configurations) and disassemble it, identifying the spare parts that need to be replaced.
Disassembling the steering column
We begin disassembling the control unit by removing the protective casing by cutting the plastic clamps. After this, use a special key of 17 to unscrew the thrust nut, take out the retaining ring, the spring and knock out the rack stop. Next, remove the boot and drive gear seal, remove the lock washer, and then use a 24mm wrench to unscrew the nut securing the ball bearing. We remove the gear. Now that there is nothing holding the rail in the case, we remove it through the right side of the case. We remove the needle bearing of the drive gear from its seat. To do this you will need a special puller. Check the drive gear bearings for play. If present, the bearings will have to be replaced.
Removing the steering column from a car
VAZ 2110 steering cardan
To replace the driveshaft, you need to remove the steering column from the car. Begin:
- de-energize the battery;
- after that, remove the cover of the signal switch on the steering wheel (to do this, pry it off with a screwdriver);
- remove the cover from the steering wheel;
- Now we are faced with two self-tapping screws, which should be unscrewed with a curly screwdriver;
- after this the lid is completely removed;
Removing the steering wheel cover
- now you need to use the same figured screwdriver to unscrew the three screws that secure the contact of the sound signal;
- disconnect the wire and remove the contact;
- now you will need to take the key for 24;
- use it to unscrew the nut that secures the steering wheel (this should not be done completely, leaving the nut mounted on the shaft);
- remove the steering wheel by pulling it towards you.
Note. The steering wheel should be removed not by jerking, but by rocking the left and right sides and at the same time pulling the part towards you. The nut is not completely removed due to the fact that the steering wheel can come out of the shaft abruptly, thus injuring the face. After removing the steering wheel from the splines, the nut is completely unscrewed.
Advice. If you cannot remove the steering wheel alone, you need to use the help of an assistant who will pull the steering wheel up while the repairman strikes the shaft through a drift.
Removing the steering wheel
- dismantle the steering column switch assembly;
- We also remove the ignition switch;
- take a 13mm wrench and unscrew the bolt securing the elastic coupling (located under the pedals);
- Unscrew the bolts securing the steering shaft at the front.
Note. These fasteners are fixed with bolts with shear heads, which eliminates the possibility of standard unscrewing. To do this, you need to strike with a chisel in a tangential direction.
- now unscrew the nuts securing the steering at the rear, using a 13mm wrench;
- dismantle the steering column of the VAZ.
Withdrawal procedure
1. Before starting work, disconnect the negative battery cable.
3. Now you need to loosen the bolt securing the base of the steering column switches. Slide it towards you. 4.Disconnect the wire from the oil pressure sensor. 5. Disconnect the 2 horn wire connectors. Remove the base of the steering column switches.
6. Insert the key into the ignition and turn it to position I to unlock the steering shaft.
7. Disconnect the block with wires from the ignition switch.
8. The steering column is secured with bolts with break-away heads. If you do not have the same bolts in stock, they can be replaced with M6 bolts 20 mm long.
9. Unscrew 2 nuts and 2 bolts, remove washers. 10. Remove the steering column from the studs, slide it towards you and lower it down. Unscrew the bolt securing the steering shaft to the propeller shaft. 11. Remove the bolt and remove the steering column by removing the thrust bushing from the shaft. 12. Press the steering shaft out of the pipe along with the bearing. Press the shaft towards the steering wheel mounting. 13. Remove the front bearing from the shaft.
14. If the steering shaft has worn or damaged splines or threads, replace it.
15. Using a hammer or drift, press the rear bearing out of the steering bracket pipe.
16. Before installing the bearings, check them for damage.
17. Press the rear bearing into place. You need to press it all the way into the pipe collar. Apply force only to the outer ring of the bearing. When installing the bearing, the wide flange of the bushing should face outward.
18. Place the front bearing onto the shaft. The wide flange of the bearing bushing should face the end of the shaft.
19. Insert the shaft into the pipe so that the rear end of the shaft fits into the rear bearing.
20. Press the front bearing into the pipe collar until it stops.
21. Install the steering column in the reverse order. The thrust bushing is installed on the shaft with the side with the larger diameter.
22. Install special washers for the bracket fastening bolts with the protruding part “a” in the opposite direction from the bolt head. 23. When installing the base of the steering column switches, before tightening the bolt securing it, adjust the position of the base on the steering column. To do this, install the lower casing and move the base so that the screw holes in the casing and the base match. After this, carefully remove the casing and tighten the base bolt. Install the steering wheel in reverse order.
Source
Assembly procedure
We begin repairing the VAZ-2110 steering rack by installing the needle bearing of the drive gear. The seat is first generously lubricated with a special lubricant such as “Fiol-1”. After this, we press a new ball bearing onto the drive gear shaft. Next, install the support sleeve from the repair kit inside the control unit housing. Now we fill the inner cavity of the column with lubricant and insert the steering rack into it.
We mount the drive gear and secure it with a locking ring and nut. We put a new boot on its shaft.
We install the stop with the seal in place, secure it with a stopper and a thrust nut. That's basically it. Now you need to adjust the control unit and put the protective cover on it.
Which steering shaft bearing should I install on the VAZ 2108?
The original number is 2108340112602, the average price is 142 UAH. There are no analogues.
Disconnect the wire from the “–” terminal of the battery. Remove the steering wheel. Loosen the bolt securing the base of the steering column switches and slide the base towards you.
Disconnect the wire from the oil pressure sensor.
Disconnect the two connectors with the horn wires from the contacts on the base and remove the base of the steering column switches. Insert the key into the ignition switch and turn it to position I to unlock the steering shaft.
Disconnect the ignition switch wiring harness from the wiring harness. If the ignition switch wires are connected to the wiring harness with a clamp, cut or loosen the clamp. The steering column is secured with bolts with breakaway heads (the same as the ignition switch). If new bolts with breakaway heads are not available, you can replace them with regular M6 bolts 20 mm long.
Unscrew the two nuts and two bolts with breakaway heads, remove the spring and special washers. If the bolt heads are stripped, the bolts must be drilled out or removed using a screwdriver and hammer.
Remove the steering column from the studs, slide it towards you and lower it down. Then remove the bolt securing the propeller shaft to the steering shaft.
Remove the bolt and remove the column assembly, removing the thrust bushing from the shaft.
Press the steering shaft along with the bearing out of the pipe. It is recommended to press the shaft towards the steering wheel mounting.
Remove the front (steering wheel side) bearing from the shaft. Replace the steering shaft if the splines or threads are worn or damaged.
Using a hammer and a drift, press the rear bearing out of the steering bracket pipe using light hammer blows. Before installing the bearings, check that they rotate easily and without jamming. The plastic bearing bushings must not be damaged.
Press the rear bearing all the way into the pipe collar using a suitable mandrel, applying force only to the outer race of the bearing. The bearing is mounted on a plastic bushing, which has a wide flange on one side. When installing the bearing, it is the wide flange of the bushing that must be directed outward. Slide the front bearing onto the shaft with the wide flange of the bearing bushing facing the end of the shaft. Insert the shaft into the pipe. In this case, the rear end of the shaft should enter the rear bearing. Press the front bearing all the way into the pipe collar using a suitable mandrel, applying force only to the outer race of the bearing. Install the steering column in the reverse order of removal. Install the thrust bushing on the shaft with the side with the larger diameter.
Replacing the steering rack of a VAZ-2110
It is rare, but it happens that replacing consumables is not enough. The steering rack, although made of steel, is still subject to wear. Most often, the reason for this is the negligence of car owners who do not monitor the condition of the steering mechanism. In addition, the rack may also be damaged as a result of a traffic accident. But there is no need to despair here either. The VAZ-2110 steering rack is replaced according to the scheme described above. The only thing you need is to purchase a complete repair kit, which costs on average about 1,500 rubles.
Self-repair of VAZ 2110 steering rack
Today we will talk about how to independently repair the steering rack on a VAZ 2110 car.
When driving over various large and small irregularities, a motorist may hear a strange sound in the area of the car's front suspension.
This sound tends to constantly progress and becomes more intrusive over time.
Many drivers who do not have sufficient experience in diagnosing a malfunction on their own very often turn to a service station.
There they receive an extremely disappointing verdict that the steering rack requires repair or a complete replacement of this important unit is necessary.
It is worth noting the rather high cost of repair and restoration work on the rack by specialists at service stations.
Replacing this mechanism with a new one seems to be an even more expensive procedure, since a new VAZ 2110 steering rack costs a lot.
Diagnosing the malfunction
Like any other mechanism, the steering rack fails sooner or later.
A similar mechanism is present in any car, both equipped with electric and hydraulic booster and without it.
Muffled sounds and impacts can be felt when driving over uneven surfaces, and can also be transmitted to the steering wheel.
The malfunction manifests itself in a similar way when the car is stationary and the steering wheel is turned.
When turning the steering wheel, a significantly increased force may still be observed.
These main symptoms indicate that the steering rack needs to be repaired, no matter what brand of car they appeared on: VAZ 2110 or another model.
To determine the state of this node, we do the following.
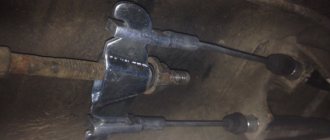
Grasp the steering shaft where it meets the rack.
Jiggle it up and down. If a knocking noise occurs, this is evidence that either repair of the steering rack housing will be necessary, or a possible cause of the knocking may be a lack of lubrication in the so-called needle bearing.
Replacing steering shaft bearings
One of the most common breakdowns that users of any car encounter is a knocking steering wheel. Regardless of whether you buy a new car or a used one, over time the steering wheel will in any case begin to knock, even with the most careful and careful operation of the vehicle. There may be several reasons for this. It is better to first check the car for a breakdown than to immediately go to a service station, where even for the diagnosis itself they will charge you a decent amount of money. You need to make sure that your wheels are set up correctly, and then check to see if any dirt or pebbles have gotten between the wheels. If the first inspection does not yield any results, then the problem is most likely in the bearings, which need to be replaced as quickly as possible.
Main signs indicating a malfunction
It goes without saying that any mechanism sooner or later becomes unusable and fails. Particularly often, the elements of the steering column of the VAZ 2110 wear out after driving on uneven roads and bad roads, which is very important in Russian conditions. When the cardan or other steering component is faulty, a characteristic knock is heard, indicating the need for replacement. Below are the main signs that characterize a malfunction of the driveshaft, and indeed the entire steering gear:
- When the steering shaft is grasped by hand in the area where it connects to the rack and moves up and down, a characteristic knocking sound can be heard.
Note. This knocking sound may not always indicate that the driveshaft has been replaced. It is likely that the needle bearing has failed, which in this case turns out to be without lubrication.
- when there is noticeable play in the bushing and the junction of the rack and pinion.
Steering rack device for VAZ 2110
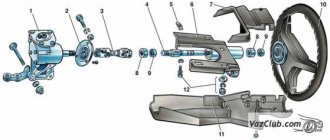
In order to repair the rack yourself, you will need to study the design of this unit.
1 - clamps; 2 — protective cover; 3 — internal plate; 4 — steering rod; 5 — outer plate; 6 — bolt for fastening the rod; 7 — locking plate; 8 — protective cap; 9 — crankcase pipe; 10 - sealing rings; 11 — support sleeve; 12 — bracket for fastening the rod support; 13 — rod support; 14 - rack; 15 — nut securing the crankcase pipe; 16 — retaining ring; 17 - sealing ring; 18 — crankcase cover; 19 — gear boot; 20 — washer; 21 — cover fastening bolt; 22 — separator with rollers; 23 — steering gear; 24 — lock washer; 25 — support plate; 26 — plate body; 27 — lower gear bearing; 28 - crankcase; 29 — left protective cap; 30 — rack stop insert; 31 — emphasis; 32 - sealing ring; 33 - spring; 34 - sealing ring; 35 — stop nut; 36 - plug.
How to replace steering shaft bearings on a VAZ 2110, 11, 12
The procedure for replacing steering shaft bearings on a VAZ 2110-2111-2112 car in pictures and videos on the topic.
Withdrawal procedure
1. Before starting work, disconnect the negative battery cable.
3. Now you need to loosen the bolt securing the base of the steering column switches. Push it towards you.4.Disconnect the wire from the oil pressure sensor.5. Disconnect the 2 horn wires. Remove the base of the steering column switches.
6. Insert the key into the ignition and turn it to position I to unlock the steering shaft.
7. Disconnect the block with wires from the ignition switch.
8. The steering column is secured with bolts with break-away heads. If you do not have the same bolts in stock, they can be replaced with M6 bolts 20 mm long.
9. Unscrew 2 nuts and 2 bolts, remove washers.10. Remove the steering column from the studs, slide it towards you and lower it down. Unscrew the bolt securing the steering shaft to the propeller shaft.11. Remove the bolt and remove the steering column by removing the thrust bushing from the shaft.12. Press the steering shaft out of the pipe along with the bearing. Press the shaft towards the steering wheel mounting.13. Remove the front bearing from the shaft.
14. If the steering shaft has worn or damaged splines or threads, replace it.
15. Using a hammer or drift, press the rear bearing out of the steering bracket pipe.
Replacing steering shaft bearings for VAZ 2110 Lada
- Repair manuals
- Repair manual for VAZ 2110 (Lada) 1996+.
- Replacing steering shaft bearings
5.3.2. Replacing steering shaft bearings
| EXECUTION ORDER |
↓ Comments ↓1. General information 1.0 General information 1.1. Vehicle Specifications 2. Engine 2.0 Engine 2.1 Possible engine malfunctions. 2.2 Replacing the coolant 2.3 Replacing the engine oil and oil filter 2.4. Installing the piston of the first cylinder to the TDC position of the compression stroke 2.5 Replacing the camshaft drive belt and tension roller 2.6 Adjusting the camshaft drive belt tension 2.7 Removing, troubleshooting and installing the flywheel 2.8. Replacing engine seal parts 2.9 Cylinder head 2.10 Grinding in valves 2.11 Adjusting clearances in valve drive 2.12 Removing and installing engine 2.13. Engine repair 2.14. Lubrication system 2.15. Cooling system 2.16. Exhaust gas system 2.18. Features of VAZ-2112 engine repair 3. Transmission 3.0 Transmission 3.1. Clutch 3.2. Gearbox 3.3. Front wheel drives 4. Chassis 4.0 Chassis 4.1. Checking the technical condition of suspension parts on the car 4.2. Rear suspension 5. Steering 5.0 Steering 5.1 Inspection and check of the steering on the vehicle 5.2. Steering column 5.4. Steering mechanism 5.5 Possible steering malfunctions. 6. Brake system 6.0 Brake system 6.1. Vacuum booster 6.2. Main brake cylinder 6.3. Pressure regulator 6.4. Brake hoses and tubes 6.5 Bleeding the brake system 6.6 Replacing brake fluid 6.7. Front wheel brakes 6.8. Braking mechanisms of the rear wheels 6.9. Parking brake 6.10 Possible malfunctions of the brake system. 7. Electrical equipment 7.0 Electrical equipment 7.1. Mounting block 7.2. Generator 7.3. Starter 7.4. Ignition switch (lock) 7.5. Checking and replacing spark plugs 7.6. Integrated engine management system (fuel injection system) 7.7. Contactless ignition system 7.8. Lighting, light and sound signaling 7.9. Windshield wiper 7.10 Replacing the electric motor of the radiator fan of the cooling system 7.11. Heater electric motor 7.12. Cigarette lighter 7.13. Instrument cluster 7.14 Checking the carburetor solenoid valve control unit 7.15 Possible malfunctions of the EPHH control unit. 7.16 Electrical diagram of a VAZ-21102 car 7.17 Electrical diagram of a car with a carburetor engine 2110 7.18 Engine control diagram 2111 (pin M1.5.4) 7.19 Engine control diagram 2111 (pin MP7.0) 7.20 Control diagram for engines 2111 and 2112 (pin M1) .5.4N, "January-5.1") 8. Body 8.0 Body 8.1 Possible body malfunctions. 8.2. Replacing the buffers 8.3 Removing and installing the radiator trim 8.4 Removing and installing the locker 8.5 Removing and installing the wing 8.6. Hood 8.7 Removing and installing upholstery, trim and windshield frame lining 8.8. Trunk lid 8.9. Side doors 8.10 Removing and installing the front seat 8.11 Removing and installing the upper and lower lining of the floor tunnel 8.12. Seat belts 8.13. Rear view mirrors 8.14. Instrument panel 8.15. Heater 8.16 Anti-corrosion compounds for body treatment 8.17. Features of body repair of models 2111 and 2112 8.18. Body care 9. Applications 9.0 Appendices 9.1 Fuels, lubricants and operating fluids 9.2 Basic data for adjustments and control 9.3 Filling volumes 9.4 Lamps used in the car |
Replacement of steering shaft bearings for VAZ-2110, VAZ-21102
Changing the bearing shaft of the steering is a fairly simple procedure; thanks to the photo report below, we will consider the principle of this process using the example of a VAZ 2110, VAZ 21102.
To do this, you should have the following tools:
Discuss
Select it and press Ctrl + Enter
Many motorists in sub-zero temperatures are afraid to use the parking brake to brake, knowing that the brake pads can freeze and this will lead to problems in the operation of the vehicle, and therefore financial losses. Drivers simply leave the car in first gear or in “P” mode if the transmission is automatic. But is it really dangerous to use a handbrake in winter?
Problems with the handbrake in winter. Using a handbrake in winter can actually lead to several problems, including:
- Freezing of the pads, which means it will take a lot of time to tear them off the brake drum
- The handbrake cable is stretched, then it will definitely need to be tightened
Fearing such malfunctions, motorists prefer to simply leave the car in first gear.
Exaggerated danger. In fact, as experience shows, such malfunctions when using the parking brake are quite rare. But ignoring the handbrake in winter can actually lead to much more serious consequences. For example, it must be used if the car is parked on a slope, otherwise at first speed it may simply drive without the owner in the cabin. With this method, cars on the road are held in place by gears on shafts in a box and a colossal load is placed on them.
To avoid problems, just monitor the weather forecast. For example, if there is a thaw outside, but weather forecasters report that frost is approaching, of course, you should not leave the car with the handbrake on. In dry, frosty weather, the brake pads will not be damaged in any way.
Bottom line. Many drivers are afraid of using the parking brake in winter, as this is allegedly fraught with serious damage, for example, freezing of the pads. In fact, there is practically no danger if you monitor the weather and know what to expect.
If the street is frosty but dry, the brake pads will definitely not be damaged, which cannot be said about the situation with a sharp cold snap after a thaw.
Official representatives of the State Traffic Inspectorate explained how the procedure for changing a foreign driver's license to a Russian one will take place.
The State Traffic Inspectorate reported on some of the nuances of foreign motorists obtaining a Russian driver's license. Now foreign licenses of categories C and D, which allow movement on trucks and buses, can be exchanged for Russian licenses. But to obtain them you will have to undergo preliminary training and pass an exam.
“Unfortunately, we cannot be confident in the professionalism of foreign drivers, especially those driving large vehicles. We do not prohibit them from working in our country, but we ask them to undergo retraining, after which they will receive the appropriate documents,” says Nikolai Gilyakov, head of the examination preparation department of the State Traffic Safety Inspectorate.
It was also noted that at the legislative level it is necessary to return to the procedure that existed 5 years ago, under which foreign citizens permanently residing in the Russian Federation could drive their car exclusively within 6 months after receiving a residence permit.
An unexpected hypothesis about the connection between transporting children to school by car and their academic performance was put forward by the head of the expert group, Natalya Agre. In her opinion, constant shaking in the car worsens the child’s brain functions.
The expert urged parents, if possible, to refrain from taking primary school children to school by private transport. She stated this at one of the events where the safety of children on the roads was discussed. Allegedly, due to everyday trips associated with constant acceleration and braking, the child’s head suffers due to the “chatter” in the cabin. When the brain is under severe stress, it is more difficult for a student to concentrate. For example, memory deteriorates, it is more difficult for children to learn poetry and absorb material - and all because in the morning they are taken to lessons by car, the social activist said.
At the same time, she warns that even rigidly fixing the child in a child car seat does not protect against this, since the head still remains quite mobile and is subject to shaking. Therefore, if parents still cannot avoid using transport to transport their children to school and back, this should be done as carefully as possible, without haste or sudden maneuvers, and even more so, avoid gross violations of traffic rules, in particular, do not exceed the permissible speed, The manager turned to the parents.
The entrepreneur also warned motorists who have children that choosing a car seat for a child must be approached with the utmost responsibility, checking certificates and crash test results, as well as compliance with the child’s weight. It is difficult to say how valid Natalia Agre’s statements are from a medical point of view. But it will certainly be more beneficial for children to walk to school. If we are talking about students in first to fourth grades, then, of course, this path needs to be done with parents.
Let us add that earlier Natalya Agre noted with satisfaction the reduction in the number of road accidents in Russia involving child pedestrians. In her opinion, this is the result of preventive and educational work, as a result of which schoolchildren began to behave more carefully on the roadway.