1. SYMPTOMS:
1. The car jerks when you sharply press the gas and drives when you press it smoothly 2. It doesn’t pull if there is less than 10 liters of gasoline (less than a glass of the fuel pump module is in the tank) 3... 4...
Procedure:
1.Removing the rear sofa, unscrewing 2 screws and removing the cover and we see this picture (yours will be different; I removed and painted the tank + put some pillows on top so that dust would not get in). Then we start the car and remove the chip from the fuel pump, the car is a little it will run and die, so we reduced the pressure in the system and when we remove the hoses, the stream of gasoline will not flood the floor of the car, but will only drip a little
2. Unscrew the 8 nuts with a 10mm wrench (I used a ratchet with an extension), remove the fastening plate, behind it is the plastic gasket, do not forget how it was installed so as not to make a mistake with the groove in the fuel pump later
3. Raise the fuel pump module up and slightly to the side so as not to damage the float from the FLS
4. Now remove the retaining ring from the guide and the chips from the sensors
If the pressure drops in the fuel system of VAZ 2110-2112 cars with injection engines, the first thing you need to check is two things:
- Fuel filter
- Fuel pump mesh
As for the first option, if necessary, we replace the VAZ 2110 fuel filter. As for the pump mesh, this is worth talking about separately.
First of all, it’s worth saying that to perform this work you will need the following tool:
- The head is 7 mm deep
- Ratchet with extension
- 17 open-end wrench
- Screwdriver flat and Phillips
The first step is to relieve the pressure in the fuel system and remove the fuel pump from the tank.
After this, all that remains is to complete the following steps:
- Remove the lower part of the pump - container
- Use a screwdriver to pry off the mesh body and remove it
- If necessary, install a new one
When to replace
Such minor repairs are carried out as the grid becomes dirty, which happens quite quickly, given the quality of domestic fuel. The correct approach is to change all consumables at the same time, guided by the frequency of pouring new oil into the engine.
During this procedure, you can replace the air and oil filters, as well as the fuel pump mesh. If you make it a habit to change this mesh only after it is completely clogged, the pump will constantly work with increased load, as a result of which repair or even replacement of the VAZ 2110 fuel pump will quickly be required.
The first sign of a faulty fuel pump is the engine refuses to start. After turning on the ignition, you can hear a slight buzzing sound of the operating gasoline supply device, which stops after it creates the necessary fuel pressure in the system.
If after this the car engine does not start or even the sound of the VAZ 2110 pump cannot be heard, then you need to check the presence of gasoline pressure in the line. This is done using the bleed valve on the ramp. The verification procedure will be discussed below. If there is no fuel, it becomes clear that the fuel pump is not working or its screen is clogged.
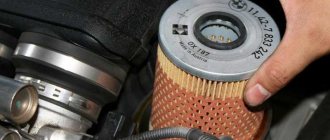
Replacing the fuel pump filter
VAZ 2110 fuel pump filter
Now we finally come to the most important part, replacing the fuel pump filter. Replacing the fuel pump is usually done with your own hands and takes no more than thirty minutes.
So:
- First you need to disconnect the wires from the battery (usually the wire with minus voltage is disconnected);
- Then we move into the car interior and remove the passenger seats, since the fuel pump is located directly under them (electric);
- When we finally see the fuel pump, we need to carefully remove two screws from it and lift the cover;
- We see the power supply; it must be turned off;
- Then we take out the entire fuel pump and unhook the filter from it;
- We install a new filter, carefully attaching it;
- We put the fuel pump back in its place.
That's all, a new filter for the fuel pump has been installed and we did it ourselves. A fuel pump filter usually does not cost too much and its maximum price is 200 or 500 rubles. If these instructions are not clear enough, you can watch a video or photo and figure it out.
Description of the work
The location of the VAZ 2110 injector fuel pump is in the gas tank located under the bottom of the car, in the area of the rear seat. It is accessible from the cabin, so no inspection holes or other additional devices are required. Only tools needed:
- open-end wrench 13 and 17 mm;
- Phillips screwdriver;
- 7 mm tubular socket wrench.
Instead of a long 7 mm tubular wrench, you can use a small open-end wrench, but this will be inconvenient and take more time. Before starting repairs, you should completely remove and pull out the rear seat to gain access to the gas tank. Two more preliminary operations that are done in the engine compartment.
- Loosen the nut securing it to the negative terminal of the battery, remove the clamp along with the wire.
- Relieve pressure from the fuel line. At the end of the ramp, near the outer nozzles, there is a bleed valve with a rubber cap on it. Having removed it and substituted a plastic cup, you need to press the valve stem. Fuel will leak out from there and the pressure in the system will drop.
Under the bottom of the rear seat there is a square hatch that provides access to the gas tank; it will need to be removed. The subsequent disassembly diagram looks like this.
- Using a Phillips screwdriver, unscrew the 2 screws securing the hatch cover, remove it and put it aside.
- Disconnect the fuel pump electric drive connector and move it out of the way.
- Using an open-end wrench, loosen and unscrew the 2 nuts that secure the fuel line pipes to the fuel pump fittings.
- Pull the tubes out of their sockets. The round rubber rings attached to their ends must be removed and replaced with new ones, since they are designed for one-time use.
- Using a long tubular wrench, unscrew the 8 nuts that hold the flat flange that presses the VAZ 2110 fuel pump to the bottom surface. Remove the flange from the studs.
- There is a rubber gasket on the mounting studs under the clamping part of the body. The latter must be removed from the studs, otherwise it will not make it possible to pull out the fuel supply device. Then carefully remove the fuel pump from the tank cavity along with the float. If the rubber gasket is worn out, then it is better to replace it too.
Cleaning or replacement?
The filter, which is located in the fuel pump, must be replaced if there is contamination on it, since its price is not high. However, if you find yourself in a situation where it is simply not possible to buy a new element, then you can wash it.
Remember that the effect of cleaning the fuel pump mesh will only be temporary, and replacement should be carried out as soon as possible.
Author: Sochi Auto Repair
Replacing the fuel pump filter on a VAZ-2110 - On VAZ-2110 cars with an injection system, in addition to the fine fuel filter, there is also a filter mesh located in the gas tank on the fuel pump. The mesh is designed for rough cleaning of fuel. You've already bought the mesh, that's not a problem, now let's change it!
Replacing the fuel pump filter on a VAZ-2110
Replacing the fuel pump filter on a VAZ-2110
Replacing the filter mesh on the fuel pump takes about 30 minutes. Let's start with the battery! To do this, you need to remove the negative terminal from the battery. Next you need to remove the rear passenger seat. And now we remove the fuel pump cover by unscrewing just two screws, then carefully disconnect the pump power supply.
Using a 17 wrench, unscrew the fuel hose fittings.
Then use a 7mm socket wrench to unscrew the fuel pump mounting nuts and carefully remove the pump so as not to damage the fuel level sensor float, while the pump cup may remain in the gas tank; it must be removed from the tank.
We remove the mesh from the pump and install a new one, put the pump in the glass and install it in place. We collect everything else in the same sequence.
Many people manage to clean the mesh with toothbrushes, but if it is not changed for a long time, the mesh becomes deformed and breaks due to the corrosive effects of gasoline. It is advisable to change the mesh, especially since the cost of a new mesh is about 60 rubles, which is not expensive.
When replacing the mesh at a service station, car service center or specialized workshop, additional work must be carried out on the pump itself, for example, fine adjustment of the fuel level float. Adjustments are made on a stand, which you don’t have in your garage!
Signs of a clogged filter
By indirect signs you can determine whether it is dirty, but it is not always possible to reliably find out about its condition without visually assessing the mesh.
Signs of a dirty filter:
- The car accelerates poorly;
- There is no necessary dynamics;
- Unstable idle;
- The engine starts poorly and stalls;
- Increased engine vibrations;
Based on the signs already stated above, you should begin inspecting the fuel system and be sure to start with coarse and fine filters. You can read how to replace the fine filter here.
Also, if the mesh is very dirty, the fuel pump itself may fail. Therefore, it is not recommended to neglect its replacement.
Replacing the pump and its filter
Required Tools
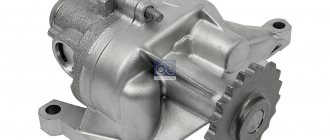
Buying a new unit is only worth checking its pressure and condition of the parts. Replace with a Bosch fuel pump. If a standard unit is selected, then its product number is 2112-1139009. To work you will need the following tools:
- Screwdriver Set.
- Rags.
- Set of wrenches.
- Set of socket heads.
Replacement process
Replacing the filter or the entire unit will take no more than an hour. The work proceeds according to the following scheme:
- First you need to disconnect the negative terminal from the battery;
- Next, you need to dismantle the plastic cover, which is located under the rear row seats;
Replacing the fuel pump mesh on a VAZ 2110, VAZ 2111, VAZ 2112
The fuel pump mesh is a coarse fuel filter located directly in the fuel pump. Before gasoline is pumped into the engine, gasoline passes through this filter and is cleaned, then the gasoline goes through the fuel pipes and enters the so-called fine filter, which cleans gasoline from small particles of dirt and retains water. Water can kill a car engine, and it gets into it due to low-quality fuel. Thanks to the fuel pressure regulator, the excess goes back into the tank. Thus, gasoline circulates through the fuel system. Unfortunately, over time, any filter becomes unusable and becomes clogged, the car begins to twitch, it develops dips and unstable idle. However, it is much worse that if the coarse filter is heavily contaminated, the fuel pump begins to wear out and fails quite quickly. Therefore, periodically the fuel pump must be removed and the filter replaced, especially since it costs a penny. Some craftsmen manage to clean it and reuse it, but we do not recommend doing this, because dirt and small particles will remain.
Pump operation and malfunctions
From the name you can understand that the fuel pump supplies fuel from the tank to the engine injectors. Accordingly, if the unit is faulty, then there will be no gasoline injection, and the power unit will not start working. There are options for injector and carburetor. The VAZ 2110 is equipped with an injector; therefore, the fuel pump must be suitable for this system. If the “ten” was modernized by installing a carburetor, then the unit will have to be taken out of stock. The unit is located in the fuel tank - under the left rear door, the electrics go under the rear row seats.
Replacing the mesh on a VAZ 2110-VAZ 2112
Removal:
1) We talked about cars with a 1.5 liter engine above.
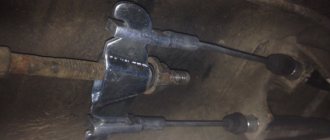
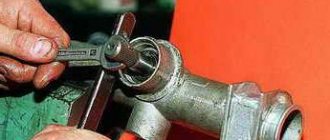
2) Now let's talk about 16-valve cars. Remove the pump, take a screwdriver and remove the retaining ring from the guide (often called the pin). There is only one ring, although there are two guides. It is removed as follows: pry it with a screwdriver and move it to the end of the guide in the direction of the blue arrow in the photo until it is completely removed. Now the main thing is not to turn the fuel pump over, otherwise the housing will fly out spontaneously and the hoses may break.
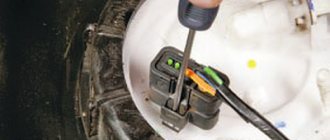
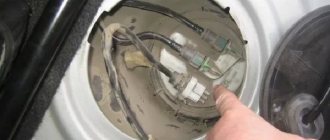
3) The photo below shows two blocks with wires; they need to be disconnected. If you pull with force and they do not give in, then you are doing something wrong and there is a possibility of breaking the clamps. Press the retaining clips and carefully remove them.
4) Grab the top of the fuel pump with your hand and separate the two housings along the guides. Put one housing aside, continue to hold the gas pump in your hands and use a screwdriver to disconnect the mesh. Remove it and replace with a new one.
Installation:
Proceed in the reverse order of removal. Make sure that the part is securely fixed; it should not fall off. We recommend that you take your time and do not install the fuel pump flap with the rear seat cushion, but rather ask an assistant to turn the key in the ignition for about 5 seconds, and you watch to see if gasoline flows from under the fuel pipes. The tightness of the system is mandatory; in case of malfunctions and leaks, replace worn parts with new ones.
Additional video: Attached below is a video using the example of a VAZ 2114 on the topic of today’s article, we recommend you watch it.
Note!
The video below shows the procedure for disconnecting the wire block; if you have difficulties with this, it is useful to watch:
We change the mesh on the fuel pump 16 valve VAZ-2112 with our own hands
The flawless operation of any car is ensured by its engine, and its operation, in turn, is simply impossible without clean and high-quality gasoline entering its channels. The main unit for supplying fuel to the engine is, without a doubt, the gas pump, which delivers it from the car’s gas tank through the fuel channels to the combustion chambers. Therefore, it is very important that all gasoline passing through is clean and of high quality.
The video describes in detail and shows how to remove, diagnose and, if necessary, replace the fuel pump mesh on a VAZ-2112.
Step-by-step process for replacing the fuel pump mesh on a VAZ-2112
In order to dismantle the mesh on the fuel pump, it is necessary to remove the fuel pump from the tank, and to do this we do the following:
- We place the car on a flat surface, ensure it is in a stable position and put on the handbrake.
- Disconnect the negative terminal from the battery.
- Removing the back seat. It can be completely dismantled by unscrewing just two bolts, or simply moved to the side.
- Unscrew the bolts that secure the fuel pump hatch.
First, turn off the fuel pump!
Please note - the power is turned off here!
Please note that when dismantling the fuel pipes, there may be a release of pressure in the system, so cover the pipes with an old rag in advance.
- When the lines are removed, remove the rubber gaskets and seals from each of them, and then replace them with new ones.
The rubber seal is indicated by the arrow.
The nuts are marked with a red marker.
If the gasket is damaged, replace it.
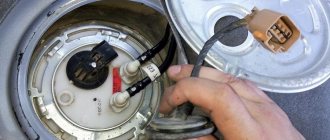
We remove the fuel pump on a rag.
Dirty fuel pump screen.
The difference between the old grid and the new one.
If any parts and elements in this system show signs of damage or wear, they must be replaced.
Cleaning the fuel pump mesh
If it happens that you do not have the opportunity to purchase a new mesh, and the old one has become unusable, you can simply clean it and below we will tell you how to do this.
There are several ways to carry out this procedure and here are some of them:
- The mesh is cleaned by soaking it in a solution of detergents or bath cleaners. To do this, mix them with water at a ratio of 1 to 10 and then leave it there for one hour. When the soaking time is over, simply rinse the mesh under running water.
- Using the same solution, rinse an old toothbrush in it and clean the mesh with rotational movements.
- If you have a compressor, then it can also be useful during such work.
Please note that after performing such mechanical work on the mesh, inspect it for damage, since the presence of defects makes it impossible to use it in a gas pump.
Fuel coarse mesh in the fuel pump - why is it needed?
The initial cleaning of the fuel is ensured by a mesh mounted on the fuel pump body, and when the car begins to move jerkily and the fuel supply is difficult, first of all you should check the condition of this mesh, because it can be contaminated to such an extent that its initially snow-white color is very difficult to recognize.
Note! The main reason for grid contamination is poor fuel quality!
When to change the screen in the fuel pump?
In order to understand when it is necessary to replace a particular component in the fuel system, and specifically the grid, you need to know about the presence of pressure in the fuel rail. You can learn how to take measurements correctly from this article.
You can also find out about its insignificant condition by the following signs:
- When the ignition is turned on, a very prolonged and loud hum , since gasoline is hardly sucked into the system through a clogged mesh. This can significantly reduce the working life of the fuel pump itself and the contamination of the entire fuel system as a whole.
- While driving, when switching to third or fourth gear and then pressing the gas pedal, there is no increase in power .
- Also, a clogged mesh can cause a loss of speed while the car is moving , since the required amount of fuel simply does not enter the combustion chambers.
Cleaning or replacement?
The filter, which is located in the fuel pump, must be replaced if there is contamination on it, since its price is not high. However, if you find yourself in a situation where it is simply not possible to buy a new element, then you can wash it.
Remember that the effect of cleaning the fuel pump mesh will only be temporary, and replacement should be carried out as soon as possible.
How to measure the pressure in the fuel system?
The easiest way to measure pressure is with a special device - a pressure gauge. The kit also includes an adapter and drain. Pressure can be determined using an air pressure gauge. This device is present in almost every motorist, as it is used to measure tire pressure. A normally functioning pump in a VAZ 2110 should have a reading of 2.8-3.2 atm. You need to connect the pressure gauge and check what the indicator is with the engine not running, but with the fuel pump on. It must be no lower than 2.8 atm.