Replacing the engine oil pump with your own hands Instructions + Video
The oil pump is the main part of the engine system, affecting the circulation of lubricant throughout all mechanisms. It is he who creates the necessary pressure, working from the crankshaft. Over time, the device wears out, forcing the owner to replace it. Find out how to do it yourself.
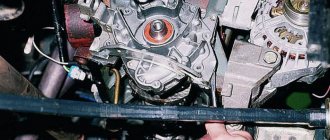
Replacing the oil pump on a VAZ 2107
To ensure normal operation of an internal combustion engine, its moving parts must be lubricated. Motor oil is used for this. To ensure the circulation of liquid lubricant in the system, an oil pump is used, the failure of which leads to a rapid reduction in engine life. How to replace the VAZ 2107 oil pump is carried out, we will consider in detail in the material.
Fault diagnosis
Checking the oil pump involves a few smart steps:
- connect a pressure gauge to the lubrication system;
- observe the scale while rotating the crankshaft;
- take pressure readings.
If they are normal, and there are no complaints about increased fuel consumption, the pump is in order. On the contrary, if the pressure fluctuates, decreases or increases, the engine oil pump must be repaired or replaced.
Below are details about diagnostics using a pressure gauge:
- Raise the hood of the car.
- Assemble the pressure gauge according to the instructions - connect the scale to the hoses.
- Find the system's emergency oil pressure sensor in the engine compartment and unscrew it.
- Screw the pressure gauge into place of the sensor.
- Start the car engine.
- Watch the pressure gauge scale carefully.
the scale shows a normal value of 2.4 kgf/cm2 - Raise the engine speed by depressing the accelerator pedal. Keep an eye on the scale - the pressure level should jump to 4.5 kgf/cm2. This is the value when the valve is triggered.
- Wait for the engine to warm up thoroughly (up to 90 degrees Celsius). Some modern engines have a higher warm-up threshold - over 100°C.
- Recheck the pressure. If the oil pump malfunctions, it will drop. Emergency pressure is below 0.35-0.45 kgf/cm2. In this case, the corresponding indicator on the device lights up.
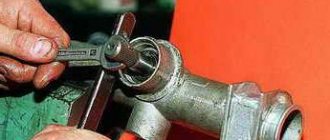
Further instructions apply to machines equipped with a distributor. The oil pump drive gear, which is located under the distributor, is checked.
This very gear must be carefully inspected for chips and burrs. If they are present, they may have appeared due to debris that has entered the system. If the splines are damaged, this will indicate regular jamming of the oil pump.
damaged splines on the gear shaft
Next, you need to check the operation of the drive by acting on it from above with a long screwdriver. Move the rod, observing the play. A large gap can be determined by eye; the rod will dangle freely - this will be irrefutable evidence that replacing the oil pump is necessary.
The optimal play is considered to be the one that forms between the rod and the body, no more than 0.1 mm
Signs and causes of oil pump failure
If the VAZ 2114 oil pump starts to malfunction, this immediately affects the oil pressure in the system (it drops sharply), as a result of which the warning light comes on. True, it’s not worth replacing the pump with a new one right away. You should first check whether the sensor itself is working? This is very simple to do - you need to take the wire coming from this device and press it to ground (motor housing).
If the sensor is working properly, the emergency light will go out immediately after pressing. In this case, the pump will still have to be repaired. If the lamp continues to glow, then the sensor itself is not working and will need to be replaced.
There can be several reasons for an oil pump failure. Most often, its gears fail (especially often when the oil is changed infrequently, which, as already mentioned, causes abrasive wear). In addition, there may be problems with the filter valve (it may get stuck), as well as with the sealing elements. In the latter case, oil leaks from the system.
Replacing the oil pump on VAZ 2114 and VAZ 2115
Before starting work, you should prepare everything you need. To replace the oil pump you will need:
- open-end wrenches - set;
- puller for VAZ oil filters;
- socket heads - set;
- container for draining old oil;
- 6 liters of new engine oil;
- 2 medium sized flathead screwdrivers.
Oil pump replacement sequence
- The machine is installed on a trestle or inspection hole and securely secured with wheel chocks. The negative wire is removed from the battery.
- The drain plug is unscrewed and the old oil is drained into a substitute container.
- The alternator belts and camshaft drive belts are manually removed from the engine.
- The crankshaft toothed pulley is pryed off with two screwdrivers and removed.
- There is a key under the pulley. It is removed from the groove manually (this must be done even if the key fits tightly in the groove, because it is easy to lose).
- The engine crankcase is removed using a socket head at “14”. Access to the oil receiver is provided.
- The oil receiver is held on by two “12” bolts. They are unscrewed using a socket head with a long knob.
- After removing the mounting bolts, the oil receiver is carefully removed from the pump.
- The pump itself is held on by six bolts at “13”. They can be turned out with either an open-end wrench or a socket wrench. When performing this procedure, remember that there are thin washers under the bolts. You can't lose them.
- When all the mounting bolts are unscrewed, the pump is pryed off with a flat-head screwdriver. This is necessary to separate it from the gasket underneath it.
- After separating the gasket, the pump is manually removed from the crankshaft, replaced with a new one, after which the lubrication system is assembled in the reverse order.
Dismantling
Depending on the situation, the oil pump can be completely replaced, or repair work can be performed - change gears, return the pump pressure reducing valve to functionality.
Pressure reducing valve
But let's talk about everything in order. In any case, work begins with dismantling the oil pump.
- Before you remove the pan to gain access to the pump, you will definitely need to drain the oil.
- To do this, warm up the engine to operating temperature, open the drain hole and wait until all the liquid drains out.
- Draining can also be done when it is cold, but due to its high viscosity, the oil can flow for a very long time and most of it will still remain inside the crankcase.
- After draining the oil, remove the three mounting bolts from the crankcase protection using an 8 mm wrench. The protection blocks access to the flywheel near the crankcase.
- Remove the flywheel guard and then remove the bolts from the crankcase. That's it, now the crankcase can be removed.
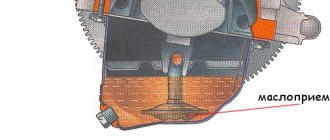
- In front of you is the crankshaft and the oil sump where the desired pump is located.
- By unscrewing the three mounting bolts, you can remove the intake from the pump.
- Let's move on to the engine compartment. Lift the hood and remove the plastic cover. This is a guard that covers the timing belt.
- Next, you need to remove the front right wheel to remove the pulley fixing washer, and then remove the pulley itself.
- Remove the timing belt and remove the six mounting bolts that hold the oil pump in place. Here you will need an 8 mm wrench.
- Remove the oil pump from the crankshaft.
Removing the cover
Disassembly
If you do not want or cannot yet purchase a new pump, you can try to repair it. Perhaps the problem is a malfunctioning valve or worn gears.
- Remove the gasket from the pump;
- Remove the bolt holding the crankshaft position sensor;
- By unscrewing the six mounting bolts, you can remove the cover from the pump;
- Using a pair of screwdrivers, lift the housing so that the pins on it come out of their holes freely;
- Remove the body, disconnect it from the cover;
- Now you need to remove two gears from the cover. The drive gear is removed first, and then the driven gear is removed;
- Next in line is the pressure reducing valve. You need to unscrew the plug under which the o-ring is located;
- Check the condition of this seal. If the ring shows signs of damage or is too squeezed out, be sure to replace it with a new one;
- Remove the valve spring;
- Now you can remove the valve itself. To do this, gently tap the case on a stand made of pure wood;
- The valve may be stuck. Do not worry. Take any thin, sharp object, pry it up and remove the element. It is better not to use metal objects so as not to damage the surface;
- Check the current condition of the aluminum cover. If there are deep scratches or signs of wear, replace it;
- If the pump body shows signs of wear, do not even try to repair anything. The only correct solution would be to completely replace it;
- You also need to make sure that the gears and the diameter of their sockets comply with the standards;
- The maximum diameter of the driven gear socket is 75.1 millimeters. If it is larger, the case must be replaced;
- Measure the width of the body in the middle. If the indicator is less than 3.4 mm, it is worn out and needs to be replaced;
- As for the thickness of the gears, according to the requirements, the thickness of the drive is at least 7.42 mm, and the driven one - 7.35 mm. In case of deviations from the norm, the gears are changed.
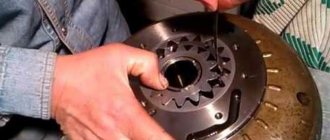
Removing the gear
Assembly and installation
If you managed to repair the oil pump, then all that remains is to assemble it and install the unit in place. If you decide to completely replace the device, skip the first part of the further instructions.
- Install the driven gear onto the housing with the chamfers on the teeth.
- Also, the new pump drive gear is returned into place using chamfers on the teeth.
- Be sure to remember to lubricate the gears with oil so that they work more reliably and longer.
- Replace the pump cover and screw back all the fasteners.
- Lubricate a new or repaired old relief valve before installing it in its proper place.
- The valve fits into its seat. Make sure installation is done bottom down.
- Now it’s the turn of the spring and the plug, which is wrapped with an o-ring. Again, these elements are pre-lubricated with engine oil.
- Using the oil pickup tube, oil is poured back into the unit.
- Once assembly is complete, rotate the pump gears several full turns. This will ensure effective lubrication of all surfaces inside the pump.
Repair
In some cases, the oil pump can be repaired. For example, if the oil receiver is clogged. It is necessary to drain the waste (oil), then remove the device and disassemble it. Then, using kerosene or another alternative, thoroughly clean the parts. Be sure to check the pan and, if necessary, clean it as well.
Below are instructions on how to properly disassemble the oil pump:
- dismantle the device;
- rinse it completely in kerosene or gasoline;
- secure in a vice;
- unscrew the fasteners of the lower part - this applies to 2-section pumps;
- remove the bolts, remove the housing together with the sealing collar;
- remove the gear and axle using a special puller and a wooden hammer (the latter only needs to be lightly tapped, making the dismantling process easier);
- pull out the oil pump pressure reducing valve;
- press the coupling and the assembly shaft together with the remaining two gears, as well as the intermediate cover;
- now disassemble the upper part of the pump - free it from the gasket, gear and axle;
- press out the remaining gears and keys.
Backlash caused by wear of parts is also eliminated by some craftsmen. However, this is extremely time-consuming and complex work. It is necessary to disassemble the oil pump and replace the gears, fitting them correctly. It will be much easier to install a new part, especially since the price of an oil pump is about 1-1.5 thousand rubles.
Replacing the oil pump
As was said, on the VAZ 2109 the oil pump, which is replaced in the cases given above, must first be removed. Let us give again the main reasons why the oil pump needs to be dismantled:
- at idle speed when the engine is warm, there is not enough oil pressure (often this is due to foreign particles getting under the pressure relief valve or the problem is associated with wear of the oil pump gears);
- When the engine is sufficiently warmed up, excessive oil pressure is observed (the pressure relief valve in the pump gets stuck).
We arm ourselves with the necessary tools:
- keys 10 and 13;
- socket heads;
- extension cord;
- cardan joints.
Dismantling
We begin work on removing the oil pump:
- we lift the car onto the inspection hole;
- remove the mudguard;
Removing the vehicle's mudguard
- drain the oil from the engine crankcase.
Note. Now you need to start dismantling the oil sump. Often the crankcase gasket causes pump failure.
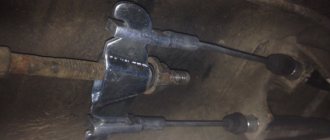
- unscrew the two metal bolts securing the pump;
Two bolts securing the VAZ oil pump
- remove the oil pump.
Note. You should know that the oil pump is installed at the front of the engine and consists of a pump housing, mounting bolts and an inlet pipe. The fastening bolts come in different lengths, and during installation they will need to be mounted in their original places.
Repair of oil pump drive VAZ
VAZ oil pump drive
It is the VAZ oil pump drive gears that often fail. Replacing the VAZ oil pump gear is a very delicate operation that requires certain knowledge.
Replacing the oil vase drive gear
It is worth recalling that on a VAZ 2114 the oil pump is replaced with the following symptoms:
- reducing pump pressure;
- pressure drop in the lubrication system;
- grinding noise when the drive is running, etc.
Advice. If the latter reason is detected and a grinding noise is observed, it means that the oil pump drive gear is most likely damaged.
We arm ourselves with the following tools:
- a set of wrenches;
- wooden stick with a pointed end.
- disconnect the negative terminal of the cable from the battery;
- remove the ignition distributor;
- we find the spitz hole of the oil pump drive gear and insert a pointed wooden stick there (it should fit into the hole with a tightness that will be noticeable);
- remove the gear from the hole in the engine cylinder block;
Removing the gear using a pointed stick
- installation of parts is carried out in the reverse order;
- After this, the ignition timing is adjusted.
Removing and installing the oil pump
Removal and installation of the oil pump VAZ 2170
The oil pump is removed for repair when its supply decreases, causing a constant drop in oil pressure in the engine lubrication system, and when oil leaks through the sealing gasket.
You will need: all the tools necessary to remove the timing belt and engine oil sump, as well as a 10mm wrench.
1. Disconnect the wire from the negative terminal of the battery.
2. Drain the oil from the engine oil sump (see “Changing the engine oil and oil filter”).
3. Remove the timing belt (see “Replacing the timing belt and tension pulley”).
Warning
After removing the timing belt, do not rotate the camshaft and crankshaft, as the pistons may damage the valves.
4. Disconnect the wiring harness connector from the crankshaft position sensor.
5. Using two screwdrivers, remove the pulley from the crankshaft.
6. Remove the key from the crankshaft groove.
7. Remove the engine oil sump (see “Replacing the oil sump gasket”).
8. Using a “8” wrench, unscrew the three bolts securing the oil receiver...
9. ...and remove the oil pan.
10. Remove dirt and rinse the oil receiver mesh with white spirit. If the screen cannot be cleaned or is damaged, replace the oil receiver.
11. Replace the torn or lost elasticity sealing ring of the oil receiver.
12. Remove the six bolts securing the oil pump to the cylinder block, move the oil pump with a screwdriver, inserting it between the pump and the main bearing cap...
13. ...and remove the pump with the gasket.
Helpful advice
Whenever you remove the oil pump, replace the gasket with a new one. Install only a factory-made original gasket; a gasket of a different thickness will interfere with the normal operation of the pump.
14. Clean the mating surfaces of the cylinder block and pump housing from the remnants of the old gasket.
15. Before installation, fill the oil pump cavity with grease to ensure oil suction from the oil sump when the engine is first started.
16. Rotate the oil pump drive gear to ensure proper installation on the crankshaft; the lugs on the drive gear should line up.
17. . with flats on the crankshaft.
18. Lubricate the seal lip with engine oil. When installing the pump, carefully tuck the working edge of the oil seal onto the crankshaft journal using a wooden stick. After this, tighten the pump mounting bolts.
19. Install all removed parts in reverse order.
20. Adjust the tension of the timing belt (see “Replacing the timing belt and tension roller”).
21. Adjust the tension of the generator drive belt (see “Replacing the generator drive belt”).
22. Fill the engine with oil (see “Changing the engine oil and oil filter”).
Helpful advice
When installing a new or refurbished oil pump, we recommend replacing the oil filter.
Video about “Removing and installing the oil pump” for VAZ 2170
Oil pump VAZ, INSTALLATION, Oil pump VAZ, INSTALLATION. VAZ 16V installation of the timing belt, replacement of the oil pump, about the crankshaft sensor VAZ 2110 REPLACEMENT OF THE OIL PUMP Repair Do it yourself!
How to replace the oil pump, also known as the oil pump, on a VAZ 2108-VAZ 21099?
Note! The tools you will need are a set of basic wrenches, sockets, u-joints, and an extension.
Removal
1) On fuel-injected cars, first of all, it is necessary to remove the crankshaft position sensor from the engine. (Details and subtleties of the process are described in the article: “Replacing the crankshaft position sensor”)
2) Then drain the engine oil in the car engine. (Here the instruction will come to your aid: “Changing the engine oil”)
3) Afterwards, remove the crankshaft timing pulley. (Read in the note: “Replacing the front crankshaft oil seal”, in paragraphs “1-4”)
4) Next, remove the oil pan, then unscrew several bolts securing the oil receiver and remove it. (For detailed steps, see the publication: “Replacing the oil receiver on a VAZ”).
5) Using a socket extension, remove the six bolts that secure the oil pump to the vehicle's cylinder block.
VAZ 2106 engine lubrication system
The lubrication system of any engine is a complex of various elements and parts that allow high-quality maintenance of the power unit. As you know, the key to successful engine operation is proper lubrication so that the moving parts do not wear out for as long as possible.
On VAZ 2106 cars, the lubrication system is considered combined, since the rubbing parts of the engine are lubricated in two ways:
- through splashing;
- under pressure.
The total capacity of the entire system is 3.75 liters. The lubrication system on the “six” consists of the following components, each of which consumes or conducts its own part of the oil:
- fluid sump;
- level indicator;
- pumping unit;
- engine oil supply pipe;
- oil filter element;
- valve;
- oil pressure sensors;
- highways.
The oil pump plays a vital role in the operation of the entire lubrication system. This device is designed to ensure continuous circulation of oil throughout all components of the system.
MAIN FAULTS
The design of the oil pump, no matter what type it is, is relatively simple, which ensures its reliability and long service life. And yet it does have faults, or rather there is only one – a decrease in productivity, which leads to a drop in pressure in the system. And this can lead to more serious damage, since components that are not sufficiently lubricated begin to wear out intensively due to oil starvation. This can happen for various reasons.
- The first of these does not apply to the pump, but leads to negative consequences in its operation - clogging of the oil receiver mesh with wear products and dirt. As a result, insufficient oil flows to the pump. It is not difficult to fix such a malfunction - just remove the pan and oil receiver, then thoroughly clean and rinse the mesh.
- The problem with pressure drop can occur due to wear of the pump components or prolonged operation with oil that contains a large number of contaminants. The result of this is the formation and increase of gaps between pump parts. Because of this, the lubricant simply flows through these gaps inside the injection cavity and the gears or rotors are not able to capture it in order to pump it into the line. In most cases, the performance of the lubrication system is restored by replacing worn elements or the assembly as a whole.
- The bypass valve can also create problems. Due to dirt, it can jam in the open position, and oil will constantly flow into the pan. This malfunction can be eliminated by disassembling and washing the pump and its channels.
Common faults
So:
- Most often, the pump of the VAZ 2112 and other VAZ models with front-wheel drive leaks through the seal, which has to be changed.
- The oil receiver also often fails, especially if you use low-quality oil, or missed replacing it in a timely manner, or the oil does not meet specifications (too thick).
- Too liquid simply will not be pumped and the pressure sensor will immediately light up.
- In this case, the oil receiver mesh becomes clogged, the circulation of oil through the engine becomes difficult, causes oil starvation, and as a result, the service life of the engine is significantly reduced.
- This includes a malfunction of the pressure reducing (bypass) valve: either it is stuck in the open position, and then the oil pressure drops. Either it does not bypass, and then the oil will squeeze out through the oil seal
Common unit breakdowns
- operational wear of the components of the unit: the pump housing or gears fail: during the operating cycle, the gap between the driven and driving gears increases. In normal condition it does not exceed 0.25 mm. Wear leads to the fact that the distance between the parts increases to 0.5 mm: the gears no longer mesh. The described breakdown makes the oil pump unsuitable for routine repairs - it is easier to buy a new part than to install new gears and adjust them;
- leakage: oil begins to leak from under the pump. The reason for this is a leaky oil pump gasket. Replacing the gasket solves the problem;
- Oil receiver clogged: The oil receiver becomes clogged due to a clogged crankcase. In this case, you need to dismantle the oil pan and clean the mechanism.
In most cases, it is necessary to purchase a new oil pump. The price of a new part in online stores is in the range of 1700 - 2500 rubles. The devices are compatible with the first generation Samara.
Signs and causes of oil pump malfunction Lada 2114
There are several markers, the appearance of which will allow you to suspect defects in the pump:
- The corresponding light on the dashboard lights up;
- Oil puddles regularly form under the car;
- Smoke is generated during engine operation.
Causes of unit malfunctions:
- use of motor oil that does not comply with the car manufacturer’s recommendations;
- oil filter clogged;
- permanently low level of lubricating fluid in the crankcase;
- non-working condition of oil level monitoring devices;
- failure of the engine lubrication system valve;
- impurities entering the engine oil (most often coolant is mixed with it).
All the described breakdowns are accompanied by activation of the control lamp, so do not delay repairs; begin service operations after activating the control indicator.
Features of repair and replacement
Oil pump repair may involve replacing the working pair (which is not always advisable), replacing the pressure reducing valve and rubber goods, and installing bushings in worn mounting holes. In some cases, it is possible to restore gears by surfacing followed by metalworking. Broken threaded connections can also be repaired - they are bored out or equipped with threaded bushings.
However, much more often the oil pump is replaced as an assembly. This is due to the relatively low cost of the part, as well as the high labor intensity of work to restore worn elements. In this case, the process comes down to dismantling the worn oil pump and installing a new one with a sealed connection to other elements of the lubrication system. Of course, this involves replacing the engine oil and filters, and subsequent flushing of the system will not be superfluous.
The nature of the operation, reliability and service life of the engine largely depend on the technical condition of the lubrication system elements. Therefore, it is important to carefully monitor their operation and do not forget to check the serviceability of parts during vehicle maintenance.
Source
Pump structure, lubrication system and principle of operation
The oil pump drive consists of two parts: a plastic gear with a worm gear and a wire lever that transmits force from the drum sprocket to the worm gear.
One of the main malfunctions of the saw’s oil system is a defective thread on the plastic gear of the oil drive, therefore, whenever possible, it is necessary to monitor its wear and quality of the thread.
The lever is rigidly mounted to the gear and they are supplied as one piece. The tip of the wire lever has a characteristic bend, which is designed for better adhesion to the drive sprocket drum. The drum has a special slot for installing the drive.
The Shtil 180 oil pump is made entirely of metal and has a non-separable design. On the pump body there is a receiving hole for oil and a groove-channel through which oil from the oil wire enters directly into the pump. The mechanism is installed in the body of the Stihl 180 chainsaw.
At the moment the engine speed increases, the sprocket drum begins to rotate the worm gear by the wire lever, and it in turn causes the oil pump plunger to rotate, as a result of which oil begins to be pumped through the oil channels to the chainsaw bar.
Typical faults
The most common oil pump malfunctions include:
- valve spring damage or deformation;
- reduction valve failure;
- wear of gear teeth;
- wear of seats on the oil pump housing;
- damage to the body;
- clogging of the pump oil receiver.
Main malfunctions of the oil pump
There are not many signs indicating a breakdown of the oil pump. The main ones include:
- the appearance of suspicious sounds at the pump installation site;
- rapid heating of the motor;
- noticeable increase in oil consumption;
- the appearance of local pinpoint oil leaks;
- reduction in engine power.
Signs of a faulty oil pump
On a note! A warning light on the dashboard in the form of an oil can, which is constantly lit, indicates a decrease in oil pressure to the minimum permissible level.
Malfunctions of the pump and the system as a whole
As you know, nothing lasts forever in this world and everything has to be repaired over time. The oil system of the Shtil ms 180 is no exception, and has its own specific malfunctions. Let's take a closer look at them.
Signs of a malfunctioning lubrication system are as follows:
- the chainsaw chain is absolutely dry and does not shine;
- oil does not leave the oil tank;
- the chain stretches quickly and this happens constantly;
- the saw bar moves to the side when sawing;
- The tire also heats up in the area of the drive sprocket and the paint melts.
All these signs directly or indirectly indicate problems in the chainsaw chain lubrication system.
The first thing to do after you suspect that chain lubricating oil is not being supplied is to check its supply. There are two ways to do this. The first is described in detail in the instructions for the tool and consists in the fact that you need to start the chainsaw, increase the gas as much as possible and point it towards any obstacle.
If the lubrication system is working properly, the oil will fly off from the tip of the tire and a strip of oily drops will appear on the surface towards which the tire is pointed. If there are still violations in the system, the surface will remain clean.
The second way is to remove the tire from the chainsaw and start it. When the engine speed increases, oil will flow from the oil channel at the tire shank installation site; if this does not happen, it is necessary to look for the cause of the malfunction.
Diagnostics
Diagnostics should begin with inspecting and checking the oil receiver (filter) of the Stihl 180 saw. As a rule, if the filter is very dirty, the oil supply may stop.
To save money, you can try to clean a clogged filter by thoroughly rinsing it in gasoline.
Next, you need to remove the drum sprocket and check the condition of the drive gear. The thread on it must be clearly defined, not licked or have any other defects; also, when the gear is removed, it is necessary to check the wire lever. It must press the gear tightly and not turn, otherwise the gear stands still and does not transmit force to the pump, as a result of which the oil supply stops.
If all of the above methods to detect and eliminate faults do not produce results, it is necessary to use extreme measures, i.e. dismantle the pump.
How to remove the pump
The oil pump is installed on the right side of the bottom of the housing, in the same place an oil line coming from the chainsaw tank is connected to it. To remove the pump, you will first need to release the saw from the handle; to do this, unscrew the rear handle of the unit and disconnect the throttle control rod. At the next stage, you need to remove the handle shock absorber plugs and, using a powerful slotted screwdriver, squeeze them out of their seats on the handle.
After the handle is removed, the chainsaw body is turned upside down. The hose leading from the oil tank to the pump will be immediately visible. It must be removed from its seat.
The pump itself is removed using an M5 threaded screw and a wide washer. The length of the screw should be approximately 45-50 mm. A washer is put on the screw and it is screwed into the pump (the inside of the pump has threads). Next, as the screw is screwed in, the washer stop will force the oil pump to rise along the threads. Thus, the pump is removed from its seat. Before starting work, we recommend reading the article on how to disassemble Shtil 180.
To better understand the process of removing the pump, you can watch the video below. In the video, the service center master shows in detail how to remove the oil pump from a chainsaw, and also describes the main malfunctions of the supply system.
The Shtil 180 oil pump is a very high-quality and reliable part, so it is necessary to change it only as a last resort, when all other elements of the system have already been checked.
After the pump is removed, it must be cleaned and purged. As a rule, the main failure of the oil pump is its blockage. Having eliminated it, you can install the pump in place.
Replacing the pump is only required if it is not possible to remove the blockage.
troubleshooting
Don't rush to conclusions and blame the pump for everything. It is necessary to organize a full check to make sure what caused the signal to appear on the dashboard.
| Check area | Your actions |
| Checking the electrical circuit | You need to check the functionality of the electrical circuit that goes from the sensor to the instrument panel. The wire that goes from the regulator to the engine must be connected to ground. If the circuit is working properly, the lamp will go out. |
| Checking the oil filter | Just unscrew the oil pressure sensor. If it is soaked in lubricant, everything is fine. If it is dry, then the filter is clogged or the filter valve is stuck. |
| Checking internal elements | You will need to replace the filter if there is a problem with it. Next, the pan is opened and the condition of the oil receiver and rubber seals are inspected. |
If the measures taken did not produce results, the lamp still does not go out, then the pump is the culprit in the current situation.
Useful information
Let's talk a little about the principles of the design and operation of the oil pump. This can help you during the repair process.
- Domestic “tens” use a combined lubrication system.
- The design of the car provides for the presence of a gear oil pump. It is installed on the front end of the cylinder block.
- Special gears with trochoidal internal gearing help reduce mechanical losses during rotation.
- The pump is equipped with a full-flow filter with a non-separable design. It contains an anti-drip and bypass valve.
- This design guarantees efficient circulation of lubricant throughout all engine components.
- The pump operates by rotating the crankshaft. The connection is direct.
- The operating life of the pump is about 120 thousand kilometers.
Location
Not everyone knows where to look for this oil pump. It is not located in a visible place, so you will have to try hard to gain access to the device.
The MN is located directly inside the engine oil sump. To get to it, the oil must be drained from the engine.
Please note that if your engine uses high-quality oil that was only recently filled, use a clean container when draining it so that you can then refill the same substance. If the oil is old, replacing the pump is an excellent reason to change the lubricant.
- Removal and installation of the oil pump from VAZ 2108, VAZ 2109, VAZ 21099 cars
Replacing the oil pump
It is advisable to replace and repair the oil pump on an overpass or inspection pit. Some motorists use a jack, but repairing a jacked car is extremely risky. Below are step-by-step instructions for replacing the pump on a VAZ 2101-07 car. The process itself can be roughly divided into three stages: dismantling, checking the new device and installation.
Replacing the oil pump
Removal
Step 1. Drain all the oil from the engine into a prepared container.
Draining engine oil
Step 2: Unscrew the oil filter. It is advisable to carry out these actions while wearing work gloves.
Removing the oil filter
Step 3. Unscrew the left and right engine mount mountings with a socket wrench.
Unscrewing the fasteners of the left and right engine mount
Step 4. When the cushions are unscrewed, place a jack under the car's clutch bell. An alternative is to use a winch and lift the engine from above.
Installing a jack under the clutch bell
Step 5: Raise the engine until the mounts are free.
Jacking up the engine
Step 6. Remove the 19 oil pan mounting bolts.
Unscrewing the pallet mounting bolts
Step 7. To unscrew, use a ratchet, extension, cardan and 10mm socket.
Using a 10 mm socket and ratchet
Step 8. After removing all the bolts, try to pull it out. If this does not work, then you need to make sure that the crankshaft counterweights are horizontal.
Remove the oil pan
Step 9. It doesn't look so bad after removing the pan. There are no signs of severe wear on parts.
This is what the parts look like under the pan cover
Step 10: Inspect the inside of the pan. In our case, there are small particles, debris, pieces of sealant, etc.
Inspection of the interior of the pallet
Step 11. Unscrew the two pump mounting bolts with a 13mm socket.
Unscrewing the pump mounting bolts
Step 12: Carefully remove the oil pump from the block. During dismantling, oil residues may get on your face, so it is advisable to keep your face as far as possible from the pump and keep your mouth closed.
Removing the oil pump
On a note! It is recommended to immediately prepare a separate container for the pump, since something is constantly pouring out of it. This will protect your clothes and the garage floor.
Step 13. Using a regular 13mm socket and an extension, knock out the bronze bushing of the oil pump drive gear from the block.
Removing the oil pump drive gear bushing
Step 14: Remove the bushing from the block.
Removing the bushing from the block
Step 15. As you can see, the bushing has burrs on both the inner and outer surfaces. This may indicate that the bushing has already been replaced previously. This completes the removal of the oil pump.
Inspection of the appearance of the bronze bushing
Checking the new pump
Before installing a new pump, you must carefully check all its elements. Below are step-by-step instructions for testing a new product. It will allow you to identify possible defects before installation, which will make it possible to avoid costly repairs in the future.
DIY oil pump diagnostics
Step 1: Be sure to test the new oil pump before installation.
Disassembling the oil pump before installation
Step 2. Remove the gears of the new device for a visual assessment.
Removing the drive and driven gears
Step 3. Rinse and blow out all parts of the pump thoroughly.
Blowing out pump elements
Step 4. On a perfectly flat block, lap the edges of the oil pump housing. For this purpose, use fine-grained sandpaper.
Grinding in the edge of the oil pump housing
Step 5. Lather the pump housing cover in the same manner to remove deep grooves and burrs.
Grinding in the pump housing cover
Step 6. As a result, you should have a lid with a smooth surface. There is no need to rub hard - just knock off the burrs.
Cover surface after lapping
Step 7. Now you need to wipe the pressure relief valve of the lid. To do this, apply a small amount of special lapping paste to the valve.
Applying lapping paste to pressure reducing valve
Step 8: Gently rotate the valve and rub it against the pump cover.
Grinding the valve to the pump cover
Step 9. After lapping, you should have a nice valve and cap contact ring. Upon completion of lapping, it is necessary to clean the valve and cover from the lapping paste.
The resulting ring after lapping the valve
Step 10. Use a block to lap the oil receiver of the device. Only carefully, without fanaticism.
Grinding in the pump oil receiver
Step 11. Blow all parts again, and then reassemble the oil pump in reverse order.
Pump assembly after repeated purging
Step 12. Using special feeler gauges, measure the gaps between the gears, between the gear and the housing, and between the gears and the plane of the housing.
Measuring gaps between gears
Step 13. After measurements, blow out all pump parts again, and then apply a little lubricant. The pump is ready for installation!
Lubricating oil pump gears
Installation
Step 1. Press in a new oil pump drive gear bushing.
Pressing in the drive gear bushing
Step 2: Make sure the bushing hole lines up with the oil passage in the block. This bushing is pressed in with a regular 10mm head with an extension.
The bushing hole must coincide with the oil channel
Step 3. After pressing the bushing, install the oil pump in place.
Oil pump installation
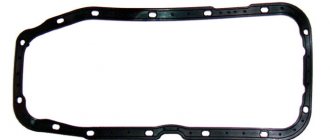
Step 4: Don't forget to install a new gasket.
The gasket also needs to be replaced
Step 5. Also clean the area on the block for the oil pump before installing the device.
Cleaning the pump seat
Step 6. Thoroughly wash the pan of dirt and remove all accumulated small particles from it.
Removing dirt from the inner surface of the pan
Step 7. If there are dents on the pallet, smooth them out using a wooden block and a hammer.
Aligning dents on a pallet
Step 8. Punch all the mounting bolt locations on the pan so that it securely presses the gasket to the block.
Punching all places for fasteners on the pallet
Step 9. Apply sealant to the joints of the front and rear covers with the block. This is not necessary, but it will be calmer.
Applying sealant to joints
Step 10. Tighten the pallet mounting bolts (there are still 19 of them).
Tightening the pallet mounting bolts
Step 11: Lower the jack so the engine sits neatly on the mounts.
Loosening the jack under the engine
Step 12. Secure the engine mounts by pre-treating the fasteners with lubricant.
Fixing engine mounts
Step 13. Don't forget to put a heat shield on the right engine mount, otherwise it will overheat from the exhaust and quickly fail.
Installing a heat shield on the right engine mount
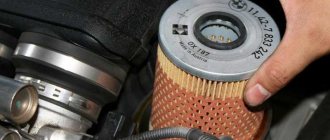
Step 14: Reinstall the oil filter.
Installing the oil filter
Step 15. Now we move to the engine compartment. First of all, reinstall the oil pump drive gear.
Installing the oil pump drive gear
Step 16. Install the distributor.
Distributor installation
Step 17. Don't forget to add oil.
Pouring oil into the engine
Step 18: Start the engine and check the oil pressure. There will be no pressure immediately after starting. This is normal as the system needs time to remove all air pockets.
Checking the oil pressure after starting the engine
Step 19. On a warm engine, the oil pressure turned out to be 1.2 kgf/cm² at 1000 rpm, which is approximately twice as much as before the replacement. This is the end of replacing the oil pump.
Oil pressure 1.2 kgf/cm² at idle
Preparation of tools and materials
To successfully replace the oil pump, you need to prepare some tools and materials. These include:
- universal joint;
- set of wrenches;
- socket heads;
- clean rags;
- kerosene for cleaning parts;
- new oil pump;
- extension.
Tools for replacing the oil pump
Also, to repair the device, you need to prepare a set of flat feeler gauges to measure the gap between the pump body and its gears. Once everything you need is at hand, you can get to work.
Pressure gauge for measuring oil pressure