Replacing the oil pan gasket in many car models is not a complicated process. You can replace the gasket yourself at home, for example, if you devote a couple of hours to this task on a weekend. This guide shows you the process and the key points you should pay attention to.
And it's better to do it sooner rather than later. A damaged or worn oil pan gasket under your engine can lead to serious oil leaks, overheating of the engine and sometimes catastrophic failure; if the oil level drops significantly without you noticing it, you can trap the engine.
Invest a few hours of your time and follow the systematic procedure described here. This will save your engine from severe damage and your wallet from costly repairs.
This article will cover:
- Preparing for removal
- Removing the oil pan
- Tips and tricks
- Some Important Notes on Gaskets and Seals
- Installing a new gasket
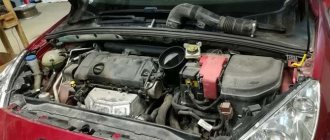
Preparing to remove the oil pan
NOTE. On some models, replacing the oil pan gasket is more difficult. For example, you may need to remove the engine from its mounts using a lift to gain access to it. If you don't know how to access your car's oil pan, look up the manual for your specific make and model online or ask a mechanic at a service station.
The manual shows the location of each bolt and any components you may need to remove for easier access.
1. Raise your car so that it is convenient for you to work on the bottom of the engine
- Drain the oil by unscrewing the drain plug3. Allow the oil to drain completely4. While under the vehicle, look for components and parts, if any, that will prevent you from gaining easy access to the pan with the keys and remove them. The most common items you may have to deal with are cross members, exhaust components, or support brackets.
What triggers replacement?
There are several reasons for replacing the control element. The main problems include:
- Constant impacts of foreign objects and stones on the pallet;
- Failure (deformation) of the seal;
- Constant high pressure can cause damage to the integrity of the material;
- Several negative factors can combine into one big problem.
These are just the most common reasons why a car owner is forced to change the seal.
Removing the oil pan
- When everything is ready, loosen all the bolts located around the pan flange. Sometimes you need to use ratchet handles or ratchet extensions to get better access to some bolts.
- Then finish removing all the bolts and remove the pan from the bottom of the engine block by hand if necessary. If it seems stuck, tap it lightly with a rubber mallet. *However, when the pan does not come loose, make sure that you have removed all mounting bolts and that no other component is holding it in place. * If this doesn't work, use a gasket cutter to cut the seal by pushing the cutter with a rubber mallet between the flange and the engine block in several places around the pan. Do not use a screwdriver to release the pan, otherwise you may damage it or the mating surface of the engine.
- Once you've removed it, check the bottom surface for metal shavings. You may find a few chips, but a large number of them may indicate excessive wear on some engine components. If necessary, contact a repair shop.
- Thoroughly clean the area where the tray is located. You must remove old gasket material and deposits. The gasket scraper speeds up the task without damaging the surface.
- After removing any traces of gasket or silicone, use solvent to clean the mating surfaces and, if necessary, wash the pan with cold detergent. If the grease and silicone are difficult to remove, use carburetor cleaner or engine degreaser and a wire brush to remove this sealant.
- Next, check the pan for damage, such as cracks, and double check the pan flange for bends. You can do this by placing it on a flat surface. The glass surface is perfect for this. * Take a close look at where the flange and glass meet, especially around the bolt holes. * You should not see any spaces. If not, straighten the flange by lightly hitting the curved areas with a hammer.
Installation of seal
Before installing a new gasket, all traces of leaks must be removed. Experienced motorists advise not only to wipe the pan, but also to degrease it. The same actions are recommended for the surface of the block. It is advisable to remove, wash and blow out (at least with a regular tire pump) the so-called “gander”. When installing it back, you can lubricate the rubber ring of the “gander” with sealant for better fixation.
A layer of the same sealant is applied from the inner perimeter. The sealant is laid out on its bed as evenly and quickly as possible, and a similar layer is applied on top. Bolts are baited; If the instructions supplied with the car do not indicate the exact order of tightening them, screw in the fasteners diagonally, crosswise, so as not to unevenly pinch any of the sides.
During the tightening process, the pan must be pressed against the cylinder block. After securing all the bolts, you should check to see if the gasket has protruded anywhere. If it “climbs out”, it’s sad, you’ll have to start installing it again (and if you managed to grab it, then run for a new one). If everything is normal, all parts and fasteners are put back in the reverse order of removal. As you can see, it’s nothing complicated, although it requires time and physical effort. By the way, replacing the oil pan gasket will go faster and without distortions if you call on a sympathizer for help - at the same time, you can drink beer together afterwards.
Some Important Notes on Gaskets and Seals
- If you are installing an engine oil pan gasket (as opposed to a rubber seal or compound), you may need special adhesive to hold the gasket in place during installation. If so, apply a light layer of adhesive or high-temp sealant to hold the gasket in place.
- Also, keep in mind that a component at the bottom of the engine may create a connection to another engine component along some portion of the oil pan flange, such as the rear main bearing cap, timing cover, or oil pump. With this configuration, you need to apply sealant where these sections meet to prevent leakage in that area once the gasket is installed.
Some engine pans use rubber seals at each end along with side gaskets. You will need to apply sealant where the rubber gasket meets.
If you are going to use sealant as a gasket, apply it evenly over the contact area to a thickness of 3 millimeters.
Possible faults
Malfunctions of this part do happen, and it is dangerous to ignore them, since loss of oil threatens serious and expensive repairs of the internal combustion engine. They can be easily diagnosed by oil leaks - a characteristic small puddle that remains on the asphalt after an overnight stay and a wet sump. The causes of leaks may be:
- loose oil pan bolt;
- gasket wear;
- loose drain plug;
- cracks in the metal.
Cracks in metal are a much more serious problem than a poorly tightened bolt. They can appear as a result of impacts with large stones, curbs, etc. Even if protection is installed under the crankcase, it can crack due to non-compliance with the bolt tightening torques recommended by the manufacturer. A crack can also occur if the drain plug is overtightened after an oil change or repair. It has a slightly conical shape, is made of a harder metal, and can tear the pan. Such a crack is difficult to see, and some service workers, trying to eliminate the leak near the plug, tighten it even more, which subsequently aggravates the situation.
It is worth noting that a slight “sweating” around the oil drain plug, in the absence of drops or streaks, is normal.
Installing the oil pan gasket
Once the pan is in place, begin to tighten the bolts by hand and lightly tighten them, following the criss-cross technique to distribute the force evenly.
NOTE. Some manufacturers recommend applying a small amount of sealant to the bolt threads before installation. Check your service manual if necessary.
Tighten the bolts with a torque wrench in a crisscross pattern to the torque specified in the manual. Do not over-tighten to avoid over-tightening the bolts and damaging the flange or gasket and ultimately causing an oil leak.
- Also, tighten the drain plug to specifications using the same wrench to prevent future oil leaks.
- With the oil pan installed, replace any components that you had to remove to access it. Check that there are no unnecessary parts, as is often the case with master craftsmen.
- Lower the engine from the mounts and tighten the mounts if necessary.
- Lower the vehicle and add the required amount of engine oil to the engine.
- Check for oil leaks after filling, and look under the bottom for the next few days to ensure that you have successfully completed the repair by replacing the oil pan gasket and that you are not dripping or leaking anywhere. Watch the following video for a visual reference. replacing the gasket.
Of course, on some car models it is simply impossible to remove the engine oil pan without the appropriate equipment.
The job of replacing the pan gasket is not an easy task. But in many car models, this task is within the reach of the average owner. However, you must follow the precautions and proper procedures outlined in this manual to complete the job successfully and save money on repairs.
Signs
The first sign by which you can recognize a gasket leak is an oil leak at the junction of the pan with the internal combustion engine. But since this element is the lowest point of the engine, it is not always possible to recognize a breakdown in time. Moreover, the scale of the problem can be different - from slight “fogging” to black oil puddles. The first option is not so scary for the car owner. Some drivers have been driving with this for years. However, if after a short parking period oil streaks form on the asphalt, it is worth inspecting the condition of the pan.
Also, a pan gasket that has lost its tightness affects the oil level. It will gradually decrease. How intensively the oil will leak depends on the scale of the tragedy. Driving with a dry engine is extremely dangerous. Once every thousand kilometers, experts advise checking the level on the dipstick. It should be above the average mark.
If it is at a minimum, the engine will experience oil starvation. Inserts, rings and other elements work “dry” - ellipse of the cylinders and other problems are formed.
Conclusion
The crankcase ventilation system is very important for the engine. Its malfunction can lead to disastrous results. Starting from simple oil fogging of the gaskets, to oil getting into the intake manifold. On diesel engines, the turbocharger may begin to “drive” oil into the intake tract, intercooler and further along the circuit. Although the turbine may be in good working order, its service life will be reduced.
Simple maintenance and regular care will save you from headaches and expensive, premature repairs of power unit components. Moreover, you can carry out repairs and control over it yourself. Based on the first signs that I talked about in this article, a malfunction can be easily determined in the early stages.
If the article was useful, share it with your friends, leave comments if I missed something. Good luck to everyone on the roads!
How to remove the oil pan on a domestic car
Below are step-by-step instructions for a Niva car with a 1.7 injection engine. Before the operation, the machine is placed above the inspection hole. The first step is to warm up the engine so that the oil can be drained while it is hot. Then you should unscrew the spark plugs. Also remove the fasteners from the hood side (2 bolts), due to which the motor is attached to the bridge.
Remove the airbag and protection fastenings.
The engine must be jacked up.
Using a 10mm socket with a ratchet, unscrew the pan. It still rests against the bridge and cannot be removed.
You need to unscrew the two bolts located on the oil pump. After this, the pan will be removed along with the pump.
A broken oil pan is a catastrophic failure for the engine.
- There are a lot of opportunities to damage a car on our roads - stones hidden in the grass or snow, curbs, ice blocks, snow dams, protruding fittings, open sewer hatches, holes, potholes, cause “injury” to the lower parts of the body, and often to the engine sump.
- While the damage to body parts is purely cosmetic, a broken engine bottom can be a catastrophic failure.
How to avoid engine damage in the event of a sump failure
After receiving a blow to the engine area, you must immediately stop the car, turn off the engine and use fresh tracks to determine where it hit. If it turns out that the oil pan is broken and an oil leak is visible, then under no circumstances should you continue to drive such a car without eliminating the malfunction.
The consequences of a trip when the engine is starved of oil can be disastrous - at best, the piston rings will scuff, at worst, they will jam in the cylinders. In any case, a major overhaul of the engine will be required.
Therefore, the driver needs to try to fix the oil leak himself in order to get to the nearest service station, and if this fails, then deliver the car there in tow (when the gearbox allows), using another car, or on a tow truck.
Oil leak from sump
If the consistency of the leaking liquid found under the car is dark brown and viscous, then this means that oil is leaking from the engine. Increased oil consumption (you have to add more often than usual) can also confirm your guesses.
Oil leaks from the pan due to:
- deformations;
- deterioration of fastenings;
- crankcase distortions.
Oil leakage in the power unit indicates a decrease in pressure, and this is fraught with negative consequences for the engine itself. The tightness of the pan is a prerequisite for the successful functioning of the entire engine system. If you regularly carry out diagnostics at a service station, you will be able to detect various malfunctions in the vehicle’s operation in time.
The longer the life of the engine, the more often the gaskets in it wear out. From time to time it is necessary to replace the pan gasket, which will be carried out competently in our car service center. For each car, a special rubberized gasket is selected that acts as a sealant.
The pan gasket is not very reliable, so it is not necessary to change it so rarely. It wears out due to constant loads and temperature changes.
How to replace a gasket
The procedure for replacing the seal is not as simple as it seems at first glance. It is necessary to raise the engine by unscrewing the engine mounts on both sides. That is, first of all, dismantling work is carried out, which will provide access to the seal.
At this stage, at a minimum, you will need a cross beam or at least a hand hoist. Further actions include degreasing the surface of the pan and block, installing a new gasket and assembly.
All these actions require the presence of basic knowledge and, of course, the availability of special tools.
If you doubt that you can replace the gasket yourself, it is recommended that you contact experienced mechanics who thoroughly know their job.
What kind of service is this?
The oil pan is a metal container containing engine oil. The oil pan gasket seals the joint between the oil pan and the engine crankcase. The engine has many moving parts that need to be lubricated with engine oil. Without engine oil, parts will damage each other. The oil pan and gasket are located under the car, at the bottom of the engine crankcase. Gaskets age and begin to leak over time. You will see traces of oil under the car. If there is an oil leak, the warning light on the instrument panel may illuminate. If you continue to drive with insufficient oil levels, there is a risk of serious engine damage.
In our car service center you can order many types of car maintenance and repair work; our technicians also perform oil pan gasket replacement and starter replacement at the highest level. We have the most modern equipment and highly qualified employees with extensive experience. Let's take a closer look at what an oil pan gasket is and what the process of replacing it is.
An oil pan is a metal container that holds engine oil. The joint between the engine crankcase and the oil pan is sealed using a special gasket. An engine needs oil because its design contains a large number of moving parts, and without the use of oil they will cause damage to each other.
The oil pan and gasket are located at the bottom of the engine crankcase. Like any rubber gasket, the oil pan gasket wears out over time and begins to leak, causing oil marks to be visible under the car. In this case, if the devices are working properly, the warning indicator may light up. If you drive a car with insufficient oil, this can easily lead to serious engine malfunctions. Replacing the valve cover gasket also prevents oil leakage.
What is a crankcase ventilation system
To reduce the negative impact on the engine life, a ventilation system was developed. It reduces pressure by “sucking out” gases through a system of pipes, hoses and valves. It is shown schematically in the figure.
What does it consist of?
- Pipes, hoses;
- Oil separator;
- Control valve.
In classic VAZ models, crankcase ventilation is simplified; there is no valve.
Scheme of work
- Gases enter the oil separator through hoses, where oil vapors are separated from gases;
- Next they enter the ventilation valve. It is connected to the intake manifold. The vacuum in it “sucks” them back into the intake.
Thus, we get rid of excess pressure.
In domestic cars, the breather plays the role of an oil separator. It is directly connected to the power unit. Oil passing through it settles on its walls. It is directly connected to the intake. One hose is connected to the air filter housing; pumping occurs during engine load. The second hose is connected to the carburetor, below the throttle. It is needed for crankcase ventilation at idle speed of the internal combustion engine.
Oil separator
It happens:
- Tangential;
- Labyrinthine.
In the first case, crankcase gases enter the oil separator housing at an angle. They twist and receive tangential acceleration. Due to centrifugal force, the oil emulsion and vapors remain on the walls of the separator and flow back into the engine sump. The gas flow continues into the valve.
The second type has a labyrinth in its design (it is logical to assume from the name). Crankcase gases passing through it, hitting its walls, flow into the sump.
Crankcase ventilation valve
Necessary for adjusting the intensity of the “suction”. A large vacuum can form in the engine intake manifold at different operating modes. A large vacuum can be created in the crankcase through the ventilation system. The higher it is, the more combustion products of the air-fuel mixture will “break through” the compression rings into the engine volume.
When excess pressure is created, the valve opens, gases are “sucked” into the inlet, and the pressure decreases. When a vacuum is formed, it closes, preventing the creation of a large vacuum. Thus, the extraction of fuel combustion residues, gasoline vapors, etc. is adjusted. from internal combustion engine.
Signs of damage and initial actions
If there are oil leaks along the edges of the oil pan towards the cylinder block, this means that the gasket itself is no longer suitable for use and must be replaced. This problem may occur due to insufficiently tightened mounting bolts. This may be due to the fact that on the new machine they were not fitted at the assembly stage. And on a used car, the bolts could become loose when driving. Therefore they need to be tightened. This must be done carefully, as otherwise you can damage the head or break the thread.
Next, you need to clean the pan from any remaining oil. Now you can continue to find out the reasons for the leakage. The gasket needs to be changed if oil continues to appear. If this happened on the road, then you can get out of the situation using a sealant. But you need to remember that this measure is temporary, and once you reach your destination, you must begin repairing the seal.