DIY clutch and clutch disc repair
The clutch of a passenger car performs an important function. This mechanism protects the gearbox (gearbox) and all its gears, bearings, and shafts from premature wear, tooth breakage, and metal abrasion. The friction linings of the disc wear out over time. For further full operation it is necessary to replace them and repair the clutch.
How does the mechanism work?
The clutch disconnects the engine flywheel from the transmission and, together with the gearbox synchronizers, allows you to smoothly, without shock, change gears on rotating shafts.
Without it, it is impossible to change gear, since gears of different speeds rotate at different speeds during movement. Thanks to the mechanism, when it is turned off, the engine continues to rotate the crankshaft, the gearbox stops briefly, allowing you to engage the next gear at that moment.
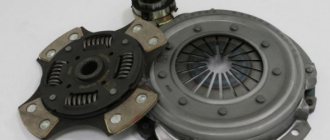
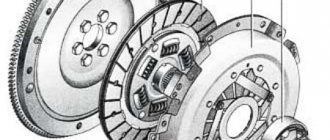
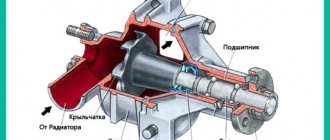
Manufacturers install single-disc dry, permanently closed devices on passenger cars. They have a central diaphragm pressure spring with vibration dampers, which are located on the driven disk. The driving half of the clutch is a non-separable part. It consists of the following parts:
- casing;
- pressure disk;
- diaphragm pressure spring.
The housing is attached to the flywheel with bolts and pins. The pressure plate is connected to the casing by steel plates. Each of them is riveted to the casing on one side, and to the pressure plate on the other. The pressure plate is connected to the outer part of the diaphragm spring using clamps. Two round rings serve as support for it. They are secured with stepped rivets to the casing body.
The driven disk is made of steel and has radial slots dividing it into 12 sectors, which are bent in different directions. Friction linings, independent of each other, are riveted to the sectors. A damper that dampens torsional vibrations connects the driven disk to the hub. The system has a hydraulic shutdown drive.
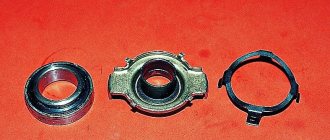
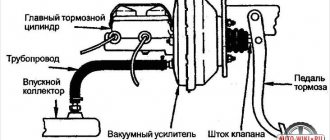
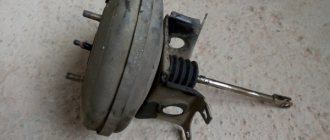
Clutch hydraulic drive device:
- main cylinder;
- clutch release cylinder;
- bearing;
- fork;
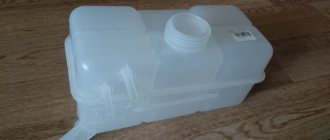
- reserve tank;
- a pedal having a servo spring;
- The tank with the drive cylinders are connected to each other by pipelines.
Signs of wear
- The appearance of friction lining odor. Either the feredos are severely worn out, or oil has come into contact with them.
- Shortened clutch pedal travel.
- Airy hydraulic drive or leakage of working fluid.
- Jerks when changing gears.
- The car “grabs” speed at the last highest point of the clutch pedal.
- The clutch is not fully depressed, it is driven.
- Upshifts are engaged without problems, downshifts are impossible to catch.
If at least one of these symptoms appears, you should urgently contact a car service center or repair the discs yourself.
Repair
Replacing a worn clutch disc with your own hands, if you have all the tools, involves the following operations:
- install the machine on a lift, pit, overpass, or lift it with a reliable winch;
- remove the gearbox by disconnecting the wires from the battery, following the procedure:
- drain the oil, remove the starter, disconnect the block with wires from the speed sensor;
- unscrew the bolt of the ignition module bracket, two bolts securing the gearbox to the internal combustion engine;
- disconnect the wire block from the reverse sensor on the bottom;
- unscrew the bolt of the gear shift rod bracket clamp;
- move back and remove the rod from the hinge, remove the wheel drives;
- to prevent the differential from falling out, insert the plugs and tie them down;
- unscrew the nut securing the gearbox to the internal combustion engine from below;
- unscrew the three bolts, remove the lower hatch of the clutch housing;
- at the bottom left, unscrew the bolt securing the gearbox to the internal combustion engine, hang the engine with a hoist;
- unscrew the left and rear engine mounts;
- by inserting a screwdriver between the clutch housing and the internal combustion engine block, move the gearbox off the guide bushings, the input shaft comes out of the clutch;
- The gearbox is lowered down and removed from under the car;
- Use a spanner to unscrew the casing bolts and remove the basket with the disc.
With the clutch removed, it is necessary to check the condition of the disc, bearing, and springs. Worn or faulty parts must be replaced. Take the opportunity to clean and lubricate all rubbing parts.
The disk surfaces must be dry, without burrs or cracks.
After repairing the clutch, replacing as many unusable components as possible, reassemble the gearbox in the reverse order and install it in the car.
Conclusion
Replacing the disc is done, you can continue to operate the car. Now he shows miracles. Gear shifts smoothly, silently, knocking and jerking have disappeared. Pulling away is a pleasure; the car obeys without question. The success of such a repair is that the disk replacement is done with your own hands.
Replacing the disk and basket
Replacing the clutch disc is done as follows. Unscrew the basket mounting bolts, then remove all parts from the flywheel. There should be no traces of oil on the flywheel or driven disk surface. If there are marks, it is necessary to check the condition of the gearbox oil seal, otherwise the oil leak will continue, which will reduce the service life of the disc. Droplets of oil falling on the surface of the lining or driven disc damage them. If the condition of the oil seal is unsatisfactory, replace it. If the surface of the driven disk is covered with deep scratches or cracks, change the basket.
Wipe with a rag, then degrease the surface of the flywheel and the basket driven disk with gasoline. Insert the disc into the basket, then slide both parts onto the manual transmission input shaft or mandrel, and then insert into the hole in the flywheel. When the mandrel reaches the stop, guide the parts along it to the flywheel and screw the basket with standard bolts. Pull out and then reinsert the mandrel a few times to make sure the disc is seated straight. If everything is normal, insert the mandrel and tighten the bolts with a force of 2.5–3.5 kgf-m. More precisely, the force is indicated in the repair instructions for your machine. This completes the replacement of the clutch disc. Replacing the clutch basket is done in the same way. The maximum mileage of the basket is 150–250 thousand kilometers and depends on many factors.
Remember, replacing a clutch disc is a responsible operation, so do not perform it in a hurry or while intoxicated.
Vibration after replacing the clutch appears due to improper alignment of the disc or weak tension of the basket. If this happens, you will need to remove and reinstall the drive and cage.
Chainsaw
The woodworking machine's clutch is centrifugal and automatically engages when the engine speed changes. If the speed is low, the elements of the mechanism are pressed against the shaft. Thus, the rotational motion is not transmitted to the sprocket. As the speed increases, the elements move apart and are pressed against the drum, thereby causing the chain to rotate.
A characteristic feature of this type of device is braking, where the chain slows down. This way it turns out to avoid some glitches. But still, this system is subject to enormous load, so it is necessary to systematically carry out preventive inspection and repair.
Changing cylinders
There is a reason to change the main cylindrical system if the functionality of the system does not improve after replacing the o-rings. Replacement with new clutch cylinders is installed when the brake fluid runs away even after replacing new cuffs.
Perform the process of removing the working cylinder and installing it according to the following diagram:
- We get rid of the spring near the pedal.
- We unscrew the two nuts that secure the cylinder to the gearbox;
- The process of unscrewing the rubber hose attached to the working cylinder is carried out by weight;
- We screw a new type cylinder to the hose to avoid leakage of the brake compound;
- We pump everything out of the cylinder, unscrew the fitting, close the hole;
- We unscrew the nuts that secure the master cylinder to the car body;
- To release the hinge connected to the pedal, you need to pull it towards you. Pull out the pin, this will release the cylinder from the pedal.
- Install the two cylinders in the same way as you disassembled them.
After replacing the cylinders, bleed the main clutch. When the air stops escaping, the cylinder is installed correctly.
How does a chainsaw engine work?
The devices released in the near future have a single-cylinder, two-stroke, carburetor-type engine. Or rather, how to unscrew the clutch cup on a stihl. How to remove the shaft on a trimmer. It contains several devices that work harmoniously. Replacing the clutch on a lawn mower. hd. #clutches, #how to remove the clutch. Main components of the motor:
- Flywheel;
- coupling;
- Incendiary module;
- Muffler;
- Mounting sleeve.
The engine installed in the saw operates at a frequency of 13.5 thousand revolutions/minute, and therefore requires treatment with high-quality oil. A high level of system cooling is required during operation. The engine of the unit is equipped with a cooling system that supplies air to cool the systems.
Brushcutter repair and review.
Signs of a bad clutch
As we already mentioned, one of the signs of a faulty clutch is the car slipping when you try to accelerate it. There are other indicators that mean it’s time to repair the clutch.
One of these signs, in addition to slipping, is the clutch sticking when engaged. In addition, clutch repair will be needed when, when you press the clutch pedal, you hear an unusual noise that was not there before.
The listed symptoms most often mean the need to replace parts such as the driven disk and release bearing.
Main types of work
Elimination of jerking during clutch operation
The cause of jerking may be loosening of the driven disk fastenings. In this case, the faulty rivets are replaced, and if necessary, new linings are installed. If the leaf springs lose elasticity, it may be necessary to replace the clutch or its driven disc assembly. If the driven disk hubs jam on the splines of the drive shaft, they should be cleaned and lubricated. If the spline part is worn, the drive shaft or driven disk is replaced.
Elimination of noise when engaging/disengaging the clutch
Replacing the clutch may be necessary if the clutch release bearing is worn or damaged, if there is increased runout of the heel of the release levers, or if the drive disc damper springs lose elasticity or breakage. Also, if necessary, adjust the free play of the pedal. In addition, to eliminate malfunctions, the release spring of the clutch release fork and the front bearing of the transmission drive shaft are replaced.
Adjusting the clutch operation
The reason for incomplete disengagement of the clutch may be an increase in the free play of the pedal. In this case, it is necessary to adjust it. Replacing the clutch may be necessary if the driven disc is warped, the diaphragm spring is loose, or the pressure plate is damaged. Also, to eliminate malfunctions, the ring valve, drive shaft or friction linings of the driven disk are replaced.
Chainsaw clutch
The clutch of the device for processing wood is centrifugal and is activated automatically when the engine crankshaft speed changes. If the speed is low, then the elements of the mechanism are pressed against the shaft. This way the rotational motion is not transferred to the sprocket. As the speed increases, the elements spread out and are pressed against the drum, thereby causing the chain to spin.
A corresponding property of this type of device is braking when the chain slows down. This way you can avoid any damage. But still, this system is subjected to heavy load, so it is necessary to systematically carry out preventive inspection and repair.
How to remove
The drive sprocket also serves as a drum. The coil on the trimmer has stopped rotating in order to remove it. And if it’s behind the clutch cup. One of the main reasons for the breakdown of this block is the grinding of the sprocket teeth. In a solid drum version, the chain may cut through the sprocket during operation. This mechanism requires replacement. If the drum has a replaceable crown, it must be removed and replaced during maintenance. After which the drum can continue to operate.
When there is a need for repairs, you should seek help from a service center where experienced specialists work. But if there is no such thing nearby, the question arises - how to remove the clutch without the help of others? If you have the necessary set of tools, you can easily implement your plans. Of course, there are some differences in models from different companies, but the disassembly scheme remains the same:
- First, remove the chain brake cover by turning the lever. Lightly unscrew the nuts to release the tension on the chain. After loosening, you can completely unscrew the nuts and remove the cover;
- The chain and guide bar are disassembled, as well as the mechanism is cleaned of dirt;
- The cylinder head spark plug is turned out and the piston is fixed. To do this, the crankshaft must be rotated until the exhaust port is blocked, and then a piece of rope is placed in the cylinder to lock the piston. After completion of the work, the rope is removed from the mechanism;
- The nuts on the clutch are unscrewed using the special wrench included in the kit. In this mechanism they are made with a left-hand thread, and this must be taken into account when dismantling. After this, the mechanism is disassembled and all its parts are inspected for damage. Although I already have it on my trimmer in order to remove the clutch assembly once as in the photo. I hope my tips on how to remove the mowing head on the Black&Decker GL716 trimmer How to replace. Worn parts must be removed and replaced with new ones.
After repairs and replacement of parts, it is necessary to reassemble in the reverse order. The disassembly process is presented in more detail in the video.
In order to independently repair such chainsaws as Shtil, Husqvarna, Partner, Goodluck, you need to know some of the features of the models. For example, some types of saws have a washer installed (between the drive sprocket cup and the motor). During assembly, it must be installed in its original place.
If the model is equipped with a special spring that transmits rotation to the pump drive, then its correct installation after repair is extremely important. Otherwise, the device may be seriously damaged. After preventive and repair work, it is necessary to check whether the mechanisms are working properly.
Replacement assembly
It is recommended to replace the clutch as an assembly. Reinstalling old parts in their original place is impractical because the risk increases after some time of having to reassemble and disassemble the clutch to replace mechanisms that have become unusable.
The need to replace a vehicle transmission component
Pressing the clutch pedal engages the release bearing, which acts on the basket spring mechanism, so that torque is not transmitted to the gearbox. Releasing the pedal causes the reverse sequence of actions.
The clutch is replaced in the following cases:
- the release bearing makes noise when the clutch pedal is depressed;
- the vehicle moves when the clutch pedal is in the “up” position;
- “downhill” movement with sharp pressure on the gas is accompanied by high speeds without accelerating the vehicle;
- clutch pedal gets stuck;
- no movement of the car when the clutch pedal is released.
Possible malfunctions include failure of the release bearing and clutch flywheel, breakdown of the shift fork and clutch disc. As well as wear of the clutch basket and the petals in it, weakening of the spring mechanism in the clutch basket.
Replacement instructions
Replacing the clutch yourself requires the use of lifting mechanisms. Such repair work is most often carried out in professional workshops.
Replacement steps:
- installing the front end of the vehicle on tripods;
- dismantling the front wheels and the fixation cable from the bracket;
- disconnecting the speedometer cable from the gearbox;
- unscrewing bolts from ball joints with steering knuckles;
- loosening of the rear longitudinal fastening from the left arm;
- disconnecting the bolts securing the left brace bracket;
- turning the lever 90°;
- removing weight from the gearbox;
- flap of the lower casing protecting the flywheel;
- left engine mount flap;
- unscrewing the rear engine mount and drive clamp;
- removing the gear shift drive;
- unscrewing the clamp from the gearbox motor;
- removing the gearbox from the engine without disconnecting the wires;
- releasing the clutch;
- replacing the release bearing and clutch driven disc with a mandrel.
Reassembling the mechanism is carried out in the reverse order. The complete clutch kit consists of a disc, clutch basket and release bearing. The price of a complete clutch is about a quarter cheaper than purchasing all the elements of such a mechanism separately.
How to change the clutch on a VAZ 2110, 2111, 2112
1). Loosen the mounting bolts on the left wheel. We jack up the front part of the wheel and place it on the sawhorses.
2). Remove the wheel and unscrew the 2 bolts securing the lower ball joint.
3). Remove the negative terminal from the battery.
4). We remove the mass air flow sensor (mass air flow sensor), loosen the clamp that secures the mass air flow sensor corrugation, and take out the air filter.
5). Remove the clutch cable from the clutch fork. Loosen the two fastening nuts that secure the cable to the bracket on the gearbox.
6). We unscrew the bolt that secures the starter to the box, and remove the first bolt securing the gearbox.
7). We find the second mounting bolt on the gearbox and release it. We also loosen the top bolt that secures the starter.
8). Remove the connector from the speed sensor and unscrew the speedometer cable.
9). We dismantle the longitudinal extension and the lever.
10). Unscrew the bolt that secures the starter.
eleven). Remove the 3rd gearbox mounting bolt. Unscrew another nut located near the right CV joint.
12). Remove the torque rod mounting bolts. There are two of them.
13). We loosen the nut, which is located on the clamp of the gearbox control drive rod, and remove the rod from the box.
14). We install the support under the engine, unscrew the 2 nuts that secure the rear cushion (the point of this is to avoid a possible breakthrough of the hoses).
15). Carefully remove the gearbox from the engine and release it to the floor. It should hang on the axle shafts.
16). As an option: we immediately replace the clutch release bearing.
17). We assess wear, replace the disc, install a new clutch basket if necessary, and check the paddles.
18). We perform assembly in reverse order.
Video
How to change clutches on Lada Priora?
1). We drive the car onto the overpass.
2). We remove the battery.
3). Disconnect the cable going to the speedometer.
4). We remove the gearbox and if you plan to put back the old pressure plate, then to maintain balance, you need to note the relative position of the flywheel and the casing of the above-mentioned disc
5). Next, insert the mandrel into the hole in the disk. You can do without this procedure, but then you need to hold the driven disk, otherwise it will fall out.
6). Holding the flywheel, unscrew all 6 mounting bolts. At the same time, this work must be done gradually, one turn from each bolt, so that the disk does not warp.
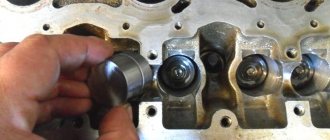
This protects the clutch
This drive plate is long worn out.
The surface is completely lowered. The status can only be seen when it is removed. When working with a coupling, there is only one basic rule to follow. That is: take your feet off the pedal. So take your foot off the pedal after every shift. And under no circumstances should you use it as a foot rest, where your foot leans on it at every bump in the road, constantly turning off and on, unnecessarily stressing the friction plate and throwout bearing. By the way, it especially suffers when someone is constantly standing at a traffic light with the gear in gear and the engine running, or perhaps in front of a railroad crossing. Better: Only when the traffic light turns yellow, shift into gear and drive away quickly.
Like a chainsaw engine
The newly released devices have a single-cylinder, two-stroke carburetor engine. It includes several mechanisms that work together. Main engine components:
- Flywheel;
- Connection;
- Incendiary module;
- Muffler;
- Bushing installation.
The motor installed in the saw operates at a frequency of 13.5 thousand revolutions per minute and therefore requires treatment with high-quality oil. During operation, a high level of cooling system is required. The engine of the unit is equipped with a cooling system that supplies air for the cooling systems.
Support the channel. turn off ( AdGuard\AdBlock ) the ad blocker. Please support our channel in any way you can.
how to unscrew the clutch on a chainsaw
for repair how to loosen the grip on the chainsaw for repair.
Clutch disc installation: what to pay attention to
Let's start with the fact that thanks to the clutch, the car is able to move off smoothly, gears are switched smoothly, which contributes to the normal operation of all elements of the transmission and the internal combustion engine itself, preserving the life of components and assemblies.
Taking into account the fact that the load on the clutch is high, the service life of the clutch itself is, on average, about 100 thousand km. Its wear is indicated by loss of traction, slipping of the clutch, incomplete disengagement of the clutch, difficulties when shifting gears, the clutch pedal may become soft or, conversely, too tight, etc.
As a rule, replacing the disc is carried out together with replacing the clutch basket, but in some cases only the disc is replaced. Let's move on. For many cars, there are two ways to replace the clutch:
- replacing the clutch with removing the gearbox;
- replacing the clutch without removing the box;
Chainsaw
The woodworking machine's clutch is centrifugal and automatically engages when the engine speed changes. If the speed is low, the elements of the mechanism are pressed against the shaft. Thus, the rotational motion is not transmitted to the sprocket. As the speed increases, the elements move apart and are pressed against the drum, thereby causing the chain to rotate.
A characteristic feature of this type of device is braking, where the chain slows down. This way it turns out to avoid some glitches. But still, this system is subject to enormous load, so it is necessary to systematically carry out preventive inspection and repair.
Clutch installation on 2112
Installation is carried out using a piece of pipe, the diameter of which should be slightly smaller than the cross-section of the rod. Place the new disk on the side that you previously remembered when removing the basket. Please note that there are no distortions. The disk must be installed absolutely level in its original place. Place the basket and thread the mounting bolts through the brackets. Tighten the bolts one by one, crosswise. After this, perform further assembly in reverse order.
How to delete
at the same time the drum. One of the main reasons for the failure of this device is
grinding sprocket teeth. In the monolithic version of the drum, the chain may cut through the sprocket during operation. This mechanism requires replacement. If the drum has a replaceable crown, it must be removed and replaced during maintenance. After this, the drum can continue to operate.
When there is a need for repairs, you need to contact a service center for help, where experienced specialists work. But if there is no one nearby, the question arises. How to remove the clutch yourself? If you have the right set of tools, you can easily implement the plan. Of course, there are some differences in models from different companies, but the disassembly scheme remains the same:
- First, the brake cover is removed by turning a lever. The nuts are slightly twisted to... After loosening, you can completely unscrew the nuts and remove the cover;
- Disassemble the chain and guide, as well as clean the mechanism from contamination;
- The cylinder head is rotated and the piston is locked. To do this, rotate the crankshaft until the relief hole is blocked, and then a piece of rope is placed in the cylinder to stop the piston. When the work is completed, the rope is removed from the mechanism;
- Unscrew the nuts on the coupling using the special wrench included in the kit. In this mechanism they are made with a left-hand thread, and this must be taken into account when dismantling. After this, the mechanism is dismantled and all its parts are checked for damage. Worn parts must be removed and replaced with new ones.
After repairs and replacement of parts, it is necessary to reassemble in the reverse order. The disassembly process is presented in more detail in the video.
To independently repair chainsaws such as Shtil, Huskvarna, Partner, Goodluck, you need to know some of the features of the models. For example, some types of saws have a washer installed (between and the motor). It must be replaced during assembly.
If the model has a special spring that transfers rotation to the pump drive, it is extremely important that it is installed correctly after repair. Otherwise, the device may be seriously damaged
After preventive and repair work, it is necessary to check whether the mechanisms are working properly.
Chainsaw Stihl (Calm). How to use
How to Lubricate the Sprocket on a Chainsaw Bar
How to install the clutch disc correctly: the opinion of motorists
- Which side should the clutch disc be placed towards the engine? “What happens if you put the clutch disc in reverse? I learned this the hard way. After assembly, I began to test the operation of the car, but there was simply no clutch, and extraneous sounds appeared, everything in the mechanism was grinding. As a result, I dismantled the gearbox again to install the element on the other side. I'll tell you what happens when the clutch is installed incorrectly.
The disc hub will rest against the flywheel support bearing, and the damper springs will rest against the bolts that secure the flywheel. As a result, a gap of 2-3 mm will appear between the disk and the flywheel. But the working area of the disk must be in full contact with the surface of the flywheel.On the reverse side, the basket will put pressure on the disk, and as a result it will be sandwiched between the basket and the flywheel. If you press the clutch, the release bearing will not be able to perform its function. The disk will be clamped, and torque will be transmitted from the internal combustion engine through the clamped hub and the damper spring housing.
How to install the clutch correctly? There are 3 methods.
Method one. Some disks are marked on both sides from the factory so that it is clear which side should be facing. There are also marks on the damper springs. The inscriptions will be made in the language of the country in which the parts were manufactured; this point is also worth paying attention to.
For example, on the side of the gearbox you can find the following inscriptions: “GEARBOX SIDE”, “PP”, “Getriebeseite”, “GB SIDE”, “TRANS SIDE”, “T/M SIDE”.
And on the engine side it may be written: “COTE VOLANT”, “FLYWHEEL SIDE”, “ENGINE SIDE”, “MOTOR SIDE”, “FW SIDE”, “SCHWUNGRAD-SEITE”.
Method two. We take the disk and apply it to the flywheel, first with one side, then with the other. If everything is correct, it should fit perfectly to the surface, nothing should catch. However, you can make a mistake here, because on many discs the hub offset is almost identical, no matter which side you apply it to, nothing will cling.
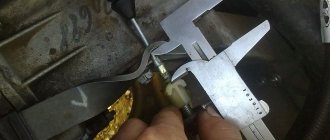
Method three. This is the best option to determine how to install the clutch correctly if nothing is written on it. Just conduct a visual inspection of the element using a caliper.
The side that faces the box will fit snugly against the basket, with the hub on that side sticking out.
There is an opening in the basket for the housing of the damper springs, in addition, the springs are also 75% placed towards the basket.
On the side adjacent to the engine, the springs will hardly stick out, by a maximum of 25%. The body is located flush with the work area. The hub will also be installed correctly.”
- Personal experience and little secrets of replacing the clutch disc
“It’s clear that if you put the clutch disc on the other side, then nothing good will happen. I installed it correctly, so I was sure that everything was in order. However, difficulties still arose.What should I pay attention to in order to install the clutch correctly?
Firstly, when you dismantle the gearbox, as well as the clutch completely, you should perform troubleshooting. Before you install the disk, look at it; if it is worn unevenly, for example, its edges are thin and the middle is thick, then the basket and flywheel will also have an uneven working surface.
Secondly, you need to remember not only which clutch disc to install, but also not to forget about the basket and flywheel. For example, you replaced the disk, but did not touch the basket and flywheel. In this case, the clamping area will not be full. After some time, you will have to dismantle the gearbox again.
Remember! During the repair, you need to install not only a new disk, but also a basket and a release bearing. Due to the fact that it can be difficult to purchase a flywheel (high cost, out of stock), I recommend taking it to a turner so that the master can sharpen the element. However, when the working surface of the flywheel protrudes, only the non-working area is machined. They grind off as much as from the work surface. This procedure is necessary to ensure that the basket damper is pressed properly.
There is no way to supply the entire clutch kit? Then we grind the basket. If all planes are made correctly, the mechanism will work properly for many years.
Conduct a visual inspection of the basket to identify uneven petal output. If the petals are unevenly positioned in the unpressed position, the basket should be replaced, because the damper will not press down enough. It is also necessary to install a new basket in the case when the petals are worn out due to the release bearing.
Are the petals okay? Then, before installing the clutch, bleed the basket from the inside. This way, all used elements will be removed, and it will begin to work properly. This procedure can be performed under pressure or you can make a squeezing device yourself.
Thirdly, be sure to install new oil seals.
One sealing lip is located on the input shaft of the gearbox, the second is on the main shaft. Typically, the input shaft oil seal is located in a removable cover, but in some cases it is necessary to disassemble half of the gearbox to replace it. For example, I encountered this on a 1997 Toyota Rav-4. The oil seal was pressed into place from inside the housing. If you have a Zhiguli, you will have to dismantle the bell to install a new oil seal.
In addition, it is imperative to re-glue the rear engine cover, the plugs hiding the gearbox bell, and the covers on the box, if any. Installing a new clutch and then finding out that there is an oil leak is not the best option. The cover may come with your engine along with the oil seal. If you have a Subaru, then due to the design features of the engine there is no cover. However, there will be a lot of plugs, they will also have to be re-glued.
As for the release and support bearings, they should also be replaced, especially since their cost is low. If you do not change them, you will have to spend a much larger amount on repairs.
Fourthly, it is important not only to position the clutch correctly, but also to center it.
This will make it easier for you to install the gearbox. Otherwise, the disc damper will be damaged and may crack. Please note that the basket bolts should be pulled diagonally, gradually. If you tighten them all the way straight away, the basket damper will burst.
Lubricant must be applied to the teeth of the input shaft, as well as the release fork tabs in the area of their contact with the release bearing. The place where the release bearing will move when squeezing, as well as the back side of the fork, where it is fixed to the thrust rod, also need to be lubricated.”
Clutch slave cylinder repair
Repair of the clutch slave cylinder must begin with its removal and disassembly. For this you need a vice and a bench tool. After removal, you need to place the working cylinder in a vice to make it more convenient to disassemble it.
Initially, you need to remove the protective cap along with the pusher. After this, it is necessary to remove the piston and remove the retaining ring located on the piston. You need to remove the O-rings and spring from the piston
After this, it is important to clean the air outlet fitting and all the holes that are in the cylinder
Next, you need to make sure that there is no mechanical damage to the cylinder bore and the outer surface of the piston. If there is any mechanical damage to the spring, it must be completely replaced. All O-rings, rubbers and protective caps must be replaced with new ones. After this, you need to rinse all parts with clean brake fluid.
How to replace the plug
The clutch drive fork is a kind of lever that retracts the pressure plate and disengages the clutch. In hydraulic drive gearboxes, such a mechanism, consisting of a pair of legs, a metal rod and a lever, is quite rare.
Replacement instructions
Along with other automotive mechanisms, the clutch fork can fail due to wear or cracking. Replacement steps:
- removing the return spring;
- bending the cylinder and removing the fork axis;
- removal of special protective coating;
- removing the plug.
At the final stage of replacement, a new mechanism is installed. For this purpose, the end of the spring is inserted into the hatch and smoothly moves towards the end past the bearing coupling and springs to a special recess with petals.