Tuning and repair of VAZ 2110
Not long ago I encountered a problem: the engine on the radiator side began to become covered with something oily. It was impossible to determine where the leak was coming from. Therefore, I washed the engine using chemicals intended for washing engines and Karchers. After driving for a couple of days, I drove the car into a pit, took off the engine protection, since you can’t really look under the hood. And I saw streaks in the crankcase area, namely in the area of the oil pan gasket. So I established that the gasket had become unusable. In this article I will tell you how to replace the oil pan gasket of a VAZ 2110. I want to say right away that such a repair will require an overpass or a pit.
- Remove the engine protection.
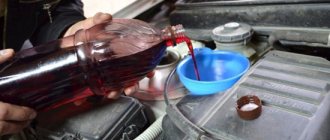
- Drain the oil. If you recently had an oil change and don’t want to spend money again (this happened to me too, I change the oil every 10 thousand, and after the change and before problems with the gasket I drove 7 thousand km), then drain it into a clean container. I took a six-liter bottle from under the water.
- Now you need to unscrew all the bolts securing the pallet - there are 16 of them. Be careful not to lose the shaped washers under the bolts.
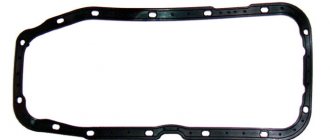
- Remove the old gasket.
6. Install a new one, having first thoroughly coated the places where it fits with sealant.
7. Place the VAZ 2110 oil pan in place. 8. Reinstall the 16 bolts. It is better to tighten it from the center to the edges of the pallet, this way the gasket will fit better. 9. Fill in the oil drained before repair. Or if you decide to change the oil in one fell swoop, then follow the instructions described here. 10. Install engine protection. That's the whole process of replacing the oil pan gasket. As you can see, there is nothing complicated. You can do this VAZ 2110 repair yourself and not overpay. __________________________________________________________________________ Source
Cleaning the crankcase ventilation system on VAZ 2113, VAZ 2114, VAZ 2115
Welcome! Crankcase ventilation system - it is present in many gasoline cars, due to it the environment is not heavily polluted and all exhaust gases are sent back to the car engine for combustion; in old cars, people themselves modify this system in such a way that all the crankcase ventilation hoses go outside (And this is all due to the fact that the engine begins to release contaminated crankcase gases and if they fly back into the engine, they will simply choke it), because of this, the environment suffers, we immediately warn you, but the engine’s power increases and it It will be much easier to breathe. Note! To clean the crankcase gas system, you will need: Screwdrivers, all kinds of wrenches and pliers!
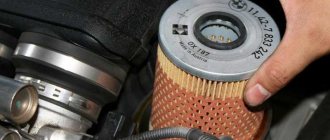
Where is the crankcase ventilation system located? This system consists of two hoses (Indicated by arrows) and a filter that passes all dirty air and oil particles through and thereby cleanses all the air of this rubbish, the filter itself is located in the valve cover (Location is indicated by a green arrow), in more detail if If you want to see it, look at the small photo, it is made in the form of a grid pack.
Note! The principle of operation of the ventilation system is this: when the engine is running, the mixture burns and for the most part everything goes into the exhaust pipe, but still, a little bit through the piston rings, vapors break through and in this case the ventilation comes into operation, due to it these vapors come out first along the lower ventilation pipe (Indicated by a blue arrow in the photo above), then they are cleaned by a filter and pass in purified form to the upper hose, the hose of the small ventilation branch (Indicated by a red arrow), and thus these unburnt vapors fly back into the car engine, to re-combustion, that’s how the ventilation system works!
When should you clean the crankcase ventilation system? When the filter becomes clogged with dirt, when the hoses become clogged, all this dirt begins to fly into the engine, so that the dirt does not fly, you need to periodically wash the filter and clean the hoses inside with a cloth, the frequency of this depends on how worn out the engine is, in new engines the first 50 thousand in general There’s no point in even getting into the crankcase ventilation system, because the rings on the pistons are intact and there’s not a lot of vapor breaking through them into the system. On used engines, we recommend it more often, since this operation is not long and there is no harm from it, only benefit ( The factory calls the figure 60,000 thousand kilometers, this is a lot, if you treat your car well, then clean the system much more often, once every 30,000 thousand kilometers approximately).
How to remove the pan on a VAZ 2114
Most car enthusiasts have heard about the existence of such a part in a car as an oil pan. But if you ask a beginner what it is needed for, what functions it performs and what it consists of, it will be quite difficult to get an intelligible answer. At the same time, everyone knows that the crankcase must be protected from mechanical shocks (there is even special protection for this).
Purpose of the oil pan and design features
The oil pan is shaped like a small bath of unusual dimensions. Depending on the make and model (and, accordingly, engine design), it may have a different configuration. Everything is done in order to prevent possible contact with the elements of the transmission located underneath or, for example, the front axle gearbox.
Some cars have a so-called “dry” sump. It has one interesting feature. The oil is not in the pan (as is usually the case), but in a special tank.
On most cars (including domestic cars), the task of the pan is to collect and store oil that circulates through the engine system. It is in the oil pan that all unnecessary debris settles, which can appear during the friction of various metal parts.
In addition, oil is collected in a special container, which at a certain point in time is not involved in the lubrication process. Subsequently, the composition is captured using an oil intake and sent to the main engine components. At the same time, the installation of such an oil “sucker” is well thought out. It captures oil not from the very bottom (where there is a lot of dirt and sediment), but a little higher. Moreover, in some models special magnets are installed at the bottom of the tray. Their task is to hold metal “chips” and prevent them from returning back to the engine.
On the inside of the crankcase there are special anti-drip bulkheads. Their task is to prevent oil from splashing during movement. In addition, the hole for draining oil from the engine is also located in the oil pan. Everyone (even beginners) knows how to check the oil level in the crankcase - this is done using a special oil dipstick.
The oil pan is a removable mechanism. It is fixed to the main unit using several bolts. In this case, a special gasket made of rubber or cork material is installed between the pan and the crankcase. Its task is to eliminate oil leaks at the junction of two elements. If the gasket is damaged, it should be replaced as soon as possible. If the malfunction is not noticed in time, the lion's share of the oil may leave the engine. The consequences for the most expensive component of a car can be very tragic.
Changing the oil pan gasket on a VAZ-2114
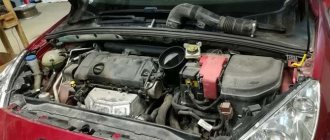
So, when the first symptoms of an engine oil leak appear, the first thing to do is inspect the engine. Damage to the gasket can be seen immediately by the appearance of a characteristic leak at the junction of the crankcase and the pan. The reasons may be different - natural aging of the material, poor quality of the gasket and its wear. In addition, problems with the gasket may appear after installing an initially defective product or insufficient (or, conversely, too strong) tightening of the bolts.
As for the gasket replacement process, it will take you no more than 20-30 minutes.
The algorithm of actions should be as follows:
- Carry out the work in a viewing hole in the garage or use a lift. If this is not possible, then you can jack up the front of the car and install wooden trim.
- Place special shoes to securely secure the car, apply the handbrake and engage first gear.
- If your car has a metal crankcase protection, unscrew the mounting bolts and move the structure to the side (it will not be needed yet).
- Start the engine and bring it to operating temperature. This is necessary in order to warm up the oil a little and reduce its thickness.
Replacing the oil pan gasket
Replacing the oil pan gasket
The work associated with replacing engine seal parts is quite labor-intensive and requires a lot of time and effort. But what can you do, the car requires care and attention, such is the lot of every car enthusiast.
If you notice that oil leakage has appeared around the perimeter of the oil pan mounting to the cylinder block, try to eliminate the leak by tightening the mounting bolts. When tightening, the bolts should be pulled smoothly, since excessive force can lead to pulled threads or tearing off the bolt head, which entails additional repairs (you may have to drill out the bolt or re-thread the cylinder block, which is extremely inconvenient in cramped conditions).
After tightening the bolts, you again find oil leakage; you need to replace the oil pan gasket . In exceptional cases, it is possible to eliminate a leak using a sealant (this is if, for example, you are on the road and you do not have the opportunity to replace the gasket with a new one). Next, you will need an inspection hole or a lift, and you will also need a tool. A set of 10.13 socket heads, universal joints, and a long adapter is best suited.
1. Remove the shield protecting the crankcase.
2. Next, you need to drain the oil from the engine, unscrew the oil plug from the valve cover, which is located on top of the engine, thereby ensuring air access necessary for normal oil drainage, prepare a bucket or any suitable container, unscrew the lower oil plug on the crankcase, and completely drain the oil.
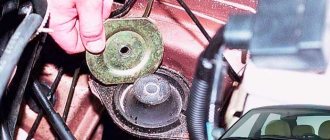
3. since, due to the limited distance, you will not be able to remove the crankcase, you will need to lift the engine, to do this you need to unscrew the nuts securing the engine mounts on the right and left sides.4. It is possible to lift the engine using two devices: a manual hoist and a cross beam. Next, we will describe the method of lifting the engine using a traverse. Having installed the yoke, lift the engine by about 3 cm; to do this, you need to turn the nut in the middle of the yoke.5. It is necessary to lift the engine so that the studs do not come out of the holes in the bracket.
Symptoms of a problem
Replacing the crankcase is a complex and responsible procedure that must be performed in strict compliance with technological standards. Making mistakes is strictly not recommended.
If the replacement is carried out incorrectly, the rupture may occur again, foreign particles will get inside the crankcase, sealing will be insufficient, which will lead to failure of the engine or its individual components.
It would seem like a simple gasket, but what a burden of responsibility lies on it.
To determine the need to replace the gasket, you should pay attention to the characteristic signs of such a problem:
- Oil is leaking.
- There is a decrease in pressure in the oil system.
- The oil level drops more rapidly than usual.
VESKO-TRANS.RU
Content
Replacing the oil sump on a VAZ 2110 do it yourself
What is that crankcase gasket for, really? Engine 10 contains a huge number of units, components and systems. The crankcase is the engine housing and plays a decisive role. Indeed, it specifically contains all the necessary engine elements and provides them with the necessary protection, allowing the oil to circulate.
Main reasons for replacement
In fact, replacing the VAZ 2110 oil pan gasket may be necessary if it is damaged. There are not many circumstances:
- Blow on the oil pan;
- Gasket deformation;
- The influence of the highest internal pressure, which violates the integrity of the gasket;
- There are several reasons for the merger.
symptoms
If the change is made incorrectly, the clearance may be repeated, foreign particles will enter the crankcase, the seal will be insufficient, resulting in failure of the engine or its individual components.
This may seem like a normal installation, but the onus is on him.
To determine the need to replace the gasket, you should pay attention to the corresponding signs of such an obstruction:
- Oil is leaking.
- There is a decrease in pressure in the oil system.
- The oil level is dropping better than usual.
Removing the oil pan
- When everything is ready, loosen all the bolts located around the pan flange. Sometimes you need to use ratchet handles or ratchet extensions to get better access to some bolts.
- Then finish removing all the bolts and remove the pan from the bottom of the engine block by hand if necessary. If it seems stuck, tap it lightly with a rubber mallet. *However, when the pan does not come loose, make sure that you have removed all mounting bolts and that no other component is holding it in place. * If this doesn't work, use a gasket cutter to cut the seal by pushing the cutter with a rubber mallet between the flange and the engine block in several places around the pan. Do not use a screwdriver to release the pan, otherwise you may damage it or the mating surface of the engine.
- Once you've removed it, check the bottom surface for metal shavings. You may find a few chips, but a large number of them may indicate excessive wear on some engine components. If necessary, contact a repair shop.
- Thoroughly clean the area where the tray is located. You must remove old gasket material and deposits. The gasket scraper speeds up the task without damaging the surface.
- After removing any traces of gasket or silicone, use solvent to clean the mating surfaces and, if necessary, wash the pan with cold detergent. If the grease and silicone are difficult to remove, use carburetor cleaner or engine degreaser and a wire brush to remove this sealant.
- Next, check the pan for damage, such as cracks, and double check the pan flange for bends. You can do this by placing it on a flat surface. The glass surface is perfect for this. * Take a close look at where the flange and glass meet, especially around the bolt holes. * You should not see any spaces. If not, straighten the flange by lightly hitting the curved areas with a hammer.
Preparing for work
Preparation plays a big role in successfully replacing the oil pan gasket. Actually, this event will not be very difficult.
- Drive the car into the pit or lift it using a lift;
- Provide high-quality light so that you can carefully inspect the condition of the pallet;
- Remove the crankcase protection if you previously installed it on your VAZ 2110;
- The oil pan must be cleaned because a large amount of dirt and oil accumulates on it. It is also recommended to clean the areas adjacent to the oil pan;
- The easiest way to detect a leak is when the engine is warm, but only at idle speed. This will increase the pressure in the oil system and will show how serious the problem is with oil leaking through the oil pan gasket.
Functions, structure and location of the VAZ 2110–12 oil pump
The engine lubrication system is designed to timely supply engine oil to the moving and hottest elements of the power unit. Oil is supplied from the sump and circulates through special channels inside the block and cylinder head. The oil pump ensures forced circulation of the lubricant.
Location of the oil pump on the VAZ 2110–12
On the VAZ 2110–12, the oil pump is located in the lower right corner of the cylinder block under the crankshaft gear, which drives the gas distribution mechanism.
The oil pump is located in the lower right corner of the engine under the crankshaft gear
This applies to both eight and sixteen valve engines. The pump housing is also the side cover of the power unit.
Oil pump device
The design of the oil pump is very simple and includes the following elements:
- housing with lid;
- driving and driven gears;
- pressure reducing valve with spring;
- oil receiver
The oil pump has a simple design based on two gears
Operating principle of the oil pump
The pump is driven by the crankshaft through the drive gear. The latter rotates the driven gear, creating a reduced pressure at the input of the device and increased pressure at the output. Thus, oil from the crankcase flows through the oil receiver tube into the pump, and from it into the engine oil line. When the pressure inside the pump begins to exceed the permissible value, a spring-loaded pressure relief valve drains excess oil back into the sump.
Replacing the pan gasket
Nowadays, various types of sealants and additives that can eliminate leaks have become quite popular. But these are all the machinations of marketing companies. In fact, these funds are of little use. The sealant can only give a temporary result so that you have time to get to the garage or service station, where you can change the gasket.
Attempts to use such methods sometimes end sadly. The pressure increases, the gap becomes even larger, and the oil leaks out almost completely. If such a problem catches you on the road, far from the service station, no one will envy you.
At the first sign, take the car into the garage and replace the gasket. You can do this yourself.
Now we will tell you exactly how this is done.
- It is necessary to remove the oil pan in case of a leak or during engine repairs. If you need to repair the engine, but you have never installed a gasket before, we advise you to combine these two activities.
- Also, dismantling the crankcase and installing a new gasket makes it possible to perform another useful procedure for your car - changing the oil. Combine them.
- First of all, remove the mud flaps from the front wheels of the car.
- Now drain the oil. If you have changed it at least once, there should be no problems at this stage.
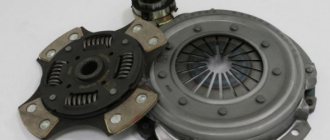
- Unscrew the three bolts that secure the lower clutch housing cover and remove it.
- Arm yourself with a 10mm socket, with which you unscrew all 16 bolts responsible for fastening the oil pan.
- Remove the pan. It would be advisable to clean it, rinse it thoroughly with special products.
- After removing the pan, you will find a gasket at the joints. If the car has been in use for a long time, its condition will not be the best. But you don't care anymore, since you plan to change it.
- Remove the old gasket from the joint and clean the surface of all kinds of contaminants. The cleaner the connection, the more securely the new gasket will fit into its rightful place.
- It is recommended to strengthen all joints using a special automotive sealant. The gasket itself does the job well, but it is never a bad idea to supplement its level of protection. Sealant is an affordable pleasure for every car owner.
Pay special attention to the type of engine oil pan gasket you buy. It must be a high quality product. Don't waste your money on it. In addition, the gasket will be quite cheap, even if it is produced by a leading auto parts manufacturer.
As you can see, the procedure for replacing the oil pan gasket in a domestic VAZ 2110 car is not at all complicated. Try to combine several procedures at once, since you decide to remove the pan. Let’s hope that you won’t have to repair the engine; the “ten” will serve faithfully for many years to come.
But once you remove the crankcase and drain the oil, it’s a good idea to replace it with a new, fresh one. The engine will only be grateful to you for this.
Loading …
Replacing the oil pan gasket on a VAZ 2110 with your own hands
Actually, why is this crankcase gasket necessary? The “tens” engine includes many units, components and systems. The crankcase is the engine body and plays a vital role. After all, it is it that contains all the main elements of the engine inside itself and provides them with the necessary protection and allows oil to circulate.
Main reasons for replacement
In fact, replacing the oil pan gasket on a VAZ 2110 may be necessary if it is damaged. There are not many reasons:
- Impacts on the oil pan;
- Gasket deformation;
- Exposure to high internal pressure, which violates the integrity of the gasket;
- A confluence of several factors at once.
Symptoms of a problem
If the replacement is carried out incorrectly, the rupture may occur again, foreign particles will get inside the crankcase, sealing will be insufficient, which will lead to failure of the engine or its individual components.
It would seem like a simple gasket, but what a burden of responsibility lies on it.
To determine the need to replace the gasket, you should pay attention to the characteristic signs of such a problem:
- Oil is leaking.
- There is a decrease in pressure in the oil system.
- The oil level drops more rapidly than usual.
Preparing for work
Preparation plays a big role in successfully replacing the oil pan gasket. Actually, this event will not be very difficult.
- Drive the car into the pit or lift it using a lift;
- Provide high-quality light so that you can carefully inspect the condition of the pallet;
- Remove the crankcase protection if you previously installed it on your VAZ 2110;
- The oil pan must be cleaned because a large amount of dirt and oil accumulates on it. It is also recommended to clean the areas adjacent to the oil pan;
- The easiest way to detect a leak is when the engine is warm, but only at idle speed. This will increase the pressure in the oil system and will show how serious the problem is with oil leaking through the oil pan gasket.
Replacing the pan gasket
Nowadays, various types of sealants and additives that can eliminate leaks have become quite popular. But these are all the machinations of marketing companies. In fact, these funds are of little use. The sealant can only give a temporary result so that you have time to get to the garage or service station, where you can change the gasket.
Attempts to use such methods sometimes end sadly. The pressure increases, the gap becomes even larger, and the oil leaks out almost completely. If such a problem catches you on the road, far from the service station, no one will envy you.
Now we will tell you exactly how this is done.
- It is necessary to remove the oil pan in case of a leak or during engine repairs. If you need to repair the engine, but you have never installed a gasket before, we advise you to combine these two activities.
- Also, dismantling the crankcase and installing a new gasket makes it possible to perform another useful procedure for your car - changing the oil. Combine them.
- First of all, remove the mud flaps from the front wheels of the car.
- Now drain the oil. If you have changed it at least once, there should be no problems at this stage.
- Unscrew the three bolts that secure the lower clutch housing cover and remove it.
- Arm yourself with a 10mm socket, with which you unscrew all 16 bolts responsible for fastening the oil pan.
- Remove the pan. It would be advisable to clean it, rinse it thoroughly with special products.
- After removing the pan, you will find a gasket at the joints. If the car has been in use for a long time, its condition will not be the best. But you don't care anymore, since you plan to change it.
- Remove the old gasket from the joint and clean the surface of all kinds of contaminants. The cleaner the connection, the more securely the new gasket will fit into its rightful place.
- It is recommended to strengthen all joints using a special automotive sealant. The gasket itself does the job well, but it is never a bad idea to supplement its level of protection. Sealant is an affordable pleasure for every car owner.
As you can see, the procedure for replacing the oil pan gasket in a domestic VAZ 2110 car is not at all complicated. Try to combine several procedures at once, since you decide to remove the pan. Let’s hope that you won’t have to repair the engine; the “ten” will serve faithfully for many years to come.
Argon welding
Argon welding is the most effective way to remove damage. This type of welding can be used to weld both aluminum and any other non-ferrous metal alloys. A good welder can easily fix a crack or weld a small hole, and the seam will not affect the functionality in any way. The disadvantage of such repairs is the high price. You can, of course, save money if you remove the part yourself and contact welding specialists directly. But in the case of common brands of budget cars, it will cost less to replace the oil pan with a new one.
Signs
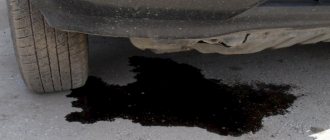
The first sign by which you can recognize a gasket leak is an oil leak at the junction of the pan with the internal combustion engine. But since this element is the lowest point of the engine, it is not always possible to recognize a breakdown in time. Moreover, the scale of the problem can be different - from slight “fogging” to black oil puddles. The first option is not so scary for the car owner. Some drivers have been driving with this for years. However, if after a short parking period oil streaks form on the asphalt, it is worth inspecting the condition of the pan.
Also, a pan gasket that has lost its tightness affects the oil level. It will gradually decrease. How intensively the oil will leak depends on the scale of the tragedy. Driving with a dry engine is extremely dangerous. Once every thousand kilometers, experts advise checking the level on the dipstick. It should be above the average mark.
If it is at a minimum, the engine will experience oil starvation. Inserts, rings and other elements work “dry” - ellipse of the cylinders and other problems are formed.