Replacing piston rings
If compression is insufficient, the VAZ 2106 engine loses power and begins to consume excessively not only gasoline, but also oil.
In the best case, you can get by with a simple replacement of the piston rings, in the worst case, a complete overhaul of the engine, starting from turning the cylinders, replacing the piston group and ending with repairing the car’s crankshaft. If you decide to change the rings yourself, there should not be any special problems when performing this repair. Of course, you will need a considerable list of tools to do this as quickly and conveniently as possible. And also, it is necessary to perform a number of preparatory work to get to the pistons:
Personally, I carried out this procedure with the engine removed, since the car was almost completely disassembled. But everything can be done even with the engine installed, but then it is most convenient to carry out repairs on a pit or a lift.
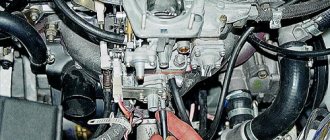
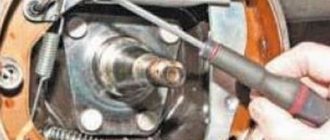
So, after the pan cover is removed, you can take a 14mm socket with a wrench and unscrew the two nuts securing the connecting rod cover. This is shown more clearly below:
When both nuts are unscrewed, you can remove the cover by hand; it can usually be easily removed without any problems:
Then, with a certain force, you need to press the connecting rod bolt with your hand or even with the handle of a hammer:
Until the piston comes out from the back of the cylinder. It will roughly look like this:
This should be done quite carefully so as not to damage either the piston itself or the cylinder walls:
Next, you can begin to remove and replace the piston rings if the cylinders are not yet worn out. To do this, carefully pry the edge of the ring with your fingernail or finger and remove it from the piston groove:
And carefully turn the ring until it is completely free from the groove:
After all the rings, both compression and oil control, have been removed, you can measure the clearance by inserting them into the cylinder and inserting a feeler gauge into the hole between the two edges:
If the values exceed the nominal values, we replace the rings with new ones. After which you can install all the parts in the reverse order of removal. It is worth paying special attention that when installing the rings, their locks should be directed in different directions for greater tightness of the cylinder.
Installing rings on the piston
Once again, to what was said above, I repeat - this instruction implies that replacing the piston rings of a VAZ 2101 is done only with your own hands, in a private garage. Therefore, by default, we do not have any “sophisticated” tools and use available materials to install the rings on the piston and the entire piston with rings into the cylinder. In our case, this is... a tin can.
Advice! One strip should be under the “lock” of the ring to prevent scratches.
Of course, you can perform this action with your bare hands, but the risk of breaking the rings and scratching the piston is too great.
Installing a piston into an engine cylinder
Lubricate the piston rings with oil, insert them into the cylinder block from above and, using a homemade mandrel, insert the piston into the cylinder.
Attention! During this procedure, make sure that each piston fits exactly into the cylinder from which it was taken and is in the same position as before. The cylinder markings must be on the lower connecting rod heads.
Piston repair: what you should pay attention to
Modern materials and technologies for manufacturing parts make it possible to operate the engine under very intense conditions. The maximum crankshaft rotation speed reaches one hundred revolutions per second. In this case, the piston and connecting rod reach a translational speed of up to 30 m/sec twice for each revolution (two hundred times per second). and the same number of times they come to a complete stop, causing huge cyclic inertial loads (the weight with such acceleration increases by more than a thousand times). Therefore, technologists try to make the piston as light as possible, making it from an aluminum alloy with a cast steel plate that compensates for thermal deformations. The piston has stiffening ribs and hard anodizing, up to the fire zone, which protects the bottom and the groove of the upper compression ring from burning out. Friction is reduced by the most advanced brands of oils with additives. But it is impossible to avoid wear, so periodically, after a certain mileage, the piston VAZ 2106 is replaced. It is better to do this when the first symptoms appear:
Operating a car with wear and tear can lead to damage that will require major repairs, which will increase the price many times over.
How to dismantle the piston yourself
First of all, it is necessary to thoroughly wash the engine, since after disassembly it will be difficult to prevent grains of sand and dirt from getting inside. The engine must be placed on a sturdy rack at a height convenient for work. Prepare rags, a set of tools and accessories:
- socket, ring wrenches and heads 10 mm., 12 mm., 13 mm., 14 mm., 17 mm., 19 mm., 22 mm., and wrench 36 mm.;
- a set of thin flat probes;
- bore gauge;
- micrometer;
- calipers;
- torque wrench;
- device for compressing rings on the piston;
- bushing for installing piston pins;
- gas-burner;
- hammer;
- core;
- portable lamp;
- large flathead screwdriver.
Tip: Before disassembling with your own hands, all parts are marked with a core, and a photo of the initial location is taken with the numbers and marks of the removable parts so that they can be installed in their place if they are suitable.
Disassembly sequence
- The engine with the head, pan and side covers removed is laid on its side to allow access to the pistons and connecting rods. Wrench 36 mm. the crankshaft is rotated to the position of maximum extension of the nuts of a pair of connecting rods.
- Using a head and a long wrench, you need to unscrew two nuts each, securing the connecting rod cap of the first and fourth cylinders, you can use any one, but it is more correct to follow the chosen sequence. By lightly tapping with a hammer, the cover moves out of place, allowing you to easily remove it from the studs. It is advisable to first familiarize yourself with the stages of work via video.
Tip: The caps and connecting rods form a pair; during their manufacture, the final boring of the mounting hole is done in assembled form, so they are marked with the cylinder number and cannot be replaced. You need to make sure that the numbers match when assembling and are directed in the same direction.
- Using the wooden handle of a hammer, resting against the pin, the connecting rod with the piston is pushed out through the upper plane of the cylinder block. The crankshaft is rotated to the maximum extension position of the nuts of the other two connecting rods. All four pistons are disassembled in the same way. The main bearings are unscrewed and the crankshaft is removed for visual inspection.
Attention: The main bearing caps are marked with marks; it is very important to place them only in their place, since they are not interchangeable; this is required by the boring technology and assembly instructions.
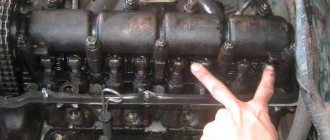
- The liners are removed from the connecting rods and covers. When repairing a VAZ 2106, the piston rings are replaced, starting with the upper compression ring, all the rings are sequentially removed from the pistons, and the piston pins are knocked out with a bushing. If possible, it is better to use a press. The parts and the block are washed with kerosene, blown with compressed air, the cooling and lubrication channels are purged.
- Sanded surfaces are wiped and checked for damage. For inspection, a portable lamp is used, changing the angle of illumination to conveniently examine small scratches. Cracks are not allowed; if they are detected, defective parts will have to be replaced, including the block.
- Wear is measured using a bore gauge in four planes located from the top plane at a distance of 5mm, 15mm, 50mm. and 90 mm. In each plane, two measurements are taken in perpendicular directions.
Piston rings for VAZ 2106
The pressure of the working gases after ignition of the fuel mixture exceeds 60 kg/cm2, which creates an axial load of more than 3000 kg. and lateral load up to 250 kg. High temperature contributes to accelerating the destruction process, when the VAZ 2106 piston needs to be replaced.
Replacement
Personally, I carried out this procedure with the engine removed, since the car was almost completely disassembled. But everything can be done even with the engine installed, but then it is most convenient to carry out repairs on a pit or a lift.
So, after the pan cover is removed, you can take a 14mm socket with a wrench and unscrew the two nuts securing the connecting rod cover. This is shown more clearly below:
When both nuts are unscrewed, you can remove the cover by hand; it can usually be easily removed without any problems:
Then, with a certain force, you need to press the connecting rod bolt with your hand or even with the handle of a hammer:
Until the piston comes out from the back of the cylinder. It will roughly look like this:
This should be done quite carefully so as not to damage either the piston itself or the cylinder walls:
Next, you can begin to remove and replace the piston rings if the cylinders are not yet worn out. To do this, carefully pry the edge of the ring with your fingernail or finger and remove it from the piston groove:
And carefully turn the ring until it is completely free from the groove:
After all the rings, both compression and oil control, have been removed, you can measure the clearance by inserting them into the cylinder and inserting a feeler gauge into the hole between the two edges:
The nominal ring gap ranges from 0.25 to 0.45 mm. The maximum permissible gap at which it is necessary to urgently change the rings is 1.0 mm.
If the values exceed the nominal values, we replace the rings with new ones. After which you can install all the parts in the reverse order of removal. It is worth paying special attention that when installing the rings, their locks should be directed in different directions for greater tightness of the cylinder.
Changing the oil in the rear axle at the link.
Installation
Before installing new piston rings, you need to check the gap at their joints.
It is assumed that the gap between the ring and the landing groove area has already been checked and complies with the standards.
Arrange the pistons and connecting rod assemblies and new piston rings in such an order that the set of rings matches the given cylinder on which the joint clearance will be measured.
Insert the top ring into the first cylinder and push the piston bottom inward so that the ring inside the cylinder becomes perpendicular to its axis. The ring should be at the bottom of the cylinder, in a position corresponding to bottom dead center.
The gap at the piston ring joint is measured with a feeler gauge. Compare the result with the set value.
If the gap is larger or smaller than specified, repeat the measurement to ensure that the ring can be installed.
If the gap is too small, then it must be increased, since otherwise, during engine operation, the ends of the ring will close, which can cause serious damage. The gap at the piston ring joint can be increased by carefully filing the ends with a thin file. Clamp the file in a vice with soft jaws and carefully move the ring along it, removing excess material.
The gap may exceed the established one, but should be no more than 1 mm.
The measurement should be repeated to ensure the suitability of the ring.
Repeat the measurements for each ring installed in the first cylinder, as well as for each of the rings installed in the other cylinders.
After measuring the gaps at the ring joint and adjusting it, the rings can be installed on the pistons.
The oil scraper ring (the lowest one on the piston) is installed first.
This ring consists of three parts.
Install a separator/expander into the groove.
Install the lower oil scraper ring guide. When installing the guides, you cannot use the device for putting on the rings, as they may break. Insert one end of the guide into the groove of the piston, between the separator and the horizontal platform of the groove, and, holding it firmly, insert the second end of the ring into the groove with your finger. Install the second guide in the same way.
After installing all the oil scraper ring parts, make sure that the upper and lower guides rotate freely in the groove. Arrange the joints of the oil scraper ring according to the picture.
The middle ring (number 2) is installed next. This ring is stamped with an “R” mark, which should face the piston bottom.
How to choose
You take the ring, insert it into the cylinder and see what thermal gap you have left. 0.2-0.3 mm is the norm.
The gap in the piston grooves for the upper one is 0.04-0.07, for the lower one 0.03-0.06; if the gap between the cylinder and the piston is more than 0.15, then a different piston group should be selected.
Crankshaft installation process
Before installing the crankshaft on the VAZ 2106, you need to wash, clean and dry the cylinder block. And only after that read the process.
Tools
To complete the installation you will need the following tools:
- a set of keys;
- Screwdriver Set;
- micrometer;
- consumables (liners, seals, half rings);
- torque wrench.
If defects in the form of scratches, burrs, or signs of wear are found on the surface of the liners, they must be replaced. The earbuds cannot be adjusted. When using the removed bearings further, you need to check the gap between them and the main and connecting rod journals of the crankshaft. For main shafts, the permissible size is 0.15 mm, for connecting rods - 0.10 mm. If the dimensions exceed the permissible limits, the liners are changed to a greater thickness after boring the necks. If the journals are properly ground and the appropriate bearings are selected, the crankshaft should rotate freely.
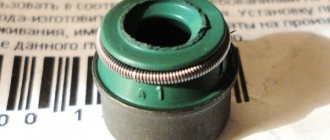
The oil seals that ensure the tightness of the crankshaft are replaced regardless of how long they have been standing. Half rings, like liners, cannot be adjusted. If burrs and scratches are found, the half rings are replaced. They are also changed if the axial clearance of the crankshaft is greater than the maximum permissible, which is 0.35 mm. The selection of new rings is carried out according to the nominal thickness or with a thickness increased by 0.127 so that the axial clearance is in the range of 0.06-0.26 mm.
Replacing the Rings of a VAZ 2106 Without Removing the Engine
replacement
piston
rings VAS 2106 no removal engine
replacement piston rings
. VAZ-21012107 When clouds of blue smoke escape from the exhaust pipe, people come to their senses with sad thoughts. There is nothing to be done, engine repair is a nasty, but inevitable step in the current life of the car.
In Lada engines that have run about 100 thousand km, the piston group is noticeably worn out. Signs of this are excessive gas consumption, engine compression below 10 kgf/cm2, the highest oil consumption (from the mark to a maximum of min per year of 1000 km), gray exhaust gases. In this case, the oil consumption after replacing the classic valve seal is unusually small. At the same time, it is often possible to replace the piston rings without removing the engine from the car. In this case, only new gaskets for the head block and pan.
Other useless parts will be dismantled. We do ditch work, as it's called flying. Using a special tool, a torque wrench and a piston ring
. Remove the battery, air filter housing, carburetor, distributor, vent hose and engine compartment oil drain.
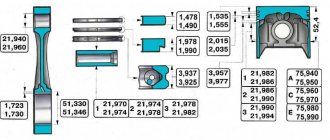
piston markings
The bottoms of different models used on VAZ engines are shown in the figure. The pistons of the VAZ 21213 and VAZ 21230 are distinguished by their markings.
The marking is applied to the surface next to the piston pin hole.
The numbers “213” are printed on the piston of the VAZ 21213, and “23” on the VAZ 2123 model.
Models VAZ 21080, VAZ 21083, VAZ 21100 have the corresponding markings - “08”, “083”, “10”.
The piston 2108 has a diameter of 76mm, models 21083 and 2110 - 82mm.
The pistons of the VAZ 2112 and VAZ 21124 are marked accordingly - “12” and “24” and differ in the depth of recess for the valve.
Models 21126 and 11194 differ in diameter.
What are piston rings and their purpose
Piston rings are elastic, open elements that are installed in special grooves on the piston body.
They are made of high-strength steel or cast iron, and covered with an alloying material on top. The alloy coating further increases strength and also reduces wear rates. Typically, 3 rings are inserted into the piston: 2 compression rings (occupying the 2 upper grooves) and 1 oil scraper ring (the lower groove). The purpose of the compression rings is to prevent hot gases from breaking through along the piston into the engine crankcase. Oil scraper - removes excess oil from the cylinder mirror, preventing it from entering the combustion chamber. In addition, the rings reduce the temperature of the piston, transferring almost half of the heat from its surface to the cylinder walls.
When the piston rings no longer cope with the tasks assigned to them due to their wear, the car engine signals this by displaying the corresponding symptoms.
Signs of piston ring wear
Blue or black smoke from the exhaust pipe indicates that wear has reached a critical stage. This indicates that excess oil entered the combustion chamber past the oil scraper ring and burned there along with the fuel. Black smoke coming out of the crankcase ventilation tube indicates that the compression rings, due to wear, allow gases to escape from the combustion chamber into its cavity.
Critical wear is accompanied by a decrease in compression (the ability to maintain pressure) in the engine cylinders. This means that some of the gases formed during the combustion of the fuel mixture, which was supposed to push the piston, broke into the crankcase without performing useful work. This is what will lead to a drop in pressure in the cylinder, therefore, the engine will lose some power. Increased oil consumption is observed.
Compression is checked with a special device - a compression meter. When the nominal pressure values are unknown (there are no operating instructions), it is first measured in a dry cylinder, then a little engine oil is poured through the spark plug hole, and the measurement is made again. If the compression increases, then the rings need to be replaced. Similar signs can be observed in the case of their “occurrence”.
“Sticking” occurs when carbon deposits formed in the piston grooves prevent the piston rings from springing, resulting in a decrease in the tightness of their contact with the cylinder surface.
This problem, if the case is not very advanced, can be corrected with the help of special fuel additives. For an engine with a carburetor system, you can try cleaning it with a carbon remover spray that is injected directly into the carburetor. If removing carbon deposits from the combustion chamber has no effect, then there is only one way out - replacing the piston rings and cleaning the grooves.
How to replace piston rings yourself
Of course, replacing rings is a rather labor-intensive procedure. It requires accuracy and certain skills, but by and large there is nothing complicated about it (unless you remove the engine). To do this you need:
- remove the cylinder head, following all the recommendations of the car manufacturer;
- drain the oil, remove the flywheel protection and engine sump;
- remove the oil intake;
- Having turned the crankshaft, set the desired piston to bottom dead center;
- unscrew the connecting rod cover and remove it;
- pull the piston along with the connecting rod out of the cylinder, pushing it upward with a wooden strip;
- clean the piston from carbon deposits. Based on its marking, determine the piston class, purchase a new set of piston rings corresponding to it;
- Before installation, each new ring is first inserted into the cylinder to check the clearance in the lock. The gap must correspond to the value specified in the vehicle's operating manual. If it is less than necessary, then the ends of the lock are carefully filed with a file;
- The pistons are thoroughly cleaned of carbon deposits. The holes intended for draining oil are also cleaned with a suitable wooden stick. The cleaned grooves are lubricated with clean engine oil;
- The rings are put on starting with the oil scraper. On one side of the ring is marked “TOP” (up), which indicates how it should be installed in the piston. The locks must be installed at 120 degrees relative to each other. This will prevent gases from penetrating through them. You cannot put the rings on in a “twist”; such installation may be accompanied by the appearance of microcracks, which will lead to their breakage;
- Reassemble in the reverse order, simultaneously cleaning everything with a clean rag and lubricating it with fresh engine oil. Pistons must be installed exactly in the cylinders from which they were removed. Also, the connecting rod caps with connecting rod bearings must be put on the same connecting rods from which they were removed.
If the wear of the connecting rod bearings allows them to be reused, then there is no need to replace them, since this will require boring the crankshaft journals. You won’t be able to do this kind of work on your own without experience.