What is the ignition system?
In general, even inexperienced drivers know that the ignition system starts the car. The system creates a spark that travels through the spark plugs at a certain engine stroke. The fuel-air mixture in the engine ignites and combustion occurs. This process is typical for gasoline internal combustion engines.
If the car is equipped with a diesel engine, then the combustion process is ensured not by a spark, but by maximum compression. That is, when the ignition key is turned, fuel enters the engine and the compression system is activated.
Ignition in a car is reproduced in three ways:
- using a microprocessor in the electronic ignition system, electrical energy is accumulated using a special unit, which then controls it and creates a spark;
- contact method, in this case the distributor (special ignition distributor) is responsible for the process;
- contactless ignition, in this case the process is controlled by a transistor switch that interacts with a contactless pulse sensor, it acts as a breaker, and a mechanical distributor directs the high voltage current.
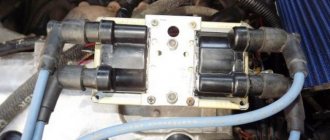
Despite the differences in the process, the design has many common parts: spark plugs, battery, wires, ignition coil, switch, devices for accumulating and distributing charge.
What can tell a car owner about the need to adjust the ignition? First of all, there are frequent situations when the car stalls even while driving. Often the car stalls at the start, immediately after the first jerk. Also, uneven operation of the engine, its overheating and strange sounds from under the hood during operation of the mechanism, which experienced car owners define as “knocking fingers,” can become signs of a malfunction of the ignition system.
This is interesting: Replacing the dashboard backlight with your own hands
How to adjust the ignition yourself?
For correct operation of the engine, it is necessary that at a specific moment (the time the piston reaches TDC) a spark is formed between the electrodes of the spark plug, igniting the fuel before the piston approaches TDC and the gas pushes it down. To regulate this moment, the ignition system has a special distributor, which is based on a slider and a contact group of the breaker. The most important adjustments to cam ignition are the gap between the breaker cams, the angle of the closed state of the contacts and the moment when the spark ignites.
This is interesting: You can deregister a car without documents
Preparatory work
Before installing the ignition, make sure that the following conditions are met:
- The spark plugs must function properly and be ready for use. If there is oil deposits, you can resort to calcination. It is strictly not recommended to use sandpaper, as the special coating may be damaged. After removing carbon deposits, fine abrasive may not get where it is needed. As a result, the candle will be unsuitable for further use. Do not try to heat the candle red hot. The main thing is to ensure that all oil deposits burn out. The spark plug gap should be adjusted evenly, following the vehicle's operating instructions. Use a wire gauge.
- It is necessary to check the condition of the breaker contacts. If there are traces of metal burnout and corrosion, it is recommended to replace the contacts to avoid a short circuit. Experienced car enthusiasts recommend Beru contacts.
- It is recommended to check the capacitor for charge and discharge using a tester. The flow of current should occur slowly and smoothly. Use a pointer tester for this.
- Make sure there is good contact between the wires from the ignition coil. You can check the coil itself using a tester, a pressure gauge, or at a stand in a car dealership.
- The ignition coil, distributor and distributor cap must be cleaned. Feel free to change the lid if there is carbon deposits on it.
- It is necessary to evaluate the condition of the carburetor. If it does not respond when adjusted, it must be replaced.
- It is necessary to check the functionality of the vacuum ignition timing. The drive must move without jamming, the walls of the tube must be thick without cracks or breaks.
Signs of an incorrectly set ignition
- the engine starts with difficulty;
- increased fuel consumption;
- the motor cannot develop power;
- in idle mode (idle speed), the internal combustion engine either stalls or over-gasses;
- the engine responds poorly to pressing the gas pedal;
- The internal combustion engine overheats;
- the engine detonates.
You can easily determine that the ignition needs to be adjusted if you hear popping sounds from the muffler and the car “sneezes.” It is recommended not to operate the machine in this mode, but to adjust it immediately. Moreover, one of the signs is detonation, which can destroy valves, pistons and cylinders.
What equipment will you need?
A complete list of required equipment is presented below:
- crooked starter or ratchet wrench;
- a flat-head screwdriver equipped with a wide, powerful blade;
- open-end wrench 12×13;
- a set of different probes;
- rubber cone plug;
- spark plug key;
- vehicle operation and repair manual from the manufacturer;
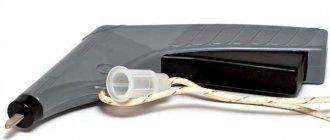
- strobe;
- protective gloves and closed shoes;
- surface degreasing agent and lubricant;
- cloth rags and paper towels.
Consequences of driving with incorrect settings
In addition to deteriorating vehicle performance, ignition too early causes other detrimental consequences:
- Detonation is the worst enemy of the engine. Due to constant impacts on the pistons, the fingers become loose and play forms in the connection. As a result, the connecting rod bushings are broken and the production of cylinders is accelerated.
- Shooting at the carburetor damages the bushings on which the valve axles rotate. The latter do not close tightly, causing the engine to suck in excess fuel at idle.
- The power unit tends to overheat and if the cooling system malfunctions, the cylinder-piston group may fail.
Modern electronically controlled engines are equipped with knock sensors. When the element detects vibration, the control unit automatically adjusts the ignition timing.
Early injection of diesel fuel into a diesel engine is fraught with damage to the high pressure fuel pump (HPF) and injectors. Imagine: a pump pumps fuel in one direction, and it is counteracted by a piston moving towards TDC. It's not hard to guess who will get the hit.
Signs of late ignition are no less dangerous. Ignition of the fuel mixture at the expansion stage leads to a decrease in engine efficiency and an increase in the load on the main parts - pistons with rings, cylinders and connecting rods. The result is easy to predict - intense heating and accelerated wear.
Shooting into the exhaust tract, caused by delayed sparking, destroys the walls of the exhaust pipe and the muffler partitions. Elements will have to be repaired by welding, or even replaced.
What needs to be considered in order to make the correct adjustment
You can do it once over a long period of time, for example a year or two, or you can do it monthly, and in some cases more often. All this depends on whether the conditions necessary for the successful completion of the undertaking are met:
- Before starting the adjustment, you need to make sure that the entire set of spark plugs is in working condition.
- Clean the breaker contacts, check its condition and gaps.
- BB wires must be in good condition. They must not be damaged; the spark plug caps, ignition coils and contacts with the distributor must be in perfect order.
- The vacuum ignition drive must be connected and it must be free-wheeling.
Only if all these instructions are followed can adjustments be made.
This is interesting: Do-it-yourself replacement of valve seals
Adviсe
- When carrying out any work on a car, it always makes sense to clean the removed parts and troubleshoot them before reinstalling them.
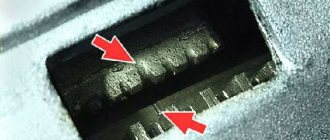
- Thoroughly clean the scale on the flywheel and, to make it easier to read, mark the center mark corresponding to TDC with a white or yellow marker.
- Remember that you are working under the hood of your vehicle with the engine on (or off). Take all necessary safety precautions, including wearing protective gloves and closed shoes, and avoiding loose clothing that could become caught in moving engine parts.
Sources
- https://proautoprom.ru/kak-vystavit-zazhiganie/
- https://carrepair7.ru/kak-vystavit-zazhiganie-na-dvigatele
- https://bumper.guru/klassicheskie-modeli-vaz/elektrooborudovanie/zazhiganie/kak-vyistavit-zazhiganie-na-vaz-2106.html
- https://ru.wikihow.com/%D0%BE%D1%82%D1%80%D0%B5%D0%B3%D1%83%D0%BB%D0%B8%D1%80%D0%BE %D0%B2%D0%B0%D1%82%D1%8C-%D0%B7%D0%B0%D0%B6%D0%B8%D0%B3%D0%B0%D0%BD%D0%B8% D0%B5
- https://remkasam.ru/ystanovka-zajiganiia.html
- https://avto-idea.ru/remont/zazhiganie-rannee-ili-pozdnee-sposoby-regulirovki-zazhiganiya/
- https://carnovato.ru/kak-vystavit-zazhiganie-na-vaz-2106/
- https://djago.ru/sistema-zazhiganiya/kak-vystavit-zazhiganie/
- https://scart-avto.ru/remont/zazhiganie-rannee-ili-pozdnee-sposoby-regulirovki-zazhiganiya/
Distributor installation instructions
Setting the ignition angle is required for cars with a distributor; on other cars, the angle is set by the ECU.
If you set the ignition timing yourself, then, as stated above, you need to follow the special marks. Depending on the specific vehicle, adjusting the KSZ or BSZ on a diesel engine or gasoline unit may have its own nuances. For example, in domestically produced VAZ cars, the ignition timing is set according to the first cylinder. That is, to align the piston should be set to the TDC position, because this is where the compression moment occurs.
The ignition system is configured as follows:
- First of all, the spark plug of this cylinder is removed.
- Use a plug or finger to close the spark plug hole.
- The crankshaft must be rotated clockwise; you can use a socket wrench for this. This is done until the air pushes the plug or finger out of the spark plug hole.
- The flywheel rotates further until the marks on its shaft coincide with the middle mark located on the timing cover. In this case, the ignition adjustment will allow you to set the angle to 5 degrees, and this is normal for a car running on 92 or 95 fuel.
- After these steps, you can install the distributor. The body of this device should be positioned in such a position that an imaginary line runs parallel to the axis of the power unit. As for the runner rotor, it should point towards the contact of the first cylinder on the cover. If everything worked out for you, then the car should start, and then you will need to adjust the angle (the author of the video is the Lty D channel).
Other methods of setting the ignition
Method by ear
Some people set the ignition by ear. Rotate the distributor and determine how the engine operates. This method is the simplest:
- Start the engine.
- Loosen the distributor nut.
- Rotate the distributor and determine for yourself how the internal combustion engine works. The engine should operate smoothly in the found position, without vibration. At the same time, the engine should develop the highest idle speed.
- After this position has been found, you now need to turn the distributor a couple of degrees clockwise and secure it with a nut.
Spark method
Another tuning method is using a spark. To do this, you need to align the marks on the crankshaft pulley with the timing mark. The slider mark points to the first cylinder. After this, you need to loosen the distributor nut and pull out the central high-voltage wire from the distributor cover.
Afterwards, bring this wire closer to ground so that there is 5 mm between them, and turn on the ignition. Rotate the distributor body 20 degrees clockwise. 20 degrees is 1-1.5 cm. Now you should slowly turn the distributor counterclockwise until a spark appears between the disconnected distributor wire and ground. In whatever position the spark appears, we leave the position of the distributor in that position and tighten it.
We recommend: What the markings on rims say: explanation of symbols, overview of parameters, selection tips
After using one of the methods for adjusting the ignition of domestic carburetor cars (VAZ, UAZ, Volga, NIVA, etc.), drive around and check how the adjustment affected the operation of the internal combustion engine.
For diagnostic accuracy, you need to:
- First warm up the engine.
- Then accelerate to a speed of 45 km/h.
- Turn on speed 4 and press the gas pedal all the way.
- At the same time, we evaluate how the engine behaves, whether it detonates or not.
- If the ignition timing is set well, after switching to 4th gear at a speed of 45 km/h, a short-term detonation will appear for 2-3 seconds and disappear after pressing the gas pedal.
- If detonation does not disappear quickly, then early ignition has occurred.
- If there was no detonation at all, then the ignition turned out to be late, you will have to set it “early”.
If it was not possible to set the ignition to the optimal mode the first time, then repeat again and again until the correct result appears. By repeated adjustments, you can achieve automaticity and learn how to adjust the ignition with your own hands, without instruments, by ear.
Basic aspects of different types of ignition, contact adjustment
Overall, installing an electronic ignition is not a particularly difficult task if you approach it wisely. If you have difficulty setting it up, you can use a device to set the ignition timing; you can find it for sale in any store. It should be noted that if your car is equipped with gas equipment, installing an ignition timing variator will help you.
You also need to take into account that regardless of the system - electronic or mechanical - the procedure for setting the angle looks identical. The only difference is that in the mechanical version, sparks appear as a result of opening the contacts.
So before adjusting, you should adjust the gap between the contacts:
- The crankshaft must be turned until the greatest distance appears between the contacts.
- Using a feeler gauge, you need to check the gap and compare it with the one prescribed by the car manufacturer.
- Using the plate, you need to set the appropriate gap and tighten all the screws.
Find out how to install the UOP correctly and how to avoid mistakes in the process from the video instructions below (the author of the video is Nail Poroshin).
Setting the ignition timing can be almost a decisive step, because it affects the correct operation of the entire starting system. Let's figure out what you should remember when starting to work on your own.
Fine tuning: weights and springs
The adjustment of the weights begins after this. This is already called fine adjustment of the distributor. In this case, the UZ is being adjusted, for which the proofreaders - TSNTR and VK - are directly responsible.
Article on the topic: How to properly clean a car's catalyst?
The first, centrifugal regulator contains two weights and two springs. When the distribution rotor rotates, the weights, under the influence of the CNTR forces, diverge to the sides. During this process, the shaft with cams or the shutter moves (if the ignition system is contactless). Thus, the contacts operate noticeably earlier.
Distributor weights and springs
Two springs act as counteraction to the CNTR force, on which the effective functioning of the entire ignition system depends. The springs themselves are different, and this is done this way for a reason.
- The first spring is longer, it is responsible for the moment the CNTR regulator, which carries out tension, comes into play. At the same time, this spring adjusts the right angle up to 1.2 thousand revolutions per minute, ensuring rigidity.
- The second spring is shorter, but it is much stiffer than the first. Corrects the breaking moment, ensuring free movement.
Experts insist that the second spring must be provided with free movement. However, some car enthusiasts believe that this results in unstable operation of the internal combustion engine at low speeds. It is supposedly regulated by the tension of this spring.
As for the VK or vacuum corrector, it contributes to the occurrence of advance only during the operation of the first chamber. In other words, when it comes to partial load on the power plant.
By itself, this advance regulator cannot create advance either at high speeds or under loads. This should be understood. And on XX, by the way, too.
Video below about the operation of weights on a distributor
Adjustment instructions
To avoid the question of how to adjust the ignition in the future, I propose to consider the instructions for adjusting the ignition timing.
The first step is to loosen the bolt securing the distributor so that it can be rotated freely during the adjustment process. Previously, ignition was determined as follows: when the slider moves in a clockwise direction, the distributor body must be turned in the opposite direction (counterclockwise). Reverse actions are determined later.
The adjustment is carried out when the engine is running at high speeds. So, grab the distributor body and try to slowly rotate it in one direction or the other. The adjustment continues until the special marks located on the cylinder block are in the correct position. This position can also be achieved by pushing the car in high gear.
Next, you need to remove the distributor cover, but first, you need to remember the location of the slider, and you need to make sure that the crankshaft stops completely, otherwise the marks may move. The next step is to configure the distributor. Depending on the car model, this process may have its own characteristics: when adjusting on a foreign car, as a rule, it is necessary to align the slider relative to the strip on the distributor body. And on cars produced by VAZ, the slider must correspond to the first cylinder of the engine.
So, to adjust the distributor, you need to place it in the position of the mark direction. After all the marks match, we begin installing it in its place.
I note that the distributor must be secured after several engine revolutions and after all the marks match.
Tips for performing adjustment work:
- All parts that you removed during the work process must be cleaned and checked for defects of various origins;
- Remember, you are working with an open engine that can run. It is important to take all necessary measures to avoid injury. Follow safety rules;
- Following the instructions “How to properly adjust the ignition”, you must carefully and consistently follow all the rules.
Ignition adjustment on carburetor engines
Adjusting the ignition by turning the distributor
We recommend: 6 reasons why the air conditioner in the car began to work poorly
It is produced by turning the ignition distributor housing (distributor), the shaft of which is driven by transmitting torque from the engine through intermediate gears. On engines of the VAZ 2108 family, the distributor shaft is rotated by direct engagement with the camshaft, but this is not of fundamental importance. The most important thing is the exact coordination of the ignition system with the mechanics of the internal combustion engine.
By rotating the distributor, the desired ignition timing is adjusted. Setting late or early ignition is everyone’s business and depends on the desire to save fuel or driving style.
Regardless of whether the distributor is installed - contact or non-contact (with a Hall sensor), turning its body against the direction of rotation of the rotor increases the ignition timing. That is, to make the ignition “early”, you need to determine in which direction the rotor rotates - you can remove the cover from the distributor and turn the crankshaft. It will be clearly visible where to turn the distributor for early ignition. But the required ignition timing is not always determined by the engine characteristics specified by the factory. Its value is also affected by the octane number of the fuel.
This is very clearly visible when using gas equipment on cars with carburetor engines. When switching from petrol to gas for the first time, the car refuses to accelerate. To achieve normal engine operation, you have to not only turn the ignition on early, but turn the distributor as far as it can go in the opposite direction. And vice versa, when switching back to gasoline, such ignition advance will be unnecessary - the knocking of the piston pins caused by detonation will “tell” this. This is due to the large difference in octane numbers between gas and gasoline. A very simple but effective way to check the accuracy of setting the advance angle is to test the operation of the motor in motion. When you sharply press the gas pedal, a slight short-term knock of the piston pins should appear in the engine gaining speed.
Testing
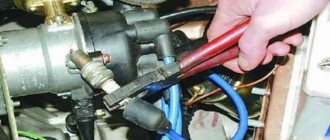
Testing can be done using a special device - a strobe light. The positive terminal of the strobe light must be connected to the positive terminal on the car battery. This ensures convenient and simple further adjustment of the system. Next, you need to find the tip of the high-voltage wire on the distributor cap in one of the cylinders and carefully remove it. Next, we carry out the adjustment by connecting the negative ignition terminal to the negative terminal on the battery.
With the utmost care, insert the strobe sensor into the cylinder and connect it to the wire located in this cylinder. Let's start the engine. Now we observe the engine flywheel, on which the flow of light from the strobe will create a stationary mark. If the ignition parameters are set correctly, the point will be located between the flywheel notch and the previous division. If the readings are different, then you need to slightly loosen the distributor mount for the flywheel. After the point is finally set in the desired position, remove and disconnect the sensor from the cylinder and reassemble the parts in the reverse order.
Warning:
- Before performing work, you need to wait until the engine cools down;
- The distributor parts are live. If the distributor or spark plugs are faulty, you may receive a painful electric shock.
Be extremely careful when performing this work. Good luck.
Stages of work using a strobe light
For installation of ignition using a strobe light on a VAZ 2106, at official dealership centers you will need to pay from 1000 to 1500 rubles. If you want to save this amount, you can carry out all the work yourself, for which you need to complete the following steps:
- We park the car indoors, give the engine time to cool to avoid accidental burns to your hands, and then slightly unscrew the distributor lock nut.
On the engine crankcase cover we find three marks, having previously cleaned it of operational contaminants, then we connect the strobe with wires to ground (black), to the ignition coil (red) and the high-voltage wire of the first cylinder (special clamp) and start the car.
- We direct the beam of a working strobe light to the crankshaft pulley, look at the relationship of its mark with the marks on the front cover of the engine, and slowly rotate the distributor around its axis until the required ignition timing angle is set, and after achieving the required result, tighten its lock nut.
You can set the correct ignition without using a strobe, which will require the use of a 12-volt test lamp.
How to set the ignition on a VAZ - procedure
First, you will need to install the ignition mark. The crankshaft can be rotated either using a ratchet or using a special wrench using the nut. On the front cover of the engine and on the crankshaft pulley there are ebbs and notches, the combination of which corresponds to different ignition timing:
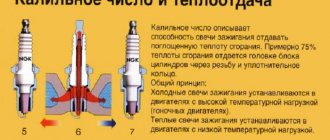
- The first mark in the direction of travel is an advance of the ignition angle by 10 degrees. Angle advance is an adjustment to the fuel burning rate. So, 10 degrees is the mark for 72 gasoline.
- Next comes the middle mark - 5 degrees ahead. It is for 80 gasoline.
- The last, short mark is a lead of 0 degrees. This means that the mixture will ignite exactly at the moment when the piston is at top dead center.
After the installation of the ignition mark is completed, you must immediately set the required gap in the contacts, naturally, where they exist. To do this, remove the distributor slider and unscrew the breaker fixing screw.
Before setting the gap, it is advisable to clean the contacts with sandpaper (600-800)
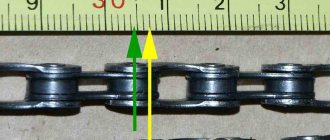
The gap between the breaker contacts in the open state should be 0.35-0.40 mm. For this you will need a flat probe.
Well, now we go directly to the ignition installation of the VAZ 2106. We unscrew the distributor mount (nut 13), and then pull it out of the housing.
Now you need to insert the distributor into place, taking into account several mandatory points:
- We set the top dead compression stroke mark in the first cylinder; accordingly, at this moment the spark should appear in it. In order to catch this moment, we put the cover on the distributor and mark the place where the armored wire from the spark plug of the first cylinder enters. Now you need to remove the cover and align the outer contact of the slider exactly opposite the mark. That is, at the moment when the piston is at top dead center, a spark is supplied from the central wire of the distributor through the contacts of the runner to the armored line from the first cylinder.
- Next, to set the ignition to 2106, you need to draw an imaginary line between the roof latches and install the distributor in place so that this line is parallel to the engine block. It’s worth saying right away that you won’t be able to get into the drive splines the first time; you’ll have to twist the housing a couple of millimeters. This is not scary, because the ignition installation requires subsequent adjustment. It is important that the distributor is completely seated in place so that it rests against the block. Next, we pull it into place.
List of specialized tools and symptoms of malfunction
It is possible to install the ignition on a VAZ 2106 yourself using the following tools:
- open-end wrench with a diameter of 13 mm;
- a specialized wrench for removing spark plugs;
- voltmeter or 12 volt test light;
- car strobe light.
A characteristic symptom that on a VAZ 2106 it is necessary to install the ignition according to the marks on the crankshaft pulley is a sharp detonation of the engine and loss of power. The problems are obvious when driving at forty kilometers per hour (in 3rd gear) and suddenly trying to increase the speed with the gas pedal. The manifestation of such a malfunction, as well as an extraneous metallic sound from the engine during a sharp throttle change, will indicate the need to adjust the ignition angle, and any car owner can carry out this repair with his own hands.