Hi all! The topic of our conversation will be installing the Start Stop button. Lately they have been talking about this more and more often, so I decided to provide some clarity regarding the possibility and feasibility of such a step.
In reality, everyone strives to improve their own comfort and make life easier. There are many examples. Cars are equipped with cruise control so as not to constantly hold the gas pedal. We also connect rear view cameras so that you don’t have to lean over the seat and twist your neck back and forth. And navigators have completely replaced old paper maps.
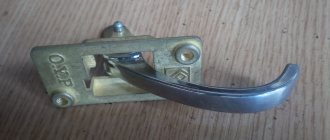
As for installing a simple button instead of the ignition switch, it is quite convenient, and even fashionable. Similar autostart is provided for many modern cars. But owners of old cars can only install the button with their own hands.
The circuit is not the most complicated, which has caused a real wave of popularity for altering the ignition system. Whether to do this or not, everyone decides for themselves.
Advantages and disadvantages
Initially, it seems that the button has a number of advantages. After all, the driver just needs to press it and the car will start. There is no need to turn the key.
But don't rush to conclusions. Also, don’t rush to Aliexpress for a new button. Even though the price of such devices is insignificant, I first advise you to study the strengths and weaknesses of such a step. Let's start with the advantages, which include the following:
- There is no need to use a key every time you want to start a car engine;
- The button launch scheme is extremely simple;
- Installation is possible on many cars;
- The level of comfort increases;
- Start-Stop can be linked quite effectively to the alarm and immobilizer;
- The price of the button is low;
- Many drivers can install the system themselves, relying on instructions and video lessons;
- The work takes no more than a few hours.
Everything looks very rosy and promising. But take your time. There are pitfalls here.
The driver will have to press the brake to start. Not the most familiar scheme, which will take some getting used to. There are also difficulties in installing an alarm system with an autostart system, where the engine start button is located.
It’s better to think about installing Start-Stop in advance. If this is done before installing the alarm system, then installing a security system will be quite expensive.
Installation methods
Nobody significantly limits car owners from installing a button on their car to start the engine with a simple press.
Therefore, more and more often you can meet those who want to install a solution:
- for 140 Mercedes;
- Niva;
- Lada Granta;
- Hyundai Solaris;
- to Priora;
- Honda cars;
- Mitsubishi ACX;
- Mitsubishi Lancer;
- Audi 100 C4;
- Toyota Yaris;
- Kia Rio;
- and even VAZ 2114.
The main thing here is to decide whether you really need this button. If yes, then move on to choosing the system itself.
Modern manufacturers of universal buttons allow you to select a mechanism for any machine. Please note that there are various connection schemes. Each of them has its own characteristics.
But a few of the most popular solutions dominate. These are the options that car owners prefer. Let me introduce you to them:
- Button with ignition key. This system will not allow you to start the car without using the ignition key. Therefore, you need to turn the key itself in the lock, and then press the button;
- Keyless. To start the motor, you just need to press the button. An extremely convenient scheme. But here it is important to install it correctly, otherwise the car will be extremely easy to steal;
- Short press. To start, hold the button for up to 2 seconds. The starter rotates and turns off when the engine is running;
- Long press. Allows you to hold a key as long as required. The starter will not stop rotating until the engine starts;
- A circuit where the ignition is activated after a key has been pressed;
- A scheme in which the ignition is activated 1 second earlier than the car starter.
Also, some combine different schemes to achieve the desired result.
If you do not have experience in such work, and also have poor understanding of automotive electrical equipment, you should not take on such work with your own hands.
Contact good workshops. Moscow alone is ready to offer dozens of addresses of car services that offer similar services. The price will be higher, but the result is guaranteed.
Installation recommendations
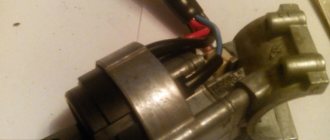
Before starting work, you should take preparatory measures. A lot depends on what kind of machine you are dealing with. Some people remove the car ignition switch itself by installing a simple key in its place. In other situations, a hole is made to size, allowing access to the wiring and allowing connection to the electrical circuit.
To work you will need a set of tools and some materials, consisting of:
- screwdriver;
- wire cutter;
- electrical tape;
- ready button;
- three four-pin relays;
- one five-pin relay;
- one relay from PTF;
- a set of insulated wiring with terminals;
- free time;
- installation instructions.
Will installing a “Start Stop” button instead of the ignition switch protect your car from theft?
Some drivers believe that installing a Start/Stop button makes the car vulnerable to car theft. This is not true: you can install it, and it is safe. Almost all modern cars have contactless key fobs. If we assume that the attacker somehow opened the car door, but he did not use the “original” key, the button will not allow the engine to start. This most likely will not help protect your car from professional car thieves, because they use repeaters to intercept the radio signal from the car's control panel. One of these devices is called “Volna”, it can be bought on the Internet.
But you can protect yourself from theft. You should not store the key fob near windows and entrance doors so that criminals do not have the opportunity to intercept the outgoing signal. Try to keep it in a thick-walled box or Faraday bag. Can be wrapped in foil.
The presence of a Start / Stop key is, first of all, comfort and reduces the time spent on starting the engine. This is very important, because we are constantly in a hurry. To install a button using a simple diagram, you do not need deep knowledge of electrical engineering. The most important thing here is not to mix up the wires. If there is a button, the process of starting the engine becomes comfortable. There is no need to insert the key into the lock (which is very inconvenient to do in the dark). Also, the lock itself sometimes jams.
The button is especially convenient to start the engine when in a hurry. Beginners who have not yet developed the skills of “blind” control begin to get nervous and perform unnecessary actions. This can lead to the car not moving when the traffic light turns green.
What do you need for installation?
The connection diagram for the Start Stop button may involve the use of an ignition key. In this case, it will be possible to start the Engine only after turning it. There are modifications that do not require a key - the engine starts after pressing a key. This option is less secure - the car becomes easier prey for attackers.
There are schemes in which the keys respond to short and long presses. A short press (a couple of seconds) and the starter will turn off after making a few revolutions. When pressed long, the starter will rotate until the engine starts completely.
In some circuits, the ignition is activated after pressing the key, but slightly before the starter. There are also combinations of the described methods.
Tools and Supplies
When connecting the Start Stop button, you will need the following tools:
- start-brake unit;
- special relays (3 pieces), each with 4 contacts;
- relay (1 piece), with 5 contacts;
- fog lamp relay;
- wiring kit;
- terminal set;
- pliers or pliers (crimping is worse when using pliers).
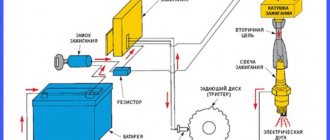
Connection diagram
Here we are talking about the simplest version of the circuit, which can be installed in half an hour. We connect the relay with a brown wire to a 12-volt battery (positive terminal). We also supply the enabling signal + there. The general negative signal is output to ground. Make sure the contact is secure. We connect the working contacts of the load relay to 12V (blue wire). We connect the negative control signal to the Start & Stop key. We leave the enabling signal + unused.
How to install
Regardless of the option chosen, you first need to prepare the installation site. To do this, you must either remove the ignition switch or cut a separate hole on the dashboard. This can be done with a soldering iron, drill, utility knife and other tools. To access the wiring, disassemble the console. If you plan to install the button in a location other than the ignition switch, be sure to hide it with a plug.
Let's consider the installation option on a VAZ 21214 (Niva). The system used will work in this way: the first time you press the button with the brake pedal held down, the engine turns on, the second time it turns off. If you press it without the brake pedal, the power unit starts and stops. When pressed with the engine running, the engine stops.
Tools and consumables
The following components will be required:
- the button itself without a lock;
- three four-contact relays with open contacts;
- one five-pin relay with closed contacts;
- rear fog lamp relay;
- wires and terminals.
Here's what you'll need to install the button:
Connection diagram
- The working contact of the relay “+” is connected to the +12V battery (colored brown).
- The enabling signal “+” is connected there.
- General “-” – to ground.
- The operating contact of the load relay is set to +12V when the ignition is on (blue wire).
- The control signal “–” is connected to the Start-stop button.
- The enable signal “+” remains empty.
There are 3 connection points created in the car: to the ignition switch block, to the brake pedal limit switch and to the control wire. This ensures that the starter will not operate after the engine is activated.
How to install a button
In other cars, the installation principle is approximately the same. The wires of the button are painted in different colors, so you need to focus on the gamma. Difficulties sometimes arise with orange wires, since there are usually several of them. The thin one, on a harness, is responsible for the brake - you need to throw it at the appropriate place in the car. Paired ones are “plus”, they are responsible for ignition. There is also a purple wire on the harness, which is responsible for starting the engine - we place it on the fuel pump. Red goes to the “minus” of the battery, black to the “plus”. Blue is used to connect the alarm and is connected to the “plus”. Yellow is responsible for connecting the button to the starter and is sent there.
How to connect the “Start Stop” button: step-by-step instructions
The “principle of different colors” of wires remains the same for any system connection scheme.
Pay attention to the yellow wires. Many kits have 3 yellow wires. You will not confuse anything if you remember the following: the thin yellow cable, which is located on the harness, controls the brake system. The remaining cables are connected to the ignition system. The system may contain a purple wire - these are directly related to starting the engine.
It is no coincidence that the conversation turned to the color scheme of the wires. To avoid hassle, car enthusiasts purchase ready-made systems that come with detailed connection diagrams with detailed explanations of where each wire should go. Manufacturers produce kits with wires of the same color.
The Start Stop button instead of the ignition switch is mounted as follows:
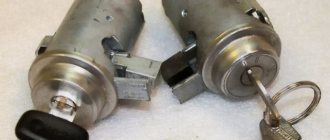
- Dismantle the ignition switch, having first removed the cylinder.
- Each electrical wire emanating from the lock is carefully cut off.
- Using electrical tape, we connect the wires going to the ignition box into one bundle, then we bring them to the button (see the connection diagram).
The stop-start key is now connected. It can be mounted on the control panel or in another place convenient for the driver in the cabin.
If you think you can install the system yourself, it’s worth a try. But it’s still better if this work is done by professionals, since an incorrectly installed key will have to be changed.
Many modern cars are equipped with a system called Start-Stop. It allows you to start the engine using a button rather than the ignition key. In addition to standard devices, there are universal solutions on sale that allow you to install such a mechanism on almost any car. Today we will tell you about how the keyless engine start button works, what advantages and disadvantages it has, as well as how to properly connect and install it on the car with your own hands.
How to install a button yourself instead of the ignition switch with aliexpress
If you nevertheless set out to equip your iron horse with such a device, it’s time to get acquainted with the features of its installation. At the moment, there are several ways to install the start-stop button. Let's consider the most common and fairly simple method.
To bring this idea to life, we will need a minimum set of components from Aliexpress, which includes:
- four-pin relays;
- connecting wires;
- diode;
- the actual start-stop button.
Once all the components have been found, it’s time to start installing the system itself. At this stage, it is important to adhere to a certain sequence of actions. This approach will save you from all sorts of unwanted surprises, which in the future can result in serious problems.
The installation algorithm involves the following steps:
- the positive terminal of the battery should be connected to the positive contact of the relay;
- the enabling “+” relay is also connected to the battery;
- the negative terminal is mounted to the ground of the car;
- the control contacts of the load relay are connected to 12V;
- the control negative output is connected to the corresponding output of the button;
- the enabling positive signal remains unconnected.
The presented installation diagram differs from all others in its ease of implementation and should not cause difficulties even for a novice car enthusiast.
What is included in the package, tools and consumables
It would not be superfluous to mention the completeness of the device in question. Due to the fact that currently there is an abundance of all kinds of analogues and modifications. given device, it is important to choose the most suitable one.
It often happens that, due to his lack of awareness, a car enthusiast, when ordering a “start-stop” button on various trading platforms, falls for the tricks of scammers or simply unscrupulous sellers. That is why it is important to know which consumables should be included with this device.
So, the complete set of delivery assumes the presence of:
- the “start-stop” button itself;
- control module;
- connecting wires with connectors.
However, the standard package does not allow you to assemble a working circuit for this device. To do this you will need to buy several more relays.
Connection diagram
To connect the device to the car, you must follow a specific connection diagram. We bring to your attention one of these schemes with a detailed explanation of the operation of key elements.
Here's another diagram, maybe it will be easier to navigate.
How to connect the device correctly
When installing a button, it is extremely important to avoid making mistakes when connecting one or another node. To do this, you must be guided by the above diagram.
It is also worth noting that one diagram will not be enough to carry out the button installation procedure. In this case we are talking about various kinds of accompanying actions. Let's look at them in more detail.
Before implementing the planned project, you will have to perform some actions, namely:
- remove the ignition switch;
- remove the steering wheel lock mechanism;
- disconnect the underwater leads;
- remove the immobilizer antenna;
- install the button in the most suitable place for yourself;
- connect underwater wires.
Advantages and disadvantages of the Start-Stop system
Start-Stop Engine is far from a new development by specialists. Although the system is constantly being improved, experts have not yet been able to resolve the nuances associated with certain “cons” of this function. Of course, each driver must weigh everything himself and analyze whether he needs an engine start button.
Advantages:
- the engine starts with a light click;
- installing a “Start-Stop” button instead of the ignition switch is possible in any suitable place;
- no need to carry the ignition key;
- additional protection from intruders (analogue of an immobilizer).
Flaws:
- to start the engine you need to press the brake pedal, you need to get used to this, novice drivers may have certain difficulties;
- the need for improvement when using an alarm system with auto start;
- the need to dismantle the standard steering wheel lock or keep the key in the ignition switch;
- Installing a security alarm on a car with an engine start button requires additional manipulations and is more expensive.
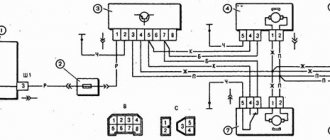
connecting the start-stop button control unit to the central control unit
#1 ToPro
- Users
- Posts: 22
- Gender: Man
- Car: opel rekord
- Real name: Egor
- Place of residence: Troitsk
In general, this is the situation, my ignition switch fell apart and without second thoughts I decided to replace it with a start-stop button, but in connection with the connection questions arose: 1) where to connect the opening-closing wires? Two wires come out of the control unit
2) What is the easiest way to get to the pressure sensor wire?
PS Opel Rekord 83 years old
Post edited by ToPro: November 25, 2021 - 11:09
- Top
#2 opelist
- Gender: Man
- Car: OPEL
- Real name: Seryoga
- Place of residence: Russia, Saratov
Why the hell is all this necessary? THREE unfortunate wiring and a simple ignition switch replaced with this tripe from a bunch of unnecessary parts?! For what ?! to stand on the side of the road at night and call a tow truck?!
or what SMS 89271277465 Seryoga I will sell spare parts from these cars:
Omega A '88 C20NE Senator A1 '79 2.0S Record caravan E2 '83 C20NE Record sedan E2 '83 C20NE Senator B '88 C30NE
- Top
#3 ToPro
- Gender: Man
- Car: opel rekord
- Real name: Egor
- Place of residence: Troitsk
Why the hell is all this necessary?
all for the sake of convenience, and there’s not only a lock, auto-start, and a lock opener
- Top
#4 opelist
- Gender: Man
- Car: OPEL
- Real name: Seryoga
- Place of residence: Russia, Saratov
or what SMS 89271277465 Seryoga I will sell spare parts from these cars:
Omega A '88 C20NE Senator A1 '79 2.0S Record caravan E2 '83 C20NE Record sedan E2 '83 C20NE Senator B '88 C30NE
- Top
#5 ToPro
- Gender: Man
- Car: opel rekord
- Real name: Egor
- Place of residence: Troitsk
Post edited by ToPro: November 27, 2021 - 13:33
- Top
#6 ToPro
- Gender: Man
- Car: opel rekord
- Real name: Egor
- Place of residence: Troitsk
- Top
#7 opelist
- Gender: Man
- Car: OPEL
- Real name: Seryoga
- Place of residence: Russia, Saratov
or what SMS 89271277465 Seryoga I will sell spare parts from these cars:
Omega A '88 C20NE Senator A1 '79 2.0S Record caravan E2 '83 C20NE Record sedan E2 '83 C20NE Senator B '88 C30NE
- Top
#8 ToPro
- Gender: Man
- Car: opel rekord
- Real name: Egor
- Place of residence: Troitsk
You don't need it at all. This tail goes to the steering wheel for other purposes.
- Top
#9 opelist
Button installation and connection methods
The following connection diagrams for the Start-Stop button are usually used:
- With or without ignition key. When this option is selected, the key is used to turn on the ignition. But the engine is started using a button. The second method involves completely dismantling the ignition switch. The ignition is turned on and the power unit is started without using a key.
- Turn on the ignition. There is an option in which pressing the button turns on the ignition, or an option in which the ignition is turned on simultaneously with the starter being activated.
- Single or long press. When using the first method, pressing once will cause the starter to rotate until the engine starts. And the second method involves rotating the starter until you release the button.
It is noteworthy that all these options can be combined with each other, since everyone has their own preferences. In most cases, installing the device does not require any special skills. Everything is intuitive; you just need to understand the connection diagram provided by the manufacturer and follow the instructions.
How to install it yourself
The easiest way to retrofit a car with a “Start/Stop” button is to purchase a ready-made set (fortunately, the modern market for automobile accessories is replete with such devices) and install it yourself. For any motorist who has at least some electrical installation skills and knows the pinout of the standard ignition switch block, making such an “upgrade” will not be difficult.
On a note! The connection diagrams for ready-made kits are the same from almost all manufacturers.
Work order:
- dismantle the steering casing;
- disconnect the ignition switch connector;
- we install the control unit, button and immobilizer scanner in the most convenient places for subsequent use;
- connect the wires from the control unit to the ignition switch connector in accordance with the diagram (it is supplied with the device);
- lay and connect the wire to the “frog” of the brake pedal.
Important! If you purchase an ignition switch block in advance and connect the wires from the control unit to it in accordance with the diagram, then, if necessary, you can quickly return to the standard engine start/stop system using the key. If you were unable to buy a mating contact group for the 3Z (specifically for your vehicle model), then you can successfully use crimp terminal blocks of a suitable size.
Assembly and installation of an engine starting system with a button
The first stage is preparing the place for mounting the Start-Stop Engine button. Some car enthusiasts prefer installing a mechanism instead of a standard ignition switch, others mount the part on the front panel or on the other side of the steering column. If you intend to leave the ignition switch in its original place, we recommend that you disguise it with a suitable cap. Do not forget that the button usually has LED backlighting, so it is better to mount it so that it does not blind you in the dark.
Installing the “Start-Stop” button from Aliexpress
In most cases, it will be most advisable to purchase a ready-made installation kit. Typically it consists of the button itself, a control unit, a reader, key fobs and a set of wires. The cost of this set in the popular Chinese online store Aliexpress is about $25. This is where you usually buy an installation kit for starting the engine with a button.
Button connection diagrams (in Russian and English)
The published schemes have minimal differences, but the principle is the same.
We will consider the procedure for installing the device on a VAZ car (Lada Kalina) while maintaining the possibility of using the standard ignition switch. In this case, only the steering wheel lock is missing. If the push-button mechanism fails, you can turn it off, connect the standard ignition switch connector and start the engine using the key. To maintain this possibility, it is recommended to purchase a block with wires for the ignition switch contact group.
Installation and connection sequence:
- Remove the ignition switch by removing the four screws using a screwdriver.
- Disassemble and remove the steering lock mechanism.
- Disconnect connectors.
- Disassemble the contact group housing and remove the immobilizer antenna.
- Install the engine start button in the selected location.
- Solder the wires according to the diagram, insulating them with heat shrink. Remove unnecessary wires from the block.
- Install everything in reverse order.
- Connect the green wire to the brake block (contact No. 4, in our situation - red). A “+” should appear on this contact when you press the brake pedal.
Checking the system operation:
- Initially the button is inactive;
- To unlock, you need to bring the key fob from the kit to the reader (a double signal should sound);
- If there is no button press within 15 seconds, automatic blocking will occur (a single signal will sound);
- after unlocking, the first press turns on ACC (in our situation it is not used), the second press turns on the ignition, the third turns off the system (if you do not first press the brake pedal);
- With the brake pedal pressed, pressing the button a third time will start the engine;
- quick start of the engine is possible - you need to press the brake pedal and simply hold the button for 1-3 seconds until the power unit starts;
- To stop the engine, press the brake pedal and press the button.
I was tired of the always dangling and clanking keys sticking out of the ignition switch, and I decided to assemble a device that starts the engine from a button. Having searched for articles on the Internet on this topic, I did not find anything that would satisfy me, and I decided to create a device from scratch. I wrote down the input and output parameters and signals on a piece of paper, and a diagram was immediately drawn.
The brain of the START-STOP Engine button is a cheap PIC16F84A .
The block monitors the state of the inputs:
- RFID (anti-theft);
- Start - actually the START/STOP button itself;
- Brake - signal from the brake pedal;
- Oil - signal from the oil sensor;
- Handbrake - signal from the handbrake.
Output signals:
- ACC - Accessories (radio tape recorder, recorder, cigarette lighter, etc.);
- IGN - Ignition;
- Starter - starter.
The circuit is assembled on a board on which all the parts are located except the start button, LEDs and speaker. Transistors used are domestically produced type KT817G, you can use any appropriate power and conductivity.
I took the housing for the control unit from the removed alarm system, and from there I took the relay, connectors with wires and protective strain gauges connected in parallel to the power contacts of the relay.
Photo of the finished block
The button itself is still in question, I want to make it beautiful and impressive. Its body will house the start button itself, red and green LEDs, and a speaker from the computer.
After assembling the block, I sketched out the operating algorithm on a piece of paper and wrote a program for the microcontroller using it.
The unit will be installed in conjunction with an alarm system and an RFID lock.
When the vehicle is disarmed, the alarm unit will supply power to the START/STOP button and the RFID lock through the relay contacts. When setting, turn off the power.
The button works as follows:
After the vehicle is disarmed, it is inactive. When the RFID lock is activated, the button will receive a short-term negative pulse and the red LED will flash, indicating readiness to start. After activating the button, if you do not turn on anything (ignition, accessories) for 5 minutes, the button is blocked again.
Two launch options are programmed:
- When you briefly press the button (with the parking brake pulled out and the brake pedal pressed), three automatic attempts to start the engine occur. If the startup is successful, the red LED goes out, the green LED lights up and the ACC relay turns on, supplying power to the accessories. If the launch fails, the button returns to its original state.
- When pressed and held, the ignition is turned on, then the starter. The starter spins as long as the button is pressed. After release, the starter turns off, the oil pressure is checked, and if the engine starts, the red LED goes out, the green LED lights up and the ACC relay turns on, supplying power to the accessories.
- The car is turned off by long pressing the button.
- To turn on/off the ACC relay, you need to briefly press the button, while the handbrake is pulled out and the brake pedal is released.
- To turn the ignition on/off, you must briefly press the button, while the brake pedal must be pressed and the handbrake released.
When the engine is running, the button does not respond to short presses.
It is impossible to turn on the starter while the engine is running!
First tests of the START-STOP Engine button on a car:
After installing the button in the car, it turned out that the circuit lacks the “Ignition 2” output; it differs from ignition 1 only in that it turns off while the starter is running. The problem was solved by installing an additional relay. Its winding is connected to the Starter output and ground. Normally closed contacts with the outputs “Ignition1” (IGN1) and “Ignition2” (IGN2) of the ignition switch.
Below is a complete diagram of the block with the missing relay (relay4) and connection circuits to the alarm unit and RFID lock.
I installed the unit in the car and tested it, it works flawlessly
Working at Proteus
Before flashing the microcontroller, you need to decide on such parameters as the pause before turning on the starter, the time it takes to crank the starter in the 1st, 2nd and 3rd attempts, as well as whether the device locking function is required or not. All this data is entered into the microcontroller when programming it.
The picture shows where to enter what. By default the following characteristics are set:
- Pause before cranking the starter - 2 seconds;
- Starter cranking time, attempt 1 - 0.8 seconds;
- Starter cranking time, attempt 2 - 1.0 second;
- Starter cranking time, attempt 3 - 1.2 seconds;
- Locking is enabled.
The pause time is easy to calculate; for example, a pause of 10 seconds is required before starting. 10*10=100. Converting 100 to hexadecimal format, we get 64h. We write this value in the desired cell.
The blocking function is even simpler; when writing to the corresponding cell 00h, the function is disabled. When writing any other value, the function is enabled.
Printed circuit board in *.lay6 format
Project in Proteus
Firmware