How to get to the mechanism
For VAZ classics, the design of the locks and mechanisms of the front and rear doors is almost the same. The only difference is that the drive of the locking part for the rear door has additional elements, the correction of which takes longer than when adjusting the front doors.
To dismantle it from the rear door of the VAZ, you will need a Phillips and flat-head screwdriver and a key size 8. The glass must be raised. Removal procedure step by step after removing the door card:
- Unscrew the lock button.
- Unscrew the locking rod bracket fastening nut and remove the washer.
- Unscrew the three fastening screws and remove the bracket.
- The bracket is removed from the door cavity along with the rods. For convenience, it is necessary to slightly bend the metal casing of the front linkage; do not bend the drive at a right angle.
- Remove the locking element from its place, unfasten the inner handle rod holder, remove the handle and drive.
- Using a screwdriver, remove the longitudinal drive hinge from the locking mechanism.
- Remove the retaining ring and disconnect the longitudinal drive from the locking rod bracket.
Installing the lock is carried out in the reverse order.
Original patented locks on Zhiguli cannot be lubricated with oil, silicone lubricants, etc. Dirt from the mechanism is removed with technical gasoline. The unit is disassembled, the parts are rinsed and dried. When assembling the mechanism, the cams are lubricated with compounds containing flake graphite.
Device
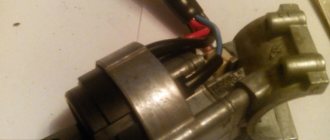
Each of the above elements has a separate design. If we look at the ignition switch in more detail, we can note such details as: locking console, housing, shaft, disk with contacts, bushing, block, and cutout of a group of contacts.
The locking console is responsible for locking the steering wheel in the absence of the ignition key in the lock. The case is a protective element and covers the entire structure of the lock. The shaft is responsible for the rotation of the disk with contacts in relation to the sleeve, and forms contact between them. The block and group of contacts, in turn, are connected to the general ignition system of the car, and transmit the resulting contact to the distributor, through the ignition coil.
Video on replacing the ignition switch on a VAZ 2107
If suddenly for some reason the presented video clip does not load, then a photo description of the entire work with a detailed explanation of each repair step will be posted under it.
Since the ignition switch of the VAZ 2107 and all other “classic” models is located under the steering casing, it is accordingly necessary to remove it first, or rather its lower part, by unscrewing several fastening bolts:
After which you can remove the upper part of the casing, since it is no longer attached:
Next, you need to crawl under the panel with your hand and disconnect all the power wires at the back of the ignition switch. But keep in mind that before this you must remove the negative terminal from the battery. It is also better to remember which wire corresponds to each contact of the lock, so that in the future you can connect everything correctly.
Now unscrew the two bolts with a screwdriver, which are marked in the photo below:
But it is also fixed on the left side. In order to release it, you need to use a thin screwdriver or even an awl to press on a certain “lock” as shown in the picture below:
At the same time we pull the lock towards ourselves and it comes out without any problems:
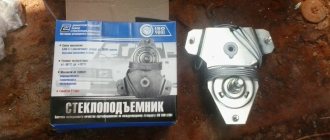
The price of a new lock is about 350 rubles. After purchase, we install everything in the reverse order and at this point the replacement procedure can be considered complete.
Sources
- https://vaz-remont.ru/stavim-besshumnye-zamki-s-vaz-2114-na-vaz-2106-svoimi-rukami/
- https://vaz2106-remont.ru/zamena-ruchki-dveri-i-lichinki-zamka/
- https://zarulemvaz.ru/kak-zamenit-zamok-zazhiganiya-na-vaz-2107/
Front door lock device
Car locks are installed in the door cavity and fixed with two screws; the locking element is connected to the opening mechanism by rods. To reduce noise when opening and closing, high-density plastic coatings are installed on the ratchets, which reduces wear on the contact surface during operation. The design contains:
- retainer body;
- cracker spring, cracker;
- rotor;
- switch;
- traction: blocker, internal drive, switch;
- outside handle;
- levers: internal drive, blocker, external drive;
- lock button;
- ratchet;
- switch roller, central roller.
Replacing the lock cylinder for VAZ 2106
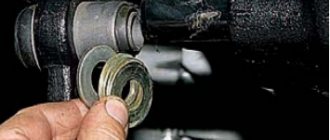
A very common situation is when a lock cylinder fails separately. We will need a flathead screwdriver and a needle. Instead of a needle, you can use a thin wire. First of all, remove the spring that is responsible for throwing the key inside the shutter at the moment of opening. To remove it, you can easily pry it off with a screwdriver, after remembering its location for subsequent installation:
Then, using a needle (or thin wire), we squeeze out the rod holding the larva, as shown in the figure:
After this, the upper ring is removed, and the latch is dismantled from the opposite side
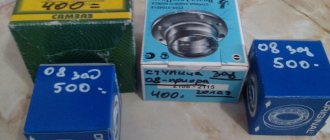
Having examined in detail how to replace the lock cylinder on a VAZ 2106, it is necessary to add an important detail: it is better to replace the lock elements of all doors (as well as the trunk) at the same time, so that there is one common key for everyone. A bunch of keys that are similar to each other will cause a lot of inconvenience. Such expenses will not hit your pocket hard; everything together will cost you about 300 rubles. Reinstallation is also carried out in the reverse order. The whole procedure may seem more complicated than it actually is. To make it easier, the description is accompanied by photographs. If there are any nuances left regarding replacing the door lock cylinder of a VAZ 2106, video instructions that can be easily found on the Internet will help you figure it out.
As the life of the vehicle increases, owners of the “sixes” begin to notice that they have to make more efforts to close the car doors tightly. When such defects are detected, motorists come to a VAZ service station to adjust the door locks. Here they refer to the operation of the VAZ 2114 door closing mechanisms, which, unlike the “six” ones, operate almost without unnecessary noise.
After adjusting the locking mechanism, after a while, car enthusiasts begin to become convinced of the pointlessness of carrying out repair operations. In this regard, car owners come up with one correct idea - to spend money once and install a silent lock on the VAZ 2106 in order to forget about this problem for a fairly long period.
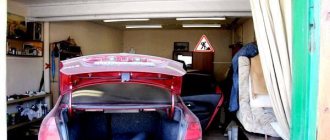
Replacing and adjusting the trunk lock
The work is carried out in the following order:
- The casing is removed.
- Replace the support mechanism. If the lock's supporting tooth breaks. Replace not only the cylinder, but also the new body. In general, this work is no different from what needs to be done to repair a door lock.
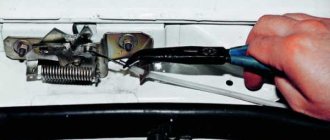
- Adjustment is carried out using the lower clamp. Unscrew the nuts and remove the washers. Assembling and disassembling the lock will help you adjust the lock. In this case, you need to act using the selection method. The desired result is the moment when the door closes effortlessly and does not vibrate when slamming and driving the car.
More extensive work is required if the retainer bushing is broken. If you are changing the lock assembly, then before its fasteners are fully tightened, you need to adjust the latch. Only after the lock closes perfectly can you tighten the fastening nuts to the maximum.
Preparatory stage
To repair the door lock of a Zhiguli 2106, preliminary work is needed. They begin with checking the position of the hinges; if there is a slight distortion, there are uneven gaps, then it is recommended to adjust the position of the locking latch. This is the easiest way for the knot to begin closing quickly and correctly. Work order step by step:
- Outline the position of the latch with a pencil.
- Loosen the three screws, do not remove them.
- Move the pawl lock and check how the locking mechanism closes.
- Tighten the screws in the new position.
On a VAZ 2106, the retainer is attached to the side of the pillar with hex screws; for the work you will need an open-end wrench or an 8-size wrench.
Lock malfunctions
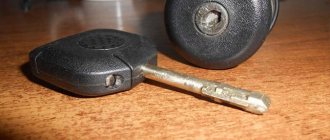
- Problem with the key. It turns slowly or doesn't turn at all. A temporary solution to the problem may be to use a penetrating lubricant, for example, VD-40. But do not forget that this is a temporary solution and you will need to replace the lock in the near future. If you do not pay attention to the jamming cylinder, then most often it ends in the key breaking;
- Problem with the operation of the instrument panel. When the key is turned to the second position, the indicator lamps do not light up. This malfunction can be solved by replacing the group of contacts;
- Starter problem. When turning the key to start the power unit, the starter does not operate. Usually this problem is related to the contact group. In order to accurately determine that a group of contacts has become unusable, you need to measure the voltage at contact 50 at the moment the key is turned.
Installation of door locks from VAZ 2114 to VAZ 2106
Some car enthusiasts take a more economical route and install silent locks from the VAZ 2114. This is done as follows:
- We saw off the “flag” of the lock.
- We dismantle the old locking mechanism of the “six” together with the connecting consoles and put it in the reserve area.
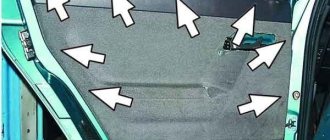
- Drill out the bottom door hole on the left. We apply the lock from the inner plane of the door, mark the drilling point where the lock sleeve of the upper fastening will be located. If necessary, we process the marking socket with a round file.
- We install the new locking unit in the landing position.
- We assemble the product. Perhaps the “chocolate” will interfere with assembly with its emphasis on the rack, but we’ll leave that for later.
- Using the same file, we adjust the right through hole from below, which will entail the correct operation of the door lock.
- We disconnect the outer lining of the product and slightly sharpen the 2 metal bushings at the end of the door, which are where the fasteners are installed.
- We sharpen the angle of fastening of the locking device, periodically checking the compliance of the angular values.
- We grind down the screw tops to tighten the locking device to a level below the plane, “flush”. Upon completion of the work, we assemble the locking mechanism. Next, we connect the rods to the lock handles.
- When closing the door and there is a problem with the protruding “chocolate”, it is necessary to make a high-quality adjustment of the locking device, after which we fix the screw connection.
- Using chalk marks, we determine the position of the screw connection when closing the car door.
- We drill the front plane of the rack, use a tap to apply an M 10 threaded connection along the hole with a step of “1”.
- Then we drill through holes in the front walls of the rack of the appropriate diameters, followed by cutting the internal threaded connection and installing the screw in the rack.
- We proceed to installing the lock drives and operating the device handles.
- We cut off the drive rod of the side-type handle from the removed device. We bend one end at a right angle, and bend the other into a ring configuration.
- We connect the internal action handle via a clamping cable.
After this, the VAZ 2106 locks will operate relatively silently.
Repair
Many owners of domestic cars are probably annoyed by the noisy closing of doors.
Often you have to slam them very hard, especially for one-year-old cars. In the video and article you will learn how to get rid of the problem with noisy closing doors of the VAZ 2106.
The factory lock on the driver's door is quite noisy. Things are even worse on the back door - it may not be closed the first time.
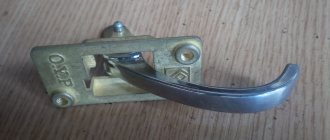
Refinement of the castle
The chocolate lock mechanism has been improved. First of all, the rings are ground off almost flush. The bolt is also modified, the thread is cut to the end. The mechanism mounting bolts were replaced so that the caps would not protrude from the mechanism.
In addition, the flag on the lock was cut off, which made more noise than sense. We will not install traction on the drive from the key. One spring was also removed, as it had a very large force.
Other improvements have also been made, details can be seen in the video.
Step-by-step instruction
1. Remove the trim
2. Remove the old lock
Open the fasteners and guide from the outside. Be careful not to break anything. You will also need to remove the handle.
3. Fit a new lock
You may need to increase the diameter of the bolt holes. This may not be the only change, so be prepared to tinker. A file is quite suitable for grinding off excess areas. The holes should be slightly oversized.
4. Set the door closing rod
First of all, remove the rubberized part from the old lock. Install it on the new spare part so that the rod goes into it and locks into place. At this point you may need to shorten the pull.
5. Install the rod on the outer handle
At this stage, you can make a special device of this type:
It will need to be bent and installed on the handle.
A rod is inserted into the outer hole. If the hole is larger and it falls out, then you can fix the rod on the other side using a plastic clamp. As a result, we get a fairly free and comfortable traction. 6. Place the guide on the glass
The guide will probably have to be shortened and modernized a little so that it does not interfere with the operation of the lock.
7. Install the electric drive rod and assemble the door
Replacing cylinders in VAZ door locks
In general, the time has come to change the larvae due to the fact that some “goblins” picked one of the locks, and their rakes fell off for such things.
Well, I basically decided to create something like a manual for replacing these larvae... maybe it will come in handy for someone.