How to remove the door trim on a Volkswagen Polo sedan video: let’s learn from all sides
Volkswagen Polo Sedan
sleeper › Logbook › Shvi, removing door trims
Volkswagen Polo Sedan
Started making shvi cars. The topic is popular in almost every way, so I won’t describe it in detail. I don’t just want to say thank you to my friend Romka fors, who put at his disposal the most awesome and joyful garage on this board (and, those who know, will learn).
Especially for comrade Schepelev, I’m posting a small guide on how to remove door trims using the example of the right front door, let’s go.
After the above steps, you need to unclip the trim clips, you need to start from the bottom, unfamiliar with the lock. This needs to be done with a special puller, but I was able to do it with my hands, why do we... If the clips come loose, you need to lift the trim a little up and it will come off.
The technological holes are very small and it was very awkward to glue the vibrating material with my hands (((
How to remove the door trim on a Volkswagen Polo sedan
Next, according to the standard scenario: we glue the surfaces that are closer to the casing with vibrating material, splen on top, and the casing itself from the inside something like this:
Tools required: TORX T30, flat blade screwdriver.
1. Disconnect the wire from the negative terminal of the battery.
2. Use a screwdriver to pry...
3. ...and move away the decorative trim of the armrest.
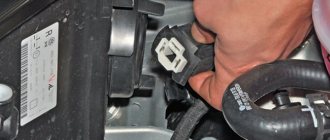
4. Squeeze the latch...
5. ...and disconnect the wiring harness block from the exterior rear view mirror control unit.
6. Squeeze the latch...
7. ...disconnect the wiring harness block from the central locking switch and remove the trim.
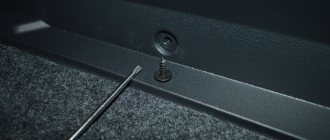
8. Remove the two screws of the central...
9. ...and one screw for the lower door trim fastening.
10. Overcoming the resistance of the latches, move the upholstery away from the door.
11. Disconnect the cable end and sheath from the outer handle.
12. Squeeze the latch...
13. ...and disconnect the wiring harness connectors from the power trunk lid lock switch and from the power window control unit.
14. Press the latch..
15. ...disconnect the wiring harness block from the door lock and remove the upholstery.
16. Remove the plug for the service window of the inner door panel. 17. Install the front door trim in the reverse order of removal.
Video instruction
The instructions are suitable for Volkswagen Polo sedan cars with 1.6l petrol engines. (105hp): 2010, 2011, 2012, 2013, 2014, 2015 model year. For restyling models 2021, 2021, 2021, 2019 and other engine options, the information may not be suitable.
Polo sedan doors, Removal and installation, Door upholstery, Replacement of limiter
Removing the door trim of Volkswagen Polo V.
Replacing the driver's door lock Polo Sedan
Owners of similar cars have noted various strange sounds inside the car. Display results as. Your name or e-mail:.
Detailed video guide on removing and installing the front door trim (card) on a Volkswagen Polo Sedan.
Behind the window lifter button there is a self-tapping screw hidden, the button will have to be driven out of its socket using a thin screwdriver, disassembled front door trim That's all for now, and next time I'll tell you a fairy tale about how a small insert decided to be covered with velor on the eve of the approaching winter, and the armrests acquired their own skin... after the tinting was done, the card on the back door in the lock area above near the glass does not fit tightly. Your name or e-mail:.
There is quite a lot of rattling in the driver's door. From experience, the window lifter guides can rattle when the fastening nuts are not fully tightened.
Cleaning the door trim after repair work 9 16k 0.
Weaknesses of Volkswagen Polo 49 53k. The story of the owner of Volkswagen Polo Sedan - do-it-yourself repair. I turned it on, drove it for a spin, and it seemed to be back to normal. These are the clips that hold the door trim on our polo.
We put everything back in place and the lock works purely manually, like in the good old Lada. Rattling noise under the driver's door trim of Volkswagen Polo Hello!
Although the dealers said not to treat the car, I still treated it everywhere and with high quality. But it's not about the processing.
I opened the door trim, removed it tightly from the pistons, but nothing broke, they treated the doors as expected, then put everything in place, the trim became as good as it was, by the way, under the trim everything was done perfectly by the factory before this, that is, before the treatment I didn’t have a lot of rattling a little bit, but today I went late in the evening and noticed that the rattling became stronger and diverged somewhere at the top, more towards the dashboard, on a flat road and at speed you couldn’t hear it, then I came home, started looking at tapping, nothing was visible and inaudible, it was like it came from the factory .
How to remove the door trim on a Volkswagen Polo
All the other doors are quiet. I have a question, what is this rattling from and how to fix it?????????
Thanks in advance, I'm waiting for your answer. You need to update your browser or try using a different one.
Volkswagen Polo Sedan 2012, 105 l. With. — car audio
Yes, I glued a corner with super glue 65G 0.5 thick...
corner in the front part of the trim (tongue)
description 50x50, the whole gift is that the THING inserted under the plastic in the front part of the card remains intact!, then in the future there will be no squeaking while driving from nowhere...
What element are we talking about - can you be more specific?
Hello. The question is this. if you pulled the cards back with your hands to remove
, is the casing bent a little? When they did the tinting, I saw how I pulled the trim with my hands. and now it doesn’t quite fit tightly to the doors, the part that is closer to the lock near the glass. Today I took it apart myself and all the clips are in place. but the trim itself still does not adhere well to the doors. Can this be fixed somehow?
can anyone tell me the part number for the door trim clips?
the knife killed me at the beginning)))
Well laid out. WELL DONE. Thank you.
the car is heavier for one passenger... 10 sheets of vibration, according to my feelings, weigh 20 kg. and there will probably not be enough of them.
Everything about doors is very clear! THX! please continue! how to disassemble the ceiling and racks? I can not…
I broke one clip when I put the casing back, and some kind of crap on top, it sticks under the plastic where you have the HF)) Tomorrow I’ll look for a clip or order
Similarly, I broke the crap that is inserted under the plastic of the mirror... how did you secure the protruding trim in that place?
Yes, the same crap with plastic masks under the mirrors that they did. Please tell me the clips on the doors are all the same and how many there are. I want to stock up in advance before Shumka. Thanks in advance.
I broke one clip when I put the casing back, and some kind of crap on top, it sticks under the plastic where you have the HF)) Tomorrow I’ll look for a clip or order
Yes, who didn’t break it without it, by the way, ok.
My brain is broken as they installed the casing at the factory, I didn’t bend it, I broke it, bent this protruding piece)))
Yes, who didn’t break it without it, by the way, ok.
Noise and vibration insulation. Doors — Volkswagen Polo Sedan, 1.6 l., 2013 on DRIVE2
Hello again everyone! As many already understood that I was about to glue the doors) You are thinking correctly, comrades. Material and tools for work
Door gluing kit for VW Polo Sedan
Next is disassembling the door. I'll tell you everything easily and simply. It’s better to pull with a jerk, and all the clips will remain alive. Unknowingly, I ruined 3 clips on the first door... I bought 10 clips in advance as a spare, just to be sure))
I glued the doors in the so-called “3 layers” 1 - Outer metal. Vibration-absorbing material Shumoff M3 + Shumoff M2. 2 - Internal metal. Vibration-absorbing material Shumoff M2 + Heat and sound insulating material Shumoff P4V. 3 — Map (plastic door trim). Vibration-absorbing material Shumoff M2. I didn’t want to make the doors too heavy; in short, I did everything without fanaticism.
Vibration-absorbing material Shumoff M3 + Shumoff M2 on the doors of VW Polo Sedan
After gluing with a vibration isolator, I wrapped all the wires with Tesa wool, glued the places where the clips came into contact with the metal with Shumoff Specific material, additionally glued the wires to the door with Shumoff Comfort 3 tape, in general, I reduced all movements in the door to a minimum. The card (plastic door trim) is also slightly glued
Map (plastic door trim) VW Polo Sedan
Next, I glued the heat and sound insulation material Shumoff P4V onto the vibration isolator layer
Heat and sound insulating material Shumoff P4V on the doors of VW Polo Sedan
Update 07/03/2014:
I wrote down a comparison of glued and non-glued doors. The difference is noticeable
Fastening the front door trim
The casing is secured with three screws and hidden plastic fasteners.
The screws for fastening the casing are located - two under the handle trim, one under the speaker.
Tools you will need:
- a thin slotted screwdriver or a knife , preferably with a blunt blade;
If you prepare plastic spatulas instead of a knife, there will be less chance of damaging the plastic.
To unscrew the screws you need a 30mm Torx.
It is convenient to use this plastic spatula. The large hook is great for resuscitating clips, the small one is for snapping off the trim.
If you do not have a torx t30 key, do not try to remove the screws with another tool. It is unlikely that you will be able to unscrew the screw, but to rip off the edges of the head and create additional problems for yourself.
Withdrawal algorithm
Before starting work, according to safety rules, it is necessary to remove the negative terminal from the battery.
- To provide access to the two fastening screws, you must first remove the decorative trim on the door handle . To do this, carefully, so as not to damage the casing, insert a screwdriver or a knife blade into the gap between the handle and the trim and pull it towards you. On some models, on the decorative trim there is a control unit for adjusting the outside mirror, from which you need to disconnect the connector with wires.
After snapping the clip, the card must be pulled up to pull out another clip from the groove. You can see it by slightly bending the trim.
Click off the part indicated by the red arrow. The opposite part (yellow arrow) is simply disengaged.
Sheathing installation
Before starting installation, make sure that the plastic fasteners are intact.
When removing the trim without a clip remover, the clips remain in the door in the unlocked position. If the clamps are not damaged, before installing the casing, they must be “cocked” using a spatula, first inserting it between the membrane and the washer, and then pushing it up.
Broken or defective clips must be replaced with new ones, otherwise a loose fit of the trim to the door will contribute to the appearance of extraneous unpleasant sounds when the car is moving.
Installation of the casing is carried out in the following sequence:
- Connect the door lock release cable.
- Secure the electrical wiring harnesses and connect all previously disconnected connectors to the central locking, power window and mirror control units.
- Connect the speaker.
- By connecting the negative terminal of the battery, check the functionality of all electrical mechanisms. A preliminary check will allow you to correct any problems in time before the door is fully assembled.
- Place the trim in place and make sure that the clips align with the seat. Secure the clips with light blows or hand pressure.
When installing the trim, you should pay attention to this protrusion that fits into the groove of the door near the glass. The plastic here is very soft, often bends and stands up unevenly.
All work must be carried out carefully without the use of brute force.
And these are the same ill-fated clips, the two on the right are broken - the result of removal without a clip cutter.
Small problems often arise when removing electrical connectors, which should be pulled out by rocking from side to side when the latch is completely unlocked.
conclusions
All work must be carried out carefully without the use of brute force.
And these are the same ill-fated clips, the two on the right are broken - the result of removal without a clip cutter.
Small problems often arise when removing electrical connectors, which should be pulled out by rocking from side to side when the latch is completely unlocked.
Required Tools
To properly remove the Polo driver's door trim, you will need the following tools:
- The blades are made of plastic; they will not damage the sheathing material. If they are not there, then you can use a knife with a dull blade or a thin screwdriver (slotted).
- Torx wrench or 30mm hexagonal socket for removing screws.
- Plastic spatula with large and small hooks. It is easy for her to snap off the latches without damaging the parts.
- Pliers.
The casing is secured with three screws, and plastic latches are also used. The screw fastenings are located below the speaker (1) and on the handle under the trim (2). To avoid breaking off the screw heads, we do not recommend using other types of tools other than a wrench.
Removing the trim on the Polo
Before starting dismantling, you need to turn off the ignition and disconnect the negative cable from the battery. Then you can proceed directly to removing the Polo driver's door trim:
- The plastic cover is removed from the handle - a spatula is inserted into the gap and the decorative strip is carefully removed.
- If the mirror adjustment unit is located on the trim, the wiring should be disconnected.
- Use a wrench or a socket to remove the screws located in the handle.
- The screw located under the speaker is also unscrewed.
- Using a clip remover, the plastic latches are carefully removed. It is better to start this procedure from the bottom. There are only seven latches on the front card - 6 of the same size, and one smaller. The latches on the rear doors are the same.
- The casing is slightly pulled down to remove the last fixing element from the groove, and is completely removed.
- The wiring for controlling the power windows, central locking, and exterior mirrors is disconnected. To do this, you need to compress the latch and remove the pad. If the connector is difficult to come out, we recommend squeezing the latch and carefully pulling out the block, moving it from side to side.
- The speaker plug is disconnected.
- The engagement of the door handle cable and the wiring harness is removed.
- If necessary, the plug of the technological opening is dismantled.
Are you here
Tools required: TORX T30, flat blade screwdriver.
1. Disconnect the wire from the negative terminal of the battery. 2. Use a screwdriver to pry... 3. ...and remove the decorative trim of the armrest. 4. Squeeze the clamp... 5. ...and disconnect the wiring harness block from the exterior rear view mirror control unit. 6. Squeeze the clamp... 7. ...disconnect the wiring harness block from the central locking switch and remove the trim. 8. Remove two screws of the central... 9. ...and one screw of the lower fastening of the door trim. 10. Overcoming the resistance of the latches, move the upholstery away from the door. 11. Disconnect the cable end and sheath from the outer handle. 12. Squeeze the latch... 13. ...and disconnect the wiring harness connectors from the power trunk lid lock switch and from the power window control unit. 14. Press the latch.. 15. ...disconnect the wiring harness block from the door lock and remove the upholstery. 16. Remove the plug for the service window of the inner door panel. 17. Install the front door trim in the reverse order of removal.
Video instruction
Reinstalling the sheathing
After carrying out repair work, the casing must be correctly put in place. If some of the latches cannot be restored, then it is worth purchasing new elements in advance.
- The lock cable is attached.
- The wiring harnesses are secured.
- The control unit connectors are connected to the central locking, mirror, power windows, and speaker. Here it is necessary to correctly position the guide rods of the window regulators. The cables pass exactly into the groove between the guide clip stop and the petal.
- The negative terminal is connected to the battery, the functionality of all systems is checked.
- The trim is mounted on the door - make sure the latches are in place.
- By pressing or gently tapping the clips are secured.
- The screws are tightened using a socket or wrench.
- The decorative handle trim is installed in place.
Trim removal video
VW Polo is a budget car option. The details of the door card and mechanisms are quite simple, made of special frills. Therefore, removing the door trim on a Polo yourself is not difficult. But all work must be done carefully, without using significant effort. Plastic parts can be easily damaged.
How to remove the Polo Sedan trim
The process has its own sequence. Before removing the rear door trim of the Polo sedan, you need to perform a number of actions. This:
- Using a screwdriver or other tool, pry off the decorative trim of the armrest handle. Afterwards she is removed.
- Next, unscrew the 2 screws that are used to secure the handle to the door.
- Use the same key to unscrew the screw holding the lower part of the door trim.
- By gently pulling, the inner panel separates. After this, use a special clamp to disconnect the wire from the window regulator.
- The end of the cable sheath is removed, removing the cable from the lever of the inner handle.
READ What Color Wheels Will Suit a Silver Car
The entire process of removing the casing takes from 10 to 15 minutes.
For your convenience, we post a video for clarity:
What is door trim and its purpose?
The door trim is made of leather or leatherette at the factory. The fastening elements are clips. The material is used to cover the body element in the inner part. To make it easier to understand how to remove the door trim on a Volkswagen Polo sedan, it is worth finding out the purpose of the part.
The cladding gives the door structure a presentable appearance. It is often dismantled to install speakers for music or change the facing material. You will have to remove the trim along with the entire door panel.
The door card is part of the body element; without it, the inside of the door is hollow. Under the fabric there is a foam pad. It is designed for sound insulation and increased thermal conductivity. Rupture or damage to the fabric lining requires replacement of the fabric. Sometimes damage leads to the fact that it becomes problematic to close the door structure. In addition to the lining, the door card contains a handle, an armrest, a pocket and other niches. If this is the driver's door, then there are also buttons for raising the windows of all four doors.
Removing the door trim
Removing the trim on the front or rear door panel of a Volkswagen Polo VW sedan will require fasteners and available tools, you will need:
Disassembly instructions:
- The bolts on the inside and outside of the handle are unscrewed.
- Disconnect the wire from the negative terminal of the battery using a thin screwdriver.
- The armrest pad is removed.
- Additional wiring is disconnected from the outside rear view mirror control unit.
To do this correctly, you will need to squeeze the latch.
- The central locking system is being disconnected. To do this, unscrew two small screws at the top and bottom.
- The clips still hold the upholstery, so you need to move it to the side carefully to unscrew the tip and the cable sheath from the outer handle.
- By squeezing the latch, the wiring harness blocks from the trunk lid lock power switch are removed.
- The wire is separated from the window regulator and the retainer.
- The latch is released and the casing is removed.
- The technological window plug is removed from inside the panel part.
If a speaker is installed in the door, it is removed last.
On Volkswagen, a clip is used as a fastening. The universal item is easy to install and comes with a special puller. Market price – 200 rubles. The clips have different tips:
Threaded fasteners are used to connect body fragments, and herringbones are suitable for fastening the trim. If you have to disassemble the door card, these elements will break, which means they will need to be replaced during subsequent assembly.
The replacement is also due to the fact that the old fasteners will provide a loose fit, which will cause extraneous sounds when the car moves.
Volkswagen Polo car rear wing replacement
Painting and body repair of a Volkswagen Polo Sedan at the TechCenter No. 1 car service center in the Primorsky district of St. Petersburg . As a result of the accident, the car was hit from behind, as a result of which the rear bumper, rear right light were broken and the rear right fender was severely jammed. Volkswagen Polo car after an accident in the direction of the insurance company will consist of the following: replacement of the rear right fender, replacement of the rear right lamp, replacement of the rear bumper, painting of the rear right fender, painting of the rear bumper, replacement of auto glass .
Photo of the car before repair:
Body repair Volkswagen Polo
Repairing the body of a Volkswagen Polo will involve carrying out a rather complex procedure - replacing the rear wing of the car . Before body work begins, the car undergoes appropriate training. The rear window of the car is cut off, the rear parcel shelf is disassembled and all trim is removed.
a new rear right fender for the Polo is delivered to our car service center and the master bodybuilder begins cutting off the jammed fender along the factory welding lines at the attachment points with the rear body panel.
First, the new rear wing of the car is fixed to the body using special clamps so that the master can correctly set all the gaps with adjacent elements.
When the new element is correctly in place, the master begins welding work. The bodyworker carefully welds the new wing to the body. After welding, the master immediately cleans the welds and levels the surface.
Bare areas of iron are immediately treated with a special compound that prevents the formation and development of corrosion.
Now you can start preparing the car for painting. The car fender is primed,
Volkswagen Polo painting
Car painting is carried out in a special painting and drying chamber; under special conditions, the maximum quality of painting of body elements is achieved. A car with a wing prepared for painting is driven into the chamber.
The rear right door is removed, so it will be necessary to paint the doorway, as well as the inside of the new rear right fender.
Before painting, the master covers adjacent body elements, as well as all openings, with a special protective film.
The rear bumper of Volkswagen Polo is painted separately on a special stand.
After painting is completed, the car body is dried in a chamber at high temperature. This is how the new paintwork hardens quickly and evenly. Upon completion of drying, the car is driven out of the chamber and the craftsmen gradually begin assembly.
The rear bumper of the Volkswagen Polo is installed in its place, and rear parking sensors are installed.
The rear right door of the car is hung. Now you can start gluing in the car windows - the rear window and the rear right window.
After final assembly of the car, the master checks the quality of the work performed, after which the car is sent for washing. After washing, the car will wait for its owner in our parking lot.
The paint and body repair of a Volkswagen Polo car has been successfully completed.
Installing new door trim
When the old upholstery is removed, it is left for cutting out a fragment when making an insert in the door. Markings are made on the part: cutting lines, places for standard holes for handles, fasteners, music speakers.
If the casing does not require replacement, then cutting out a new part according to the pattern is not provided.
Instructions for installing the panel on the driver's door:
- The cable for opening the door fragment lock is connected.
- Electrical wiring harnesses are secured.
- Connectors are connected to the control panel, power windows and mirrors.
- The battery terminal is connected.
- The functionality of all electrical mechanisms is checked.
When installing the panel, it is important to make sure that the latches match the seat. The clips snap into place by simply pressing in the middle. At the end, the handle is mounted with two screws from the bottom and top.
Rear door of Volkswagen Polo
Cases of replacing the rear door of Volkswagen Polo:
- deformation of metal after an accident, accident, impact;
- peeling, peeling of paintwork;
- natural wear, metal fatigue, formation of deposits, rust, corrosion;
- damage to standard fasteners, latches, contact boards, electric window lifter drive;
- installation of noise and vibration insulation on the car;
- change of primary color, partial painting;
- straightening work on the threshold and underbody of a Volkswagen Polo car.
What is door trim and its purpose?
The door trim is made of leather or leatherette at the factory. The fastening elements are clips. The material is used to cover the body element in the inner part. To make it easier to understand how to remove the door trim on a Volkswagen Polo sedan, it is worth finding out the purpose of the part.
The cladding gives the door structure a presentable appearance. It is often dismantled to install speakers for music or change the facing material. You will have to remove the trim along with the entire door panel.
The door card is part of the body element; without it, the inside of the door is hollow. Under the fabric there is a foam pad. It is designed for sound insulation and increased thermal conductivity. Rupture or damage to the fabric lining requires replacement of the fabric. Sometimes damage leads to the fact that it becomes problematic to close the door structure. In addition to the lining, the door card contains a handle, an armrest, a pocket and other niches. If this is the driver's door, then there are also buttons for raising the windows of all four doors.
Instructions for removing the door trim on a Volkswagen Polo Sedan
Door trim wears out over time, but not every car enthusiast knows to remove This element allows you to give the body part an attractive appearance; its replacement is required if the material is damaged or the internal gasket is cracked. Regardless of the reason, you will have to disassemble the entire structure, but with our instructions you will understand how to do this.
READ Where is the starter located on a Peugeot 206
Removing the door trim
Removing the trim on the front or rear door panel of a Volkswagen Polo VW sedan will require fasteners and available tools, you will need:
Disassembly instructions:
- The bolts on the inside and outside of the handle are unscrewed.
- Disconnect the wire from the negative terminal of the battery using a thin screwdriver.
- The armrest pad is removed.
- Additional wiring is disconnected from the outside rear view mirror control unit.
To do this correctly, you will need to squeeze the latch.
If a speaker is installed in the door, it is removed last.
On Volkswagen, a clip is used as a fastening. The universal item is easy to install and comes with a special puller. Market price – 200 rubles. The clips have different tips:
Threaded fasteners are used to connect body fragments, and herringbones are suitable for fastening the trim. If you have to disassemble the door card, these elements will break, which means they will need to be replaced during subsequent assembly.
The replacement is also due to the fact that the old fasteners will provide a loose fit, which will cause extraneous sounds when the car moves.
Impeccable Polo sedan door repair: restoration and replacement
Our auto center employees periodically undergo professional compliance checks. All clients are provided with an individual approach. When performing restoration manipulations, methods of labor organization are used that make it possible to increase the efficiency and efficiency of work.
Our service center specializes in complex restoration measures, restoring the original physical condition of door components and painting them. A full repair of the Volkswagen Polo door is being carried out. These operations are performed in the presence of mechanical and corrosion damage.
Volkswagen Polo door repair, as well as restoration of damaged body parts
We have a good material and technical base. This allows our craftsmen to carry out high-quality operations on straightening, straightening and replacing doors of any location. The presence of a painting shop allows painting work to be carried out. Our service center performs the following types of repairs:
locksmith work;- straightening and straightening of door body elements;
- mechanical extraction of severe damage and elimination of concavities using slipway equipment;
- returning the stiffeners of the door parts to their original position to restore the properties of the structure;
- welding work;
- preparing frame parts for painting;
- treatment of the body surface with a special substance that protects against minor physical influences, corrosive and chemical influences;
- painting of restored door components;
- polishing the door covering.
- natural processes (adverse weather conditions);
- operational influences (the appearance of violations of the integrity of the body shell due to careless maneuvers, non-compliance with traffic regulations, corrosion);
- exposure of the door surface to active chemicals;
- involvement of a vehicle in a traffic accident;
- intentional damage to the body by third parties.
Our service station ensures the prompt implementation of restoration operations of the required quality. This is explained by the presence of a professional team of frame repair specialists who are certified specialists.
They have extensive experience and skills in such technical activities. Our technical staff is characterized by specialized education and regular training in new organizational techniques for working in specialized centers.
Our professionals carry out restoration operations using modern equipment. Thanks to this, the quality indicators and accuracy of restoration operations are increased. We carry out timely updating of the material and technical base. This makes it possible to carry out prompt and high-quality repairs.
For several years, our auto center has been providing services for the restoration of door components of the Volkswagen Polo Sedan that have suffered from corrosion or mechanical influences.
During the operation of our car service, we have introduced special methods for conducting restoration operations with strict adherence to the structural parameters of body parts.
With the help of these actions, our technicians achieve the correct distribution of load effects during operation of the machine. The mechanics of our service station have the necessary qualifications to carry out complex restoration procedures.
For this purpose, special technical equipment is used and rational use of labor resources is achieved. These organizational measures make it possible to reduce the time required for repair operations.
Cost of our services
We carry out a wide range of technological measures aimed at correcting possible problems with the body shell of vehicles. We have the opportunity to provide combined services at a fair price. To satisfy the interests of the client, we constantly stabilize the cost of providing frame repairs.
Restoring damage to the integrity of the paint layer will cost less than eliminating serious damage to the body. For such procedures, more labor resources are involved.
Warranty
Our car service, after providing repair services, provides car owners with high-quality warranty service in order to ensure customer comfort and meet their requirements. We rarely receive requests from car enthusiasts for warranty service due to the provision of qualified restoration work.
In the event of such requests, our specialists responsibly fulfill warranty obligations to eliminate existing defects. In most cases, car enthusiasts turn to us for technical assistance based on recommendations from car owners who have used our services.