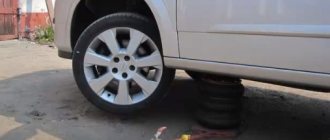
Symmetrical reverse gear Volkswagen Polo
The Volkswagen Polo is a car without significant design flaws.
Despite this, many car owners are not satisfied with the fact that the car has only one reverse light. This impairs visibility when driving backwards at night, which increases the risk of damage to the bumper on an obstacle. Therefore, many drivers decide to modernize the electrical circuit of their car.
Making symmetrical reverse gear on a Volkswagen Polo is not difficult. At the same time, the car will receive a more complete appearance, and driving it will become safer, since the car will become more visible to other road users.
The process of independently connecting a symmetrical reversing light on a Volkswagen Polo
In order to install symmetrical reverse gear on a Volkswagen Polo, you must follow the instructions given below.
- Remove all clips securing the trim.
- Pry up the trim and remove it.
- Inspect the wires going to the lamp.
- Remove the rear light.
- Straighten the wires. You need to find the electrical wiring that powers the reverse light.
- Remove the back cover of the lamp. Its fastening is implemented using five latches. It is recommended to carry out work in a warm room, since at low temperatures there is a high risk of damage to the fasteners.
- Find the red filter that interferes with the reverse gear setting.
- Remove the light filter.
- After removing the red filter, the flashlight should look like the photo below.
- Cut the wires going to the reverse signal.
- Make a connection.
- The connection point of the wires should be soldered.
- Check the quality of soldering. There should be no movement of the wires relative to each other. Otherwise, there will be poor electrical contact at the soldering site. The twist will begin to heat up and over time, due to oxidation and deterioration of contact, the temperature will increase. Under the most unfavorable conditions, the connection point may catch fire.
- Insulate exposed areas with insulation or heat-shrinkable casings.
- Check the functionality of the reversing lights.
- Reinstall the casing.
- Recheck reverse operation.
Replacement process
The updated version of the Polo will feature even sleeker LED lights. Every car sooner or later undergoes lighting repairs. You can, of course, contact a service center and pay a substantial amount of money to replace incandescent lamps, or you can change everything yourself.
It’s a different matter if the car was involved in an accident and the glass body cracked. Then replacing the flashlight will cost slightly more than buying light bulbs. One way or another, the method of removing and installing the part is the same.
Tail light design Before you begin the procedure, you should carefully study the design of the sedan's rear light. Outside is the building itself. Below it there are four light bulbs: All components are attached to a special metal block, which is held in place by a locking screw located inside the luggage compartment.
If the light does not work, this does not mean that the light bulb has burned out.
Replacing lighting equipment on a VW Polo
To replace lamps in a Volkswagen Polo, you will need the following tool:
- Wrench No. 10;
- Torx wrench T-25, 27, 30;
- Hook from car kit;
- Flat-head screwdriver;
- Gloves;
- Napkin;
- New light bulbs.
Blocklight
In this Volkswagen model, the biggest difficulty is replacing the low beam lighting equipment. To complete this task, you will have to remove the headlight. Replacement is carried out equally on both sides:
- The power supply from the head light is disconnected;
- By pulling the rubber protection tab, the boot is removed;
- The block headlight is taken out from the niche;
- The protective cover is dismantled and the light bulb is removed from the headlamp housing.
- The low beam lamp is replaced and subsequent assembly is performed in the reverse order.
When performing such work, you need to remember that the unit contains halogen light bulbs. When performing work, you should not touch the glass shell with your hands, as marks may remain, which will lead to the darkening of the light bulb when heated.
But more and more often recently LED bulbs are being installed in the low beam headlights. They provide bright light and illuminate the road well.
Replacing the light source in the turn signal is performed in the following sequence: turn the socket clockwise if the bulb is installed on the right side, and counterclockwise in the left block headlight; Remove the light bulb, install a new one and reassemble in reverse order.
We replace light bulbs as follows:
- Turn the light bulb socket counterclockwise;
- Remove the lamp socket from the housing;
- We replace the lamp and install everything in place.
Anti-fog headlight
The light bulb can be replaced using different methods: from underneath the car or by removing the headlight. The first method is performed on an overpass or inspection hole.
Replacement steps:
- Unscrew the screws securing the front part of the fender liner, bend the front wheel liner;
- Press the latch of the power supply chip, disconnect it from the lamp;
- Turn the light bulb counterclockwise and pull it out of the housing;
- Install the new light bulb in reverse order.
The fog lamp is removed if it is necessary to replace the light fixture or when replacing the front bumper. This is done using a special hook from the car kit. Replacement process:
- Insert the wire puller into the hole for adjusting the headlights, gently pull out the decorative trim, remove it, overcoming the resistance of the latches;
- Unscrew the fog light mounting screws using a Torx T-25 wrench;
- Remove the headlight so as not to damage the wiring;
- Press the latches of the block, disconnect the power from the light bulb connector on the back of the headlight;
- Turn the light bulb counterclockwise and remove it from the housing with the socket;
- Replace the new light bulb and reinstall it.
Side turn signal
Step-by-step instruction:
- Move the side turn signal towards the front of the vehicle;
- Remove the pointer from the hole;
- We pull the cartridge, pull it out of the body;
- We replace the old light bulb with a new one and install everything in place.
Dimensions
Performed symmetrically for the left and right lights:
- Scroll the socket with the light bulb counterclockwise;
- We take out the socket and change the baseless light bulb.
The light source for the taillights changes as follows:
- Disconnect the negative terminal from the battery;
- Open the trunk;
- Pull the special cutout on the side of the upholstery towards you;
- Using a slotted screwdriver, lift up the red stopper of the connector, press the latch, disconnect the wires;
- Unscrew the fastening nut;
- Pull the lamp out of the body so as not to damage the paintwork of the car;
- Release the latches on the lamp holder and remove the platform from the lamp;
- Unlock the socket and replace the light bulb;
- Snap the cartridge between the latches;
- Reassemble the lantern in reverse order.
For those car enthusiasts who want to make their Volkswagen Polo bright, you can purchase LED multi-color chameleon bulbs. They are equipped with two diodes on the sides and are mounted in sidelights. The light bulbs shine brightly and intensely, with a power of 2.0 W.
Headlight adaptation
Dismantling the headlight may be necessary if it is replaced, or if it becomes necessary to remove the front bumper. In this case, you will need to disconnect the block with the power wire and unscrew the two fastening screws in the upper part of the headlight using a 20mm Torx wrench.
Video: removing the headlight of a VW Polo Sedan
After installing a new headlight (or an old one after repair), as a rule, it is necessary to adjust the direction of the light fluxes. At a service station, conditions for adaptation are better, but if necessary, you can adjust the headlights yourself. On the body of the headlamp, you need to find regulators that adjust the light beam in the horizontal and vertical planes. When starting the adjustment, you should make sure that the car is fueled and equipped, the air pressure in the tires is correct, and there is a load weighing 75 kg on the driver’s seat. The sequence of actions in this case is as follows:
- the light beam control switch is set to position “0” (i.e., there is only a driver in the car or a driver with a front passenger);
- low beam turns on;
- one of the headlights is covered with opaque material;
- the light beam is adjusted in the vertical plane by rotating the regulator, which is located closer to the axis of the car, with a Phillips screwdriver;
- the same manipulations are performed with the second regulator;
- the second headlight is closed and the procedure is repeated;
- PTF adjustment is performed in the same way.
It should be remembered that when adjusting the headlights, the car must be located on a strictly horizontal surface. The point of regulation is to bring the beam angle into line with the value indicated on the headlight. What does this mean? On headlights, as a rule, the standard angle of “incidence” of the light beam is indicated: as a rule, this value is expressed as a percentage with the headlight on next to it, for example, 1%. How to check if the adjustment is correct? If you park the car at a distance of 5 meters from a vertical wall and turn on the low beam, then the upper limit of the light flux reflected on the wall should be at a distance of 5 cm from the horizontal (5 cm is 1% of 5 m). The horizontal line on the wall can be set, for example, using a laser level. If the light beam is directed above a given line, it will blind oncoming drivers; if below, the illuminated road surface will be insufficient for safe driving.
Replacing low beam lamps on Polo 2013-2015. (dorestyle)
In pre-restyling models, access to the rear of the canopy for maintenance is provided. This is convenient and safe from the point of view of possible damage to glass and paintwork. Replacement of light bulbs is carried out in the following order, the same for the left and right sides.
- On the back of the case, find a suitable connector with three contacts. This is a standard header for base/plinth type H4. The connector is placed directly on the contacts. The space between the contact block and the housing is covered with a rubber boot with a hole for power supply.
- Remove the connector from the housing by rocking and pulling it back. You must hold on to the block; pulling on the wires is unacceptable. There is no need to use force; with small displacements of the pads to the sides, the connection is undocked quite easily, there is no lock there.
- Remove the rubber boot.
- By simply pressing the protruding loop, the retaining spring is retracted back and down, after which the base is completely released and can be removed.
- The new H4 lamp fits neatly into place, exactly as its predecessor stood, with the flat horizontal contact facing up.
- Reinstall the wire retainer by lifting and snapping its bracket.
- Place the rubber boot and electrical connector in their original position. Make sure that it “sits” all the way and the contact is reliable.
- Test turn on the low beam to make sure everything is in order.
Do not touch the quartz flask with your bare fingers; the appearance of grease stains leads to an increase in temperature and rapid failure.
Video
When replacing the boot, you need to make sure that it tightly covers the gaps between the case and the base.
Device management
The control of lighting devices in the car is conveniently located in one place: under the air deflector to the left of the steering wheel. A convenient classic type switch turns on the currently needed optics.
Let's consider the procedure for turning on lighting fixtures:
- The low beam lamp on a Volkswagen Polo turns on when the handle is moved to the extreme right position. The high beam is also located in the same position, but to activate it you will have to move the left steering column switch vertically.
- The switch lever, located on the left under the steering wheel of the car, also controls the operation of the Volkswagen Polo's turning lights. Moving it to the extreme upper position allows you to use the right turn signal, and to the lower position – the left turn signal.
- The extreme right or middle position of the handle is a transition step for turning on the fog lights. The next step to operate the front fog lights is to pull this handle towards you until it locks for the first time. Pulling it out all the way will help to activate the rear fog lamps of the VW Polo.
In the forward position, the high beam turns on briefly only for those moments for which it will be held manually by the driver. To constantly operate in high beam mode, move this steering column switch to a position away from you and lock it.
Let us note something convenient for the driver: if one of the turning lamps of the Volkswagen Polo fails, the indicator for turning on the turning lights begins to blink in an accelerated rhythm. This way, the car enthusiast will be able to understand that the light bulb on the Volkswagen Polo should be replaced.
You should not put off replacing a burnt-out optical device until later. In practice, many accidents occur when the driver turns on the turn signal, but it does not work. The result is an accident, serious damage to the car, and injuries to people because of such a trifle.
Replacing lamps on a Volkswagen Polo sedan
To replace burnt out light bulbs, it is not necessary to take your car to a service center. You can carry out this simple operation yourself if you follow the instructions for its maintenance.
Replacing lamps on a Volkswagen Polo sedan yourself seems to be a very simple procedure that novice craftsmen can handle. By spending a minimum of effort and time on this, you can save a decent amount. Let's consider the operation of updating lamps on cars for two versions of lamp units, separated in time by 2015.
What kind of lamps are installed?
| Name | Base | Power, W |
| Block headlight | ||
| high/low beam lamp | H4 | 60/55 |
| turn signal lamp | PY21W | 21 |
| size lamp | W5W | 5 |
| Back light | ||
| turn signal lamp | PY21W | 21 |
| brake light | P21W | 21 |
| side light lamp | W5W | 5 |
| fog lamp | P21W | 21 |
| reverse lamp | P21W | 21 |
| fog lamp | HB4 | 51 |
Low and high beam lamps
Operations for replacing low and high beam lamps are considered using the example of one (right) headlight of a Volkswagen Polo.
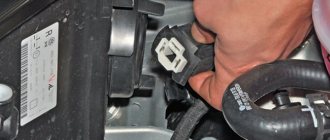
- First, the block with a set of supply wires is disconnected from the lighting device.
- Pull the tip of the rubber protective boot and remove it.
- By pressing the protrusion of the retainer with the spring, you must carefully remove its edges from engagement with the retaining hooks on the body.
- At the last stage, the damaged illuminator is easily removed from the headlight housing.
- To do this, simply pull it towards you.
To remove dirt from the holders, use a clean rag moistened with alcohol.
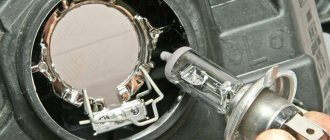
The new lamp, designated H4, is installed in its place in the reverse order to that described above.
When removing light bulbs, they can only be held by the socket. This is explained by the fact that the updated products are halogen-type illuminators, the bulb of which, according to the instructions, is prohibited from touching with your own hands. Otherwise, when they are heated, individual parts of the surface may darken.
Turning lamps (as part of the headlight)
To remove the turning lamps that are part of a unit that has already been removed from the car, you will need:
- First, you should grab the base with your hand and press on it.
- Turn it in a clockwise direction.
- In the next step, the lamp is removed from the structure holder with a force directed towards itself.
At the final stage of the procedure for removing the turn signal lamps, a new PY21W type light fixture is taken and mounted in the reverse order.
Marker lamps
Replacement of side lamps on Polo cars is carried out in the following order:
- With a little force, press the cartridge and carefully turn it counterclockwise (you should act very carefully so as not to crush the flask).
- At the end of the disassembly, the burnt-out marker lamp is removed from the housing.
2276-6-13-15-01
We put a suitable cap from a felt-tip pen on the lamp bulb and remove the lamp from the shade. We replace other lamps in the same way. When it comes to lighting design, the Germans have no equal. Both low beam headlights and rear lights are constructed with the utmost care from the highest quality and most reliable materials. There is no point in talking about design at all.
Separately, it is worth noting the painstaking work on the design of the rear dimensions of the Polo. Even the old sedan model uses high-quality LED technology, which is used for most modern foreign cars. The updated version of the Polo will feature even sleeker LED lights. Every car sooner or later undergoes lighting repairs.
You can, of course, contact a service center and pay a substantial amount of money to replace incandescent lamps, or you can change everything yourself. It’s a different matter if the car was involved in an accident and the glass body cracked.
Then replacing the flashlight will cost slightly more than buying light bulbs. One way or another, the method of removing and installing the part is the same.
Tail light design Before you begin the procedure, you should carefully study the design of the sedan's rear light. Outside is the building itself. Below it there are four light bulbs: All components are attached to a special metal block, which is held in place by a locking screw located inside the luggage compartment.
Tools:
If the light does not work, this does not mean that the light bulb has burned out. Perhaps the reason lies in the fuse box located in the front panel on the driver's side. If the problem is the light bulb, then when replacing it, experts recommend using either originals or analogues with the appropriate parameters and special markings on the base of the device. Under no circumstances should replacement be done with bare hands.
Replacing low beam lamps on Polo 2015-2019. (restyling)
On restyled versions, access is difficult, so replacing the low beam lamp will require removing the headlight. It's not as difficult as it might seem. You will need to remove a Torx screwdriver from the trunk. Or use a similar attachment from any tool kit for motorists.
The Torx screwdriver lies in the organizer placed inside the spare wheel; its shaft allows the installation of one of two sides with different calibers; you need to choose the appropriate one.
- On the upper part of the partition, suitable for the headlight housing, there are several screws with Torx heads; unscrew two of them located on the stampings. The one that holds the housing stop between them does not need to be unscrewed.
There are two options: disconnect the electrical connector coming from the back of the headlight, or leave it in place, but then it will be less convenient to work, the unit cannot be completely removed from the car, everything will have to be done hanging near the bumper. But if you have the skill, it's not difficult. To disconnect the block, you need to press the plastic clamp on it towards the supply wires and pull the contact group back.
- In addition to the two mounting screws, the headlight is held on the vehicle by two spring latches hidden under the bottom of the headlight. Apply some force while simultaneously rocking it up and down and pushing it over the bumper. The latches will release and the headlight will be removed.
Do not use excessive force, as this may damage the latches. It's better to spend a few extra seconds swaying.
- The low beam bulb is located closer to the fender and is covered at the back with a rubber boot. It is larger in size than the one covering the second lamp.
- The plastic handle of the plinth must be turned counterclockwise by 30-40 degrees, which will remove it from the fixing grooves.
- Remove the lamp together with the socket, then gently rock it out of the socket, remembering how it stood with its protruding antennae relative to the connector.
- The new light bulb is installed with the same precautions, that is, without touching the bulb with bare hands. We recommend doing this with lint-free gloves.
- The headlight is assembled in the reverse order, the socket is turned clockwise until it stops in the grooves, the cap is installed in its proper place.
- The headlight is carefully inserted into the latches, the screws are screwed into place.
- After a trial run, you can proceed to the second side.
Video: replacing a light bulb
LED low beam lamps for VW Polo
Installing LED lamps in headlights is a sore subject for many car enthusiasts. According to the requirements of the rules, it is allowed to use only those lamps specified by the manufacturer. If the LEDs were supplied at the factory, then there will be no questions, but unauthorized replacement of standard lamps may result in fines or temporary deprivation of rights. This requirement applies not only to the Volkswagen Polo, but also to any other brands or models of cars.
The reason for this strict approach is the significant difference in the design of halogen and LED devices. Reflectors and headlight reflectors are designed to work with an incandescent filament of a certain configuration and size. The position of the LEDs is completely different, it is almost impossible to adjust the beam of light to meet the requirements. Therefore, when driving, such headlights begin to blind drivers of oncoming cars, creating emergency situations, which is unacceptable.
What kind of lamps are installed?
| Name | Base | Power, W |
| Block headlight | ||
| high/low beam lamp | H4 | 60/55 |
| turn signal lamp | PY21W | 21 |
| size lamp | W5W | 5 |
| Back light | ||
| turn signal lamp | PY21W | 21 |
| brake light | P21W | 21 |
| side light lamp | W5W | 5 |
| fog lamp | P21W | 21 |
| reverse lamp | P21W | 21 |
| fog lamp | HB4 | 51 |
How to replace
Replacing a low beam bulb yourself takes up to 30 minutes, including the correction:
- Disconnect the car battery.
- Open the hood of the car and disconnect the block with the headlight wires by prying it off with a screwdriver.
- Remove the sealing cone.
- The lamp on the sedan is secured with a spring bracket. Remove the loop from the groove on the reflector, push the latch down, and remove the damaged part.
- Install a new consumable and reassemble in reverse order.
This is a fairly simple procedure, but if you are not confident in your skills, it is better to contact a car service. The optics of the low running lights, like the reversing lamp, need to be checked regularly. It is recommended to periodically check the fastening of contacts and wiring.
How to change a headlight bulb on a Volkswagen Polo Sedan
Your Volkswagen Polo Sedan requires periodic updating of lighting fixtures. When low beam lamps and reversing lamps fail, they should be replaced and adjusted. You can contact a service company to install new light bulbs, but the cost of services is not affordable for all car owners. You can replace low beam lamps with your own efforts, spending minimal time and money.
The basic scheme for replacing a low beam lamp in a Polo Sedan looks like this:
- It is necessary to fix the hood cover in the open position and place it on the stop.
- Next, you need to pick up the lamp wire block and disconnect it from the lighting fixture.
Step 2 - Then you should pry up the lamp seal and remove it.
- The locking loop on the reflector comes out and it needs to be lowered.
Step 4 - Then the old lamp is unscrewed from the headlight unit.
Step 5 - After this, you need to install a new light bulb and secure it with a spring clip.
Step 6 - Finally, close the hood and adjust the headlights.
Step 7
To avoid burns, lamps must be held with gloves or a cloth. Avoid contact of grease, oil and other liquids with lighting fixtures. If any substance does get on the lamp, it must be treated with alcohol and the dirt removed.
How to replace low beams in a Sedan car
Now let's look at the process of installing low beam lamps in a Polo Sedan in more detail.
Necessary tools for work:
- wrench “10”;
- Torx T25 star wrench;
- hooks from a car tool kit;
- flat blade screwdriver;
- gloves;
- a small clean piece of cloth;
- new headlight bulb.
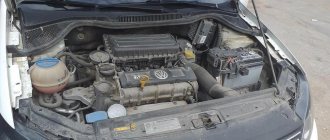
Sometimes replacing the low beam bulb requires dismantling the entire headlight unit. To do this, disconnect the wires from the fluorescent lamps by pressing the latch block. It must be removed from the connector of the wire bundle regulator. The block is also disconnected from the lamp socket. Then, using a wrench, unscrew the screws securing the headlight housing to the body. Next, the entire system is carefully removed and removed from the car. After carrying out the necessary repair and maintenance work, the headlight unit is installed in place in the reverse order.
Adjusting headlights in Polo Sedan cars
Always after replacing the lamps in the headlight, it is important to adjust the lighting system in the Volkswagen Polo Sedan. This procedure can also be carried out independently.
To do this, you need to recreate the real operating conditions of the machine. The car should be installed horizontally against a flat wall at a distance of five meters. The driver's seat should be occupied by a person of your build. The trunk should have one spare tire and a set of tools for car repairs.