Removing and installing the rear door trim on a VAZ 2110 | VAZ 2111 | VAZ 2112
NOTE Removal and installation of the trim is shown using the example of the right rear door. All left rear door hardware can be removed and installed in the same sequence.
The doors of cars of recent years are equipped with central locking with an electric drive. The rear door lock has a lock for opening from inside the car; the locking lever is located on the rear end surface of the door. The door locks can be locked when transporting children in the rear seat.
Removing the trim
1. We prepare the car for repair work. 2. Use a Phillips screwdriver to unscrew the door lock button.
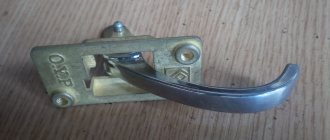
3. From the rear of the window lifter handle (1), insert the blade of a thin slotted screwdriver between the socket (3) and the handle trim (2). We press the handle lining away from the socket, releasing the latch (protrusion) located on the inside of the handle lining. In this position.
8. Using a slotted screwdriver with a wide blade (putting fabric folded in several layers under it), press the trim away from the door. At the same time, we remove the eight trim fastening holders from the door holes. 9. Slightly lift the trim and remove it from the door.
Sheathing installation
We install the door trim and all previously removed parts on the car in reverse order. Before installing the casing, we check the fastening holders - replace deformed or damaged holders. When installing the trim on the door, we align the trim holders with the holes in the door panel and lightly tap the heel of the palm to press the holders into the holes.
useful tips for motorists
Dismantling
Front doors
Removing door trims is not at all difficult. The only unpleasant thing is that the clips are often damaged.
They can, of course, be repaired, but it’s much easier to stock up on ready-made ones without fooling yourself. There are some peculiarities: if you have euro cards, you need to dismantle the window lift lever (if your VAZ has one).
But we will tell you about the basic algorithm for dismantling door trim with your own hands:
- It is necessary to use a thin screwdriver to press the trim of the manual window lift handle away from the socket, guiding it so that it disengages and remove it. If you have electric windows, then naturally skip this point;
- Remove the socket;
- Using a screwdriver, release the locking mechanism for the inner handle of the armrest and remove it;
- Remove the screws securing this handle;
- Press the inner handle of the lock, turn the armrest handle up and remove it;
- Unscrew the button blocking the door lock;
- Unscrew the screw securing the outside mirror control mechanism and remove it from the lever;
- Remove the triangular trim, removing the pistons for its fastening from the two holes in the door.
Rear doors
Removing the rear door trim of a VAZ with your own hands has some differences.
First you need to unscrew the fastening screws (there are 3 of them) and remove the cover. Using a screwdriver, press the upholstery so that the pistons bounce off.
When doing this, keep the screwdriver close to each piston so as not to tear off the holders. It is also necessary to remove the spacer sleeve from the window lifter shaft.
Sometimes this item may need to be replaced due to damage. Also, the upholstery may wear out or deteriorate during use. At the same time, the appearance of the car inside the cabin also deteriorates. Therefore, the upholstery needs to be replaced with new one.
How to remove and reinstall the front door trim on a VAZ 2110, 2111, 2112
Step-by-step photo and video instructions for removing the trim on the front door on VAZ 2112, 2110, 2111 cars.
It is best to have a couple of pistons for fastening the door trim in stock, because... they can easily break during disassembly.
1. Using a thin screwdriver, press the trim of the window handle away from the socket. At this moment, you need to move it so that the protrusion on the cladding snaps away from the socket. After this, you can remove the trim and window handle.
2. After this, you can remove the socket itself.
3. Using the same screwdriver, press the lock of the plug and remove it from the inner handle of the armrest.
4. The inner armrest handle is held on by two screws. You need to unscrew them too.
5. We press the inner handle of the lock and at the same time turn the armrest handle up and remove it while removing the lock handle from the hole in the armrest handle.
6. The lock button is simply unscrewed with a screwdriver.
7. Now you need to unscrew the screw and remove the outside rear view mirror control mechanism from the lever.
8. The triangular overlay is held on by two pistons.
9. If you are removing the rear door, you need to unscrew the 3 screws securing the trim and remove it.
10. The door trim on the VAZ 2110 itself is held on by 8 pistons. The position of the pistons on the front door is indicated in the photo.
11. And on the back door. To remove the upholstery...
12. ... You need to use a screwdriver to press out the upholstery so that the pistons come out of the fastenings. Try to place the screwdriver as close to the pistons as possible - there is a chance that the pistons holders will simply come off.
13. Remove the spacer sleeve from the window lifter shaft.
14. Broken upholstery fastening pins should be replaced. The old piston is simply cut off. The new piston is inserted into the hole with the protrusion and, with light pressure, rotates in the hole until it is completely fixed in the holder.
15. The VAZ 2110 door trim is installed back in the reverse order of removal. Make sure that the end of the lock lock gets into the hole in the trim.
16. Using light blows of your fist on the upholstery, secure the pistons in the door.
17. The edge of the seal must remain outside. If it gets under the upholstery, take it out.
18. In order to remove the front door pocket, you need to unscrew 3 lower and 1 upper screws and it will simply come off. It is also installed back.
Removing the door trim of a VAZ 2110
Home » Car brands » VAZ » VAZ 2110 » Removing and installing the front door trim on the VAZ 2110, 2111, 2112
Removing and installing front door trim on VAZ 2110, 2111, 2112
Hello, today we will tell you how to remove the door trim on a VAZ 2110, 2111, 2112. There are many situations that require removing the trim, for example, repairing a window regulator, door lock, speaker wiring, or in order to make noise insulation. Before removing the trim, you need to buy new pistons for attaching the trim to the door, because... Often they break or wear out, and as a result, the trim will begin to hang and knock on the door.
So let's start removing the casing. First, pry up and remove the window handle lock and the handle itself
Removing the window handle
Now we unhook and remove the plug from the inside door handle.
Removing the handle cap
Behind it, unscrew the 2 bolts securing the handle and remove it
Unscrew the 2 bolts securing the handle
After this, unscrew the door closing bolt and the side view mirror control lever bolt.
Unscrew the door lock button Unscrew the bolt securing the side mirror adjuster
Next, unscrew the lower door pocket and remove it
Unscrew the door pocket
All that remains is to pull off the casing from the pistons, there are 8 of them in total. If you can’t remove it by hand, pry it off from the side with a screwdriver.
Replacement of door trim on VAZ 2110, VAZ 2111, VAZ 2112
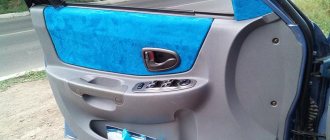
Welcome! Door trim - during a side impact, it helps because the person receives fewer injuries; if it is missing, then all the metal parts will rest against the person, in addition, it gives the doors an appearance and in most cases it simply serves as a convenience, for example, a hand to put it on it, as well as to close the door, open it, twist it. When you open and close the door with your hand, you work with the door handle or with the trim itself.
Note! To replace it you will need: New pistons (you can buy them at a car dealership, they cost literally pennies, just one casing uses 8-10 pistons, so take this into account) and a regular Phillips screwdriver!
Summary:
Where are the mounting points for the sheathing? Almost any kind of skin is attached to one-time-use pistons, but in some places it is also held on by screws; the mounting locations vary depending on the skin, that is, the rear skin is attached in slightly different places, unlike the front; for clarity, we have given two photographs below, on the left they showed the trim of the front door and the arrows indicate the places where the pistons hold it, respectively, in the right photo everything is the same, but only the trim is no longer on the left, but on the right, by the way, the blue arrows show the places where the screws secure them, you remember all these places, because the casing needs to be bent and it needs to be bent exactly in those places where the pistons are located.
When should you replace your door trim? Over time, the casing gets scratched and deteriorates, due to this, the appearance of the car from the inside becomes not very beautiful and the casing is changed, but the casing does not always need to be changed, in most cases it is simply removed and therefore this article can still be used in it both the removal and installation of the trim are described, and in some cases (Very rarely) people who love their cars and simply those who want to give a new look to the car, this trim is removed and a new one is installed, of a completely different type or even from Priora (It fits the top ten, but you’ll just have to tinker with the electronics because in the Priora the electronics in the front door are located in the driver’s room, and in dozens it’s located in the floor tunnels in the middle and besides that you’ll have to redo the ventilation a little, namely through the trunk, otherwise the windows will most likely sweat ).
How to remove the rear door trim of a VAZ 2110
Door trim is intended for noise and vibration insulation, as well as for decorative finishing of these doors.
The removal process is the same for both front and rear doors. The only thing you should pay attention to is the window regulators. In the rear doors they are mechanical, and in the front doors, depending on the modification, they can be either electrically or mechanically driven. In addition, the front doors have rear-view mirrors and in some modifications it is necessary to remove the internal mirror drive handle.
How to replace the door trim on a VAZ 2110-VAZ 2112?
Note! The front trim (Depending on the configuration) is easier to remove than the rear one, because electric windows are used at the front and there is no need to remove the window lowering handle on them (it simply doesn’t exist), but on the rear doors in most cases there are these same handles, by themselves (Front and rear trim) are removed identically; for clarity, we will show the replacement process on both trims!
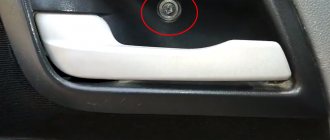
Removal: 1) First, unscrew the button that opens and closes the door (Indicated by an arrow), it has edges on top for a Phillips screwdriver, or you can even try to unscrew it without a screwdriver, just twist it counterclockwise by hand and if it unscrews, you can proceed further for removal and replacement.
2) Then remove the door handle (the so-called armrest), to do this, disconnect the trim from it in the central part (see small photo) and then unscrew the two bolts (the approximate location of the bolts is shown by red arrows) securing the handle, once this is done, Pull the door release handle (indicated by the blue arrow) by hand and thereby remove the armrest from the car door.
3) Next, remove the door trim trim at the bottom by unscrewing all the screws that secure it (see small photo), behind the trim if you have a speaker located. then in this case, also remove it by unscrewing all the screws that secure it and disconnecting the wires that are connected to it, so that the work can be done safely, we recommend that you remove the minus terminal from the battery, how to do this, read the article: “Replacing the battery by car".
4) After that, if there is a window lowering handle on the trim, it can be easily removed using a screwdriver, this is done as follows, the screwdriver is inserted between the socket (Indicated by number 3, located at the very end and made in the form of a circle) and between the trim (Indicated by number 2, located in the middle, between the socket and the handle itself) and as soon as the screwdriver is inserted, use it to press the lining away from the socket and with your other hand pull the lining to the top (see photo 2) and thereby it will be removed, and if it is removed, then The handle can be easily removed because nothing will hold it anymore.
5) And finally, take a thick flat screwdriver and wrap a thin cloth around it so that the car doesn’t get scratched, and insert this screwdriver between the trim and between the door in those places where the trim fasteners are located (Where the clips secure the trim, we’re already in two photos at the very beginning shown) and bend the trim away from the door; the fasteners may break, so be sure to stock up on new ones before starting work.
Note! If, when removing the trim, the decorative trim of the rear view mirror gets in the way, then you remove it, unscrew the screw that secures the rear view mirror control handle (see small photo) and remove the handle, then use a screwdriver to pry the trim and remove it from its place, putting it aside aside!
Installation: Install the trim in the reverse order of removal, all deformed holders must be replaced with new ones, and when you install the trim, align the holders with the holes on the door and lightly hit them with your hands, get them to lock (there will be a click) and you can assume that the trim has been replaced on the car .
Additional video clip: You can see the process of removing the trim using the example of a VAZ 2110 car in the video located just below:
How to remove the Priora door trim with your own hands
Door trim and its components
If you suddenly want to improve the sound insulation on the Priora or simply check and repair the internal mechanisms (door handle, ESP, etc.), you will need to remove the front door trim or rear door trim. How to remove the casing and how to disassemble it correctly with your own hands? We will try to give you the answer to this question in this article.
Few car owners can go to service centers every time there is a malfunction. Some work, such as removing trim, can be done yourself.
Priora car skins are attached using bolts and special holders, most often made of plastic. It is worth taking care of spare clips in advance, as they may break during disassembly.
The tools you will need are Phillips and straight screwdrivers. Before starting repairs, you must disconnect the negative cable from the battery. During operation, screwdrivers should be directed as close as possible to the holders and fasteners so as not to damage the integrity of the casing.
You can wrap the screwdriver blade with electrical tape or simply insulation from some unnecessary wires. This measure will prevent damage to the top layers of paint on the car door.
How to disassemble the front and rear door trim
The front door trim of the car is held on by special pistons and screws. Disassembly is carried out in the following steps.
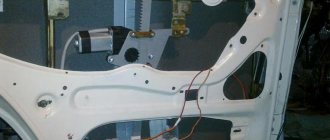
First, you need to unscrew all the screws that are located in the area of the car door handle, and along with them the screws that hold the special window lifter control module of the car
Next, very carefully remove this module, just like the car mirror control module
The next step is to disconnect all the wires connected to the modules and connecting them to the power source by releasing the latch. After all the wires are disconnected, you can safely begin to disconnect the handle trim holders. Carefully unscrew the screws, remove the cladding and set it aside.
How to remove the door trim of VAZ-2110, 2111 and 2112
Today I will tell you how to remove the trim from the doors of a VAZ-2110 car and any tenth family. In addition to the pistons, the trim is also screwed under the decorative element of the door handle with two bolts, as well as along the lower edge and also the door pocket with three screws. So, for dismantling we will need Phillips and flat-head screwdrivers, as well as a strong rag or something soft so as not to damage the paintwork on the door when we unfasten the pistons with a screwdriver. So, first we use a flat screwdriver to pry the plug off the plastic door handle and two bolts open to our eyes. Take a Phillips screwdriver and unscrew them:
Then use the same screwdriver to unscrew the three screws at the bottom of the door:
Then we unscrew the speaker, if installed, in the lower right corner of the door, usually secured with four screws, and disconnect the terminals from it.
Now unscrew the door lock using a Phillips screwdriver or by hand:
Now all that remains is to carefully pry off all the “pistons” in turn, with which the door card is pressed directly to the door itself. They are plastic, it is not easy to break, but it is possible, so carefully, one by one, wrapping the screwdriver in soft thread, so as not to scratch the door, we press out each piston. Here is a schematic photo showing the approximate locations of the pistons.
Actually, we pull off the door trim from the pistons and get access to all the door elements of our dozen.
We make noise, vibration, repair locks, in general, it doesn’t matter why we needed to remove the trim from the door, we assemble it in the reverse order. Good luck to everyone on the roads and less breakdowns