Ford Focus was introduced to the world market in 1998. Since 2000, the configuration has remained the best-selling in the compact class; in Russia, the model received the nomination for the best car of the “Small Middle Class” in 2012. The Focus family is attractive for its affordable price, ease of maintenance and reliability of assembly. Over the course of 23 years of production, the model underwent three updates and two restylings.
The Ford Focus 2 door lock is not a frequent consumable. Fastening elements and mechanisms are made of durable alloy and hard plastic; the minimum service life of the unit is 5 years. The Ford Focus lock on the front door is disassembled in cases where it becomes necessary to lubricate it, make adjustments or repairs.
Castle freezing
Almost every owner of a second-generation Focus has encountered the problem of being unable to open the driver’s door or any other door in the winter. This is especially true after washing and precisely at that time of year when the temperature drops below zero. What is the reason?
In fact, it's simple. The fact is that after washing, water enters the lock and freezes there. As a rule, after washing, no one waits for the car to dry in a warm room, which leads to freezing of the lock parts.
How to solve this problem? When the interior warms up, the door will open by itself. However, if you don’t have time, you can either put the car in a warm room, or use a hairdryer to heat the lock and melt the ice. By the way, blowing air only worsens the situation, because it drives water deeper into the castle.
This is interesting: Removing and installing the Ford Focus 3 steering mechanism
Broken cable
So, one fine day you discovered that you can’t close the driver’s or passenger’s door on the second Focus.
If there are no foreign objects in the opening, and the weather is warm outside, then you need to check the handles. Try pulling the door handles outside and inside. If any of them has free movement, then the cable may be broken. By the way, this problem most often arises in the cold season. When the temperature outside is sub-zero, the rods under the cards freeze and the cable breaks due to the load. In this case, it will not be possible to close the door.
Is there any way to lock the door? Yes, this can be done, but it will not be possible to open it again without disassembling the entire mechanism. To do this, you need to set the lock tongue in the position that corresponds to the open door. If it does not rest against the bracket, then the position is correct. After that, hold the tongue and begin to close the door. When he reaches the lock, you need to quickly throw him and slam the door. We repeat that such a closure will not allow it to be opened again. Then we climb on the passenger side and go where we need to go. It is best to go to a service center and have the lock repaired.
Ford Focus 2 lock drive repair
Often the reason for the incorrect operation of the Ford Focus 2 door closing mechanism is not the lock itself, but its drive. For example, when you try to open the door from the outside, the lock does not react in any way to the force transmitted to it from a working outside door opening handle. And the door, of course, does not open.
The most likely reason for this is a broken cable, which in this case is used as a lock drive. Most often, the cable breaks in a cylindrical cracker, which serves as a tip.
Restoring the drive's functionality is quite possible if you turn a new tip on a lathe. Work on restoring the lock drive cable from the external handle in steps:
- Remove the trim.
- Pull out the outside door handle drive cable and make sure that the tip is torn off.
- Turn a new cracker-tip on a lathe, maintaining certain parameters.
- Insert the cable into the hole provided for it and, tightening the screw as tightly as possible, secure it.
- Liberally lubricate the drive mechanism with dirt-resistant white LIQUI MOLY grease and check its operation.
The parameters that the tip for the lock cable must meet if you are making the part yourself:
- Its total length should be 14 mm, diameter 7 mm.
- A hole with a diameter of 3 mm is drilled in one of the ends in the middle, but not all the way, and not reaching about 4 mm. Cut a thread in it for the screw.
- At a distance of 5 mm from the blind end perpendicular to the cylindrical bushing, drill for the cable.
It is recommended to remember the parameters when purchasing a ready-made tip on the market, since the part cannot be found in an auto parts store. Repairing the lock on the Focus is carried out quite rarely, since it is easier for drivers to change the entire lock.
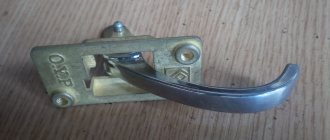
Disassembly process
The dismantled lock assembly consists of a lock and a mounting bracket attached to it. The lock itself, in turn, consists of electromechanical and mechanical parts. The procedure for disassembling the front driver's door lock of a Ford Focus 2 step by step:
- Drill out the rivet on the body, unclip the latch, and disconnect the mounting bracket.
- Remove the lock protection cover.
- Unscrew the 2 screws and disconnect the cable using screwdrivers.
- Disconnect the electromechanical and mechanical parts.
- Carefully inspect and ensure the integrity of the mechanical part. If any defect or breakdown is detected, repair or replace the mechanical part with a new one.
In 90% of cases, the entire lock is replaced; disassembly is carried out at specialized service stations to repair the mechanical part.
- Clean the mechanical part with WD-40 and generously lubricate it with LIQUI MOLY dirt-repellent white lubricant.
- Unscrew the screws of the cover of the electromechanical part of the lock using a Torx T10 screwdriver.
- Open the cover and make sure that all parts of this mechanism are intact. If the mechanism is intact, clean and still contains factory lubricant, then it is better not to touch it.
- Reassemble the lock in the reverse order, using a new rivet at a certain stage.
To quickly disassemble the locking element in the station wagon version of the pre-restyling version, you need to prepare the following tools:
- set of standard screwdrivers;
- Torx T10 screwdriver;
- mechanical drill.
Features of repairing the driver's door lock of a Ford Focus 2
Ford Focus was introduced to the world market in 1998. Since 2000, the configuration has remained the best-selling in the compact class; in Russia, the model received the nomination for the best car of the “Small Middle Class” in 2012. The Focus family is attractive for its affordable price, ease of maintenance and reliability of assembly. Over the course of 23 years of production, the model underwent three updates and two restylings.
The Ford Focus 2 door lock is not a frequent consumable. Fastening elements and mechanisms are made of durable alloy and hard plastic; the minimum service life of the unit is 5 years. The Ford Focus lock on the front door is disassembled in cases where it becomes necessary to lubricate it, make adjustments or repairs.
Door glass replacement
When the trim is removed, use the electrical connector to connect the window regulator unit and lower the window completely. Remove the rubber seal on both sides along the upper edge of the door. On the mounting card, remove two rubber plugs that block access to the bolts that secure the glass directly to the holders. By pressing the window regulator button, we lower or raise the glass to such a position that its fastening bolts are aligned with the holes in the panel. Using a 10mm socket wrench, unscrew the bolts and carefully pull the glass out manually onto the outside of the door. Installing the glass is done in the reverse order.
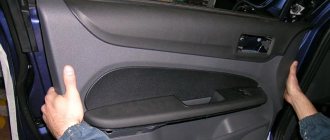
How to remove the trim
Dismantling the driver's door trim of a Ford Focus car is carried out in cases where it is necessary:
- replace glass;
- repair or replace the window regulator;
- repair or replace the internal door lock and its drives;
- replace the outside door handle;
- replace the cylinder mechanism (cylinder) of the door opening lock;
- install additional sound and heat insulation;
- repair old or install new speakers.
The door trim is made of high-strength soft plastic, it is attached to self-tapping screws and internal clips. During dismantling, several fasteners almost always fail and become unsuitable for reuse. Before repairs, it is recommended to purchase additional clips based on 6 clips per door.
Trim Removal Tools:
- flat slotted screwdriver;
- special screwdriver – Torx T25 (asterisk);
- a set of plastic tools for removing trim, clip cutters;
- socket wrench with 8 mm head.
Step-by-step algorithm for dismantling the casing:
- Lower the side window.
- Remove the protective mesh of the high-frequency speaker - “tweeter”. To do this, you need to pull the mesh so that the locking latches unfasten.
- Use a Torx T25 screwdriver to unscrew the fastening screw.
- Very carefully, so as not to damage the brackets, remove the door seal.
- In order not to lose the staples, remove the tweeter triangle.
- Disassemble the armrest. To do this, insert the tip of a flat-head screwdriver between its upper and lower parts, lift the screwdriver slightly up and pull the lower part towards you.
- Unscrew the two released casing fastening bolts with an 8 mm socket.
- Disconnect all door wiring connectors.
- Remove the inner door handle trim. To do this, you need to pick it up with something sharp and hard from a set of plastic tools and disengage it. Then you need to move it slightly forward in the direction of travel of the car and remove it.
- Use a plastic tool to hook it and slightly bend the casing away from the metal base, and then carefully pull the edge of the casing towards you until the piston that holds it comes off.
- In the same way, unclip the remaining pistons along the entire perimeter of the casing and remove it.
- Pull out the remaining pistons in the door leaf using pliers.
Before you begin installing the casing after completing the necessary work, you need to insert the missing pistons into it. Installation of the casing is carried out in the reverse order.
This is interesting: Removing and installing the air filter housing Ford Focus 3
Front left door lock for Ford Focus I 1998-2005
Using a drill, respectively, with a diameter of 3 mm, a hole 4 mm deep is drilled, after which a hole 38 mm deep is drilled with a drill with a diameter of 10 mm. Next, carefully tap the cylinder with a hammer to ensure that all the pins fall out of their places.
Then we turn the cylinder core to position 2 of the ignition key and use a screwdriver with a thin tip to press the cylinder stopper and remove it from the ignition switch. On this. Installation is carried out in reverse order. The following demonstrates an easier method, without drilling the lock cylinder.
Lock cylinders for Ford Focus 1 in the lock there is a hole with a lock. Before we press the lock, turn the key to the first position. If you can’t turn it, hit it with your palm or a hammer, because you need to turn it anyway.
In this case, you need to try to slightly rotate the steering wheel; it will probably prevent the lock from unlocking. After turning the key, press the lock. We pull the cylinder with the key towards us and hold the jammed cylinder in our hands, after which we disassemble it, clean it and repair it.
After reviewing this photo report, changing the ignition switch cylinder on a Ford Focus I Ford Focus with your own hands will not be difficult. To get to and repair the ignition switch you will need to remove the steering wheel, so it costs cylinders for Ford Focus locks 1 set of sockets, a set of bargains and a flat-head screwdriver, as well as a drill with a drill bit if.
I answer that this material helped me. I did the same without drilling.
Ford Focus 1 replacement ignition lock cylinder
I just didn't remove the steering wheel. Thank you for taking the time to post the photos and... I fixed the ignition lock cylinder on FF1, thanks only to you, my friend! Good day. I had problems with the ignition switch of my American Ford Focus SE Sport, Zetec, sedan, year of manufacture, quite a long time ago, but due to my great laziness, I still didn’t get around to fixing it until the thunder struck. The car would not start on the street, the lock, despite all the efforts, would not open.
It was in the evening, after much effort the car had to be abandoned on the street until the next morning. I spent the whole night on the forum, read a lot of posts, and by the morning I was ready to drill out the cylinder, until I came across cylinders for Ford Focus locks 1 very interesting post on the forums.
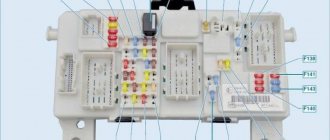
What should you do if the Ford car lock closes and immediately opens the doors?
The central locking system on the Ford Focus 2 may behave this way due to the windows and doors not being tightly closed. Try to “push” each door and at this moment use the central locking again. In addition, the behavior described above is sometimes due to the fact that some foreign object has hit the door.
And finally, we look at the glass - they must fit completely into the grooves.
Help: If the alarm system does not work on the Ford Focus 2, the central locking operation is tied to it. The central locking may begin to behave strangely, and with a high degree of probability the symptoms of malfunctions will go away the moment you sort out the problems in the alarm.
All fuses are good, but the lock will not open manually.
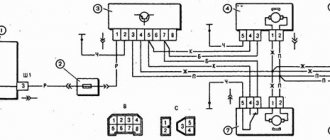
Let's consider two main reasons:
- It is possible that the supply wires have broken or the contacts have oxidized, which led to a lack of the required voltage at the door activator input. This means that the control signal is simply not transmitted by the drive to the other doors.
- The activator switch could fail, for example, due to damage to the wires extending from the terminals. However, poor contact on the terminals themselves also leads to the fact that the control signal is not transmitted.
Replacement of external handle and lock
This procedure is performed in cases where the outside handle of the driver's door stops working normally. The same can be said for the castle. The process of removing them from Ford is quite simple and does not require much qualification from the technician.
Let's get to work. To begin with, using the technology described above, we remove the casing. Open the door and remove the rubber plug from the hole at its end. Next, using a T25 socket wrench, unscrew the bolt securing the lock and remove the lock itself, disconnecting the power connector from its electrical unit. We take out the lock cylinder.
Let's move on to removing the handle. On Ford it is removed by moving it towards the removed lock cylinder. We replace, if necessary, the gaskets on the handle. We insert the new handle, cylinder and the lock itself into place. We do everything in reverse order. We install the casing, not forgetting to connect all available electrical connectors. We check the functionality.
Replacing the window lift mechanism
If the power window mechanism fails, it is not at all necessary to contact a service center. You can also perform the replacement procedure yourself. The technology for replacing this unit is the same for both front doors.
Begin. We remove the casing. We loosen the bolts securing the glass holders, as described earlier. We lift the glass up until it stops and fix it to the door frame, for example, with tape.
Disconnect the wiring connector from the electric motor and the window lift mechanism gearbox.
We remove the end of the lock drive cable from the internal handle, having previously unscrewed the screw securing its housing with a socket wrench. It is necessary to remove the cable seal from the hole in the mounting card and push it with the cable inside the door, as well as the locking bushings for attaching the lock itself. We do this carefully so as not to break the petals on the clamps. We unscrew the mounting card, and, moving it away, we take out from the door cavity everything that was pushed out.
Next, disconnect the speaker connector. We take out the plastic holder of the wiring harness from the holes in the mounting card. Then you need to disconnect the wire connector from the electric locking drive. We take out the wiring seal in the mounting card and pull out the wiring itself through this hole.
Now the mounting card assembly with the window regulator unit is completely freed.
We remove the broken mechanism from it. We install a new one. We assemble everything in reverse order.
Do not forget that before installing the new mechanism, it is necessary to move the glass holder to a position in which the cracks of the two levers of the glass lifting mechanism would fit between the notches in the holder on both sides, and the notches would not be visible.
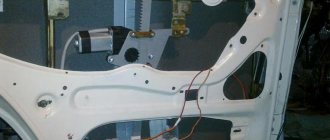
Dismantling the front door of Ford Focus 2 restyling
Before removing the Ford Focus 2 door lock, the doorway itself is disassembled. For the restyled version, in order to get to some components and mechanisms of the door, you will need to disassemble it almost completely. For example, this may be necessary to clean, repair, or replace the window lift mechanism. To do this, dismantling the door card is not enough; the element will have to be thoroughly disassembled.
List of work that needs to be done to dismantle the front door of a Ford Focus using the example of replacing the window lifter mechanism:
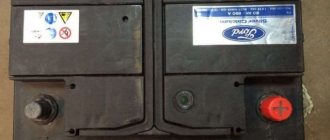
- Turn off the ground or disconnect the negative terminal from the battery.
- Remove the door trim. The differences between removing the left (driver's) door trim and the right one will consist only in disconnecting the excess wire connector for the power windows and side mirrors.
- Loosen the glass fastening bolts and lift it to the top position. Secure to the frame in this position using tape.
- Disconnect the connector of the wires going to the electric motor of the gearmotor. To do this, you need to squeeze the latches that hold this connector.
- Disconnect the lock drive cable from the inside handle of the front door and remove its seal from its seat. Push the cable and seal inside.
- Carefully loosen the three fasteners that secure the lock to the mounting panel. To do this, push their locking sleeves inside.
The bushings are very fragile, so if they are broken, then during installation they must be replaced with self-tapping screws, having previously drilled holes of the required diameter.