02/23/2021 12,874 Audi 80
Author: Ivan Baranov
The dashboard serves an informative, functional, as well as aesthetic purpose. The article discusses the Audi 80 instrument panel: location of indicators, purpose, possible breakdowns. Step-by-step instructions are given on how to repair the instrument panel.
[Hide]
Removing the front panel and replacing the Audi 80 B4 heater
One of the most unpleasant procedures for every car enthusiast is stove repair, because as a rule it entails disassembling the entire dashboard.
It's a tedious task and will take a lot of time. But if you are not afraid, then our instructions will help you. We will look at the example of an Audi 80 car. If you are a novice car enthusiast. I recommend inviting a more experienced auto mechanic to help you. Attention: when removing the levers, be extremely careful not to break them.
To work you will need the following set of tools:
- 8mm socket wrench;
- Positive screwdriver
- Minus screwdriver;
- Head 22 with extension and wrench;
So, here is our step-by-step instructions:
- First of all, we dismantle the steering wheel. We take out the steering wheel cover, disconnect the signal wire, unscrew the fastening nuts and remove the steering wheel completely.
- Next in line is the block of steering column switches. Here you need to unscrew a couple of screws and remove the cover.
- Now let's move on to the "tidy". Here, the same as in the second step - unscrew the bolts (there are two of them) and reset the connectors (there are also two of them).
- Through a small hole in the cover of the steering column switches, you need to unscrew the bolt (hexagonal) and remove the entire switch block. While performing this step, reset two connectors at the same time. We also take out the rubber plug.
- We proceed to dismantling the central panel. At this step you need to remove the radio and stove control knobs (do not break them - it’s quite simple). In order to do everything carefully and not damage the handles: pull them out a little, pry them off with a minus screwdriver, find self-tapping screws (2 pieces) under the side handles and unscrew them.
- We dive under the panel, there are six fastening screws and remove them.
- We proceed to removing the shelf at the driver’s feet and the glove compartment.
- We look under the ashtray for the center console mounting bolts (two pieces), unscrew them.
- There are plugs on the sides of the center console. We find them, pry them off and remove them with a screwdriver.
- There is a bolt hidden under the plug; unscrew it.
- Reset the wire connector.
- Carefully and not sharply pull the entire central part of the panel towards us, while simultaneously lifting it slightly upward.
- Reset the remaining contacts.
- There is very little left. go to the engine compartment and remove the pipes leading to the stove.
- We find the fastening nut near the stove and unscrew it. Below it there is another nut; remove it too.
- Remove the passenger wiper.
- Let's move on to working with the cover that covers the stove air intake filter. We dismantle the filter and the tray itself in which the filter is placed.
- Now we unscrew the studs securing the stove to the body (there are two of them)
- Rocking it a little from side to side, lift the stove towards you.
- We take out the heater radiator and replace it with a new one.
- Reassemble in reverse order
The work is quite long and difficult. Here I don’t advise you to save money and do this for all service stations. If this is not possible, then I recommend inviting a knowledgeable person to carry out this entire procedure under the control of a knowledgeable person. GOOD LUCK!
Audi 80, 90 dashboard removal and repair
Removal and repair of the dashboard on the Audi 80 and 90 series may be necessary in case of failure of any of the instruments, as well as in case of mechanical damage to the box body. Whatever the reason for the intervention, the German concern and leading experts recommend contacting experienced professionals to prevent further damage to the main measuring and control devices.
If you decide to troubleshoot problems yourself and change the dashboard yourself, we recommend using only original spare parts and components. Otherwise, there is a big risk that additional costs will be required for sharpening and processing parts, purchasing non-standard fasteners and adapters.
How to remove the dashboard on an Audi 80, 90
The dashboard is assigned many functional tasks, so the comfort, reliability and safety of driving a vehicle depends on its integrity and serviceability. To remove and repair the dashboard on an Audi 80, 90, you will need to perform the following set of actions:
- Using a Phillips screwdriver, unscrew the 2 bolts securing the upper cover of the steering column.
- Unscrew the fasteners that were hidden under the top cover.
- Turn the back of the panel to reach the available connectors.
- Carefully disconnect the blocks leading to the sensors and instruments, the on-board computer, carefully bending the “tabs”-clamps.
- The fasteners securing the speedometer drive are unscrewed.
- The screws installed around the perimeter of the panel and the temperature sensor fasteners are unscrewed.
- With careful forward movements, without jerking, the dashboard of the Audi 80, 90 is pulled out “towards you” and slightly upward.
After this, you can begin repairing sensors and devices, replacing the dashboard housing. Even if there have been no complaints about the operation of the electrical equipment, it is advisable to check the quality of the soldering of the contacts in order to prevent the need to re-disassemble the panel in the near future. Assembly is carried out in the exact reverse sequence.
You can buy used spare parts for your car on our website
offers to buy used spare parts for Audi 80th and 90th models on the following conditions:
- Inexpensive - no extra charges or overpayments;
- Official warranty support;
- Free consulting support;
- Various payment methods - cash and bank transfer;
- Competent consulting support;
- Professional assistance in choosing spare parts and components;
- Delivery across regions, pickup from warehouses in Moscow region;
- The assortment is regularly updated.
By ordering used Audi 80 spare parts from us, you save your own money and time resources. All auto products presented in the catalog have undergone careful selection, quality control, serviceability and suitability for use, and our own certification system. Therefore, each of our customers is 100% insured against defects and substandard parts.
Call or write to us to order used spare parts for the Audi 80 B4, original components, body parts and interior equipment elements, components and assemblies without extra charges, overpayments and risks.
Removing the front panel and replacing the Audi 80 b4 heater
This photo report shows in detail the procedure for disassembling (removing) the central panel (torpedo), as well as removing the stove with your own hands on an Audi 80 (B4). It is worth noting that this work is quite painstaking and if you are horrified by the sight of a bunch of wires in which it is easy to get tangled, then we do not recommend disassembling the panel without a specialist.
Be as careful as possible when it comes to removing the stove control levers. They are easy to break.
For this job you will need:
- 8mm socket wrench;
- A pair of flat and Phillips screwdrivers;
- Head 22 with extension and wrench;
First of all, remove the steering wheel. To do this, carefully remove the cover on the steering wheel (signal cover).
Signal wire - disconnect.
Remove the steering wheel by unscrewing the nut.
Unscrew 2 screws, then remove the cover on top of the steering column switch block.
Next in line is the dashboard. We also remove it by unscrewing 2 bolts and disconnecting 2 connectors.
Next, you need to loosen the bolt (hexagonal) through the hole in the bottom cover, then remove the block of steering column switches, simultaneously removing the two connectors.
Next, you need to dismantle the central panel.
To do this, take out the radio, then remove the stove control knobs.
When removing, be careful not to break them.
To remove them carefully you need to pull them out a little and pry them off with a screwdriver. There are 2 screws under the side handles, they need to be unscrewed.
There are six screws under the panel. We unscrew them.
Next, we need to dismantle the shelf under the driver’s feet, as well as the glove compartment at the passenger’s feet.
Next, there are 2 bolts under the ashtray. We unscrew them. They hold the center console.
Remove the plugs on the sides of the console.
We also unscrew the bolt on the side of the console from the glove compartment.
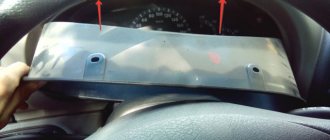
The connector indicated by the red arrow must be disconnected.
Now we slowly pull the central panel towards us, lifting it up a little. Disconnect all remaining contacts.
Next, in the engine compartment, remove the pipes from the stove. There is a nut near the ignition coil - unscrew it. There's another one underneath.
And finally, we dismantle the passenger wiper. Remove the cover covering the air intake filter of the stove. Remove the filter and the filter tray itself. Next, unscrew the two studs securing the stove to the body. From the passenger compartment, carefully pull the stove towards you, rocking it from side to side. We take out the heater radiator and put a new one in its place. Next we assemble in reverse order.
More posts about Audi 80:
Replacing the clock in the dashboard
Next, the Audi 80 b4 donor panel is taken - the process of disassembling it depends on the need for further use, and you can treat it not so carefully.
- 4 legs leading to the tachometer and two to the clock are soldered out of the donor panel.
- Then they are soldered to identical places in the panel being modified.
- For the functionality of the clock backlight, a jumper must be installed between the contacts, as on the donor.
- Using the utmost care and precision, install the new tachometer in place, making sure to fit into the newly soldered legs.
- If everything was assembled the first time, you need to remove the power stabilizer from the donor Audi V3 unit and install it in the same place on the panel being repaired. Otherwise, the backlight bulbs will burn out with enviable consistency.
- The Audi b4 dashboard is assembled in the reverse order and secured.
- Final check of the result and testing of the functionality of the modified Audi 80 dashboard. At the same time, you should check the correctness of the temperature and fuel level arrows, and, if necessary, proceed with further repairs.
Since we had to disassemble the dashboard, it would be useful to carry out a complete preventive maintenance of all elements and eliminate malfunctions that arose during operation.
Audi 80 | Removing and installing the front panel assembly site (“dashboard”)
On vehicles equipped with airbags, after disconnecting the negative battery cable, wait 20 minutes before working on any airbag system components. (refer to the Section Removing and reinstalling components of the auxiliary safety system (SRS)).
Clamping pins are used here, consisting of two elements, which can be removed as follows: press the rod in the center of the pin as deeply as possible, using a screwdriver with a narrow blade. Slide the tines of the old fork under the head of the stud and lift it out of the panel. Carefully lower the panels away from the front panel and remove them from the metal mounting tabs on the bulkhead.
Disassembling the Audi 80 tidy. Dashboard B3. Photo report
Rear view of the tidy
I marked in red everything that needs to be unscrewed to separate the board with blocks from the case. There is a screw hidden under the backlight control; I unscrewed it with thin pliers, or a 7mm wrench.
green - nuts for fastening the left and right block with instruments
block with speedometer at the bottom on a latch:
block with overheating and handbrake lamps. remove the white cover, carefully pull out the case, right now it is only held on by the connector:
carefully remove the scarf from the latch:
that's all, we inspect, call the tracks and elements:
view of handkerchiefs with overheating and handbrake
don't scold. did it for the first time =)
COMMUNICATION: middle block - overheating/brake fluid pressure
Removing the heater on an AUDI-80. Replacing the heater radiator on an AUDI-80 with your own hands - February 12, 2012 - Blog
1. Unscrew and remove the steering wheel itself 2. Unscrew the two screws that secure the top cover of the steering column switch block 3. Unscrew the two screws that secure the dashboard in the lower part, and carefully remove it, at the same time disconnecting the electrical connectors from it. We put the tidy in a safe place. 4. Remove the steering column switches. To do this, it was necessary to slightly unscrew the screw - and not unscrew it all the way - which can be accessed through an oval hole on the right side of the lower half of the steering column switch panel 5. Pull the steering column unit towards you, and disconnect the two white electrical blocks on the right and left of the steering shaft and just as carefully put it away in a safe place 6. Remove the plug from the ignition switch Operations for dismantling the central tunnel
1. Take out the rear ashtray and unscrew the two screws under it 2. In the area of the handbrake button, take out the plug and unscrew another bolt 3. Raise the handbrake and move the freed part of the tunnel back 4. Unscrew the self-tapping screw that secures the gearshift knob frame 5. Unscrew the knob of the gearshift knob and remove the leather boot. Together with the frame, we remove the front part of the tunnel Operations for removing the center console
1. Using pliers through a thick layer of thick paper or cloth, remove the handles that control the stove (3 pcs.) 2. Under the left and right handles, unscrew the screws and remove the stove control panel cover 3. We see under it a white box, in the corners of which there are 4 more screws , fix it to the console - unscrew them 4. Open the ashtray and unscrew with a head one bolt securing the cigarette lighter to the ashtray 5. Remove the cigarette lighter and disconnect the plug from it, not forgetting about the backlight 6. Remove the ashtray. To do this, unscrew the two screws securing it at the top and the two bolts at the bottom, access to which opens after removing the front part of the central tunnel 7. Take out the radio 8. If there is one, take out the small shelf located next to the center console buttons. To do this, unscrew one self-tapping screw in the depths of this very shelf 9. I did not remove the center console, but unscrewed the 2 nuts under the dashboard that hold the pipeline together. Operations for removing the glove compartment and the shelf above the driver's feet
1. Everything is clear here. I will only note that on carburetor cars, when removing the driver's shelf, it is necessary to remove the air damper control handle - the “choke”. To do this, use a thin screwdriver to press down into the hole on this handle and pull it towards you. Operations to remove the torpedo itself
1. Open the driver's and passenger doors and remove two plugs from each side at the ends of the torpedo 2. Unscrew the bolts securing the torpedo to the body 3. Next, I removed the speakers from the torpedo. You may not need this 4. The torpedo is attached to the central floor tunnel - we give two bolts on the left and right of the tunnel 5. In the radio area you need to give one self-tapping screw and two small nuts on the left and right - they secure the air ducts to the stove Operations carried out in the engine compartment
1. Use a coin to turn the 3 locks of the large black plastic cover and lift it up. If it gets in the way, you can remove it and the wiper 2. Take out the cabin filter, if there is one 3. Unscrew the two nuts securing the filter basin to the heater box. We unsnap the tape clamps and remove the box (without losing the gasket) 4. Unscrew the 2 studs securing the heater body to the body 5. In the area of the ignition coil there are 2 nuts with large washers - one at the top and the other 15 cm below - unscrew them 6. The antifreeze did not drain , just removed 2 pipes from the heater radiator on the engine compartment side Replacing the heater radiator
1. In the cabin and carefully pull the torpedo towards you. You don’t need to apply much force, otherwise you might tear something (I also had to unfasten the connectors under the dashboard on the driver’s side, about 6 of them) 2. I didn’t remove the dashboard completely, but pulled out its right end as far as possible and took out the stove itself from air duct assembly 3. The heater radiator itself is secured with two self-tapping screws and two latches. I unhooked all this and secured the new stove. Assembly is done in the reverse order. 1. Leaf collection net 2. Nut 3. Air intake shaft 4. Seal 5. Resistance 6. External air fan 7. Heater housing 8. Heater control panel 9. Connecting channels 10. Front footwell air nozzle 11. Heating channel for the front part of the cabin 12. Footwell air nozzle 13 .Adapter to glass defrosting channel 14. Air intake shaft 15. Retaining bracket
Auto-assistance
This problem not only causes inconvenience, but can also lead to car breakdowns. “Tidy” is intended to inform the driver about the condition of the main components and assemblies of the vehicle, and signals possible failures in the performance of a particular unit. Its malfunctions can be divided into several types, the most common types of breakdowns are:
- The backlight does not work;
- The warning lights have failed;
- One or more power unit status indicators do not work.
What should you do in this case?
All control and measuring instruments of this panel are powered from the on-board network. Therefore, if it completely fails, check the condition of fuse F12 at 15 Amps. If a single device or indicator light fails, the search continues in the appropriate circuits.
You can check the indicators on the removed panel. To do this, you can apply on-board network voltage to their terminals or use a measuring device in resistance testing mode. To ensure reliable readings, you need to free one terminal of the indicator from the supplied wires. When the power is connected, the arrows of the indicators should begin to move. If this does not happen, or the ohmmeter shows infinity on the scale, the pointer is faulty and must be replaced.
Where else to look for a problem?
Indicators or warning lamps may not work due to a lack of information from coolant temperature sensors, oil pressure in the lubrication system, and others. They are also easy to check. It is enough to remove the wire connected to it and short it to vehicle ground with the engine running. If in this case the indicator arrow “comes to life”, the problem may be in the sensor. Its condition can also be checked with an ohmmeter, which should show its resistance.
The driver's headache can be caused by the condition of the instrument panel itself, especially if the vehicle has been in use for a long time. The input connector sockets become loose to such an extent that their pins break off the solder joints, and in some cases, the traces of the printed circuit boards. A soldering iron and tin solder help out in such cases.
Experts recommend cleaning the tracks from the protective coating with nitro varnish, and then carefully inspecting their condition using a magnifying glass. There is also poor contact in the contact group of the ignition switch. After replacing it, the functionality of the “tidy” is restored.
Share this article with your friends:
Removing the front panel of Audi 80 b3 video
Removing the front panel and replacing the Audi 80 b4 heater
Replacing a heater radiator on an Audi 80
How to pull out the dashboard of an Audi 80 and change the light bulbs. Video for subscriber.
How to disassemble the tidy Audi 80 V3 [2015 @ ]
Repair of stove speed switch. How to disassemble the central panel of an Audi 80.
AUDI 80 B 3 REPAIR OF OVEN DAMPERS without removing the dashboard
Audi 80 B3/B4 LED instrument panel lighting
Cabin filter housing installation on Audi 80 B3 [@ 2015]
Audi 80 instrument panel speedometer repair.
Audi 80 b 3 stove repair
- Test drive Ford Focus 3 sedan video 2011
- Video of a ski lift accident
- Big test drive Volvo s40 video
- How to remove the radiator grille on Renault Logan video
- Subaru forester sg5 review
- Installing fog lights on a Hyundai Elantra HD video
- Nissan note crash test
- Nissan Largo off-road video
- How to change thresholds on a Volkswagen Passat B3 video
- Crash test of Russian-assembled Kia Rio
- Cross-country ability test Renault Duster video
- DIY Mitsubishi injector repair video
- Replacing the rear wheel bearing of a Volvo XC90 video
- Chevrolet equinox 2005 review
- Cleaning the muffler Honda Dio 34 video
We replace the heater radiator on Audi 80 and 100 cars on our own
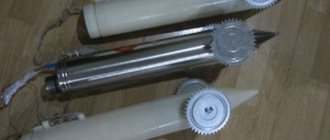
In order for the automobile heating system to operate normally, it is necessary to maintain the working condition of all its components and mechanisms. One of these is a radiator device. If this element fails, the driver will know about it the first time the heater is turned on. How to replace the Audi 80 heater radiator and in what cases it is necessary - read in this article.
Old and new Audi radiators
By what signs can you determine that the radiator of the Audi 80 B3, B4, Audi 100 C4 or any other model needs repair or replacement:
- Coolant leak. In this case, the radiator of the Audi 80 B4 stove could fail, or the pipes could be damaged.
- The blowers blow cold air, but the heater is set to warm.
- The heating system takes a long time to warm up before it starts blowing cold air.
Replacement instructions
Replacing the Audi 100 heater radiator is not a particularly simple task; to complete it you will need several hours of free time and all the necessary tools. As for the latter, you will need to prepare standard plumbing tools, including wrenches, pliers, screwdrivers, etc. To properly remove the heater stove, we recommend that you strictly follow all the steps specified in the instructions.
Posts 1 page 30 of 43
Share128.03.2011 22:25
- Author: FpeHk
- Active participant
- From: Samara
- Registered: 08/22/2010
- Posts: 197
- Respect: [+3/-0]
- Positive: [+0/-0]
- Gender: Male
- Age: 26 [1993-04-28]
- ICQ: 75539307
- Car: Audi 80 b2 “GLS” 1981
People, please tell me where to unscrew and how to remove the front panel (as in the photo) the car is an adapter, Sorry if I created the topic in the wrong place. And most importantly, it’s hard to put it back.
Share228.03.2011 22:39
- Author: nafanya
- Active participant
- From: Novocherkassk, Kamensk-Shakhtinsky
- Registered: 12/19/2009
- Posts: 301
- Respect: [+2/-0]
- Positive: [+3/-0]
- Gender: Male
- Age: 33 [1986-11-12]
- ICQ: 258139222
5 wrench nuts for 10, one behind the side deflectors, one behind the central one, under the hood on the sides under the windshield frame
Share329.03.2011 17:16
- Author: FpeHk
- Active participant
- From: Samara
- Registered: 08/22/2010
- Posts: 197
- Respect: [+3/-0]
- Positive: [+0/-0]
- Gender: Male
- Age: 26 [1993-04-28]
- ICQ: 75539307
- Car: Audi 80 b2 “GLS” 1981
Today I climbed and searched and found 4 nuts. and there is somewhere else in the center. (I'll look for more climbing)
Share429.03.2011 17:28
- Author: nafanya
- Active participant
- From: Novocherkassk, Kamensk-Shakhtinsky
- Registered: 12/19/2009
- Posts: 301
- Respect: [+2/-0]
- Positive: [+3/-0]
- Gender: Male
- Age: 33 [1986-11-12]
- ICQ: 258139222
Behind the air duct of the central deflector (constantly cold air)
Share530.03.2011 20:58
- Author: FpeHk
- Active participant
- From: Samara
- Registered: 08/22/2010
- Posts: 197
- Respect: [+3/-0]
- Positive: [+0/-0]
- Gender: Male
- Age: 26 [1993-04-28]
- ICQ: 75539307
- Car: Audi 80 b2 “GLS” 1981
I took it off today and now I'll tighten it. Now, when you put it back, you need to glue it (they say so as not to rattle. There is some kind of special fabric) is it necessary or not?
Share630.03.2011 21:10
- Author: nafanya
- Active participant
- From: Novocherkassk, Kamensk-Shakhtinsky
- Registered: 12/19/2009
- Posts: 301
- Respect: [+2/-0]
- Positive: [+3/-0]
- Gender: Male
- Age: 33 [1986-11-12]
- ICQ: 258139222
I glued it for myself (the air duct in the ponele burst), although it didn’t rattle before, it became quieter and warmer in the cabin
Share730.03.2011 21:29
- Author: FpeHk
- Active participant
- From: Samara
- Registered: 08/22/2010
- Posts: 197
- Respect: [+3/-0]
- Positive: [+0/-0]
- Gender: Male
- Age: 26 [1993-04-28]
- ICQ: 75539307
- Car: Audi 80 b2 “GLS” 1981
I glued it for myself (the air duct in the ponele burst), although it didn’t rattle before, it became quieter and warmer in the cabin
Did it burst due to the sizing?
Share830.03.2011 21:38
- Author: Dronik71
- Blocked
- From: Tula
- Registered: 04/28/2010
- Posts: 1422
- Respect: [+11/-2]
- Positive: [+34/-2]
- Gender: Male
- Age: 30 [1989-07-04]
- ICQ: 457841855
- Rewards: glfluder
- Warnings: 3
Nafanya - what did you glue it with?
Share905.04.2011 21:35
- Author: nafanya
- Active participant
- From: Novocherkassk, Kamensk-Shakhtinsky
- Registered: 12/19/2009
- Posts: 301
- Respect: [+2/-0]
- Positive: [+3/-0]
- Gender: Male
- Age: 33 [1986-11-12]
- ICQ: 258139222
the most common guerlain coated with foil
Share1023.04.2011 09:58
- Author: Mihaelshu
- Active participant
- From: Kirov
- Registered: 10/01/2010
- Posts: 461
- Respect: [+3/-2]
- Positive: [+8/-2]
- Gender: Male
- Age: 41 [1978-05-13]
the most common guerlain coated with foil
Should I glue it in a circle or will it be enough at the attachment points?
Share1123.04.2011 21:50
- Author: nafanya
- Active participant
- From: Novocherkassk, Kamensk-Shakhtinsky
- Registered: 12/19/2009
- Posts: 301
- Respect: [+2/-0]
- Positive: [+3/-0]
- Gender: Male
- Age: 33 [1986-11-12]
- ICQ: 258139222
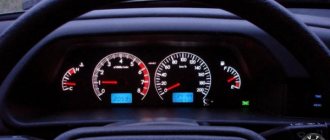
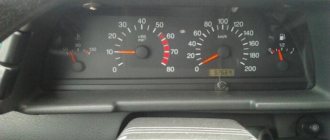
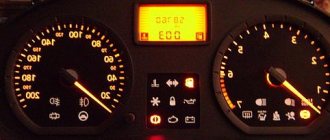
Description and location of indicators and instruments on the panel
The Audi 80 instrument panel includes instruments, indicators and alarms.
Audi 80 instrument cluster
All these devices inform the driver about the technical condition of the car in real time, the operation of the engine and other control systems, so good visibility and information content are important. Many drivers use LED lighting for the dashboard, which improves visibility at night and gives the interior an individual look (video author: Nikita Losev).
Every driver should know what each symbol or warning light means.
In the Audi 80, the instrument panel makes it possible to obtain the following information about:
- the current state of the power unit and control systems;
- vehicle speed, engine speed;
- possible malfunctions;
- correct operation, etc.
The following main control and measuring instruments can be mentioned:
- speedometer;
- tachometer;
- oil level indicator;
- Voltage regulator;
- battery charging indicator light;
- coolant temperature indicator;
- odometer.
Instrument panel equipment
The complete set of the shield depends on the model; Audi 80 A4 and Audi 80 B4 may differ. It may include various levers, switches, measuring and control devices.
The device also includes control elements:
- backlight;
- radio control buttons;
- hazard warning button;
- front light adjustment lever;
- brightness setting.
Checking and repairing the dashboard
Armed with a magnifying glass, you should carefully check all soldering points and connectors, paying special attention to the power stabilizer. A faulty stabilizer usually shows signs of damage on the body. But if none are observed, it is necessary to be sure to solder its contacts, after making sure that it works.
Often the cause of a malfunction is the ring terminals - the temperature, fuel level and backlight of the Audi panel depend on them. It is precisely because of the formation of cracks in the soldering of the ring terminals that the arrow begins to show incorrect values, irritating the car owner, and the backlight does not light up.
Useful article: Replacing the coolant temperature sensor on an Audi 80 64
All suspicious places must be carefully inspected and soldered, otherwise the positive mood from the normally working temperature and fuel level needles in the Audi panel will be short-lived.
Possible faults
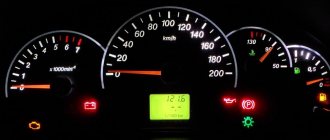
Tidy malfunctions lead to a decrease in information content. Incorrect readings of measuring and control devices can lead to an emergency on the road, so you should monitor their serviceability.
Possible problems are listed below:
- The instrument panel does not light up and there is no voltage supplied to it. This may be due to oxidation of the contacts.
- Light bulbs go out, instruments with measurement scales do not work. It is possible that the terminals or contacts on the instrument board have oxidized.
- Contacts fall off and crack.
- Board fault.
- The indicator lights have burned out.
- Instrument needles are jumping. The reason is most likely in the microcircuit.
- If the stabilizer malfunctions, the power unit temperature and oil pressure indicators do not work.
Tuning dashboard
Common malfunctions of the Audi b4 and b3 tidy
Many Audi 80 owners notice that over time the backlight stops working, the fuel gauge and engine temperature take on a life of their own, and often the warning light on the panel does not light up when the tank is empty. Usually the reason lies in poor contacts that appear at the site of microcracks. If the missing backlight can still be survived, then temperature and fuel are important indicators that must be constantly monitored. And if the needle of any of the sensors floats or shows completely incorrect values, you should not put off repairs for a long time.
In addition, the Audi dashboard has already been disassembled and nothing prevents a thorough inspection of all components.
Installation and repair instructions
If the indicators and instruments begin to take on a life of their own, the lights flash periodically, then it is necessary to remove the panel and repair it.
To do this you need to do the following:
- First, remove the top cover under the steering switch. To do this, you need to unscrew two screws from the bottom and pull the cover up and towards you.
- Next, remove the instrument panel itself by unscrewing two screws.
- We take out the shield by pulling it towards ourselves. To completely dismantle it, you need to disconnect all connectors. To turn off the on-board computer (if present) or the mini-control unit, you need to press the antennae. Before disconnecting the 26-pin connector, you need to lift the latch up with a screwdriver and open the lock.
- By unscrewing three screws, depending on the configuration, either the on-board computer or the minicontrol unit is removed.
- To remove the tidy board, you need to remove the backlight control. Underneath there is a screw securing the board to the case.
- At the next stage, you should unscrew all the screws that secure the board to the body, as well as the fastenings of the fuel level and temperature gauges, and disconnect the speedometer connector.
- By pulling up, remove the board.
- Next we do a visual inspection. We check the quality of soldering. We solder all suspicious places. Soldering must be done carefully so that flux does not get between the paws. If flux gets in, there will be no normal contact. If it does sag, it should be removed with a needle and wiped with an alcohol-containing solution.
- After completing the repair, we reassemble in the reverse order.
Photo gallery “Removal and repair of tidy”
Knowing how the dashboard is disassembled, you can tune it with LED backlighting and replace measuring instruments. This will give it a personalized look.
How to disassemble the Audi b4 panel
Replacing the clock with a tachometer is not difficult. With a little experience in soldering, all work can be completed within a few hours. When purchasing a donor, it is advisable to take the entire instrument, and not just the tachometer - otherwise, some problems may arise in connecting and finding additional radio components.
The procedure is as follows:
- Using a Phillips screwdriver, you need to unscrew 2 self-tapping screws, thanks to which the upper cover of the steering column in the Audi 80 is held in place.
- Remove the cover and put it aside - it will not be useful until reassembly.
- Under the cover there are 2 self-tapping screws that secure the device itself; they should also be unscrewed.
- Then you should turn the dashboard with the back side down to gain access to the connectors.
- Carefully disconnect all the chips going to the fuel, temperature, mini-computer sensors, etc., not forgetting to bend the plastic tabs located in the middle of the connectors - they serve as latches.
- There is no need to remove the steering wheel, as some people do - just remove the panel through the right side. Before this, you must remember to unscrew the Audi 80 b4 speedometer drive.
- Next, unscrew all the bolts located around the perimeter of the tidy and the nuts holding the temperature sensor.
- After this, the top part is removed from the panel.
Useful article: Carburetor: which one can be installed on an Audi 80?
At this point, the stage of disassembling the dashboard is completed, and you can proceed directly to replacing the clock and repairing any faults that have arisen. The Audi panel assembly process should be carried out in reverse order.