Viburnum dashboard lights
The other day I encountered the following problem: one of the Kalina dashboard lamps (tachometer needle illumination) stopped lighting.
Without hesitation, I decided to disassemble the instrument panel and find out why the backlight was not on. It turned out to be very simple - the light bulb burned out. Now about everything in more detail. The Kalina instrument panel itself is quite easy to remove - you need to unscrew 4 screws in sequence. The first two attach the decorative trim, the remaining two - the tidy itself.
After unscrewing the bolts, you need to disconnect the wiring harness connected to the rear. Do not rush to pull, it is held on by a latch, first open the lock, then pull out the connector. The lock snaps upward, pull it on the left side.
Now you can pull out the tidy itself. It will be easier to pull it sideways to the left or right.
Replacing light bulbs in the dashboard of Lada Kalina and Priora. When everything broke again
oapv; User menu oapv View oapv profile Read diary View downloads. Reputation weight: Re: Illumination of the instrument cluster and controls - 1.
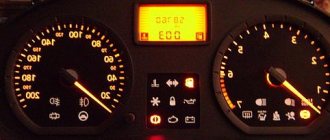
Good afternoon The backlight of the instruments, as well as the light control module and the climate control unit, stopped working completely.
At the same time, the tidy indicator lamps work, as well as the tidy itself. But the glove compartment light bulb turns on when the headlights are turned on, as it should, the interior lighting and the radio are working normally. Where to look and what to do? User menu madbee View madbee's profile. Cigarette lighter illumination, probably!
I have a Granta console installed, so the cigarette lighter is in the ashtray and sparks periodically. Which wire is responsible for lighting the cigarette lighter? And how do I actually fix the dashboard lights? Don't kick with your feet, nothing electrical. madbee. Reputation weight: 0.
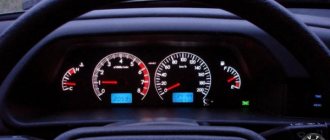
The lamps in the upper part of the instrument panel do not light up, the illumination of the tachometer, speedometer and coolant, fuel level. At the bottom, everything is on fire. In addition, the backlight lamps on the dashboard and the cigarette lighter do not light up.
Diagnostics
- Check the panel backlight brightness adjustment slider. It often happens that the brightness adjustment is at a minimum and the backlight is very dim or does not light at all;
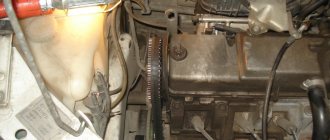
- Check the panel hanger fuse. On Kalina, the fuses are located under the cover of the light switch block. In the block you need to check fuse F7, it is responsible for the panel illumination. The fuse location diagram is on the light switch block cover;
- One of the most common problems is a wiring problem that causes the panel backlight to not work. This usually happens when some wire breaks. In this case, only an electrician can help you.
Step-by-step replacement process
Now we’ll tell you how to change light bulbs. In order to ensure correct replacement, it is recommended that specialists perform the entire list of manipulations in the following algorithm.
- After dismantling the panel, using a Phillips screwdriver, unscrew the two screws holding the Lada Kalina speedometer unit.
- Now we move on to disconnecting the electrical connectors of the wires from the panel. It is important not to confuse the connection points. For this purpose, it is recommended to perform additional cable marking.
- Next, using a tester, we check each lamp separately. If any of the lighting components is faulty, then we replace it with a new analogue. The lamp is removed using pliers. To do this, hold the base with them and turn the lamp counterclockwise. We install a new lamp on this seat, performing manipulations according to the reverse algorithm. We do this with every lamp that has become unusable.
- We return all dismantled interior components to their original places and make connections with the on-board network, eliminating the possibility of confusion.
- We check the result of the operation performed by turning on the ignition. If everything is done correctly, the lamps will glow, illuminating the panel.
Lamp selection
When choosing lamps, you can go in two ways:
- Install regular incandescent lamps, such as those installed by the manufacturer.
- Install LED lamps.
We recommend installing LED lamps, since their lifespan is longer than standard ones and you can also slightly reduce the load on the generator. Also keep in mind that LED lamps have pros and cons. If you install an LED lamp and it does not light, turn the socket with the lamp 180 degrees.
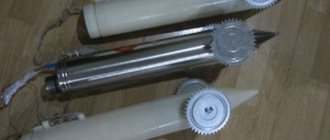
The instrument panel on Kalina uses a type of lamp with a W1.2W socket. In any auto store you can buy a socket with a lamp or a light bulb separately.
Installation of LED lamps
Many car owners, especially tuning enthusiasts, prefer to use LED lamps to replace conventional lamps, which illuminate the dashboard of the Lada Kalina much brighter. For such an event, both diodes are used, which are inserted into the so-called sockets intended for ordinary lamps, and LED strip. The latter is simply glued around the perimeter of the instrument panel.
The process of replacing LED lamps itself is carried out according to a similar scheme, which we previously analyzed. The only thing you need to do before starting work is to cut off the tip of the diode a little. The diode must be cut down very carefully so as not to damage the luminous element. If the cut is not made, the diodes will not produce scattered light, that is, the luminous element will illuminate only one point.
Removing the instrument panel
To remove the shield you will need a flathead and Phillips screwdriver.
Unscrew the two top screws (as shown in the picture), then carefully remove the panel under the steering column. It is held on top by clamps, and on the bottom by 3 fasteners that just need to be turned.
Under the panel we see 2 more self-tapping screws for fastening the shield; we also unscrew them. Now lower the steering wheel to the lowest position and remove the plastic cover of the shield.
Now all that remains is to unscrew the two screws holding the dashboard itself. They should be unscrewed carefully, as the screws may fall under the panel. It is better to unscrew them with a screwdriver with a magnetized tip.
We pull the panel slightly towards ourselves and see the green block and wiring harness. Disconnect it by pressing the “tab” and pulling slightly upward. After which the instrument panel will be removed.
Step-by-step instruction
- Before starting work, use a ten-point open-end wrench to loosen the nut securing the negative terminal of the battery and remove it. It is worth noting that when the instrument panel is removed, all readings except mileage are reset.
- For ease of operation, position the steering wheel as if driving straight.
Using a small Phillips screwdriver, unscrew the two screws securing the plastic cover of the shield.
Remove the plastic trim of the instrument panel by disengaging the two spring clips at the bottom.
Using a small Phillips screwdriver, remove the two screws securing the instrument panel.
Remove the instrument panel and go to a well-lit area to change light bulbs. It is worth noting that the lower part of the parting shield is inserted into the recess and supported by rollers on the sides.
To replace the lamp, grasp the socket with pliers and turn it counterclockwise. After turning, remove the socket along with the lamp.
Take a new lamp socket, install it in the seat and turn it clockwise until it stops. It is worth noting that if your lampshade is in good condition, the lamp can be replaced separately. You remove the lamp by simply pulling it towards you.
You can see the procedure for replacing light bulbs in the Lada Kalina dashboard in this video:
Phased replacement of lighting fixtures
To ensure that replacing the light bulbs on the instrument panel of the Lada Kalina is done correctly, experts recommend doing it in the following sequence:
- After removing the dashboard dashboard, use a Phillips screwdriver to unscrew the two fasteners that secure the speedometer.
- Next, the contact block is disconnected from the panel; when disconnecting, you should take into account their color so that nothing is confused during assembly.
- After disconnecting the wiring, the tester is activated, with the help of which each light bulb is checked for functionality. If the device shows that the element has failed, it should be replaced by removing the base.
- It is most convenient to unscrew the base using ordinary pliers, turning the base counterclockwise with it.
- A new one of the same size is installed in place of a light bulb that has become unusable.
- All parts that were removed are installed in their original places in reverse order.
Why does the instrument panel backlight on the Lada Kalina not light up?
During operation of the Lada Kalina, situations may arise when the dashboard backlight disappears. If this happens, then you need to find the cause of the breakdown as soon as possible and eliminate it. There are several reasons for the backlight to disappear, but they are all related to a malfunction of the car's electrical network.
Removing the instrument panel
In most cases, before establishing the reason for the disappearance of the backlight on the Lada Kalina dashboard, you first need to dismantle it.
To remove the instrument panel you will need the following tools:
- a set of keys;
- Phillips and flathead screwdrivers of different lengths.
The procedure for dismantling the instrument panel on the Lada Kalina:
- Turn off the power to the car. To prevent a short circuit during work, you must first disconnect the negative terminal from the battery. If this is not done, there is a possibility of electrical equipment failure.
- Lower the steering column to its lowest position. This will allow you to gain easier access to the instrument panel.
- Unscrew the two screws securing the cover; this will require a short screwdriver. Then it is carefully pulled out, while it is necessary to overcome the resistance of the spring clamps. It is necessary to shake the pad and gradually pull it towards you.
When the dashboard has been dismantled, you can proceed to diagnostics and search for the reasons that caused its malfunction.
Video: removing the instrument panel
Brightness adjustment lost
One of the very first actions to take when the instrument panel backlight disappears is to check the brightness adjustment. The driver himself or his passenger can change the setting. There is a wheel on the panel with which you can set the brightness of the instrument lighting. If it is turned to minimum, the backlight may glow very weakly or not glow at all. Just turn the wheel and adjust the brightness.
Fuse problems
The next step in troubleshooting is to check the fuses. To do this, you need to use the technical documentation of the car and find where the fuse responsible for the instrument lighting is located. The fuse box is located on the left side under the cover with the light switches.
Also, the purpose of the fuses is written on the cover and if you look closely, you can find where which one is located. It is enough to replace the required fuse and if the problem is there, the instrument lighting will start working. On the cover, the fuse responsible for the instrument lighting and interior lighting is designated F7.
In addition, the socket into which the fuse is inserted may become damaged, or a breakdown may occur inside the unit itself. To diagnose, you will have to completely remove the fuse box. If the mounting block fails, it must be replaced.
Wiring problems
One of the most unpleasant options is a malfunction in the car’s electrical wiring, which leads to failure of the instrument panel backlight. This may occur as a result of a broken wire. To identify it, you need to use a multimeter to check the wires responsible for powering the instrument backlight. They can be identified on the car's electrical diagram. Once the break is found, it is removed and isolated.
In addition, the reason may be oxidized contacts of the mounting block or wire blocks. In this case, disconnect the connector near the fuse box and on the dashboard. After this, inspect and, if necessary, clean the contacts.
Problems with light bulbs
It is possible that the instrument panel lighting has disappeared due to failed light bulbs. There are a total of 5 light bulbs on the Lada Kalina dashboard.
Replacing them yourself is easy:
- The dismantled instrument panel is turned over, since the light bulbs are located at the back.
- Take out the light bulbs and check their functionality using a multimeter. The cartridge is turned counterclockwise. If you have difficulty pulling the light bulb out of the socket by hand, you can use pliers.
Video: replacing light bulbs
The board burned out
In some cases, a problem with the dashboard lighting may be due to a faulty control board. Some craftsmen try to restore it with a soldering iron, but this is a complex process and only professionals can do it. Usually, when such an element fails, it is replaced with a new one.
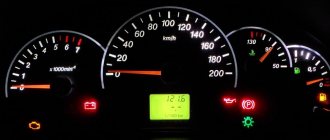
Dashboard lamps
The dashboard provides the driver with a lot of useful information that allows him to monitor the condition of the car, the driving process, diagnose breakdowns in a timely manner and correct them. So, the panel light comes on for the following reasons:
- The battery is not charging.
- For one reason or another, the handbrake is stuck.
- Not enough fuel in the tank.
- The oil pressure has decreased (which indicates the need to urgently stop the engine to avoid more serious consequences).
- Excess water in the filter. To prevent water from entering the pump, which could lead to damage, you need to drain excess water from the filter.
- The fuel system is malfunctioning.
- There was a failure in the propulsion system and much more.
As you can see, the panel lamps allow you to determine what is wrong in the car; if the lamps themselves fail, then you can miss a very important breakdown, which can even lead to an accident. This is why it is so important not to delay replacement (the lamps cannot be repaired).
Today, the car market offers a wide range of lamps for the control panel, ranging from the standard version, which is cheaper but also has average characteristics, to modernized versions that give the panel, and therefore the entire atmosphere of the car, a different, more expressive atmosphere.
Professionals also advise replacing standard lamps with LEDs, which largely decorate the panel.
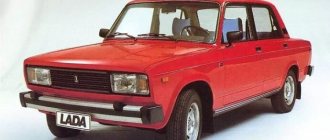
So, we list several of the currently most popular options suitable for the VAZ 2114.
- LED lamps Sho-Me SM-T5 (blue, white and red). Country of origin: Korea, price: 80 rubles. for a couple.
- High-brightness SMD LED module – 20 rubles.
- LED Sho-me SM-T5-cap-super (white) – 50 rub.
- Halogen lamps from Osram and Philips cost approximately 40-80 rubles apiece.
As you can see, prices for lamps are not high. It is worth noting that replacement takes very little time, which we will talk about later.
Stern maintenance
On a Lada Kalina, replacing the brake light bulbs may be necessary if the headlight is damaged or the element itself burns out. Due to the design features of the car, repairs can only be performed by completely disassembling the rear panel and removing the entire headlight.
- On a Lada Kalina, replacing brake light bulbs begins with dismantling the headlight. To do this, you need to remove the plastic cover from where the seat belt comes out. The second part is attached a little lower - near the belt reel. The nuts are unscrewed with a No. 10 wrench. You should be extremely careful when doing this. If a part flies into the body panel, you will not be able to get it out.
- As soon as the device is freed from its mounts, all lamps will be accessible. You can remove them from the mount by turning the base 45 degrees clockwise.
- Next, the light bulb itself is removed and replaced with a new one.
- Reassembling the headlight is performed in reverse order.
Standard replacement of light bulbs of Lada Kalina dimensions and other elements is carried out at home without significant difficulties. Changing the lamps alone is quite easy. This does not require any specialized tools or deep, professional knowledge of mechanics. It is enough to follow the instructions for car repair and maintenance.