04/06/2021 10 403 VAZ 2105
Author: Ivan Baranov
The dashboard informs the driver about the current state of the car. The article discusses the instrument panel of the VAZ 2105, its typical faults, and provides instructions for removing and repairing, as well as tuning the device.
[Hide]
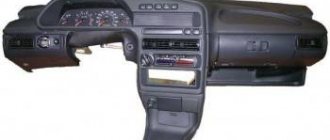
Description of the torpedo on the VAZ 2105
The front panel is a metal frame covered with polyurethane foam and a special film, mounted in the front part of the cabin. The product contains an instrument cluster, radio panel, glove box and shelf, air ducts, levers and switches.
What kind of front panel can be installed instead of the standard one?
The torpedo of the VAZ “five” today does not look very beautiful: angular shapes, minimal instrumentation, black and not very high-quality finishing material, which cracks and warps over time. For this reason, many owners seek to improve the interior and functionality of their car by installing panels from other cars. On the VAZ 2105, with some modifications, you can install a torpedo from the following cars:
- VAZ 2105–07;
- VAZ 2108–09;
- VAZ 2110;
- BMW 325;
- Ford Sierra;
- Opel Kadett E;
- Opel Vectra A.
Before installing a particular front panel, you should evaluate whether it is suitable in size, what modifications are required, and how to make the connection.
How to remove a torpedo
The need to dismantle the panel may be due to various reasons:
The tools you will need are a Phillips and slotted screwdriver, as well as a 10mm wrench or socket. The dismantling process is performed as follows:
- We de-energize the on-board network.
- Unscrew the screws securing the plastic steering shaft linings and remove them.
- We dismantle the instrument panel.
- Unscrew the fasteners and remove the shelf.
Dashboard
The dashboard of the VAZ Five, as in any other car, is an integral part, since it contains devices for monitoring the technical condition of the car while driving. The device is installed on the left side of the dashboard opposite the steering wheel, which makes it easy to read information. The device is equipped with the following elements:
- 4 pointers;
- 6 indicator lights;
- 1 digital indicator (odometer).
The instrument panel uses the following devices:
- speedometer;
- signal light block;
- car odometer;
- voltmeter;
- coolant temperature sensor;
- fuel level sensor in the tank.
What kind of dashboard can be installed
The “five” dashboard can be improved in several ways:
- perform tuning using new lighting elements, scales and instrument needles;
- introduce an instrument cluster from another car;
- do the tidy yourself by installing the necessary indicators.
It is possible to modify the shield by replacement, but only with careful selection and adjustment of the device to the standard torpedo, as well as after preliminary development of the connection diagram.
From another VAZ model
Some owners install a panel from Kalina on the fifth model of Zhiguli. The product looks modern, and the information from the instruments is much better readable. The essence of the modification comes down to installing a new shield into the standard case, for which it needs to be filed, trimmed, and assembled with the new mechanism. After completing the mechanical work, it is necessary to connect the new instrument panel with the wiring, checking the functionality of all gauges and indicators.
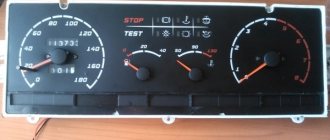
From "Gazelle"
If you like the instrument cluster from the Gazelle, then you can install it. At the same time, you need to understand that you will have to redo the wiring by making adapters due to mismatched connectors, and then install the product in a standard case with the accompanying stages of adjustment and modification.
From a foreign car
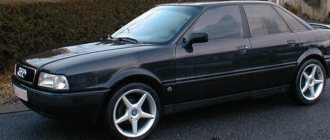
Many owners of classic Zhiguli cars, in the process of tuning their car, install a dashboard from foreign cars. Basically, products from cars manufactured in the late 1980s - early 1990s are suitable for these purposes. One of these is the BMW E30, Audi 80.
Features of a standard stove
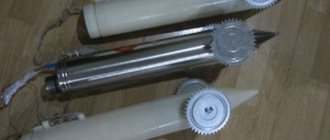
The classic design as a whole is not bad, but it does not heat very well. If you study the design features, you can pay attention to the fact that the left pipe, which conducts glass heating, does not cope with the task. In winter, this point is a serious problem. The point of the modification is to install an additional fan that will force air. Recommendations for performing the work are as follows:
- The first step is to remove the deflector from the pipe. This kind of work is quite simple to do; all you need to do is pry it off with a screwdriver.
- The next step is to install a 50mm computer fan, which will create pressure in the system. The shape and dimensions of the structure determine that the fan is ideal for the landing site.
- To ensure that the case fits perfectly under the fan, we apply it and apply markings. After this, using a knife or other cutting material, we make a seat.
- The reflector blades should also be disassembled, filed, and then reinstalled.
- If the fan is not suitable for the torpedo, then it should be changed. By trimming the structure you can make it more compact, after which installation will not be difficult.
- The fan should be connected to the wire that comes from the stove. When the ignition is turned off, no electricity is supplied. In addition, the fan will turn on while the stove is operating. This way you can eliminate the possibility of the fan running constantly, which could negatively affect the life of the device.
Then you should reassemble the structure, after which you can check the operation of the system.
Malfunctions of the VAZ 2105 dashboard
The dashboard of the car in question uses a minimal set of indicators, but they can also work intermittently at times. Therefore, you need to know about possible malfunctions and be able to eliminate them, especially since this does not require special tools.
Removing the instrument panel
To dismantle the device in question, you will need a slotted and Phillips screwdriver, and the procedure itself consists of the following steps:
- We de-energize the on-board network.
- Use a screwdriver to pry off the screw caps.
Replacing backlight bulbs
One of the common malfunctions of the tidy is the burnout of the backlight bulbs. Their replacement consists of the following steps:
- We remove the dashboard.
- We remove the faulty light bulb from the device along with the socket.
Video: replacing instrument panel backlight lamps on a VAZ 2105
Diagnostics and replacement of individual devices
Since each of the indicators on the dashboard displays the status of a particular vehicle system, the occurrence of problems causes inconvenience during operation. Therefore, it is advisable to eliminate any malfunctions as quickly as possible.
Fuel level indicator
The “five” uses a BM-150 fuel sensor located in the fuel tank. Structurally, the device consists of a variable resistor, the resistance of which changes depending on the moving lever with a float. Also on the lever there is a contact that turns on a lamp on the tidy, signaling a low amount of fuel in the tank (4–6.5 l). There is a dial indicator on the dashboard that displays the gasoline level.
If there is a suspicion that the fuel sensor is not working correctly (the tank is constantly full or empty), then you need to check its resistance:
- when the tank is empty, the resistance should be in the range of 315–345 Ohms;
- when half filled - 108–128 Ohms;
- at full - 7 Ohms.
How to get rid of unevenness
Typically, irregularities occur when a smooth section of the dashboard gives way to a sharp bend. In this case, in this area you need to warm up the surface again with a hairdryer, after which it can be stretched in the right directions and smoothed. Do not forget that the material is very delicate and can be easily scratched.
It is recommended to view the pages of this site with a monitor screen resolution of 800x600 pixels.
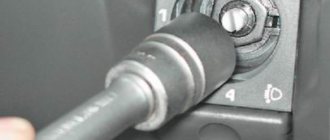
We remove the instrument panel of the VAZ-2105 (2104) and VAZ-2108 (2109)
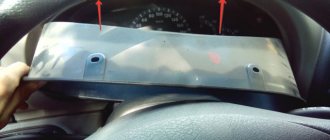
This has to be done when you need to replace a lamp or device. To avoid accidental short circuit of the wires, first disconnect the “positive” wire from the battery. Next, on the VAZ - 2105 (as well as 2104), pry it with a screwdriver and remove the plugs on the left and right edges of the shield (photo 1), and then unscrew the two screws securing the shield to the panel (photo 2). Pulling the shield towards you, disconnect the wire connectors, disconnect the individual wires (preferably with a screwdriver, as shown in Photo 5), unscrew the speedometer drive nut and remove the shield. To replace the light bulb, turn and remove the socket (photo 3). We install the shield in the reverse order. If you need to remove a key located on the shield, just pull it towards you and remove it from the socket along with the block (photo 4). For the VAZ-2108 (2809), we dismantle the instrument cluster as follows. We remove the visor-frame by first pulling the top edge, and then lifting the visor up (photo 6). By pressing with your hands on the protruding ends of the spring latches towards the middle, we remove the shield from the panel (photo 7). We disconnect the wiring blocks, the econometric hose (photo and the speedometer shaft) from the shield. To replace a lamp, turn and remove its socket (photo 9). If any indicator device is unstable, check whether the nuts that ensure contact of its terminals are tightly tightened with conductors on a printed circuit board. To remove the relay-breaker of the warning lamp that monitors the brake system, just pull it towards you (photo 10). Attention to owners of VAZ-2105, 2104, 2107!
If for some reason you removed the lower steering shaft casing and the clamp securing the wiring harness to the casing, be sure to re-fix the wires, as shown in photo 11. Otherwise, they may get on the universal joint, which, by fraying the insulation, causes a short circuit and car fire. Unfortunately, many such cases have been recorded.
The dashboard informs the driver about the current state of the car. The article discusses the 2105, its typical faults, and provides instructions for removal and repair, as well as tuning the device.
Description and location of indicators and instruments on the panel
In order to fully use the information that the dashboard provides, you need to know the location and purpose of its instruments and indicators, and their characteristics. The instruction manual provides a description of the device. A standard panel consists of a set of measuring and control instruments, as well as alarms.
Instrument panel VAZ 2105
The dashboard typically contains the following components:
- speedometer – speed indicator with trip meter;
- coolant temperature and fuel level indicators;
- indicator lights for battery charge, oil level, fuel reserve;
- control lamps, turning on side lights, high beams, direction indicators;
- voltmeter;
- signaling unit;
- switches for heated rear window, rear fog lights;
- switches for exterior lighting and electric heater fan.
When installing an on-board computer, it becomes possible to monitor more than 20 parameters that allow you to control the operation of components and systems of the machine. The information is reflected on the display (the author of the video is RusLan 404).
Construction of standard car panels
Basically, the panel instruments are located on the left side, opposite the driver, so that information can be easily and quickly read. The usual standardized set of panels, including those on the VAZ 2106 or 2105, consists of the main control and measuring instruments of the car. They are designed to clearly and immediately notify the driver about car malfunctions or the working condition of the leading components and systems of the car, the current speed, the fullness of the fuel tank and other indicators.
The average “tidy” model assumes the presence of the following devices:
- speedometer, which reports speed;
- lamps-controllers for the operating state of car components;
- car mileage counters - daily and total;
- temperature sensor in the cooling system;
- fuel level sensor in the tank;
- engine speed indicator - tachometer (absent in the “five”).
The control and measuring devices of most vehicles are equipped with light bulbs that signal problems by lighting up in bright red. Problems can lead to an emergency. Therefore, in this case, it is better to stop moving and find out the degree of deviation from the norm.
The instrument panel of a VAZ 2105 car consists of electronic, light and mechanical devices (which are gradually being replaced by electronics). If there is a problem with its operation, urgent repairs or complete replacement are necessary.
Possible faults
Dismantling and repair of the device may be required for the following malfunctions:
- The control panel backlight does not light up. You should check the condition of the wiring, contacts, and the serviceability of fuses.
- Not a single sensor or indicator works, and the warning lights do not light up. First of all, you should check the fuse in the mounting block and replace it if it is burned out.
- If the indicator arrows jerk in different directions, the cause is most often poor ground contact.
- Malfunctions may be related to the operation of the dashboard itself. It is necessary to dismantle the shield and carry out diagnostics.
- Sometimes the functionality of the device is caused by a malfunction of the cigarette lighter. The instrument panel does not work or does not function correctly.
- The functionality of the control panel sometimes disappears after tuning.
Tuning with LED lighting
When to remove the tidy
Repairing the dashboard can be useful in the case when any of the control lamps simply burns out, and this is extremely undesirable, since the car no longer has any means of monitoring such systems as, for example, the state of the injection engine control unit (naturally, in the latest 2107 models years with an injector). The Check Engine lamp appeared only in sevens with these motors, and if it burns out or loses contact with the circuit board due to vibration or moisture, then one can only guess at the reasons for the unstable operation of the engine.
Well, the instruments themselves, the tachometer, speedometer and sensor status indicators in the systems, rarely fail, if ever. By the way, you should pay attention to the tidy at the moment when the ignition key is turned and all the lamps flash in test mode, so to speak. It is this moment that will make it clear that the control lamp of a particular system does not work and explanatory measures need to be carried out with it.
Installation and repair instructions
Dismantling the control panel may be required for repairs, tuning the panel, replacing sensors, etc. The procedure is simple and can be performed at home.
Tools and materials
To disassemble and repair the dashboard, you must prepare the following tools and materials:
- a set of keys;
- Screwdriver Set;
- diagnostic tester;
- new sensors and parts needed for replacement;
- elements for tuning.
It is better to buy originals to avoid fakes.
Algorithm of actions
To dismantle the tidy, you need to perform the following steps:
- Turn off the power supply to the machine by disconnecting the negative terminal from the battery.
- After unscrewing the mounting bolts, you need to remove the casing from the steering column.
- By removing the plugs and unscrewing two screws, the instrument panel is removed.
- Next, the wire plugs are disconnected.
- After opening the glove compartment, you need to unscrew the mounting bolts. The bolts securing the shelf for things are unscrewed in the same way.
- By pulling the handle of the hydraulic light corrector, you need to remove it. Then, using a socket wrench, unscrew the mounting nut and push it in.
- In the glove compartment, disconnect the power cord for the backlight lamp.
- After unscrewing the two bolts, you need to move the heater control unit.
- Next, you should dismantle the air duct.
- The next step is to unscrew all the console fasteners.
- When the last two fastening nuts in the center are unscrewed, you need to carefully remove the panel from the studs and remove it from the interior.
Next, the necessary repairs, tuning, replacement of sensors are performed, and backlighting is installed. After completing all the manipulations, the assembly of the device is carried out in the reverse order of disassembly.
To make assembly easier, during disassembly you should mark the wires and sort the devices and sensors.
Repair or replacement of the instrument console
The VAZ 2105 instrument console is dismantled to completely replace it or due to the failure of any of the sensors. In order to disassemble and remove the console, you need the following.
- Disconnect the negative terminal from the battery, turning off the power to the car.
- Remove the instrument console and radio.
- After opening the lid of the storage box, unscrew the housing mounting bolts.
- Do the same with the shelf for things located under the drawer.
- Remove the hydraulic light corrector handle by pulling the handle. Next, use a socket wrench to unscrew the fastening nut and push it inward.
- Disconnect the wiring that powers the backlight in the storage compartment drawer.
- After unscrewing both screws, move away the control unit for the interior heater.
- Remove the central air duct from the compartment.
- Then unscrew: four screws securing the edge of the console to the body from below, three fastening screws from its upper edge, fastening nuts on the left and right sides from above using the socket head of a wrench.
- Lastly, unscrew the two securing nuts in the center, very carefully remove the panel from the studs and remove it from the interior.
Then the necessary manipulations are carried out: repair or replacement of sensors, tuning, lighting is installed, and the torpedo is modernized. When disassembling and dismantling the sensors, they must be sorted so that later, during assembly, there is no mistake. When disconnecting the wires, a mark of ownership is made on each of them. This also simplifies the subsequent assembly of the console.
When installing a repaired or replaced “tidy”, all actions performed occur in the reverse order. You should connect the electrical part carefully and carefully; the marks on the wires will come in handy here.
The VAZ-2105 is produced when there are obvious defects or it is damaged. If this is your first time doing this kind of work, then this article is for you. It is best to reupholster the dashboard with a practical and high-quality coating, for example, leather or good leatherette.
Tuning ideas
The VAZ 2105 was little modernized, mainly in the engine. Owners of “fives”, like UAZ cars, often resort to tuning the instrument panel to give it a modern look and increase functionality.
On the VAZ 2105, tuning is possible in the following options:
- purchase a ready-made kit, which includes dials for sensors, instrument panels, parts for lighting, wiring and terminals for connections;
- A budget option is to illuminate devices with LEDs of different colors;
- More technically difficult is the texture and color change of the console.
With the help of LED lighting, you can change the design of the control panel, make it stylish and give it a personal look.
Improved and updated console design
The dashboard is a car control part that is constantly in sight of the driver and passengers. First of all, the owners of the VAZ “five” strive to change the design of it, since it is simple, budgetary and visual. Tuning can be different: this includes installed lighting for the instrument console, and overlays on the instruments, and a modified dashboard as a whole. It all depends on the imagination and financial capabilities of the owner.
| Methods | Materials | Result |
| Modern industry offers tuning using ready-made special kits. | It includes instrument panels, dials for sensors, lighting components, terminals for connections, and wiring. | The “tidy” modified in this way looks stylish and modern, especially if the car’s interior is modernized accordingly. This is a rather expensive option for car interior design. |
| There is a more budget-friendly way: spectacular lighting of the “five” torpedo. | For this you will need LEDs of different colors. | By choosing a variety of colors and lighting schemes, the owner will make his car come to life. This tuning will be especially effective at night. The control console lighting comes in different types and can be used to create a unique design. |
| Changing the texture or color of the console looks more technically difficult. | The style of the interior should be combined with the selected texture and color. | It is worth taking a balanced approach to the decision to modernize in this way, so this option is not always convincing and successful. |
VAZ 2105 instrument panel tuning (LED backlighting) part 1.
Easy-to-do-it-yourself tuning using instrument overlays will allow you to radically change the standard to modernity, especially if you use LED backlighting. To do this, you will need diodes of different colors (to suit the owner’s taste), trims, arrows for instruments (they can be borrowed from imported cars).
Video “LED illumination of the VAZ 2105 tidy”
This video demonstrates how to make an LED speedometer backlight (video author - Roldugin TV).
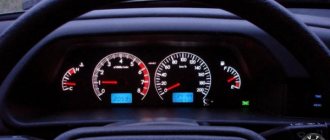
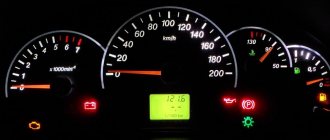
Instrument panel model 2105
Instrument panel model 2105:
1 - external lighting switch. The three-position switch has three fixed positions. In the first - the external lighting is turned off; in the second, the side lights and instrument lighting are turned on; in the third - the low beam headlights are additionally turned on;
2 — warning lamp for insufficient oil pressure.
When the ignition is turned on, it lights up red and goes out after the engine starts. If the lamp continues to light after starting the engine, this indicates low pressure in the lubrication system. To avoid engine failure, it should be turned off and the cause of the malfunction eliminated;
3 — liquid temperature indicator in the cooling system.
The transition of the indicator arrow to the red sector of the scale indicates engine overheating. You should stop and eliminate the cause of overheating;
4 — battery charge indicator lamp.
When the ignition is turned on, it lights up red and goes out after the engine starts. If the lamp continues to light after starting the engine, this indicates insufficient tension of the generator drive belt, a malfunction of the generator or the warning lamp circuit;
5 — signaling unit:
— activation of the parking brake (lights up red when the ignition is on and the parking brake lever is raised);
— covering the carburetor air damper (lights up in orange when the ignition is on and the air damper control handle is extended);
Model 2105 Instrument Panel - Removing and Replacing Bulbs
Location of lamps on the instrument panel: 1 — speedometer illumination lamp (AMH 12-3-1 (T3W); 2 — signaling unit (A 12-1.2 (W1.2W); 3 — battery charge indicator lamp (AMH 12- 3-1 (T3W); 4 — instrument cluster illumination lamp (AMH 12-3-1 (T3W); 5 — insufficient oil pressure warning lamp (AMH 12-3-1 (T3W); 6 — fuel reserve warning lamp (AMH 12-3-1 (T3W); 7 — voltmeter backlight lamp (AMH 12-3-1 (T3W); 8 — control lamp for turning on the external lighting (AMH 12-3-1 (T3W); 9 — control lamp for turning on the direction indicators (AMH 12-3-1 (T3W); 10 - high beam indicator lamp (AMH 12-3-1 (T3W)
1. We prepare the car for operations (see “Preparing the car for maintenance and repair”).
2. Disconnect the wire from the negative terminal of the battery (see “Battery - removal and installation”).
3. Using a thin screwdriver, remove the two plugs for the screws securing the shield.
4. Using a Phillips screwdriver, unscrew the two screws.
5. Disconnect the wires from the fan switch terminals. The top wire is blue-black, the middle wire is yellow-blue, and the bottom wire is red.
To avoid injury from the protruding plugs of the switch when disconnecting the speedometer drive cable, we recommend removing the switch by squeezing its latches.
6. Moving the instrument panel as far as possible to the left, unscrew the knurled nut securing the speedometer cable by hand and disconnect the cable.
7. Disconnect the three colored connectors of the instrument panel wiring harness (red, green and white) from the instrument panel wiring harness.
8. Moving to the right, remove the instrument panel.
Replacing warning lamps
1. Remove the lamp socket from the housing.
2. By pressing and turning counterclockwise, remove the lamp from the socket and install a new one.
Replacing the backlight lamps of the speedometer and voltmeter instrument cluster
1. Using a screwdriver, remove the lamp socket from the lamp body.
2. By pressing and turning counterclockwise, remove the lamp from the socket.
Replacing indicator lamps
1. Having turned the lamp socket 90° until its protrusion coincides with the slot in the board, remove the lamp socket from the hole in the board.
2. Replace the lamp together with the socket.
Replacing the cigarette lighter socket lamp
We replace the cigarette lighter socket lamp with the instrument panel removed.
1. Squeezing the walls of the lamp housing, disconnect it together with the lamp from the cigarette lighter housing.
2. Remove the lamp socket from the housing.
3. By pressing and turning counterclockwise, replace the lamp.
Installation of all removed parts is carried out in reverse order.