Today we will show you detailed and visual photos and video instructions on how to replace the cabin filter on an Opel Astra J with your own hands.
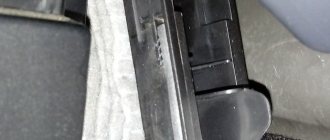
We snap off the side plastic from the glove compartment; it is convenient to do this with a special plastic spatula:
One of the screws for securing the glove compartment is hidden under it; unscrew it. Then we open our glove box and unscrew 3 more fastening screws, they are clearly visible:
Now pull the glove compartment towards you, disconnect the backlight bulb and remove it. After this, we snap off the protective black plastic filter cover from both sides:
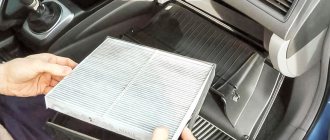
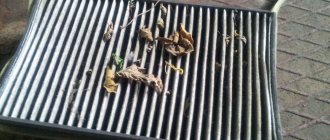
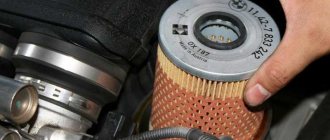
We take out the old filter element and wipe its seat well with a damp cloth. Very often you can see various small debris there, for example fallen leaves, all this needs to be cleaned out. This can be done by turning on the stove at full power; all the foliage usually flies out of there right away. We install a new cabin filter, while paying attention to the arrow that shows the direction of air movement, it should look from bottom to top:
We carry out assembly in reverse order.
Video of replacing the cabin filter in the Opel Astra J:
Backup video on how to replace the cabin filter in an Opel Astra J:
You can tell when the cabin filter has become unusable by the deterioration of the air conditioner, stove, and systematically fogged windows. We will show you how to remove and replace the Opel Astra J cabin filter with your own hands in this manual. We recommend changing it every 10-15 thousand km.
You will need: a new cabin filter, a 7″ head, 15 minutes of time.
With the left front door open, lift the cover.
Carefully open the lid.
The internal latches are made of plastic so they won't break off.
Open the glove compartment and unscrew the bolts.
Next, remove the Opel Astra J cabin filter cover.
We take out the old filter and vacuum the space.
Turn the arrow down and install a new Opel Astra J cabin filter.
The manufacturer of the Opel Astra J recommends changing the air filter in the cabin at least every 10,000 - 15,000 (km). If the car is operated in a region with a high level of dust, then the Opel Astra J cabin filter should be replaced every 5000 (km).
- Signs of filter wear
- What will be required for repairs?
- Replacement process
Signs of filter wear
- There is an unpleasant odor in the cabin that does not go away
- The furnace (or air conditioner) is not working with enough power
- The interior windows often fog up
If any of the signs (or even a combination of them) is noticed, you need to service the Opel Astra filtration unit as soon as possible; replacing the cabin filter is very quick and easy.
What will be required for repairs?
- Socket wrench for 7
- Flathead screwdriver (to pry up the filter when removing it)
- New filter
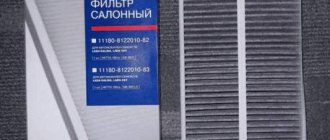
Please note that the original filter has article number: 13271191. Also, in addition to it, you can also find a modified filter element, which is supplemented with a layer of activated carbon.
A carbon filter purifies the air more efficiently, but it also clogs faster.
Experts strongly recommend that you replace the Opel Astra cabin filter yourself in the spring.
Signs of a clogged Opel Astra J filter
- Unpleasant smell inside the cabin. It does not fade and is permanently preserved.
- Weak flow of incoming air through the deflectors. A clogged filter element loses its throughput and a kind of plug forms, preventing the flow of air.
- Increased fuel consumption. Due to the fact that the climate control system cannot provide the required air flow into the cabin, it has to be turned on at a higher power, which negatively affects fuel consumption.
- Formation of dust (if driving with the windows closed) on the interior panels. It may also indicate that the Opel Astra J cabin filter needs to be replaced.
- There is deposits and dirt on the cleaning filter itself. May have different origins (contamination is clearly visible in thematic photos and videos).
Replacement process
According to these instructions, the filter can be changed in exactly 15 minutes.
- We turn off the car and move to the next seat
Many motorists move the passenger seat back so that they can turn comfortably during repairs. But if the driver has a small build, then this “extra movement” can be skipped
- Open the glove compartment and remove everything from there
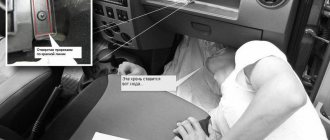
- Unfasten the side of the dashboard. When replacing the cabin filter of the Opel Astra J, you need to be careful when snapping off the side panel. There is a live wire that needs to be carefully removed in order to place the side panel on the floor (or on a chair). The wire is marked in the photo
- We unscrew the 4 bolts on the glove compartment (they are located in the corners) and pull the glove compartment towards you. The wire for illuminating the glove compartment can not be disconnected; it is long and allows you to lower the glove compartment to the floor
- We go to the cover of the filtration unit and unclip the latches. In some models there are latches only on the sides, in other models there are latches on the top, in others on all sides
- Carefully remove the old Opel Astra filter element; replacing the cabin filter can be accompanied by cleaning the filtration compartment (of course, if you have the time and desire)
- We install a new filter. Note the directional arrow. It must coincide with the direction of the air flow. Also, you can find original filters where the arrow points up (against the air flow), but next to it there is the signature “UP”. Regardless of the direction of the arrow, the text information should be turned right side up, not upside down. That is, conscientious labeling can also be considered as a guideline.
By the way, there is a video about this:
The cabin filter is designed to protect the interior, eliminating the appearance of dirt and the entry of any microbes and organic compounds. This is an important part in a vehicle. Replacing the cabin filter on an Opel Astra J on time makes movement smooth, easy and safe. Thanks to him, the salon is always fresh and clean, and there is no harm to health.
How to replace the cabin filter in an Opel Astra J?
The manufacturer of the Opel Astra J recommends changing the air filter in the cabin at least every 10,000 - 15,000 (km). If the car is operated in a region with a high level of dust, then the Opel Astra J cabin filter should be replaced every 5000 (km).
Signs of filter wear
- There is an unpleasant odor in the cabin that does not go away
- The furnace (or air conditioner) is not working with enough power
- The interior windows often fog up
If any of the signs (or even a combination of them) is noticed, you need to service the Opel Astra filtration unit as soon as possible; replacing the cabin filter is very quick and easy.
What will be required for repairs?
- Socket wrench for 7
- Flathead screwdriver (to pry up the filter when removing it)
- New filter
Please note that the original filter has article number: 13271191. Also, in addition to it, you can also find a modified filter element, which is supplemented with a layer of activated carbon.
A carbon filter purifies the air more efficiently, but it also clogs faster.
Experts strongly recommend that you replace the Opel Astra cabin filter yourself in the spring.
Replacement process
According to these instructions, the filter can be changed in exactly 15 minutes.
- We turn off the car and move to the next seat
Many motorists move the passenger seat back so that they can turn comfortably during repairs. But if the driver has a small build, then this “extra movement” can be skipped
- Open the glove compartment and remove everything from there
- Unfasten the side of the dashboard. When replacing the cabin filter of the Opel Astra J, you need to be careful when snapping off the side panel. There is a live wire that needs to be carefully removed in order to place the side panel on the floor (or on a chair). The wire is marked in the photo
- We unscrew the 4 bolts on the glove compartment (they are located in the corners) and pull the glove compartment towards you. The wire for illuminating the glove compartment can not be disconnected; it is long and allows you to lower the glove compartment to the floor
- We go to the cover of the filtration unit and unclip the latches. In some models there are latches only on the sides, in other models there are latches on the top, in others on all sides
- Carefully remove the old Opel Astra filter element; replacing the cabin filter can be accompanied by cleaning the filtration compartment (of course, if you have the time and desire)
- We install a new filter. Note the directional arrow. It must coincide with the direction of the air flow. Also, you can find original filters where the arrow points up (against the air flow), but next to it there is the signature “UP”. Regardless of the direction of the arrow, the text information should be turned right side up, not upside down. That is, conscientious labeling can also be considered as a guideline.
Source: https://remontautomobilya.ru/kak-zamenit-salonnyj-filtr-v-opel-astra-j.html
Functions of the cabin filter Opel Astra J
Every year, a large number of harmful substances that appear during the operation of industrial and agricultural plants are released into the air; volumes of automobile exhaust also exceed permissible values. These phenomena are extremely dangerous inside a car. That is why installing a filter is mandatory, allowing you to protect the lungs of motorists and passengers from a list of negative impacts. The second function of the SF is to block contaminants in the stove, as this reduces its ability to cool the working fluid, which may result from overheating of the elements of the air conditioning system.
It is thanks to the SF that up to 95% of debris, dust and moisture, as well as dangerous impurities present in the air, are eliminated. Depending on the type of SF, it allows you to retain dust of different fractions, unpleasant odors and toxic substances. In addition to protecting the health of passengers, SF helps to prolong the service life of the ventilation system. By trapping large dust particles, the part does not allow it to negatively affect the driving mechanisms of the air conditioning system, which therefore quickly become unusable.
Signs of filter replacement:
- reduction in the transmission speed of the ventilation system, which will be manifested by constant fogging of car windows,
- abnormal operation of the air conditioning system,
- volumetric amount of dust in the cabin,
- the occurrence of unpleasant odors.
All these troubles can be easily eliminated: install a new cabin filter. But in order not to expose yourself to danger, it is better to replace the part on time.
Replacing the cabin filter Opel Astra J: photo, instructions on how to change
Some Opel Astra J owners do not know where the cabin filter element is located and how to replace it. Meanwhile, the filter performs an important function, and its timely replacement will save you from many troubles.
Before wondering how to change the cabin filter of an Opel Astra J, you need to have at least minimal information about it. The cabin filter is a part of the heating/air conditioning system, which is designed to clean the air entering the car from outside, while the flow enters inside through air blowers.
First of all, the filter element protects the lungs of the driver and passengers from exhaust gases. It has been proven that if there is no filter in the cabin, then the concentration of gases inside the cabin is six times higher than outside.
In addition to harmful emissions from automobiles, the filter element also protects against windshield wiper fumes, road chemicals, soot, dust, smoke and even viral bacteria.
Therefore, this spare part of the air conditioning system is indispensable for urban use with dense traffic and traffic jams, on roads with reagents, or when driving on dusty country roads.
Kinds
The Opel Astra J filter element can have several varieties:
- Dusty. The most common type. It is used on most modern cars, even in the high price category. Air purification occurs through cellulose or synthetic fibers. It looks like corrugated paper, which is folded in rows with cells - the general appearance is in the form of a rectangular structure. Performs primitive but important functions - it protects against the penetration of dust, grains of sand, soot particles, insects and plant pollen.
- Carbonic. This type can be found on cars of the executive class and premium segment, or you can purchase it yourself. Along with corrugated paper there is an additional layer, which consists of activated carbon. This increases filtration efficiency, resulting in the capture of even the smallest particles of phenolic, benzene and oxide elements. When the carbon layer becomes clogged and ceases to perform its functions, the filter becomes simply dust. It looks like a rectangular block with ribbed parts. Regulations
The Opel Astra J cabin filter is replaced in accordance with the maintenance regulations - every 10,000-15,000 kilometers. However, when operating in difficult conditions, the filter element may become clogged earlier.
Signs of a clogged Opel Astra J filter
- Unpleasant smell inside the cabin. It does not fade and is permanently preserved.
- Weak flow of incoming air through the deflectors. A clogged filter element loses its throughput and a kind of plug forms, preventing the flow of air.
- Increased fuel consumption. Due to the fact that the climate control system cannot provide the required air flow into the cabin, it has to be turned on at a higher power, which negatively affects fuel consumption.
- Formation of dust (if driving with the windows closed) on the interior panels. It may also indicate that the Opel Astra J cabin filter needs to be replaced.
- There is deposits and dirt on the cleaning filter itself. May have different origins (contamination is clearly visible in thematic photos and videos).
Replacing the cabin filter in Opel Astra J
To work you will need:
- Original filtration element (1808246).
- Ratchet (1/4).
- Nozzle 7 mm.
- Flat blade screwdriver.
How to change the cabin filter in Opel Astra J:
- Move the front passenger seat as far back as possible.
- Pry off the seal (made of rubber) and remove the side cover (dashboard).
- Remove four screws.
- Pull the glove compartment towards you, thereby removing it.
- Open the filter door plug.
- Pry up the filter with a screwdriver and pull it out.
- Insert a new one into the socket and assemble everything in reverse order.
For more information on how to change the cabin filter of the Opel Astra J (GTC), you can watch the video below.
Remove the glove compartment Unlock the lid latches Open the lid Remove the old filter element Replace the cabin filter The direction of the arrow on the filter should correspond to the direction of air movement
Replacement frequency
The cabin filter absorbs a huge amount of air, so it tends to get clogged. New cleaning parts that allow enough air to pass through for the climate control system to operate while also blocking dirt and dust from entering the cabin. Single-layer consumables are the cheapest and of lower quality; they clean the air from large dust particles. And two-layer and three-layer parts retain gases and microorganisms.
Of course, there is a specific relationship between the transmission speed and the level of air filtration, but, in general, even three-layer products ensure stable operation of the ventilation system. As they become clogged, the transmission speed decreases, so it is very important to replace them on time. Replacement according to the regulations is carried out after 20-30 thousand km. But in practice it has been shown that consumables need to be changed twice a year.
How to replace the Opel Astra cabin filter with your own hands
Concern for the environment and the health of road users is a trend in the global automotive industry of the last decade. Most major automakers allocate huge amounts of money to develop new systems and modernize existing ones in order to meet modern ideas about the safety and environmental friendliness of vehicles.
Signs of wear and clogging
The established replacement periods for the SF are an average value created on the basis of experience in using a specific number of machines of this model. But it all depends on certain driving conditions. Typically, the need for replacement is identified not by the kilometers traveled, but by other signs or by assessing the external condition. The following signs indicate the need to replace the SF:
- glasses sweat very often;
- dirty and stale air in the cabin;
- Heating and air conditioning systems do not operate efficiently because a clogged filter prevents them from drawing in air properly.
Cabin filters come in original and analog versions. The price difference is present even among analogues. The quality of the consumable directly depends on the quality of the paper used. Poor quality of paper or insufficient area - and the SF no longer reproduces its functions or its service life is sharply reduced. If the fiber is treated with chlorine, the filter can fight certain types of microbes. The artificial fiber also attracts small particles using electrostatic voltage. We recommend choosing a filter from a reputable brand.
Important information! By the way, many non-original consumables do not match the size, which is why you have to trim it. Non-original consumables can be very dense, which will lead to rapid breakdown of the ventilation system. Therefore, special attention should be paid to choosing a cabin filter.
How to change the cabin filter on an Opel Astra J with your own hands
The cabin filter is designed to protect the interior, eliminating the appearance of dirt and the entry of any microbes and organic compounds. This is an important part in a vehicle. Replacing the cabin filter on an Opel Astra J on time makes movement smooth, easy and safe. Thanks to him, the salon is always fresh and clean, and there is no harm to health.
Functions of the cabin filter Opel Astra J
Every year, a large number of harmful substances that appear during the operation of industrial and agricultural plants are released into the air; volumes of automobile exhaust also exceed permissible values. These phenomena are extremely dangerous inside a car.
That is why installing a filter is mandatory, allowing you to protect the lungs of motorists and passengers from a list of negative impacts.
The second function of the SF is to block contaminants in the stove, as this reduces its ability to cool the working fluid, which may result from overheating of the elements of the air conditioning system.
It is thanks to the SF that up to 95% of debris, dust and moisture, as well as dangerous impurities present in the air, are eliminated. Depending on the type of SF, it allows you to retain dust of different fractions, unpleasant odors and toxic substances.
In addition to protecting the health of passengers, SF helps to prolong the service life of the ventilation system.
By trapping large dust particles, the part does not allow it to negatively affect the driving mechanisms of the air conditioning system, which therefore quickly become unusable.
Signs of filter replacement:
- reduction in the transmission speed of the ventilation system, which will be manifested by constant fogging of car windows,
- abnormal operation of the air conditioning system,
- volumetric amount of dust in the cabin,
- the occurrence of unpleasant odors.
All these troubles can be easily eliminated: install a new cabin filter. But in order not to expose yourself to danger, it is better to replace the part on time.
Where is the cabin filter located?
The filter is located just behind the glove compartment. It is better to choose universal products from trusted manufacturers for replacement.
Replacement frequency
The cabin filter absorbs a huge amount of air, so it tends to get clogged.
New cleaning parts that allow enough air to pass through for the climate control system to operate while also blocking dirt and dust from entering the cabin.
Single-layer consumables are the cheapest and of lower quality; they clean the air from large dust particles. And two-layer and three-layer parts retain gases and microorganisms.
Of course, there is a specific relationship between the transmission speed and the level of air filtration, but, in general, even three-layer products ensure stable operation of the ventilation system.
As they become clogged, the transmission speed decreases, so it is very important to replace them on time. Replacement according to the regulations is carried out after 20-30 thousand km.
But in practice it has been shown that consumables need to be changed twice a year.
Signs of wear and clogging
The established replacement periods for the SF are an average value created on the basis of experience in using a specific number of machines of this model. But it all depends on certain driving conditions. Typically, the need for replacement is identified not by the kilometers traveled, but by other signs or by assessing the external condition. The following signs indicate the need to replace the SF:
- glasses sweat very often;
- dirty and stale air in the cabin;
- Heating and air conditioning systems do not operate efficiently because a clogged filter prevents them from drawing in air properly.
Cabin filters come in original and analog versions. The price difference is present even among analogues. The quality of the consumable directly depends on the quality of the paper used.
Poor quality of paper or insufficient area - and the SF no longer reproduces its functions or its service life is sharply reduced. If the fiber is treated with chlorine, the filter can fight certain types of microbes.
The artificial fiber also attracts small particles using electrostatic voltage. We recommend choosing a filter from a reputable brand.
Important information! By the way, many non-original consumables do not match the size, which is why you have to trim it. Non-original consumables can be very dense, which will lead to rapid breakdown of the ventilation system. Therefore, special attention should be paid to choosing a cabin filter.
How to change the cabin filter on an Opel Astra J?
Many motorists change consumables with their own hands, because they believe that it is not difficult.
You can also do this if you use our instructions. To replace you need:
- Know exactly the installation zone.
- Know the position of the Northern Fleet relative to the direction of air masses.
- Know the type of consumable - the analogue in some situations may differ slightly from what is indicated in the technical book.
When replacing a consumable, the main thing is to set the correct position relative to the direction of the air masses. The desired direction is marked with an arrow on the part itself with the inscription Air Flow. The SF is inserted into a special cartridge.
Required Tools
Regardless of the modification of the Astra, the cabin filters correspond to the size. To perform a quality installation, we will need two screwdrivers and an 8mm wrench.
How is a car component replaced?
Even if you do not have relevant experience in car repair, you can replace the SF with your own hands simply and quickly. Let's outline the stages of this event step by step:
- Empty the glove compartment completely.
- The compartment for things is fixed to the dashboard using four screws located on the front side in the corners - we unscrew them using a Phillips screwdriver.
- The backlight also needs to be removed, otherwise you will not be able to remove the glove compartment.
- You need to pry it off with a flat screwdriver and pull it towards you.
- You have removed the lampshade, and now you can get the glove compartment itself by pulling it towards you.
- The SF latch will open, which is fixed to the torpedo body with three bolts. They need to be unscrewed.
- Access to the SF will open; remove it by simply pulling it towards the passenger door. This must be done carefully, as a lot of debris collects on the filter.
- We install a new consumable and perform the steps in reverse order.
As you can see, there is nothing complicated about the replacement - on average, the entire event will take 20 minutes. Please note that in a service station the same work will take longer and will cost 700 rubles.
Therefore, when you perform this activity yourself, you will receive double profit.
After you have taken out a dirty cartridge, you need to clean the compartment, since this is where a lot of debris often collects, it begins to rot, spreading an unpleasant odor that even a carbon filter cannot cope with.
How to change the cabin filter on an Opel Astra J?
Many motorists change consumables with their own hands, because they believe that it is not difficult.
You can also do this if you use our instructions. To replace you need:
- Know exactly the installation zone.
- Know the position of the Northern Fleet relative to the direction of air masses.
- Know the type of consumable - the analogue in some situations may differ slightly from what is indicated in the technical book.
When replacing a consumable, the main thing is to set the correct position relative to the direction of the air masses. The desired direction is marked with an arrow on the part itself with the inscription Air Flow. The SF is inserted into a special cartridge.
Required Tools
Regardless of the modification of the Astra, the cabin filters correspond to the size. To perform a quality installation, we will need two screwdrivers and an 8mm wrench.
How is a car component replaced?
Even if you do not have relevant experience in car repair, you can replace the SF with your own hands simply and quickly. Let's outline the stages of this event step by step:
- Empty the glove compartment completely.
- The compartment for things is fixed to the dashboard using four screws located on the front side in the corners - we unscrew them using a Phillips screwdriver.
- The backlight also needs to be removed, otherwise you will not be able to remove the glove compartment.
- You need to pry it off with a flat screwdriver and pull it towards you.
- You have removed the lampshade, and now you can get the glove compartment itself by pulling it towards you.
- The SF latch will open, which is fixed to the torpedo body with three bolts. They need to be unscrewed.
- Access to the SF will open; remove it by simply pulling it towards the passenger door. This must be done carefully, as a lot of debris collects on the filter.
- We install a new consumable and perform the steps in reverse order.
As you can see, there is nothing complicated about the replacement - on average, the entire event will take 20 minutes. Please note that in a service station the same work will take longer and will cost 700 rubles. Therefore, when you perform this activity yourself, you will receive double profit. After you have taken out a dirty cartridge, you need to clean the compartment, since this is where a lot of debris often collects, it begins to rot, spreading an unpleasant odor that even a carbon filter cannot cope with.
Replacing the cabin filter in Opel Astra J
Replacing the cabin filter is a fairly common procedure that should not be neglected. I replace my Astra every 15-20 thousand km, but if there is high humidity in the cabin (which, thank God, I don’t have), it is recommended to change it more often. To replace the Opel Astra J 1.7CDTi, I used a carbon filter with number 13271191 costing 2,000 rubles.
To replace the cabin filter, you will need to completely remove the glove compartment, since it is located behind it. And so, let's dull it!
Remove the bottom cover of the glove compartment. To do this, unscrew one 7 mm torx screw and remove the cover, which is held on by 2 latches. There is a slight subtlety here; you need to pull the bottom cover towards you, instead of pushing it away from you, since the movable part of the latches is located closer to the passenger seat (see photo).
Rice.
1 Structure of the latch of the lower glove compartment lid
Now you need to remove the side panel located between the glove compartment and the door. To do this, move the door seal to the side, and then move the side panel to the right. The panel is held in place by three latches and a hook, which is important not to break, otherwise it will subsequently rattle when driving.
Rice. 2
ec84a64a.jpg
Rice.
3 Latches holding the side panel in place
Now you can remove the glove compartment. It is held in place by four 7mm Torx screws. When removing the glove compartment, you need to be extremely careful not to damage the backlight wires. Therefore, we remove the glove compartment and as soon as the backlight wire becomes visible, turn it off, after which you can completely remove the glove compartment.
Behind the glove compartment are the main elements of the ventilation system. We find a black square “box”, which is a compartment containing the cabin filter. In order to open the lid, you need to disconnect the clamp on each side (shown by arrows in the photo below).
Rice. 4
Location of the cabin filter, Opel Astra J
To remove the cabin filter, you need to pull it towards you; I had some difficulties with this, since there were no protruding elements on the cabin filter that could be grabbed by. In general, I used a screwdriver with a flat blade, insert it with the housing and the filter so as to pick it up and “rip” it out of the compartment.
Next, install a new filter to replace the old one, making sure that the air flow direction arrow drawn on the filter is directed downward. Next, close the lid and make sure it closes without cracks.
We install the previously removed glove compartment into place (the main thing is that we don’t forget to connect the backlight power!), that’s basically it, the work is finished, it took about 15 minutes to do everything.
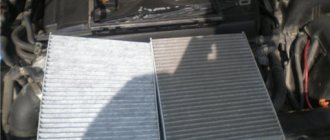
Finally, a couple of photos of the old and new filters, as they say, for comparison.
Rice. 5
On the left is the new one, on the right is the old one, in case anyone hasn’t guessed)
Rice.
6 Enlarged
Source: https://takemake.ru/catalog/opel/astra/31.html
Answers (1)
According to the scheduled maintenance regulations, the cabin filter in the Astra J is changed every 30,000 km. In real conditions, replacements may be required at more frequent intervals, for example, every 10-20 thousand km, depending on the dustiness of the area. In summer, the filter clogs faster than in winter. By the way, if the windows of your car sweat in winter or in rainy weather, it means the cabin filter is clogged.
Suitable cabin filters:
Fram CF 10774 - from 416 RUR BOSCH 1,987 432 304 coal - from 1,033 RUR ALCO (MS-6398C) - Champion CCF0134C coal - from 700 RUR FRAM CFA10775 coal - from 645 RUR
It's better to take coal - it's better.
The replacement scheme is not so simple at first glance, but if you replace it once, it will be easy in the future.
1) The filter is located under the glove compartment. And the glove compartment itself will need to be removed. To do this, we need a screwdriver with a socket head (head 7). Unscrew three of the four bolts.
2) then move the sealing rubber aside so that it does not interfere.
3) Remove the side plug-cover. We disconnect the wires. Unscrew the fourth bolt that holds the glove compartment.
4) take out the glove compartment. And we see the plastic filter panel. We take out the filter from the panel and change it. the direction of the filter - how we install it will be visible there.
We assemble everything in reverse order.
unscrew the 3 bolts with a 7mm head
remove the cover by moving it to the right
the cover is removed - you can disconnect the wire plug, but you can not. For example, the person who changed my filter turned off the airbag and did not touch the wires
unscrew the 4th bolt
This is what the filter looked like when we took it out - very dirty, the windows were sweating quickly and there was an unpleasant smell in the cabin
We installed this Fram filter - I won’t say that it’s that good, it’s ordinary! it’s better to install coal - not much more expensive, but better
The cabin filter is an element that helps clean the air inside the car during its operation. With its help, it is possible to rid the interior space of pollutants, among which the most common are dust and dirt. Thus, the cabin filter is a fairly important element in the design of the Opel Astra J, and therefore it requires regular inspection and timely replacement.
It is worth taking a closer look at what filters can be used in the Opel Astra J, as well as how to replace it if it wears out.
Replacing the cabin filter on the Opel Astra J: 1.6, video
Replacing the cabin filter on an Opel Astra J should be done regularly; the exact service conditions will depend on the nature of the vehicle’s operation.
If the routes are dusty, driving is carried out mainly in urban conditions, clogging will occur faster. In general, the service life of the unit is limited; after the period specified by the manufacturer, a new part will need to be installed.
It is not recommended to do purging; only replacing the Opel Astra J cabin filter will really help resolve the issue.
Why and when do you need to change the cabin filter?
Replacing the Opel Astra Jay cabin filter should be done in a timely manner, this will help maintain clean air and prevent an unpleasant damp smell. When traveling along unpolluted, smooth roads, maintenance is done less frequently, and vice versa. It is possible to shorten intervals in large cities and when the vehicle is used very actively.
Signs that indicate the need for urgent replacement of the filtration element:
- the appearance of a characteristic aroma of dampness in the cabin;
- problems with air cooling and heating;
- fogging of windows for no apparent reason.
If a putrid, persistent odor occurs, only replacing the old salon with a new one will help. Most likely, moisture has accumulated inside the structure and rotting has begun. The decomposition of organic substances, that is, the remains of insects, plant pollen, and leaves, is especially dangerous. When they come into contact with foam rubber, they begin to release rot and moisture.
Important! The main types of filters are carbon and paper dust. The first one is more expensive and provides maximum cleaning quality, the second one is simpler and cheaper.
A putrid, pungent odor almost always indicates a problem with the filter. Sooner or later, even the highest quality element will fail. Maintenance should be carried out in a timely manner, without waiting for serious malfunctions. The aroma of dampness is not only unpleasant, but also a sure sign of air contamination with microorganisms.
Wear cannot be determined visually; it is better to carry out maintenance in a timely manner, without waiting for unpleasant symptoms to appear.
How to choose the right filter
Replacing the Opel Astra G cabin filter always begins with the purchase of a new filtration element.
The manufacturer recommends relying on the original; this will minimize the risks of incompatibility of parts and eliminate the likelihood of serious malfunctions due to this reason.
The originals have no downsides, except for one thing – the price, which is above average. Buying an analogue will help minimize costs and save your budget.
Important! High-quality alternative options will cost 2-3 times less.
To replace the cabin filter of the Opel Astra j 1 6, you can take the following modifications:
- TSN 9.7.761;
- Mann Cook 29 001;
- Print Blue ADN12520.
When purchasing, you need to look at the compliance of the selected element with the measurements of the ventilation system box or container. Any deviations (even minor ones) lead to a decrease in the quality of cleaning; the filtration element wears out much faster.
The originals have optimal quality, the analogues have an affordable price
Where is the cabin filter located?
To remove the old element and install a new one, you need to figure out the installation location. It is mounted under the glove compartment. It is not necessary to remove the box for maintenance; ideally and according to regulations, this should be done. The steps are simple, the main thing is to perform them carefully so as not to damage the fastenings or the cover. The layout of cabin filters in all Opel Astra cars is the same.
Replacing the cabin filter on the Opel Astra J
If the work is to be performed for the first time, you can watch a video on replacing the cabin filter in the Opel Astra J:
Another option is to follow the instructions. The Astra J maintenance scheme is simple and straightforward; there are usually no difficulties with it.
First you need to prepare for the work. The master takes old clothes or a special protective suit. Since when blowing through the ventilation duct a lot of dust, dirt flies, and oil and soot residues may come out, you need to prepare a rag for wiping off dirt and a vacuum cleaner. This will allow you to quickly get the interior in order. In addition to work clothes, gloves are also taken.
The tool you need is a Torx screwdriver. If you plan to clean up dirt with a vacuum cleaner, you should use glasses for individual eye protection. The procedure for performing replacement work:
- Carefully remove the glove box to expose the part.
- Unscrew the screws and carefully remove the lower fasteners.
- Remove the light from the glove box and pull it out.
- Using a snake, unclip the filter cover and remove the old working element. To do this, you need to bend over; if you can’t do this, you will have to remove the glove compartment (the bending option is suitable for those motorists who want to limit themselves to a minimum of actions).
- Unclip the connector to disconnect the airbag, then reassemble the structure in the reverse order.
Service intervals for cabin filters are standard and must comply with maintenance regulations. They use regular or coal, simple dust is inexpensive, but does not have the highest efficiency.
Important! At the moment, activated carbon provides the maximum degree of purification.
Conclusion
Replacing the cabin filter on an Opel Astra J is mandatory as it becomes dirty, and preferably at a specified interval - every 10 thousand km. Sometimes the frequency of maintenance is reduced or increased taking into account the characteristics of the operation.
Where is the filter located
The cabin filter is located behind the glove compartment. The glove compartment, in turn, is located opposite the passenger seat in the front of the car. Finding the part in this case will not be difficult if you remove the glove compartment.
The price of the original cabin filter in the Opel Astra J is approximately 800-900 rubles, the item number is id32087. There are also analogues that can be used when replacing the cabin filter. They are produced by other manufacturers, but they do the job perfectly.
The table shows the main analogue models that can be used in the Opel Astra J.
| Analogue | vendor code | Cost, in rubles |
| Lynx | LAC1515 | 500 |
| Behr | AFW-1054 | 250 |
| Ks | 50013959 | 300 |
| MANN-FILTER | CU2757 | 650 |
| AMD | 1808 | 300 |
| SAT | ST6808611 | 150 |
| DENSO | DCF011P | 250 |
Thus, the car owner can independently choose which cabin filter to use in case of replacement.
However, it is worth noting that the lower the cost of a part, the shorter its service life. This point must be taken into account in order to replace the cabin filter in time.
Replacement instructions
- Unscrew the screws installed on the glove compartment and pull them towards you.
The screws highlighted in red need to be unscrewed. - Then unplug the connector that is attached to the light bulb and remove the glove compartment.
- There is a decorative trim attached to the air duct; remove it. To do this you need to turn the clips.
- Unscrew the three screws that secure the part. And unclip the two fasteners at the bottom and top.
- Pull out the old auto filter.
- Install the new one with the correct side.
- Tighten the screws, put on the cover, connect the connector and tighten the screws.
Done, replacing the cabin filter in the Opel Astra is complete.
Also, instead of replacing it with a new one, you can try cleaning the old filter part for the Astra car. But you can only do this once. For this:
- Dilute the detergent in water and place the part there.
- Shake several times. And rinse.
- Use a cotton swab to remove the dirt. And rinse again.
- Dry. Because a wet filter part may become moldy and smell bad.
Replacing the filter
First of all, it should be noted that the manufacturer recommends changing the cabin filter every 10-15 thousand kilometers traveled by the car. However, if the Opel Astra Jay is operated in rather dusty conditions, then the filter should be replaced once every 5 thousand km.
Signs of wear
You should start by determining the need for replacement, namely, whether there are signs of wear. These include:
- the appearance of an unpleasant odor that cannot be removed from the cabin;
- reduction in power while the stove or air conditioner is operating;
- fogging of windows in the car interior.
Any of the signs already guarantees the presence of a malfunction in the car's cabin filter. Therefore, in this situation, manufacturers recommend changing it as soon as possible. In this case, the installation can be carried out by the car owner himself, since the procedure does not present any difficulties.
Replacement materials and tools
The replacement tools and materials will include a set of screwdrivers, a new cabin filter and a spanner. If you wish, you can also stock up on a vacuum cleaner or a rag to clean the space behind the cabin filter.
Procedure
The replacement will take no more than 15 minutes if you understand the design of the car and know where everything is. If you wish, you can also watch a video that will clearly demonstrate how to install a new cabin filter.
As for the replacement procedure itself, the owner of the Opel Astra J will need:
- Open the glove compartment and empty its contents.
- Unfasten the side of the dashboard. To do this you will have to use tools. Additionally, it is worth noting that this work requires careful and careful handling, since any careless action will cause serious damage.
- Unscrew the bolts securing the glove compartment and pull it towards you. In this case, it is not necessary to disconnect the glove compartment light wire, since it will not interfere with the process.
- Remove the filtration unit cover by unsnapping the fasteners.
- Remove the old cabin filter and clean the free space.
- Install a new filter. Installation should be carried out in such a way that the direction of the index arrow coincides with the direction of the air flow.
After installation, you will need to assemble the structure back and check the functionality of the cabin filter. If the unpleasant odors have disappeared and the windows no longer fog up, it means that the installation was performed correctly and the problem lay precisely in this part. Otherwise, if the problems have not disappeared, you should think about the presence of serious problems and seek help from a service station for diagnostics.
The Opel Astra J is considered a very reliable vehicle. However, even this model requires regular inspection of its constituent elements, which include the cabin filter. Thanks to timely replacement of the filter, it will be possible to increase the life of the vehicle as a whole and prevent contamination of the interior with dust or dirt.
Car manufacturers install cabin filters in almost all new models. The importance of such a detail has been proven more than once by the following function: purifying the air that enters the cabin through the ventilation system. Capable of retaining dust, pollen during flowering, soot and other harmful components.
Replacing the cabin filter Opel Astra j
Replacing the cabin filter of a car should not be taken lightly; this is an extremely important and common procedure. Replacing the cabin filter in the Opel Astra J should be done every 15-20 thousand km, and if high humidity prevails in the car interior, then the filter must be changed more often.
Tools needed to replace the filter:
- Pliers;
- Key to 7;
- Screwdriver;
- New original filter with number 13271191.
The process of replacing the cabin filter on an Opel Astra j
Since on Opel the cabin filter is located behind the glove compartment, the glove compartment must be completely removed from the passenger compartment.
First of all, for ease of operation, you need to remove the glove compartment lid. To do this, use a 7mm to unscrew one torx screw and remove the cover from the two latches. At the same time, it is necessary to remember that the bottom lid of the glove compartment must be pulled towards you, and not away from you, since the latches are located closer to the passenger seat.
After removing the cover, it is necessary to dismantle the side panel, which is located between the door and the glove compartment. To do this, you need to move the door seal to the side, and then move the side panel to the right. The panel is attached using a hook and three latches, which are important not to break, otherwise the panel will ring when driving.
Now it's time to remove the glove compartment. 7mm Torx screws . When removing the glove compartment from the niche, you need to be very careful not to break the backlight wires. For this reason, it is necessary to remove the glove compartment until the backlight wire appears, after which it must be disconnected and continue removing the glove compartment.
In the cavity behind the glove compartment, there is the entire cabin ventilation system; among all the elements, you need to find a square box, which is a compartment for the cabin filter. In order to remove the box cover and get to the filter element, it is necessary to disconnect the clamps on each side.
To remove the filter itself from the housing, you need to pull the filter towards you. Since the filter does not have any protrusions, to remove it you need to use a screwdriver to pry out the cleaning element through the gap between the housing and the filter.
Next, a new one is installed in place of the old filter; during installation, the main thing is to position the filter correctly in the housing. The correct location is considered when the arrow on the filter indicating the direction of air flow is directed downwards. After this, the housing cover is closed; when closing, you need to pay attention to the fact that there is a tightness and there are no cracks.
The previously removed glove compartment is installed in place, and the backlight is connected, after which the replacement of the Opel Astra J cabin filter is considered complete.
Source: https://help2drivers.ru/zamena-filjtra-salona-opelj-astra-j/
How does the cabin filter work?
The cabin filter, depending on its type, consists of several layers:
- 1 layer. Cleans the air from large particles of “garbage”.
- 2nd layer. Consists of synthetic fiber that attracts dirt particles. Significantly improves the air in the car interior.
- 3 layer. Material impregnated with activated carbon. Helps prevent harmful impurities contained in the exhaust gases of other cars from entering the cabin.
In the Opel Astra H, the cabin filter is located behind the glove compartment. The Opel Astra H cabin filter is replaced every 15-20 thousand kilometers.
The main signs of the need for replacement:
- If the air outside is clean, but there is an additional unpleasant smell in the car;
- When the ventilation system is turned on at maximum speed, the power is not enough for high-quality airflow;
- The windows in the cabin sweat if there is high humidity outside.
If at least one of the above symptoms is present in the cabin, you will need to replace the cabin filter on the Opel Astra N. The procedure is carried out with your own hands with a minimal set of tools.
labavto.com
The cabin filter is designed to protect the interior, preventing contamination and the penetration of any parasites and elements of nature. It is an indispensable part in the Opel Astra car.
A timely replaced part allows the car to drive smoothly and easily. Thanks to him, the cabin will be clean, and your health will not be in danger when you are driving. The Opel Astra N cabin filter should be replaced every 20-30,000 km. If you are in an environmentally unfriendly place, then you will have to change the element twice as often. Why is a cabin filter so useful? It eliminates extraneous odors from the cabin, prevents insects and metal particles from getting inside the car, maintains the correct microflora in the car and protects against bacteria. In this article you will receive detailed instructions on how to replace a spare part on an Opel Astra car.
Before the replacement begins, you need to select the right and suitable element. We propose to consider these four existing options for Opel Astra cars.
- Single layer.
- Double layer.
- Three-layer.
- Combined.
So, the first one will only be able to eliminate large particles such as insects, branches, leaves and other debris. The second will cope with smaller and invisible particles, such as dust, gases, exhausts, etc. The third does not even allow such “troubles” as bacteria, microorganisms and viruses to pass through. The only downsides to these three cabin filters are that they are mostly tuned to a certain level of difficulty. Therefore, it is recommended to use a combination. It protects against all types of dirt. But, by the way, you should choose based on the area in which you live.
Old filter from an Opel Astra N car
Replacing the cabin filter of an Opel Astra car is a simple procedure and can be done very easily with your own hands, so don’t be lazy, save and forget. Remember that you save and forget, first of all, about your condition and the condition of your Astra car.
The process of replacing the cabin filter
To replace the filter element you will need the following tools and materials:
- Slotted and Phillips screwdriver;
- Set of heads;
- Cabin filter with article number 1987432040;
- Clean rags;
- Vacuum cleaner or compressor.
In the Opel Astra H, replacing the cabin filter is carried out according to the instructions presented below.
Step-by-step replacement instructions:
- Open the front passenger door to access the glove compartment.
- Open the glove compartment to unscrew the 4 screws.
- A view of the consumable cover will open.
- Unscrew the cabin filter cover using a set of sockets.
- Remove the old filter element and replace it with a new one.
- The process of replacing the filter element takes about 10-15 minutes.
After replacement, you can check the stove. It should work like new. Clean air must enter the cabin.
Replacing the cabin filter in Opel Astra J, photo and video instructions
Today we will show you detailed and visual photos and video instructions on how to replace the cabin filter on an Opel Astra J with your own hands.
We snap off the side plastic from the glove compartment; it is convenient to do this with a special plastic spatula:
One of the screws for securing the glove compartment is hidden under it; unscrew it. Then we open our glove box and unscrew 3 more fastening screws, they are clearly visible:
Now pull the glove compartment towards you, disconnect the backlight bulb and remove it. After this, we snap off the protective black plastic filter cover from both sides:
We take out the old filter element and wipe its seat well with a damp cloth. Very often you can see various small debris there, for example fallen leaves, all this needs to be cleaned out.
This can be done by turning on the stove at full power; all the foliage usually flies out of there right away.
We install a new cabin filter, while paying attention to the arrow that shows the direction of air movement; it should look from bottom to top.
Source: https://remontautohelp.ru/zamena-salonnogo-filtra-opel-astra-j-foto-i-video-instrukciya/
Possible breakdowns and their causes
In the Opel Astra, the cabin filter must be replaced on time, and especially in cars with an air conditioning system, otherwise its components begin to wear out quickly. The reason is that when cold air enters the car, the evaporator begins to wear out. As a result, it fails. Expensive repairs and replacement of a new evaporator will be required. To prevent such a breakdown, the consumables must be changed in a timely manner - after the mileage has expired or according to the characteristic symptoms described above.
Also, when replacing, it is advisable to use a vacuum cleaner or compressor to blow out the installation area. This manipulation will protect against the rapid loss of effectiveness of the new filter.
On the Opel Astra j, the cabin filter must also be replaced in a timely manner to avoid problems with the vehicle.
Car manufacturers install cabin filters in almost all new models. The importance of such a detail has been proven more than once by the following function: purifying the air that enters the cabin through the ventilation system. Capable of retaining dust, pollen during flowering, soot and other harmful components.
How does the cabin filter work?
The cabin filter, depending on its type, consists of several layers:
- 1 layer. Cleans the air from large particles of “garbage”.
- 2nd layer. Consists of synthetic fiber that attracts dirt particles. Significantly improves the air in the car interior.
- 3 layer. Material impregnated with activated carbon. Helps prevent harmful impurities contained in the exhaust gases of other cars from entering the cabin.
In the Opel Astra H, the cabin filter is located behind the glove compartment. The Opel Astra H cabin filter is replaced every 15-20 thousand kilometers.
The main signs of the need for replacement:
- If the air outside is clean, but there is an additional unpleasant smell in the car;
- When the ventilation system is turned on at maximum speed, the power is not enough for high-quality airflow;
- The windows in the cabin sweat if there is high humidity outside.
If at least one of the above symptoms is present in the cabin, you will need to replace the cabin filter on the Opel Astra N. The procedure is carried out with your own hands with a minimal set of tools.
Replacing the cabin filter in Opel Astra J Leave a comment
Good day everyone! If you are looking for information on how to replace the cabin filter in an Opel Astra J, then you have come to exactly the right place. In the article you will find the most complete instructions that will help you cope with the work. A separate photograph with a comment will be added to each stage of the procedure, and at the end of the article a video will be added in which everything is explained and shown in detail. So, let's go.
Why and when to change the cabin filter on an Opel Astra J?
The cabin filter is designed to filter the air entering the interior of the car. In older cars there was no such option and the air entered the car interior along with dust, dirt, leaves and insects. Nowadays, cars have become more technologically advanced and almost every model includes a cabin filter in its design.
It should be understood that during operation, the cabin filter, like any other filter element, becomes unusable. Determining a clogged filter is not difficult if you simply remove it and evaluate its external condition. On most cars this can be done in just a couple of minutes and without any tools. The removed filter can be shaken or blown out with a compressor, which will slightly extend its life. However, in some cars, reaching the cabin air filter requires more effort. In this case, in order not to do this work several times, it is better to immediately replace the cabin filter with a new one. Indirect signs will help determine whether the cabin filter is clogged.
Firstly, if in damp weather the car windows begin to fog up very much, then the first thing you need to do is replace the Opel Astra J cabin filter.
Secondly, if in the winter season the heater in the car begins to blow worse, then the cause of the malfunction may be hidden in a clogged cabin filter.
Thirdly, if when you turn on the heater or air conditioner you begin to notice an unpleasant odor from the air ducts, then the cabin filter needs to be replaced quickly. The filter became clogged, and due to the accumulation of condensation, bacteria began to multiply on it.
These three signs will be enough to understand whether a car interior is required or not. And if you own the car for a long time, you should know that the cabin filter of the Opel Astra J is changed once every 30,000 km. If the car is used in dusty conditions, then it is better to reduce the replacement interval to 15,000 km.
DIY instructions for replacing the cabin filter in Opel Astra J in 5 steps
Step 1. Move aside the door seal on the front passenger side and disconnect the decorative plastic trim. The cover is secured with latches, so no screwing is required. Just pull the cover to the side. This is required in order to get to the glove box mounting screws.
Step 2. Open the glove compartment and unscrew the four mounting screws with a 7″ head, as shown in the photo below:
We pull the glove compartment towards us and place it on the floor. The lamp wire does not need to be disconnected to save time. Its length is quite enough.
Step 3. We press the two latches along the edges of the cabin filter plug with our fingers and remove it to the side.
Step 4. We take out the old cabin filter and install a new one in its place. Make sure that the filter element is positioned correctly. If it says AIR FLOW, then the arrow on the filter should point down.
Step 5. We do everything in reverse order, i.e. We install the plug, glove compartment, decorative trim and door seal. We dispose of the old filter in the trash.
That's all. The procedure for replacing the cabin filter in the Opel Astra J is now complete. Everything took about 15 minutes. The savings from the work done is approximately 200-300 rubles.
Video of replacing the cabin filter in Opel Astra J with your own hands
The process of replacing the cabin filter
To replace the filter element you will need the following tools and materials:
- Slotted and Phillips screwdriver;
- Set of heads;
- Cabin filter with article number 1987432040;
- Clean rags;
- Vacuum cleaner or compressor.
In the Opel Astra H, replacing the cabin filter is carried out according to the instructions presented below.
Step-by-step replacement instructions:
- Open the front passenger door to access the glove compartment.
- Open the glove compartment to unscrew the 4 screws.
- A view of the consumable cover will open.
- Unscrew the cabin filter cover using a set of sockets.
- Remove the old filter element and replace it with a new one.
- The process of replacing the filter element takes about 10-15 minutes.
After replacement, you can check the stove. It should work like new. Clean air must enter the cabin.
SJRacing - tuning components for your car
Replacing the cabin filter in Opel Astra J, photo and video instructions
Today we will show you detailed and visual photos and video instructions on how to replace the cabin filter on an Opel Astra J with your own hands.
We snap off the side plastic from the glove compartment, this is convenient to do with a special plastic spatula:
One of the screws for securing the glove compartment is hidden under it; unscrew it. Then we open our glove box and unscrew 3 more fastening screws, they are clearly visible:
Now pull the glove compartment towards you, disconnect the backlight bulb and remove it. After this, we snap off the protective black plastic filter cover from both sides:
We take out the old filter element and wipe its seat well with a damp cloth. Very often you can see various small debris there, for example fallen leaves, all this needs to be cleaned out. This can be done by turning on the stove at full power; all the foliage usually flies out of there right away. We install a new cabin filter, while paying attention to the arrow that shows the direction of air movement, it should look from bottom to top:
We carry out assembly in reverse order.
Video of replacing the cabin filter in the Opel Astra J:
Backup video on how to replace the cabin filter in an Opel Astra J:
Read times: 278; Today: 1
Cabin filter for Astra J 1.6 115 hp. Which one should I install and how should I change it?
According to the scheduled maintenance regulations, the cabin filter in the Astra J is changed every 30,000 km. In real conditions, replacements may be required at more frequent intervals, for example, every 10-20 thousand km, depending on the dustiness of the area. In summer, the filter clogs faster than in winter. By the way, if the windows of your car sweat in winter or in rainy weather, it means the cabin filter is clogged.
Suitable cabin filters:
Fram CF 10774 - from 416 RUR BOSCH 1,987 432 304 coal - from 1,033 RUR ALCO (MS-6398C) - Champion CCF0134C coal - from 700 RUR FRAM CFA10775 coal - from 645 RUR
It's better to take coal - it's better.
The replacement scheme is not so simple at first glance, but if you replace it once, it will be easy in the future.
1) The filter is located under the glove compartment. And the glove compartment itself will need to be removed. To do this, we need a screwdriver with a socket head (head 7). Unscrew three of the four bolts.
2) then move the sealing rubber aside so that it does not interfere.
3) Remove the side plug-cover. We disconnect the wires. Unscrew the fourth bolt that holds the glove compartment.
4) take out the glove compartment. And we see the plastic filter panel. We take out the filter from the panel and change it. the direction of the filter - how we install it will be visible there.
We assemble everything in reverse order.
unscrew the 3 bolts with a 7mm head
remove the cover by moving it to the right
the cover is removed - you can disconnect the wire plug, but you can not. For example, the person who changed my filter turned off the airbag and did not touch the wires
unscrew the 4th bolt
This is what the filter looked like when we took it out - very dirty, the windows were sweating quickly and there was an unpleasant smell in the cabin
We installed this Fram filter - I won’t say that it’s that good, it’s ordinary! it’s better to install coal - not much more expensive, but better
Replacing the cabin filter on an Opel Astra J
To replace the cabin filter you will need a flathead screwdriver, a 7 mm socket and a 1/4″ ratchet. The cabin filter is located under the panel. To begin, open the front passenger door, pry off the rubber seal and remove the side cover of the torpedo (just pull the cover to the side).
Replacing the cabin filter on an Opel Astra J
Now unscrew the 4 bolts, one of them under the removed cover.
Replacing the cabin filter on an Opel Astra J
After unscrewing the bead, it pulls freely towards itself. Now you can see the cabin filter housing. The housing cover is held on by two latches at the edges and 2 bolts on the top.
Replacing the cabin filter on an Opel Astra J
After removing the cover, you can remove the cabin filter with a screwdriver; the main thing is to remember the direction of the arrow on the filter in order to install the new filter correctly.
Replacing the cabin filter on an Opel Astra J
Now we assemble everything in reverse order.
Do-it-yourself removal and replacement of the Opel Astra J cabin filter
You can tell when the cabin filter has become unusable by the deterioration of the air conditioner, stove, and systematically fogged windows. We will show you how to remove and replace the Opel Astra J cabin filter with your own hands in this manual. We recommend changing it every 10-15 thousand km.
You will need: a new cabin filter, a 7″ head, 15 minutes of time.
With the left front door open, lift the cover.
Carefully open the lid.
The internal latches are made of plastic so they won't break off.
Open the glove compartment and unscrew the bolts.
Next, remove the Opel Astra J cabin filter cover.
We take out the old filter and vacuum the space.
Turn the arrow down and install a new Opel Astra J cabin filter.