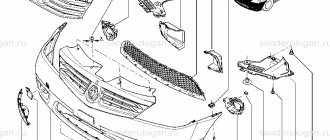
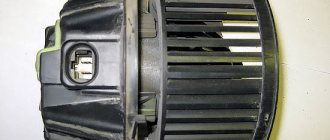
To make the driver and passengers feel comfortable, the French manufacturer equips its car with a cabin filter. This part purifies the air that comes inside from the external environment. In large cities this is no less in demand than on the highways, in rural or wild areas.
Your lung protection
The cabin filter appeared relatively recently, but has become an integral part of a modern car. Don't underestimate this item. As you know, the air contains a huge amount of harmful substances, and in cities their concentration is tens of times higher. Every day, the driver inhales various compounds along with the air:
- tire material particles;
- asbestos pieces from brake pads;
- viruses, bacteria, spores;
- oxides of carbon, nitrogen, sulfur;
- hydrogen fluoride;
- heavy metal compounds;
- smoke, soot and soot.
Naturally, in small quantities these substances do not pose a major health hazard. But imagine inhaling them every day for several hours a day. During hours of idling in traffic jams, an “overdose” of these compounds can cause oxygen starvation, dizziness, shortness of breath and dulled reactions. This will eventually result in loss of consciousness. Naturally, the driver cannot afford this, because while driving you need to be attentive and collected.
These substances are especially dangerous for allergy sufferers and those who suffer from diseases of the respiratory system. During the flowering period, such drivers have the hardest time. The solution to these numerous problems is the Renault Logan cabin filter. When the windows are closed, most of the fresh air enters the car through the air ducts, in the path of which the filter element is located. Even a regular paper filter can stop up to 99.5% of small particles. More efficient models can further retain odors.
Thus, a simple filter will become your shield against small and large particles, purifying the air entering the car. Replacing the filter is mandatory if you live in cities, are often stuck in traffic jams, or regularly travel off-road.
Which filter should you choose?
Original factory-produced cabin filters have the number 272775374R, designed for first-generation cars (2006, 2007, 2008, 2010, 2011, 2012 year of manufacture) and 272773016R - for second-generation cars (2014, 2015, 2021 year of manufacture). The type of device is not related to the configuration and engine size and is the same for Logan with 1.4-1.6 engines, and Duster 2.0. Original elements have a disadvantage - high cost, so non-original ones are more popular.
Classic filters recommended for installation can be seen in the gallery.
Filters of average quality are produced in Russia, for example, the Nevsky filter is a carbon-based cleaning element.
Codes
Codes of cleaning products that are suitable for Renault Logan:
- Original. Has code 7701062227 (coal).
- Delphi. Code TSP0325178C (also carbon).
- Delphi. With code TSP0325178 (regular).
- AMC. NC2008 9 (regular).
When purchasing a cleaning element, you need to make sure that it has a plastic cover. It is designed to fit securely. If the cover is missing, it will not be possible to properly install the filter system.
Which filter to choose for installation in Logan 2
If you decide to install an original filter, you can buy it using Renault part number 77 01 062 227 . Its cost is quite high, so if you frequently replace filters, it is better to choose analogues. Their cost is significantly lower than the original, but the quality is no worse than the original.
- AMD AMDJFC86 from 320 RUR
- Avantech CF0201 from 400 RUR
- BIG Filter GB9906 from 300 RUR
- BIG Filter GB9906C from 450 RUR (carbon)
- Bosch 1 987 432 120 from 500 rub.
- Fortech FS031 from 280 RUR
- FranceCar FCR210131 from 250 RUR
- LYNXauto LAC215 from 500 RUR
- LYNXauto LAC215C from 600 RUR
From the analogues proposed above, you can choose either a regular paper or a carbon filter. Many motorists believe that a carbon filter better purifies the air coming from the street.
What is the purpose?
The cabin filter is designed to clean air flows entering the cabin from the surrounding atmosphere through the air duct system. The main factors leading to gradual pollution are dirt and soot created by the flow of cars, both in urban conditions and on country roads. These substances and compounds, suspended in the air entering the cabin, negatively affect health and can cause diseases.
The primary role addressed here is to reduce the degree of negative impact of polluting factors on the driver’s respiratory system.
The auto parts market is replete with a variety of offers. In such a situation, the owner of a Renault Logan has a difficult task - to choose the right cabin filter based on its quality aspects and his own financial condition. According to the established rule, filters that contain a carbon element have the best conditions. Despite the higher price, these are able to more effectively prevent harmful impurities from entering the cabin, and carbon absorbent is endowed with the ability to partially disinfect the air flow.
Due to the prevalence of the Renault Logan model on the domestic market, such elements are on sale everywhere.
What models can you buy?
Drivers have two options: order original and compatible models. If we talk about one type of filter, then there are no fundamental differences in the design. Both original and compatible models will be clogged after 15 thousand in any case. Factory models have catalog numbers 272775374R for the first generation cars and 272773016R for the second. They are easy to find in stores and are of acceptable quality. The only drawback is the price of 700-800 rubles.
On cars manufactured since 2015, part number 272773151R is used. This is already a filter with a carbon filler, so we recommend replacing it with the same or another analogue with a carbon layer.
Among compatible paper models, drivers recommend products from the following brands:
- Filtron K 1152/K1321;
- Bosch 1 987 432 120/1 987 435 011;
- Mahle LA230/LA923;
- MANN CU1829/CU22011.
The cost of analogues varies from 200 to 500 rubles. If you have not had a filter before, then examine the design for the presence of a cabin filter cover. You may have to purchase it additionally. It has catalog number 272763745R.
OWNERS SERVICE
RENAULT > LOGAN > Installing and replacing the cabin ventilation filter In a modern car equipped with air conditioning, such a filter is a must. It not only cleans the air in the cabin to the satisfaction of the owner, but also protects the evaporator from contamination. During operation, the evaporator is wet, everything that the street air carries through it settles on it: fluff, leaves, mosquitoes, dust, sand. As a result, not only does the operation of the air conditioner deteriorate, but this debris begins to rot, filling the interior with a characteristic odor. Special aerosol cleaning products are of little use; only a runny nose can save you from the stench. Unfortunately, on cars assembled in Russia, the cabin filter still remains in little demand. Among the disadvantaged is KIA Spectra. Even in a richly equipped car - with an automatic transmission, with alloy wheels - there is no such filter. However, it is easy to install in Spectrum without any modifications. This won't work with Logan. The most amazing thing is that the place for the filter is provided and has long been known to craftsmen - you just need to cut out the plastic plug of the air duct. But removing the air duct means disassembling half the car! And working in the cramped space under the instrument panel is inconvenient. However, this is the lesser of two evils.
There it is, the stub! What prevented the factory from making it removable?
To work you will need a hacksaw blade, a sharp knife and a mirror. The plug (shown by the arrow in photo 1) is located on the passenger side. Its front and bottom edges are clearly visible, the others are covered by adjacent parts. First, we cut the plastic with a cutter (where it is not visible - using a mirror). The resulting shallow grooves will serve as guides for the knife, which will complete the job. The task is to carefully cut a window measuring 38 by 150 mm and remove the burrs. The result is in photo 2.
We cut out and cleaned the burrs so that there would be no interference when installing the filter.
At the same time, thoroughly vacuum the inside of the air duct, removing any debris that has accumulated in it. The attachment to the vacuum cleaner pipe will be, for example, a piece of flexible hose capable of passing through a 38 mm wide gap. By the way, where does this garbage come from? Take a look at photo 3. Do you see the huge gap between the grille and the glass washer filler neck? The only thing that won't fly here is a banana peel!
Why not a garbage bin! However, this is the bane of many cars.
We acquired the filter itself in advance. Experts suggested the best option - from Nissan-Micra. However, there are probably others. The price, depending on the type (regular or coal) and the manufacturer, ranges from 400 to 700 rubles.
The filter frame is elastic and can be easily bent as needed during installation.
[ya4]
The filter is slightly larger than the resulting window. We squeeze the filter and insert it to the middle, then, pressing the upper right corner of the plastic filter frame, push it in until it stops. Photo 4 shows how the filter is deformed.
Ready!
At the top the element is pressed with a stop pin, at the bottom it snaps onto the edge on the air duct body - as if it was already there! If the latch does not lock (it happens!), remove the rubber seal - the filter is pressed quite tightly against the air duct body without it.
The whole job lasts half an hour at most.
[ya4]
==============================================
Another installation guide
==============================================
1. The most difficult thing: buying the right filter
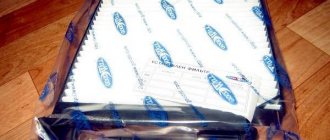
Cabin filter Goodwill AG557 cf A filter with part number (spare code) 7701 062 227 is suitable for Logan (we bought it at Exist), it is initially installed on Nissan Micra, Note, Renault Clio II, Clio III, Clio Symbol and Modus .
Since we didn’t have any particular complaints about the cabin filter (any is better than none), we chose the cheapest ones for testing - Goodwill AG557 cf. Exist - well done, they delivered faster than promised (5 days versus 10).
2. Tools and materials for installing the filter
You will need: a carrier, a good strong wallpaper/linoleum knife, a small piece of isolon or any other sealing material, Logan, a cabin filter, a ruler and 20 minutes of time.
3. Installation
Now I’ll show you the Very Place where the filter is installed! The place where the filter is installed is carefully marked at the factory in the form of a clearly defined frame on the air duct located inside the center console. 90% of the installation work comes down to sticking your head into the gap between the dashboard and the engine compartment shield and cutting through the thin plastic covering the filter compartment with a knife.
[ya4]
The plastic is thin and cuts quite easily. Don’t be afraid to damage anything: behind the plug there is emptiness (although with the proper fanaticism you can tear something off, for that matter).
Correction: behind the plug on the left, 15 mm, there is an air conditioner evaporator. In general, it is difficult to damage it using the work technology described here, but it is possible - if you have a lot of strength, you are in a hurry and wield the tool from side to side.
In the end, this is what you should get.
To prevent dust and other crap from penetrating the joint between the filter housing and the air duct, you can make a gasket from isolon (or any other soft material). There is no point in describing how to do this, it’s easier to show.
Before installing the filter in place, you need to squeeze it from the sides, deforming the filter element (nothing will happen to it), insert its upper part into the seat, then fix the lower part until it clicks.
Next, turn on the heater fan at speed 4, turn off the recirculation (if it was turned on) and see if there is any blowing from the junction of the filter with the air duct. If not, that’s it, there will be much less dust in the cabin from now on.
Good luck!
Primary sources:
Website of the magazine “Behind the Wheel” https://www.zr.ru/a/122155/
Renault Logan. Operating experience, reviews, service on the private blog VLZ34https://ds.b-alt.ru/?p=48
Installing and replacing the cabin ventilation filter
What does the replacement procedure for Renault Logan look like?
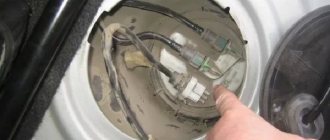
Where is the filter located? The element is located directly in the cabin in the area of the center console. It is possible to get to it for the purpose of replacement from the passenger seat.
Most of the first generation copies, unlike the Renault Logan 2 model, did not initially provide for the presence of a filter element. In the intended location of its placement there was a plastic plug, which was required to be dismantled before installation in the seat. The situation changed dramatically with the release of the second generation of cars, when the presence of a cabin filter already became a rule, and not an additional option.
Replacing the cabin filter involves performing the work in several steps and does not require extensive experience of a car mechanic. It is recommended to use a flashlight as a handy tool.
Replacement of an element is carried out as follows:
- First, we move the passenger seat back (all the way), which will ensure easy access to the location;
- Using a flashlight, we find the place where the element locks and open it manually;
- remove the used filter block from the landing niche;
- We install the new element in the reverse order: insert the new element into the niche, close the plastic lock and move the passenger seat to the desired position.
In cases where the manufacturer does not provide for the presence of a standard one in the database, installation of the cabin filter is carried out in a similar manner, but with some changes, namely:
- after dismantling, we blow out the air duct in order to clean the seat for the new element;
- if this is a primary installation, then dismantle the plug, cut out a window in the plastic for mounting a new element, making sure to bevel the sharp corners with sandpaper so as not to hurt your hands during the installation process;
- install the new filter in the groove of the air duct (you can install a soft gasket between the air duct and filter housings) and snap the bracket into place;
- After installation is completed, it is recommended to secure the new element with a self-tapping screw, preventing it from unexpectedly falling out of its seat (if necessary, the self-tapping screw can be unscrewed without much difficulty).
Types of filters
Before purchasing a filter element, we recommend that you familiarize yourself with the classification of products by type. The following types of filters can be found in stores:
- Classic barrier. Made from paper, natural or synthetic fibers. The cheapest of the existing ones, it is capable of retaining only large and small particles. Ideal for those who don't want to splurge. There will be enough protection from dust and insects.
- Coal. The key feature is a layer of activated carbon, which has excellent absorbent properties. These models are suitable for allergy sufferers and people sensitive to air quality, as they are able to trap unpleasant odors.
- Electret. Includes an electrified fibrous layer. Thanks to this, the filter more effectively stops small particles measuring 5-100 microns. They also cope with particles 0.4-1 microns in size, stopping from 60 to 99 percent.
- Combined. The most expensive and effective. They include several protective layers, stop small pollutants, and trap and contain unpleasant odors.
The choice of filter type falls entirely on your shoulders, depending on your priorities. If you want to save on purchases, then barrier models are enough. For more effective air purification, buy carbon or similar elements. The key condition is compatibility with the Renault Logan mounting socket.
Signs of cabin filter wear
The most convenient and fastest way to check the position of the filter element is to conduct a visual inspection. Considering the accessibility of the part location, this does not seem difficult. At the same time, we recommend paying attention to a number of characteristic symptoms that most often indicate the need to change the filter. This includes the following:
- fogging of windows, glass on the dashboard;
- problematic operation of the air conditioning and heating systems;
- the appearance of unpleasant odors from ventilation holes;
- rapid clogging of the upholstery.
The last sign is another good reason to change the filter more often. Dust from the street will settle on the seats, doors and clothes of passengers. You will have to clean more often. It is much easier and more convenient to install a fresh filter. You will learn further how to replace the Logan cabin filter.
Installing a new cabin filter
Installation of the cabin filter is carried out:
- when there is a plug;
- instead of the old, worn-out filter.
The process of installing a cabin filter is shown in a video from the author autologan.
Instead of the old filter
To replace the old filter on Renault Logan, follow these steps:
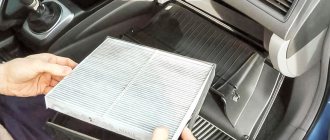
- First you need to remove the old cleaning element from its location. Pull the plastic handle on the bottom of the lid.
- We clean the filter location from various particles and dirt that have accumulated during vehicle operation. They may adversely affect the performance of the new device. For more convenient cleaning, you can use a vacuum cleaner, but the easiest way is to use an old rag.
- Change the interior element. It is not recommended to reuse an old filter, even after cleaning the valves and rinsing it. When installing a new device, you need to squeeze the front part on both sides, otherwise the filter will not fit into the grooves. First attach the top part, and then the bottom until it snaps into place. If you hear a click, this means that the filter element is firmly in place.
- After all the steps have been completed, you need to make sure that the system is working correctly and everything is sealed. To check, turn on the blowing mode to maximum power and inspect the cracks in the structure. If the air does not pass anywhere, then the job is done correctly.
If there is a plug
In the case when you have to install the filter yourself in the body where the plug is located, you must:
- Using a knife or scalpel, cut off the muffling part. You need to cut carefully, without touching the internal component of the ventilation system. After this, a hole will open - a place for the filter, however, it has not yet been installed. To avoid cutting a hole larger or smaller, you can use a measuring tool, this will increase accuracy.
- It is necessary to clean from dirt, dust and sediment. All this accumulates there during the use of the car.
- After all the conditions described above have been met, install the filter itself into the grooves.
Where is
To find out whether you have such an option or not, you need to carefully look at the right side of the stove. Where the passenger would normally place their left foot (the closest part of the heater housing to the engine), there will be a black molded plug located. Behind the plug there is a channel for installing the element. You need to check whether it is installed or not when buying a car. Otherwise, due to long-term operation without a filter element, the air circulation in the stove radiator may be disrupted due to the adhesion of dirt and dust to its honeycombs. This negatively affects the operation of the heating system, and the heater begins to heat worse, and with prolonged use it can damage the radiator.
Choosing a new Renault Logan filter.
The manufacturer produces 2 parts for its models - 272775374R and 272773016R for the first and second generation of the sedan, respectively. Since 2015, the updated model 272773151R has been installed on cars. The main difference is the presence of carbon filler, which makes the element more efficient. These models are original and do not differ depending on engine type and configuration. But their cost is quite high - from 700 rubles, which forces us to look for more affordable analogues.
The most popular analogues for the first/second generation of sedans, respectively:
- Bosch 1987432120/1987435011,
- Filtron K1152/K1321,
- MANN CU1829/CU22011,
- Mahle LA230/LA923.
Also, if you need to install a filter on a Renault Logan 2nd generation car in the basic configuration, you need to buy a plug, article number 272763745R.
Where is the filter located in Renault Logan?
Since 2014, Renault cars have been assembled in Russia. In 90% of cases, Russian Renault Logan manufacturers do not provide for the installation of an air filter in the cabin of the basic configuration. In this place there is often a plug in the form of a plastic cover. You won’t be able to find it with the naked eye, but checking its availability yourself won’t be difficult.
Location information is indicated in the vehicle manual.
The location of the cabin air cleaner is the same for all cars: the first generation, produced since 2007, and the second.
The only difference between the elements on Renault Logan and Renault Logan 2 is the shape of the plug. Until 2011, there was no standard cabin filter; the consumable material was part of the filter cartridge. In the second phase, it began to be cast together with the stove body.
In accordance with design solutions, the element is installed in the front panel behind the partition of the engine compartment. The easiest way to access it is through the passenger seat - in the footwell. If the car is initially equipped with a unit, then an accordion-shaped air cleaner will be located in its place. If not, use a plastic plug with a special recess for self-installation.
Is it possible to restore
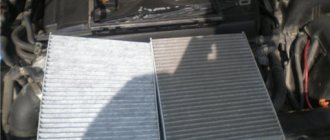
A popular question on car forums is whether cabin filters can be restored and cleaned? Some car owners try to vacuum them or even wash them. These actions are ineffective, since it will not be possible to remove at least 50% of all contaminants. Small particles sit tightly in the pores of the fiber, so even a cleaned filter cannot compare with a completely new model. Remember that the carbon layer cannot be restored, therefore, after the expiration of its service life, models with a carbon layer completely lose their absorbent properties and are equivalent to paper ones. Likewise, blowing will not help, even when using a special installation.
Replacing the cabin filter Renault Logan
When installing a cabin filter on a Renault Logan for the first time, replacing it will later seem like a trifling job, especially on first-generation cars. The filter plug can be seen behind the center console when viewed from the glove compartment, and to remove the filter it is enough to:
- On the first generation, press the latch protrusion at the bottom of the plug with your finger, tilt it up and remove it from engagement with the heater body.
- On the second generation, unscrew the two screws holding the plug, then hook the filter curtain with your fingers and pull it out.
Installation is no less simple, especially on the first generation, where it is impossible to confuse the direction of the air flow (indicated by an arrow at the end of the filter). On second-generation cars, the arrow should point forward in the direction of travel of the car.
The filter cartridge is carefully folded (otherwise the tight fit to the walls of the compartment will not allow it to fit smoothly) and is inserted into the heater body, after which it is closed with a plug.
When removing the filter, as a rule, a large amount of debris spills onto the mat. It is worth vacuuming the inside of the stove body itself - the size of the slot for the filter makes it quite easy to operate with the narrow nozzle of the vacuum cleaner. On cars with air conditioning, replacing the cabin filter should be combined with cleaning the condenser: on sale you can find many aerosol compositions for cleaning and disinfecting honeycombs. A flexible nozzle is inserted through the filter hole, with which the composition is evenly sprayed over the entire surface of the air conditioner radiator, after which it quietly flows through the drain. You need to wait about 10 minutes and replace the filter.
If there is no filter on the machine, then a certain flexibility and a sharp stationery knife will be required. It is not difficult to understand how the plug is cut out of the stove body if you have a removable one on hand. Helpful advice: the knife should be heated with a gas burner, then it will move very smoothly and without the risk of distortion; this technology has long been developed by mechanics at Renault car dealerships.
Video of replacing the cabin filter
How to change the cabin filter of Renault Sandero
The budget sedan Renault Logan quickly gained popularity in Europe, but practical residents of the Old World clearly lacked a hatchback - this is the type of body that is considered the most popular here. Therefore, the appearance of Sandero, designed on the basis of Logan, was quite expected and a logical step. Moreover, both cars turned out to be 90% unified, especially with the release of the second generation Sandero. True, this 90% obviously does not include a cabin filter - it is not installed on the prototype, but on the Sandero it is present in all trim levels without exception, with the exception of the basic ones (I generation - Sandero Authentique, II - Access).
How to replace the Renault Sandero cabin filter yourself.
However, nothing prevents their owners from installing this part themselves; fortunately, this technology was tested to the smallest detail on Logan. But if you have to tinker a little with the installation, then replacing the cabin filter of a Renault Sandero is a really trivial operation, taking even an untrained user no more than 10 minutes. Those who have already done it usually do it in 2-3 minutes.
So, we found out how to change and how much a new cabin filter (Renault Logan) costs. As you can see, it is not difficult to buy this part, and you can replace it without any effort. Therefore, it is not necessary to seek help from specialists.
Replacement procedure
To change the cabin filter element of Renault Logan, you will need a flashlight to illuminate the space under the glove compartment. The part is attached with a latch, so no exotic tools are needed. The change is carried out in two stages: removing and installing a clean cabin filter element. If it is missing initially, you will have to tinker a little with removing the plug, but it is not difficult (the installation procedure will remain the same).
Replacing the cabin filter
Removing the filter
To remove a part that has become unusable, use the following instructions:
- since manipulations are performed from the side of the front seat for passengers, it must be moved back as far as possible;
- use a flashlight to illuminate the space under the glove compartment, find the latch on the left that secures the cabin filter;
- “unfasten” the latch from below and lightly pull the part (it should come out without problems).
If the filter element is not provided for your car, you will have to cut out the plug. To do this, you will need a construction knife, which is used to make a hole, and a hacksaw for metal, which is used to cut out the entire plug. After carefully removing the plug (in order not to damage other components, the blade must be kept strictly straight, not at an angle), the edges of the cut are ground with sandpaper. For ease of installation, the filter element can be rolled up slightly.
Installing a cabin filter
There is nothing overly complicated in the installation; you only need to perform four steps:
- the place in which the deteriorated part was located may be heavily contaminated - it needs to be blown out and cleaned of contaminants;
- Next, unpack the clean filter;
- the filter element should be slightly bent from one of the edges and can be inserted into the installation slot with the upper part of the frame;
- insert the filter until you hear a characteristic click.
How to decide whether to install it yourself or turn to the services of a specialist? Based on the instructions, as well as watching the corresponding video, you can easily perform the procedure yourself. You can also install the Renault Logan cabin filter “from scratch” yourself, because no additional skills or tools are required. The replacement-installation process takes at most 30-40 minutes.
Is it necessary to change or install a filter element in the Renault Logan interior? Without a doubt! If the replacement is untimely or absent, the car owner will face a lot of problems: fogging of the windows, failure of the microclimate (the stove may stop functioning in the winter, which in itself will remind you of the need for replacement), malfunction of the ventilation and air conditioning system, the interior will simply become thick in a short time layer of dust. The car will be hard to work with, and at the same time its owner will also suffer. It is believed that it is not easy for the lungs that inhale harmful road dust. Knowing how to change the cabin filter of a Renault Logan, you can save a little on car service services by redirecting these funds to the purchase of a higher quality part.
Replacement steps
If the car was originally equipped with an air cleaner and you only need to replace it, follow these steps:
- Under the glove compartment, find the recess where the cabin air filter is located. Carefully remove the element by snapping and pulling the plastic handle from below.
- Clear empty space of dirt. You can use a car vacuum cleaner or a simple rag. This stage is necessary so that the new resource does not wear out more quickly.
- Install a new filter element. Fastening is carried out from top to bottom. To do this, you need to squeeze the front part on both sides and place it in the grooves (there should be a click).
Important! After replacement, it is recommended to check that the elements are in good working order - whether the filter is installed tightly enough, and whether anything from the outside is interfering with its operation. Turn on the blower at maximum power and check if air is passing through the cracks
Replacement regulations.
This practice is quite common among manufacturers, when certain options are removed in order to reduce the cost of the package. This problem also affected cars of a friendly concern - AvtoVAZ; Lada Largus models were forced to install these parts themselves. In other cases, if this option is already provided, then you will need to spend no more than 10 minutes replacing and installing a new consumable.
According to the maintenance regulations, the cabin filter on Renault Logan must be replaced at least once a year or during scheduled maintenance, which occurs every 15 thousand kilometers.
But at the same time, it is worth periodically paying attention to the fact that in some cases replacement may be required much faster:
- When operating a car in the summer on dusty sections of roads, the filter element becomes much more clogged with fine dust, as a result of which replacement may be required after 6-7 thousand kilometers.
- With frequent idle time in traffic jams, the element becomes clogged with small particles of exhaust soot, as a result of which it may appear relatively clean in appearance, but at the same time the surface acquires a gray color, indicating severe contamination, and permeability is reduced to almost zero.
- In the fall, leaves can get into the air ducts - even a small amount can begin to rot and become a breeding ground for millions of bacteria that cause an unpleasant odor. It is quite difficult to get rid of it; you will need not only replacing the filter element, but also completely cleaning the box.
Installing a new filter
After you have removed the contaminated element, you will find a fairly large accumulation of dust on the plastic rim. It should be removed with a dry or damp cloth or vacuum cleaner. But first you need to plug the hole, otherwise all these deposits will get into it. And this, in turn, can negatively affect the operation and functionality of the engine. After using the vacuum cleaner, it is recommended to treat the area again with a rag soaked in alcohol or a piece of other rags. Now unpack the new cabin filter and install it in its original place
It is important to know that this element must “sit” without distortion. After that we start assembling
First, we take the lid and also clean it of accumulated dirt. Of course, there is not as much dust on it as on the filter itself, so a dry cloth or wet wipe will do just fine. Next, we put the lid on the special guides and look at the result. Ideally, everything should fit tightly and securely. If the cover is difficult to install or is not fully secured, you most likely did not install the cabin air filter correctly. In this case, you need to look for places where it bends. It also happens that the Renault Logan cabin filter is defective. In this case, we take it back to the store. All latches are installed in their original places and are tightly fixed. You don't need to make much effort; press until you feel the lid is in place. Most often this is signaled by a short click. Next, in the reverse order of removal, install the screws. To avoid rust formation, it is better to treat them with WD-40 before installation. In this case, the next time you replace it, you will not have problems unscrewing those same screws from the plastic cover. You don't need to tighten the screws all the way, but so that they hold the lid properly. Otherwise, the thread may be damaged. You can see a brief photo instruction on how to replace the filter in the picture below. As you can see, the whole process consists of four stages. The entire replacement takes no more than 5-10 minutes.
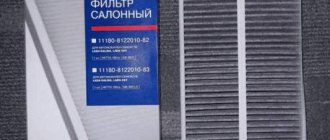
Air filter selection
Air filters for Renault Logan are divided into 2 types:
- Original - filter elements created by Renault Corporation;
- Analog - developed by other manufacturers, but suitable for Renault cars in all technical parameters.
In the case of Renault Logan, the question arises of finding compatible analogues, because original spare parts are unreasonably expensive. The following types of air filter are installed on Renault Logan of different generations, depending on the engine:
- Oval - designed for 8-valve engines with a volume of 1.4 and 1.6 liters;
- Trapezoidal - installed on a 16-valve engine with a volume of 1.6 liters;
- Rectangular - preferred for Renault Logan 2nd generation.
The following brands of analog air filters are suitable for installation on a car of the brand in question:
- Goodwill;
- Bosch;
- Filtron.
The listed filter elements are in no way inferior in technical characteristics to original parts for Renault Logan, but differ favorably in terms of price. The price of the analogues in question varies between 200-300 rubles, while the price of the original filter is 700 rubles. At the same time, analog parts can be found in any auto parts store, while Renault filters are not sold everywhere.
Replacement process
Before you start replacing the filter on Renault Logan, you need to prepare the required tools . The car enthusiast will need:
- Set of wrenches;
- Clean rags;
- New filter element;
- Medium diameter screwdriver.
We recommend: Which summer tires are better to choose for Renault Logan: 14 or 15 radius?
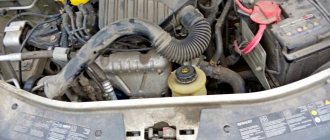
The further procedure depends on the location of the filter. This part, depending on the Renault Logan generation and engine type, may be located in the upper part of the carburetor or inside the air intake. To remove a used filter you must:
- Turn off the engine;
- Using a prepared screwdriver, unscrew the bolts of the air intake holder or the top panel of the carburetor;
- Remove the part that prevents access to the filter to be disposed of;
- Remove the old filter element.
Before installing a new air filter, it is necessary to clean the air intake and carburetor from accumulated dust. This can be done using rags prepared in advance. After cleaning, a new air filter is installed and all parts are returned to their original position.
Important! When installing the filter element, you must ensure that the unit cover fits tightly to its body. Otherwise, gaps will appear through which unpurified air will enter the engine, which can cause serious damage to the Renault Logan system.
8-valve and 16-valve engine
Replacing the air filter in Renault Logan 1.4, 1.6, 2 is a standard procedure that does not have any special differences depending on the engine capacity. The only difference is the location of the filter element in cars with 8-valve and 16-valve engines and the replacement process that depends on this.
In the case of an 8-valve engine, the filter is located at the top of the carburetor. To remove the part, it is necessary to remove the clamps that are located on both sides of the filter element. After this, it is necessary to remove the bolts on the body of the filter protective box and the lower screws. When removing the part in question, the air intake pipes must be moved to the side, because they can serve as an obstacle to the removal of waste material. After these manipulations, the filter box is removed, cleaned, and then the filter is changed.
If the engine is equipped with 16 valves, then the filter element is most likely located inside the air intake. For this reason, the procedure for changing the filter element itself is somewhat more complicated:
- The rubber seal is removed;
- In the places where the previous filter is attached, the air intake pipes and the unit itself are disconnected;
- The vacuum pump hose connected to the filter element box is moved to the side;
- The part to be disposed of is carefully detached from the fastenings to avoid damage to the resonator.
Air filters are designed for single use in the Renault Logan system. The discarded filter element should not be used, even if thoroughly washed. The part accumulates harmful elements that can contaminate the fuel system of the vehicle and cause irreparable harm to it.