The manufacturer does not install cabin filters in Lada Largus cars. Even the equipment of the car does not provide for this. Therefore, many owners try to install such a filter system on their own. What if, for example, you bought a car that already had a filter, and it’s time to change it? What to do if you have never encountered this task? After all, the service center charges more than two thousand rubles for such work! For many this is decent money. We will tell you in this article how to replace the cabin filter on a Lada Largus.
It is not recommended to ignore reinstalling the filter element. After all, it saves us from polluted air while driving. You can, of course, remove the clogged filter and not install a new one at all... But just think about the kind of air we breathe in the cabin! Dirt and dust enter our body, causing serious illnesses. But whether to install a filter or not is an individual matter.
How often do you change it?
In the instructions for the filter, the manufacturer indicates a filter change interval of 15 thousand kilometers. But such a resource is rarely observed in practice. Drivers try to change purifiers earlier. Some people keep the time period and reinstall the system once a year, without paying attention to the mileage interval. It is not recommended to delay the replacement period, as this will immediately affect your health. In addition to dirt from the air, unfavorable particles will also be released from a clogged filter.
How do you know when it's time to change the filter? There are several signs by which this is determined. Even an inexperienced driver should know about the following indicators:
- An unpleasant, fetid, rotten, sour aroma began to appear in the car’s interior.
- The air flow from the deflector is very weak. There is almost no free circulation.
- The windows fog up when driving.
- Particles of debris, dust, dirt, and leaves on the road begin to fly out of the deflectors.
If at least one indicator begins to appear, check the cleaning system. Then off to the store for a new filter!
Replacement frequency
Video Replacing the cabin air filter on a VAZ 2114 VAZ 2115 VAZ 2113 Lada Samara 2
Regardless of whether your Largus or Largus Cross has a cabin filter from the factory, or you install it yourself, the recommendations regarding replacement intervals will remain the same for everyone.
The official instruction manual attached to the Largus and the Cross version states that it is recommended to change the consumables every 15 thousand kilometers traveled. But the figure is quite arbitrary and does not coincide with the real wear rate of even the highest quality consumables.
In general, high-quality filters wear out faster because they have smaller pores that can trap the smallest particles of dust, debris and other contaminants that penetrate the ventilation system. And cheap consumables let large volumes of particles pass by, retaining only larger ones. If you care about your own health, use really good cabin air filters.
Those who travel a relatively small number of kilometers using Largus to travel to work and home may not even cover 15 thousand kilometers in a year. But it is not recommended to operate a machine with an old filter for more than 1 year.
The optimal replacement interval is considered to be from 7 to 10 thousand kilometers. This is relevant for those who live in a large city and are faced with traffic jams, exhaust gases and other air pollution, as well as for residents of the suburbs, where they often have to drive on dusty roads. All this quickly contaminates the filter, so it needs to be replaced earlier than the indicated 15 thousand km.
The motorist can understand for himself when the filter on his Largus or Largus Cross has worn out and needs to be replaced. There are several signs indicating this:
- in the cabin, when parked and driving, an unpleasant odor is felt, which has putrid and sour undertones;
- air comes out of the deflectors in weak streams, or it does not circulate at all;
- when the windows are closed and the ventilation or stove is turned on, the glass quickly begins to fog up;
- Particles of debris, leaves and other contaminants fly into the cabin through the deflectors.
If you observe at least one of the presented signs, your cabin filter has already outlived its usefulness. It is recommended to replace the consumable as soon as possible.
Installing a filter element in the cabin
How to replace the cabin filter: instructions
First you need to determine where this element is located in the cabin. On the dashboard you need to identify the back side - that’s where the filter is installed. Replacing it is not at all difficult, but it will take a lot of time. Some drivers can’t even cope, give up and turn to professionals.
It is necessary to prepare a new filter element, unpack it, inspect it, understand its design, especially if you are doing this for the first time. You must have a knife on hand. Stationery will do. Then proceed like this:
- Place the machine on a level surface so that there are no distortions. Provide clear access to the passenger door from the front.
- Sometimes Lada owners dismantle the seat to make it easier to approach the desired area. But it will be easier to push it all the way back. The seat in this position will no longer hurt. But if you still have doubts, then unscrew the mounting bolts (there are 4 of them), remove the seat and take it out of the cabin.
- In the center of the dashboard (on its back side) there is a rectangular plastic housing. An insert is soldered into the end area. It looks like a lid. It is necessary to carefully cut the hole, focusing on the outer contour of the insert. The hole should be rectangular.
- Insert the filter into the resulting niche. That's it, now mount the seat back and enjoy the fresh air in the cabin.
These instructions are suitable for the first installation of the cleaning system. If your Lada Largus already has a filter that needs to be replaced, you must first carefully remove it from its niche. It can no longer be used, so throw away the dirty element without regret.
Installation of cabin filter in Largus
Replacing a cabin filter with an air conditioner is not difficult, however, it is quite uncomfortable, since the location of the filter component is very difficult to access, or rather, under the front panel of the LADA Largus, when viewed from the passenger seat. Many owners do not even know where this filter is located. Before the “operation” we recommend dismantling the designated seat using the appropriate key. The most advantageous “posture” when working may be a recumbent position with your legs thrown up on the rear seat row cushion. This is more comfortable than the kneeling position, which involves an unnatural bending of the body. Your head should be “armed” with a flashlight so as not to miss a single significant moment during the work process.
Having studied the documentation supplied with the car, we find the location of the filter. In Lada Largus this place is closed using a rectangular plastic plug. There must be a special support pin on the top edge of this component, indicated by the corresponding mark. To make it possible to install the filter, the marked plug will need to be cut out with a knife.
Please be patient as the plug material is quite tough and resists cutting. Use a ruler to make the cut neat. If small burrs appear during the operation, they can be eliminated using the same knife. We move our attention towards the previously indicated pin, which cannot be cut out in order to be able to fix the new filter. When performing the operation, “arm yourself” with maximum concentration and accuracy, because this will ensure installation of the filter without the need for additional sealing manipulations.
Renault Sandero Stepway ground clearance
Now the owner of Lada Largus is faced with an unexpected surprise, because the dimensions of the cut opening are somewhat small for installing a larger filter. To install the component correctly, we slightly crush it on the outside and move it inside, gradually pressing it against the far wall of the panel. When the owner purchases a quality product, its lower edge is made in the form of a lid, which allows the air openings formed under the front panel to be sealed.
After this, we turn on the heating system fan at full power and at the same time check the ability of the deflectors to freely direct air into the cabin. If all the recommendations are followed correctly, the filter built into the depths of the panel will last quite a long time.
When, after installing the filter component, some of the deflectors refuse to direct air into the cabin, care should be taken to check the correct installation of the component in the Lada Largus car.
The most common causes for this defect are:
- a filter with poor quality was purchased;
- during the production of the plug cutout, extra holes were formed in the side of the panel;
- The lid did not close completely.
In some cases, manipulations with adjusting the filter in the seat will not help, then additional sealing is required. Masking tape is ideal for these purposes. As an alternative, insulating tape can improve the situation, but it must be of decent quality. Avoid using sealant or adhesive as subsequent replacement will require you to cut out the used component. There is a considerable risk of damaging the filter seat or inadvertently touching the nearby evaporator of the air conditioning system.
After completing the necessary sealing procedures, do not be too lazy to check the functionality of the blowing system. For this purpose, you will need to set the maximum impeller rotation speed for at least 5 minutes. If you accidentally break the support pin during the installation process, you will need to install the specified component again. For this purpose, it may be useful to use strips of metal, from which you will need to construct suitable brackets. Replacement of the cabin filter with air conditioning is completed.
Features of selection and preparatory procedures
It is important to mention here that in Largus with air conditioning you can purchase equipment from Renault Logan. The platform is completely identical, so the filter cartridge will fit without any problems. When the time comes for replacement, you should pay attention that there are fillers of different composition and structure on sale. You can find:
- With spongy tissue. The cheapest option. It costs on average about 600 rubles, does not do its job well and can tear even during installation.
- With multilayer polymer material. Such a sample will cost around 1000 rubles. More reliable and efficient.
- With carbon element. The highest quality and reliable model. Activated carbon traps all small particles, absorbs harmful toxins and fights unpleasant odors much longer than previous options.
Once you have purchased a cartridge according to your budget, there are a few things you should take care of before replacing it. Due to the difficult accessibility of the filter socket, for ease of installation you will need to move or completely remove the front passenger seat. It is also worth thinking about lighting (a regular flashlight will do) and a vacuum cleaner, since removing the old filter will cause a lot of debris to fall out of it.
Also, it is important to check whether the equipment is available in a particular Largus or not. Perhaps the previous owner installed it himself. The stub itself will be present in any case. But. If there is a filter, the slots will be clear and do not need to be further cut with a knife. If it is “deaf”, it means that there is no filter in the car yet. And it does not need to be changed, but installed. Installing a purification plant manually by craftsmen costs 2,000 rubles.
How to replace the cabin filter on a Lada Largus
The manufacturer does not install cabin filters in Lada Largus cars.
Even the equipment of the car does not provide for this. Therefore, many owners try to install such a filter system on their own. What if, for example, you bought a car that already had a filter, and it’s time to change it? What to do if you have never encountered this task? After all, the service center charges more than two thousand rubles for such work! For many this is decent money. We will tell you in this article how to replace the cabin filter on a Lada Largus. It is not recommended to ignore reinstalling the filter element. After all, it saves us from polluted air while driving. You can, of course, remove the clogged filter and not install a new one at all... But just think about the kind of air we breathe in the cabin! Dirt and dust enter our body, causing serious illnesses. But whether to install a filter or not is an individual matter.
Installing the cabin filter
| Author: sowa Published: 3255 days ago (August 20, 2012) Logbook: Largus in Saransk Category: Uncategorized Edited: 15 times - last March 5, 2014 Mood: excellent | +17↑ Votes: 17 |
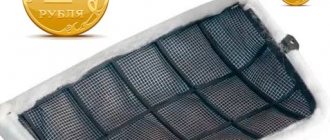
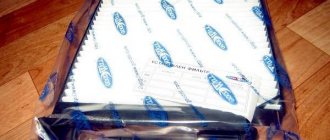
Finally, after 2 weeks of owning Largus, I found the time to install a cabin filter. I made the decision to install it in advance even before purchasing the car. For some time I debated whether to do it myself or not. It didn’t even occur to me to contact the Lada dealer. Therefore, while waiting, the PTS called Renault. They happily agreed, with the caveat “well, if it’s like in Logan,” then we’ll deliver it. I didn’t place a bet with them because... considered the prices inflated and not appropriate for this work - 850 rubles. the filter itself + 1500 rubles installation. After reading the Loganov forums, I decided that I would install it myself, because... There doesn’t seem to be anything too complicated. I'm thin in build, so I decided I could climb through. I placed a purchase order at the Logan Shop the day after purchasing Largus and a few days later the filter arrived in my city. Delivery via transport is, in principle, cheaper than by mail by 50-100 rubles. The parcel was handed to me in a plastic bag (like for sugar) tied with a plastic tie. Therefore, the box with the filter was quite dented, but the filter was not broken.
The image has been reduced. Click to see original.
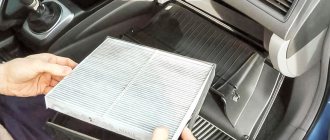
After inspection and measurements, only one thing confused me: the filter had a variable cross-section, it was narrowed in the middle, this is clearly visible in the photo. It’s not clear whether it’s a marriage or something crumpled. The remaining sizes corresponded to the description in the Logan forums. I didn’t get upset, because... I trusted the Logan shop and suspected that this might not have a decisive role during installation. But I was wrong.
The image has been reduced. Click to see original.
I note that I prepared for this “Act” for a long time.
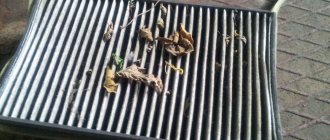
I downloaded several instructions from different places. The general part, of course, was the same for everyone, but there were also nuances that were a little confusing. Thanks to Alexey, he successfully resolved them and inspired me. I won’t describe all this, because... in Largus it turned out to be easier. I will only say that small nuances are due to changes in the Logan plug versions in phase 1 and phase 2. For Largus, everything is simpler. In the photo I show the tool that I used. But I warn you, it is very uncomfortable. The office knife has a thin blade, so the end of the blade got stuck in the viscous plastic and broke off several times. Everywhere it is recommended to use a shoe knife or scalpel, and this is true due to their greater strength.
The image has been reduced. Click to see original.
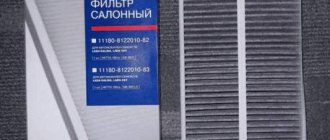
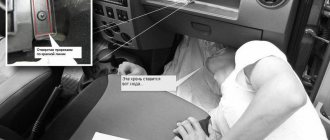
For those who don’t yet know where the plug for the cabin filter is, I’ll let you know. It is located under the “dashboard” on the passenger side, closer to the front wall of the engine, just above the passenger’s feet, on the left. That. The filter is directed towards the front console (towards the driver, to the left).
The image has been reduced. Click to see original.
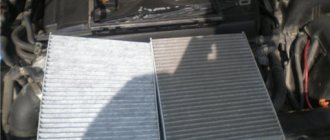
The most important and basic work, I would even say the only one, comes down to carefully cutting out this plug.
This is where the dog is flogged! You have to be almost a yogi to do this. The fact is that, for example, I was never able to see the near vertical side of the plug, no matter how I did not touch my cheek to the pile covering. But thanks to Alexey , I already knew that it had to be cut by touch. I personally could not go to bed to carry out the work as in Lganov’s instructions. My “pose” was as follows (it’s a pity there was no one to take a photo): I was lying on the two front seats, my legs out through the driver’s door, and my back of the neck was resting against the slope of the pile covering. That. looked almost straight ahead. But this doesn't help matters at all. In fact, for me this was the only possible pose. I prepared carelessly, hoping for daylight and an LED flashlight. But I didn’t attach the flashlight, so it was even more inconvenient to work, but it was possible. Somehow I spread a lot of “lyrics”. Actually on the work process. I decided to take Alexey's : 1) make 2 vertical long cuts, 2) cut in the middle, 3) and simply break out along the short sides. In general, that’s exactly what I did. But it didn’t work out perfectly as I wanted, maybe my hands don’t grow that way. Below are photos of the cutting stages. You need to cut along the technological flows, i.e. cut out the deepest part of the plug. To understand and calculate the required force, I will say that the plug has a thickness of 1.5 mm, the material is viscous, so it is difficult to cut at first, but on the contrary it is easy to remove burrs.
The image has been reduced. Click to see original.
The image has been reduced. Click to see original.
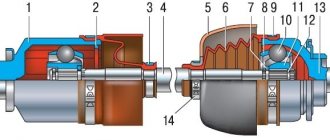
It can be seen that the knife flew off and scratched the plastic, but it’s okay, the main thing is to be careful when cutting out the nearest “vertical” because the air conditioner evaporator is located nearby. As you can see, the final result in terms of cleanliness of processing is quite good. For comparison, I’m posting a photo from Inteya (found somewhere on the Internet):
I couldn’t cut it out neatly right away, there were “saggings” left, and the lower jumper didn’t even break off.
But removing the remaining burrs seemed like an easy job to me. Attention! Photo 7 shows that the plug is not completely cut off. I don’t know whether it’s correct or not, this is my decision based on filter measurements and publications on the Internet that the height of the “hole” should be 150 mm. In addition (this is not visible in the photo), in the upper part of the plug there is a thin technological line, 5-7 mm from the top. That's what I was focusing on. Why they didn’t make the plug exactly 150 mm is a mystery to me, I still don’t understand it. And besides, in Fig. 2 I showed the technological influx, which exceeds this 150 mm. My measurements showed that it seemed to have to rest against this remnant of the uncut plug. I even wanted to cut it, not in height, but in a “cross”, leaving half, but the same height. Assuming that it will fit just under the uncut part of the plug. But Alexey dissuaded me and I left him. It is not possible to check how everything fits inside there, but ahead of events I will say that the “influx” did not interfere. By the way, I so freely called it a “technological influx”, but in other “sources” it is called a “thrust pin”. Supposedly it supports the top, and this allows the filter to fit snugly. But personally, I'm not sure about this. Photo 1 shows that the filter has a “neck” design, i.e. the part with the filter paper is wider than the front part of the filter, and this forms an L (or U)-shaped profile. My personal opinion is that the planting density is ensured due to this G(P). In general, having somehow cut out the hole, I perked up and began the most enjoyable part - installation. I couldn’t insert it right away, but it took 30 seconds, I turned it this way and inserted it. The fact is that the plastic part of the filter with paper is very flexible, so it forgives a lot. The first time I inserted it like this: the filter cover was up, and one by one I first inserted one edge of the filter, then the other and the bottom until it clicked. Like this:
The image has been reduced. Click to see original.
The image has been reduced. Click to see original.
The image has been reduced. Click to see original.
The image has been reduced. Click to see original.
But I think this is the wrong way.
Holding the filter correctly vertically, squeeze the outer edge and insert it into the hole, then press the top, and then snap the bottom. If anyone doesn’t understand why you need to compress it, let me explain: the part of the filter with the accordion is larger in size than the cut-out plug, that’s why it’s necessary to compress it. Well, I installed the filter, turned on the fan at speed 4, and stuck my hand in to check. And... Here I was disappointed. The air simply blew my hand away, but not all over the office, but only in the middle on the motor side. In photo 3 I already showed that it is narrowed there. There is nowhere to go, buy from Renault for 850 rubles. reluctantly, it takes a long time from the Logan shop and the price is almost the same including delivery, and it’s not a fact that the other one will be better. Therefore, I found the following ways to combat it: I inserted wooden spacers and, due to the lack of door and window seals, simply stuck on painter’s tape - 4 layers.
The image has been reduced. Click to see original.
And lo and behold! After this, the flow of “parasitic” air disappeared! Personally, I spent quite a lot of time on the work - almost 1.5 hours cutting and 0.5 hours adjusting the filter. With a good tool you can do it faster. PS: for the more meticulous and neat. There is one point that I decided to ignore. I read somewhere that sometimes another blade is glued to the “tail” of the filter, supposedly to exclude “bypass” air. I measured the depth of the niche, it exactly matches the long accordion! But maybe, due to the deformations, it’s really worth playing it safe and gluing on another petal.
← Hood gas struts | Installing a check valve in the rear window washer system →
Create your own logbook, and you will be able to share with forum members your opinion about Largus, useful developments, installed additional information. equipment and tuning, trips and travel! To create a logbook, you must register on the site.
Tags: installing cabin filter
Popular in in-flight magazines
DRL Traveling on Largus Fuel consumption Armrest Mileage Discs Radio To1 First impressions Buying Largus Electrics Covers for Largus Bumper net Modifications HBO Speakers Rear view camera Wipers Interior lighting Brake light Tuning Tires and wheels Check valve Tuning lights Noise insulation Winter tires Rugs Largus DVR Rki-19 Winter operation Roof box PTF Tail lights Izhevsk Car audio Injectors Mudguards Washer reservoir Hood stops Low beam lamp Installing a cabin filter Parking sensors Thresholds Lada Largus LED Carpet covers Floating idle speed Trunk lighting Tinting Trunk shelf Trip to the sea Hood seal Accident Owner's review Fender liners Walkie Talkie Additional Socket Eyeglass case Replacement 5th gear
Comments (46)
| ewgeni777 August 20, 2012 at 08:03 pm +1 |
|
| sowa August 20, 2012 at 09:28 pm +1 |
|
| Vasilich August 20, 2012 at 09:36 pm +1 |
| If the installation is like on a Renault, then like this: https://www.logan-shop.spb.ru/logan-wiki/item/ustanovka-salonnogo-filtra |
|
| sowa August 20, 2012 at 09:58 pm +1 |
| Of course, the installation is the same as on Renault, but it’s interesting that it would be on Largus. On Largus the swells on the plug are slightly different compared to Logan phase 2. On Largus it is easier. |
|
| Vasilich August 20, 2012 at 10:15 pm +1 |
| Thank you for your photo report, everything is clearly and clearly described. I have a question. Where is that notorious air conditioner evaporator located? |
|
| sowa August 21, 2012 at 07:34 +1 |
| I pointed with an arrow in Fig. 7. It is located very close, literally 1.5 cm from the near edge of the plug. Along the plane, the filter and the evaporator are located almost closely. |
|
| Vasilich August 21, 2012 at 08:13 +1 |
| Clearly, I saw everything. |
|
| sab August 21, 2012 at 00:36 +1 |
| useful experiment... respect.. |
|
| dmpl August 21, 2012 at 05:53 +1 |
| thanks for the photo report |
|
| Sehc August 21, 2012 at 07:28 +1 |
| Of course, the filter itself gets wrinkled during installation, thanks for the manual. When the car arrives, I’ll start practicing the poses)) |
|
| Sergey August 21, 2012 at 02:21 pm +1 |
| This is killing me! Is it really not possible at AVTOVAZ, or more precisely at Avtoplastkomponent, to install a normal REMOVABLE plug in the form of a plastic filter part, but without the filter element itself???!!!! So that you can remove it and install a filter without any problems! And don’t mock the car, as well as yourself, by twisting your body into yoga poses! Our automakers don't want to make cars for people. |
|
| sowa August 21, 2012 at 03:28 pm +2 |
| not only ours but also the French don’t want it either. The main thing for them is making a profit. I remember some time ago in an interview they said that they were not going to discontinue the classics. And we are advocating that they will come and update everything here for us. Capitalists will squeeze the last of their equipment as long as it produces profit. Actually, they are right in some ways; we consumers should vote with our rubles. As for the plug, it's really ugly. As I understand it, the same design is incorporated in both Clio and Megane. But for some reason they have a filter or at least a removable plug. Why don’t the gentlemen capitalists who advocate globalization take and unify this unit on all models? And the gentlemen from VAZ, when answering all specific questions about childhood diseases, answer that making changes at this stage is expensive! Yeah, we drove the car almost idle for 5 years and didn’t do anything further than the bumper and suspension arms. A shame! |
|
| Alexey August 21, 2012 at 6:20 pm +1 |
| Great job! Glad I could be a part of this “fun” process in terms of recommendations! I think a lot of people will use these recommendations and save some money! THANK YOU! |
|
| BogDV August 22, 2012 at 01:07 pm +1 |
| To keep the air from blowing your hand, I can recommend a gasket as recommended https://ds.b-alt.ru/?p=48, the gasket itself, and instructions for inserting the filter can be found here https://logan-shop.spb.ru/logan -wiki/item/ustanovka-salonnogo-filtra, I haven’t tried it myself yet, I’m mentally preparing, although there are alternatives. |
|
| sowa August 22, 2012 at 2:29 pm +1 |
| Interesting instructions - Factory! But this factory instruction suggests removing the seal from the filter and gluing another seal onto the filter seat. Maybe someone did this, but why change the awl for soap if the filter itself fits normally without removing the seal? Secondly, in my case, the air was blown in only from one place, and the sealing frame in your photo is shown along the entire perimeter. I suspect that in each specific case it is necessary to look for an individual sealing solution, because... alternative filters are often not made very well. It is interesting to try to install a native Renault, but it is 2-3 times more expensive. |
|
| Basil August 22, 2012 at 03:28 pm +1 |
| Everything is simple and clear. I really wanted to do it myself. |
|
| ARTEM000 August 24, 2012 at 12:52 pm +2 |
| I did this procedure yesterday. Cut it out with a gas soldering iron. It has an attachment for cutting plastic. I would like to say hello to the people who decided not to install a cabin filter. I had a "wonderful" time. |
|
| sowa August 24, 2012 at 5:55 pm +1 |
| Soldering iron! This is cool! New experience! |
|
| EDUARD76 August 24, 2012 at 6:00 pm +1 |
| I wonder if this procedure can be performed with a regular wood burner? |
|
| sowa August 24, 2012 at 7:40 pm +1 |
| I think everything is possible, but firstly, I didn’t see the near edge cut by touch, and secondly, it’s easier to “mess up” with a burner |
|
| Basil August 25, 2012 at 03:37 pm +1 |
| Hooray! I did it. Costs: GoodWill filter (carbon) - 350 rub. And... that's it. |
|
| sowa August 25, 2012 at 03:52 pm +1 |
| Congratulations! How did you get up? Did it siphon like mine or was it a normal specimen? |
|
| Basil August 25, 2012 at 5:24 pm +1 |
| Yes, it was only siphoning in front of the engine wall. glued 2 sides. 2 layers of tape and it was fine. |
|
| webchik2 August 25, 2012 at 5:33 pm +1 |
| What configuration does your car have? If it’s standard, do they install a filter in the deluxe? |
|
| EDUARD76 August 25, 2012 at 6:08 pm +1 |
| No filter is included in any configuration. |
|
| webchik2 August 25, 2012 at 6:24 pm +1 |
|
| vitos September 15, 2012 at 11:39 am +1 |
| I installed a filter using the sowa method today and everything worked! But now my right shoulder and neck are aching... |
|
| sowa September 16, 2012 at 5:54 pm +1 |
| vitos , congratulations! Well, tell me siphonilo? Did you compact it? What filter did you use? |
|
| vitos September 17, 2012 at 11:34 am +1 |
| sowa, in this topic I wrote briefly about everything. Everything went according to your scenario, so there is nothing more to write. |
|
| Ivan September 23, 2012 at 12:03 +2 |
| All this is of course interesting! But is there an option when the heater body is replaced, let’s say with a ready-made socket for the cabin filter, or let’s say as additional equipment for a car in the cabin? |
|
| levenbruk August 21, 2013 at 01:45 pm +1 |
| Well, it's time to change your shoes! I was tricky with the “foreign car”, brought more or less to its logical conclusion, now with the “goose”, let’s do the same thing, mother Russia!!! |
|
| Salavat74 February 12, 2014 at 03:11 pm +1 |
| Good report - I’m not going to bother installing a filter!!!! |
|
| dfcbkmtdbx February 12, 2014 at 07:43 pm -1 |
| Don't drift, your eyes are afraid - but your hands do! I set it on myself for about an hour with five smoke breaks, and stuck it on my father in 15 minutes - he got the hang of it. |
|
| Kravt77 March 15, 2014 at 12:42 pm +1 |
| Thanks for the photo report. Everything was done as the author did, and the effect with air transmission was exactly the same. There are filters with a black plug, and there are also filters with a black plug separately from the paper accordion (included, so to speak), but I purchased the filter for 250 rubles. with a white cap like the author's. And during installation, I noticed the deformation of the plastic precisely in the middle (it turned out to be barely noticeably narrowed and slightly bent in an arc). By the way, such a defect is not noticeable from the outside. It is noticeable only by “shooting with the eye” along the entire plane of the end of the plug. I don’t know whether this defect is due to the unoriginality of the filter, but I came up with this way to eliminate it. Since air flowed from the gap in microns of millimeters, I decided to stick foamed double-sided tape along the height of the transmission (that is, vertically from the top to the beginning of the step under the rubber seal). I happened to have 1.5 cm wide FIt tape at home and I glued two strips on the right and left. Some of the width was inside the plastic box, and some of it was released outside, from the side of the plug. The second side is made of polished paper and does not interfere with the insertion of the filter. Attention! There is no need to separate the second adhesive side from the tape! So as not to glue the filter tightly)). The calculation was that the porous adhesive tape would completely fill the voids on both sides, squeezing in more places and less in places. At the same time, such a seal can be used without additional modifications to the filters in the future. The sealing was 100%. at speed 4 with closed air ducts there is no blowing. |
|
| Kravt77 March 15, 2014 at 01:16 pm +1 |
| By the way, for ease of operation and complete visual accessibility, I came up with the idea of putting the flashlight on the top of the glove compartment (from the inside under the panel). There was quite a strong angle there and the flashlight did not hold.. I used a non-slip mat (bought a long time ago and cut to make a recess for mobile phones and cup holders). Working with a flashlight was twice as fun and invigorating.)) |
|
| sedmoi71 April 21, 2014 at 6:30 pm +1 |
| I installed a cabin filter for myself, I only suffered for 30-40 minutes, I made it easier with a shoe knife, cut out a hole, and then began to break out the plastic with pliers, it turned out quickly, then I just trimmed the edges and inserted the cabin filter, the big inconvenience is that you need to lie on on the right side and I’ll also say right away, don’t be lazy, remove the front passenger seat, it will be more convenient. |
|
| andruny69 April 23, 2014 at 05:59 +1 |
| I’ll add my two cents: I broke out the plug for about an hour. Using the method from the previous comment. Then I inserted the filter for another hour. I think next time everything will work out three times faster. What was the catch: really leave the top bead no more than 5 mm, and also scrape out the edges perfectly evenly (without burrs and micro beads). As soon as everything was scraped together, the filter fit perfectly with a click, but before that it didn’t fit at all. It sits tightly and doesn’t siphon anywhere! (maybe I have a filter like that?) |
|
| sowa April 23, 2014 at 07:57 +1 |
| I confirm that the issue is precisely the quality of “scraping” the hole for the filter. My colleague cut it out and complains to me that the filter doesn’t fit. Well, I took a camera, took a picture and enlarged the photo on the computer, where all the jambs became visible. After this, the colleague began to correct his mistakes, so much so that he overdid it and cut off too much. Now he began to siphon. So there is no need to rush, it is better to approach this process carefully; you do it only once. |
|
| megaelektrik March 22, 2015 at 10:33 pm +1 |
| And how much edge should I leave on top? |
|
| oapv March 22, 2015 at 11:18 pm +1 |
|
| megaelektrik March 22, 2015 at 11:38 pm +1 |
| Thank you. But you will need to measure and calculate with a ruler. |
|
| megaelektrik March 25, 2015 at 09:19 pm +1 |
| When installing, I got 7-8 mm, with a filter length of 148-149 mm |
|
| oapv March 25, 2015 at 11:32 pm +1 |
| Severyanin May 14, 2021 at 00:43 +1 | | the work speeds up significantly if it is possible to drill several holes, at least 12 mm, with a drill (if 220 volts are available) or a screwdriver. Naura climbs into the “glove space” with a drill. Next, I personally connected these holes with a cut using a blade from a hacksaw. Well, I removed the burrs with a knife. The operation was completed with a wide flat file. The filter clicked quickly, although I wonder how hands-on the engineer who created such a design was. What, it was impossible to make the filter have a simple rectangular shape and fit into its place without creases? |
|
| oapv May 14, 2021 at 08:51 +1 | | the work speeds up significantly if you heat up a large stationery knife - the plastic cuts like butter |
|
| Add a comment | RSS comments feed |
Additional comments: |