Replacing the outer door handle of VAZ 2114 and 2115
The design of external door handles on VAZ 2113, 2114 and 2115 cars is quite reliable if we consider the old-style handles. But there are often problems with new, so-called Euro pens. But in this article we will look at the replacement of external handles using the example of old-style cars.
In order to make this repair yourself, you will need the following type of tool:
- 8 mm head
- extension
- ratchet handle or crank
- screwdriver short flat
Removing and installing the outer door handle on VAZ 2113, 2114 and 2115
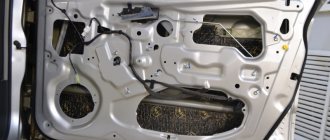
The first step is to remove the door trim. After this, access to the lock mechanism and its rods from the inside opens.
Now unscrew one nut securing the handle from the inside, as shown in the photo below.
The second nut is located on the outside:
From the outside, move the handle slightly to the side, as shown clearly:
And then it is necessary to disconnect the two rods from the handle mechanism of the VAZ 2114-2115 from the inside. This can be done using a flat screwdriver, and the shorter it is, the more convenient it all is.
The rods are hinged, so you will have to apply moderate force to disconnect them from the lock mechanism. After which you can finally remove the handle and replace it with a new one.
It is worth noting that the price of a new factory handle for the front doors is around 300 rubles, but the rear ones can be bought a little cheaper - from 200 rubles apiece. Installation occurs in the reverse order of removal.
Source
The second stage is assembly!
- Before installing the Euro handle in the VAZ 2115 door, you need to remove the lock along with the cylinder from the old handle. To do this, remove the rod that is attached to the cylinder, then carefully remove the retaining ring of the cylinder along with the spring. We install the key in the keyhole and pull it towards ourselves along with the cylinder.
- We clean and lubricate the mechanism, as well as all rods and connections, after which we install the rubber gasket that comes with the Euro handle and begin assembly.
- Before final assembly, we check how the handle and lock work, making sure that everything is assembled correctly and works as it should.
- We attach the handle to the bolts and assemble everything in the reverse order.
As you can see, installing Euro handles on a “tag” is a fairly simple task that any “home” craftsman can do. By installing Euro handles “Lynx” on a VAZ 2115, they can improve the appearance of the car and also make opening doors more pleasant.
We change the door handle on a VAZ-2114 with our own hands: replacing the inner and outer handles
VAZ-2114 owners have repeatedly faced the problem of replacing a door handle. This process is quite simple, but people often get confused with it and, out of ignorance, damage the element itself or a neighboring one. The article will tell you how to replace a door handle from the outside without much effort.
Video about replacing the inside rear door handle (carefully mat):
The video will tell you about the features of replacing a door handle on a VAZ-2114, and will also tell you about the main subtleties and nuances of the process.
Handles "Lynx"
Despite the fairly extensive range of Euro handles suitable for the VAZ 2114, domestic owners of the “fourteenth” most prefer to use the “Lynx” kits. These are high-quality, reliable products with excellent design, smooth lines, streamlining, and excellent grip comfort.
Plus, of course, quality plays a big role in the popularity of accessories. Here it is not possible to make any claims to the Lynx Euro handles for the VAZ 2114 car.
The process of replacing the internal door handle on a VAZ-2114
One of the simplest operations is replacing the door handle from the inside. So, motorists often figure out what needs to be done.
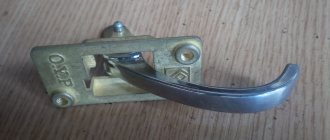
Broken interior door handle.
But, nevertheless, we will describe the complete technical replacement process:
- By prying and pulling with a screwdriver, we remove the door handle trim.
We remove all elements including the handle trim.
We remove the door card.
Disconnect the drive rods from the handle.
We install a new handle and attach the rods.
Exterior door handle replacement process
Many car enthusiasts think for a long time about how to approach the replacement process, but everything is much simpler than it seems at first glance. To determine the fastening method, just look at the technical documentation, where you can clearly see that the door handle is attached inside.
Based on this, one can logically guess that in order to remove the outer door handle, it is necessary to dismantle the door trim. Next, the process will follow the same pattern:
- When the casing is dismantled, remove the thrust rods from the handle lock.
Remove the door handle thrust rods from the frame
Unscrew the screws securing the rods
Unscrew the fasteners and remove the handle
How to replace all door locks, rods and cylinders on a VAZ 2113-VAZ 2115?
1) First, let’s start with the main one, without this you not only can’t change the locks, but in general you can’t start the operation since all the work on replacing all the things that are listed in the title is carried out with the trim removed from the door, it can be removed quite simply and more thoroughly about how to do this if you don’t understand yet, read the article: “Replacing a door on a VAZ” in Fri 1-8, and after the trim is removed, proceed to removal, let’s immediately note a couple of facts in order to change the cylinder to be disconnected from it , but in order to change the rods, you don’t need to remove or disconnect anything, the same with the door locks, the rods from them too will need to be disconnected and only then unscrew the screws that secure the locks, so let’s start with the rods themselves first and we will explain how they are removed, firstly, you can start disconnecting them completely from any side and from any place, for example, start disconnecting the rod first from the internal lock as shown in photos 1 and 2 (Photo 1 shows disconnecting with a locking screwdriver the washer that holds the rod, and already in photo 2 the disconnection from the internal lock of the rod itself is shown), then using a screwdriver and your hands, disconnect the other rods and continue the whole operation until the rods on both sides are disconnected, as they are disconnected on both sides, remove them one hundred percent from the car (there are several rods in the car and each one goes to the locks and there is even a rod to the cylinder, they are disconnected as you already figured out with the help of a screwdriver and hands, first just disconnect all the lock washers or the plastic clamps and pull them by hand by the rod, disconnect it from the lock or from the cylinder, etc., but the rod is not always secured with the help of clamps, from time to time it gets hooked on one end to something, in this case, also disconnect its end with a screwdriver and then remove quite the rod itself), and thus remove all the rods from the car.
VAZ 2114 - replacing the lock cylinder and door handle
Test drives, reviews, repairs and almost everything else related to the auto topic.
Replacing the lock cylinder for VAZ 2108 2109 21099
In 2021, a new video hosting appeared that pays everyone for views, likes, and subscriptions. The channel is still damp.
2) After the rods are removed or disconnected from those things that you are going to replace, proceed to removing these things themselves, first we will analyze the removal of both door locks, the internal lock and the external one are removed together, in other words, if you decide to change the external lock, then for you and the internal one will have to be touched (You don’t even have to change the internal lock for a new one, but you’ll just have to tinker with it even if you only need to change the external one) and on the contrary, everything is the same, to remove the external lock you will need to loosen it with an impact screwdriver two screws that secure it (Please note, loosen, the impact screwdriver does not serve any purpose anymore, we advise you to completely remove the screws with an ordinary screwdriver) these screws are also indicated by arrows in photo 1, how the screws are turned out, go further and pull the lock, remove it from the car (see photo 2) if it is also useful for you to change the internal lock, then in this case remove the door opening handle (read how to do this in the article: “Replacing a window lifter on a car”, everything is described in Fri) and then Then climb into the inside of the door and use a screwdriver and your hands to disconnect the two rods (Those rods that you will need to disconnect from the internal lock are shown in the photo below under number 1), how the rods are disconnected, remove the internal lock and how it will be pulled out, start disassembling it, to do this, disconnect the lock washer from it using a screwdriver that strengthens the internal drive rod (see. photo 3, on it the lock washer is indicated by an arrow) and after that, disconnect the rod itself from the lock (see photo 4), disconnect the other rod in almost the same way, it is attached to the internal lock by a plastic retainer, you just need to move it aside and the rod can then be quietly disconnected from the lock; see the video clip at the end of the article for more detail.
Handle selection
General view of external door handles
Choosing a pen is quite simple, if you don’t take Euro pens. All spare parts of this nature are produced only by the manufacturer, or rather AvtoVAZ. So, let's look at the articles:
- 2109-6105180 – original catalog number of the inner door handle.
- 2108-6105177 – article number of the outer door handle.
Causes of malfunction
There can be several reasons for a door handle malfunction. So, the motorist himself can damage the element during operation, or outsiders can do it. Let's consider the main reasons why the product will have to be removed:
- Road accident . This is perhaps the most common reason. So, damage to the door will be a reason to remove the door handle. Also, damage to the external element can lead to such actions.
- Handle breakage due to wear . Usually, this is a breakdown of the plastic part, a break due to frequent opening or excessive pressure using brute force.
- Actions of third parties that led to the breakdown of the element.
Quality checking
Whether it be Lynx or European pens from another manufacturer, you definitely need to make sure of the quality of the products offered to you. There are some useful tips for this.
- Buy directly from good stores rather than ordering online. Today it is important to order many spare parts online. But the problem is that you won't be able to see or touch them until delivery. If we are talking about online ordering, check the reliability of this online store, read reviews about it, study the nuances of delivery and payment. The best option is to pay the courier on the spot. This way you can first look at the handles, and only then, if everything is good, pay for the order. Well, when you are in a regular store, there will be nothing difficult in studying spare parts in detail.
- Package. Surprisingly, it is important to pay attention to the packaging. Factory products must have barcodes, certificate marks, full instructions, a warranty, and so on.
- Content. If each pen is packaged in a separate bag, this indicates a responsible approach by the manufacturer. After all, the transportation process takes a lot of time, and you yourself know the quality of our roads. Constant shaking leads to friction between parts, which leads to scratches and damage. Separate packaging will prevent this from happening.
- Instructions. Good manufacturers provide detailed instructions for installing them along with Euro handles. There is nothing complicated about this, but the very fact of the presence of this instruction already speaks volumes.
- Quality. Alas, it cannot always be determined visually. Nowadays low-grade materials are so skillfully disguised that only laboratory tests can help you in some cases. As for European pens specifically, the best guarantee of quality is purchasing products from a trusted manufacturer. Such as Lynx, for example.
Varieties
The Lynx Euro pens have a factory designation, which determines the differences between the sets.
- IN 1. This designation indicates that the package contains four handles - two rear and two front. In this case, the front larvae do not have.
- AT 2. There are also four handles, a pair for the rear and front doors. Only here the larvae are present.
Which one should I choose? The question is purely individual. On the one hand, B1 have a solid, smooth structure that is not spoiled by key holes. For external tuning they are simply perfect.
The second option is preferable for those who value quality, visual appeal, but at the same time reliability. After all, the presence of a cylinder will give you the opportunity to open the car with a key if problems arise with the alarm or key fob.
Causes of malfunction
If the product begins to work incorrectly, the part must be repaired or replaced. Sometimes it is enough to carry out preventive actions to avoid a malfunction. Car enthusiasts tighten the bolts of the internal mechanism, lubricate or adjust individual elements. In any option, disassembly of the door is provided to gain access to the metal of the body. Reasons for dismantling:
- Defects found: scratches, abrasions, chips, microcracks.
- Required tightening of fasteners.
- It takes force to open the door. Insufficient adhesion to the body part was noticed.
- Adjustment required.
- There was a breakdown inside: the hardware came off, a gap appeared between the door and the handle, and the device began to wobble.
- Mechanical damage was detected.
- An intruder tried to open the car.
- Due to improper operation of the handle, the door does not close properly.
- The external manipulator is damaged.
- The body was deformed as a result of the accident.
If the cause of the breakdown is related to an accident, then preventive repairs will not help. The handle consists mainly of plastic. The material is durable, but not strong enough to withstand a strong blow.
When replacing an element, it is best to install a Euro handle. Once they were made only for foreign cars, but now they are available for domestic cars.
Preparatory stage
For repairs, a repair kit is purchased; it will cost around 800 rubles. It includes hardware, tools, an internal door handle for VAZ 2114, but the price may vary, it mainly depends on the manufacturer. Additionally, rods are purchased, equipment and premises are prepared. Tools:
- Phillips screwdriver;
- socket wrench;
- hardware;
- Silicone Grease;
- rags.
If you need products individually, it is better to contact a small car dealership. When purchasing, it is important to explain which door the part is needed for: rear or front, left or right.
The process of replacing the internal handle on a VAZ-2114
If the driver's door is being dismantled, it is important to take into account the presence of a central lock. The internal fragments are connected to the outer handle. In the event of a breakdown, the latch is changed, the procedure is carried out from the salon. Algorithm:
- The plugs are removed.
- The external bolts are unscrewed.
- The cover is removed.
- The panel clips are unfastened.
- The casing extends.
- Electrical wiring is disconnected.
- The handle extends.
- The panel is released.
- The internal screw under the handle is unscrewed.
- The euro handle is removed.
Now you can inspect the device, clean internal parts, repair or replace. Even a new mechanism must be lubricated with silicone.
Assembly is carried out according to the reverse scheme: fastening with internal hardware, connecting wires, returning the cladding, tightening external fasteners.
Adjusting the front or rear door
Setting up door cards is carried out in several stages. Experienced drivers take a comprehensive approach; they check gaps, re-adjust hinges, and inspect the locking and manual mechanism. There are several options for customizing the doors:
- Use a wrench to loosen the internal hinge screws. Tapping with a hammer is carried out so that the structure moves to the desired position. Then the fasteners are tightened back.
- To even out the gap, the hinge mechanism is also loosened in two places: top and bottom. The door needs to be raised/lowered by adjusting the height.
- The curvature of the metal can only be corrected by straightening.
- Adjusting the lock involves loosening the latch, then moving it up/down.
- The handle is being disassembled. If the internal screws are deformed, they are replaced.
When the door is in the correct position, the mounting bolts are tightened with a wrench. Then the functionality of the device is checked again.
Changing the outer handle
To dismantle and install a new device, you will need the same set of tools. No drilling instructions:
- The interior euro handle unwinds. The cladding panel is dismantled.
- The handle nut is removed, then the fastener holding the external object.
- The thrust rods and seals are removed from the closing mechanism.
- The handle is removed from the door opening. To do this, remove the nut and pull the handle to the side.
- The door niche and openings are cleaned of dust and dirt. Metal parts are treated with anti-corrosion agent and silicone.
Assembly is carried out in the reverse order: the product is inserted, the nut and bolts are fixed. It is important to ensure that the hardware is securely tightened.
Before assembling the decorative panel, it is recommended to check the functionality of the device. If there are any shortcomings, the mechanism is refined and adjusted.
Out of stock see availability in other cities
| Contents: 4 handles. | The set contains 4 euro pens. |
| Manufacturer: | DZA (Dimitrovgrad Automotive Components Plant) LLC, Dimitrovgrad |
| Vendor code: | 21140-6100040-20 |
| Name: | External door handle VAZ 2114 front set + trunk lock 21140-6100040-20 |
| Product from category: In categories: | VAZ body mechanisms |
| Availability: |
Pickup from a warehouse in Yekaterinburg
Payment upon receipt:
- Cash
- Transfer to card
- By bank card
- By invoice (for organizations with VAT)
Important. Before receiving the product, check its availability by phone or place an order on our website.
Delivery by courier in Yekaterinburg and nearby cities
- Payment in cash upon receipt of goods
- The cost of delivery within the city and nearby cities is 100-250 rubles
- Free delivery throughout Yekaterinburg for orders over 10,000 rubles.
- Please check with the RusAvto manager for delivery times and costs.
For minimum order and delivery costs, see the Delivery section.
| Minimum order | Cost of delivery | Free delivery from | |
| Ekaterinburg | 1000 | 150 | 6000 |
| Upper Pyshma | 3000 | 200 | 10000 |
| Berezovsky | 3000 | 200 | 10000 |
| Aramil | 3000 | 200 | 10000 |
| Revda | 5000 | 400 | 17000 |
| Pervouralsk | 5000 | 400 | 17000 |
| Polevskoy | 7000 | 500 | 26000 |
| Sysert | 7000 | 500 | 26000 |
| Novouralsk | 10000 | 600 | 34000 |
| Nevyansk | 12000 | 700 | 37000 |
| * does not apply to large spare parts and special goods. price | |||
Delivery by Russian Post
- Prepayment 30% of the cost of the goods (Cashless payment on invoice)
- The balance of the amount is cash on delivery upon receipt of your goods at the post office.
- Delivery services are paid by the recipient according to the current tariffs of Russian Post.
Why do we ask for partial payment in advance before shipping? In our practice, there have been cases when goods sent by cash on delivery remained for a long time in the recipient’s post office and were not picked up. We were forced to pay for storage and incur additional costs for returning unclaimed goods to our warehouse.
VAZ-2114 owners have repeatedly faced the problem of replacing a door handle. This process is quite simple, but people often get confused with it and, out of ignorance, damage the element itself or a neighboring one. The article will tell you how to replace a door handle from the outside without much effort.
Video about replacing the inside rear door handle (carefully mat):
The video will tell you about the features of replacing a door handle on a VAZ-2114, and will also tell you about the main subtleties and nuances of the process.
Installation
Installing Euro handles on a VAZ 2114 is a lengthy process. Get ready to devote a whole day to this issue. It is best to learn the disassembly and assembly sequence using visual videos.
The stages of installing euro handles are as follows:
- The door trim is removed. This is a rather lengthy task that can take up the most time among all other processes. Don’t forget, the casing still needs to be put in place later.
- There is no need to drill, saw or cook anything. The only exceptions are those Euro handles that are not intended for the VAZ 2114. They are adjusted, something is cut out. Complex and sometimes pointless tuning. Today there are many excellent Euro handles that fit perfectly on the “fourteenth” model without unnecessary manipulations during the installation process.
- Each new part is installed in place of the standard one.
- It is advisable to arm yourself with additional fasteners for the trim in advance, since an inexperienced car owner can damage them during disassembly or reinstallation. They are cheap, but can come in handy at any time when replacing Euro pens.
- After removing the old handles, be sure to clean the socket and treat the surfaces with polish. After this, proceed to install new elements. There is nothing complicated there if you remember the dismantling process well.
- The penultimate stage is reassembly.
- The process of installing Euro handles on a VAZ 2114 is completed by cleaning new accessories and putting things in order inside and outside the car.
Euro pens are a simple but effective way to look at your car differently. Initially, it seems that installing such elements will have little effect on the appearance. But after installation you realize how different the car looks. Such a small accessory has a very positive effect on the VAZ 2114. This is a good and fairly simple type of tuning.
Replacement of all door locks, rods and cylinders on VAZ 2113, VAZ 2114, VAZ 2115
The door consists of a cylinder, a rod, an external lock, an internal lock, etc., thanks to which the door of the car is kept in place while moving, preventing it from opening; over time, the locks or the cylinder itself become unusable and when inserting the key into the cylinder, turning it in it, the door may not open or not close, this will indicate that either the cylinder, or the rod, or the internal lock has become unusable and it’s time to change them, this is not very difficult to do and Even an ordinary car owner can cope with this if he does everything carefully and follows the instructions that we outlined in this article.
The process of replacing the internal door handle on a VAZ-2114
One of the simplest operations is replacing the door handle from the inside. So, motorists often figure out what needs to be done.
Broken interior door handle.
But, nevertheless, we will describe the complete technical replacement process:
- By prying and pulling with a screwdriver, we remove the door handle trim.
We remove all elements including the handle trim.
We remove the door card.
Disconnect the drive rods from the handle.
We install a new handle and attach the rods.
Exterior door handle replacement process
Many car enthusiasts think for a long time about how to approach the replacement process, but everything is much simpler than it seems at first glance. To determine the fastening method, just look at the technical documentation, where you can clearly see that the door handle is attached inside.
Based on this, one can logically guess that in order to remove the outer door handle, it is necessary to dismantle the door trim. Next, the process will follow the same pattern:
- When the casing is dismantled, remove the thrust rods from the handle lock.
Remove the door handle thrust rods from the frame
Unscrew the screws securing the rods
Unscrew the fasteners and remove the handle
How to install Euro handles “Lynx” on a VAZ 2115?
- The first step is to remove the door trim; underneath there are rods and handle fasteners that we need to replace. To do this, unscrew the screws holding the “pocket” and turn off the power to the speaker and power window buttons.
- Next, we pry up the plastic cover of the door handle and remove it in order to unscrew the screws securing the handle and door card.
- Then we pry up the plastic body of the handle that opens the door and take it out.
- Remove the plastic trim for adjusting the rear view mirror, then carefully pry up the door card and remove it.
- We remove the protective curtain and proceed to dismantling the rods and the external door handle. Using a key “8”, unscrew the nut securing the handle inside the door on the driver’s side, as well as the second nut located on the edge of the door in the area of the seal.
- Now you can remove the rods. I’ll say right away that many people have a lot of difficulties with this, since the space inside the doors is limited and working there is not entirely convenient, but if you get used to it, you can deal with it quite quickly. Using a screwdriver, pry up the plastic tips and remove the rods that do not allow the handle to come out.
How to remove the door handle of a VAZ 2109, 2114.
So, we'll start by removing the door card. To do this, unscrew the pin that closes the door from the inside. Next, we take out the plugs from the door handle and unscrew the bolts that secure the handle.
Now, perhaps, the most difficult thing that will have to be done, and at this stage many people have a question about how to remove the window lifter handle of the VAZ 2109, 2114. To do this, take a thin, narrow minus screwdriver. We insert it between the latch and the washer and carefully press out the jammed handle latch. Next, pull it towards you and take it out completely.
I hope the photo makes everything clearer.
We unscrew the bolts securing the door card from the bottom (if you have a VAZ 2114 with electric windows, then unhook the pads from the window buttons) and take out the rubber seal from the top. Remove the decorative trim of the interior door handle by prying it off with a screwdriver or knife. Now nothing prevents us from removing the door trim and pulling it out from the bedbugs.
We pull out the rods coming from the handle lock and from the handle itself. It is more convenient to do this by grasping the plastic part of the rod with pliers. Or you can try to pry them off with a screwdriver.
The handle is held on by two nuts. We unscrew them and pull out the handle.
What are Euro pens
Factory door handles for the VAZ 2114 are not particularly convenient or beautiful in design. Euro pens are an excellent replacement for them. They are called that because the idea of design and operating principle was taken from Western automakers. Such handles have long been used on many cars of European brands.
Opening the door with their help is very simple; you do not need to press the lever under the handle, as with the factory solution. To open, just pull the handle itself and the mechanism will work, after which it will return to its original position.
This principle of operation allows the Euro pens 2114 to look quite attractive and minimalistic. They do not have any protruding elements, buttons that need to be pressed or levers that need to be pulled. The lock cylinder is installed in the handle (in VAZ 2114 euro handles for front doors) and that’s it, the rest of the mechanism is hidden and cannot be detected at first glance.
Most often, car enthusiasts prefer Euro handles for the VAZ 2114 Lynx. Compared to other kits, they are painted in body color, have a fairly nice appearance and are quite reliable. The mechanism itself has been working without problems for more than three years, but the paint on them is susceptible to high-pressure washing and loses ground earlier, with frequent washing.
But in general, the manufacturing quality of these handles is very high and even higher than that of the factory version. Often, the installation of Euro handles on a VAZ 2114 is carried out after the standard ones have broken down.
Also, Euro pens “Lynx” can be presented in two sets to choose from, marked B1 and B2, they mean the following:
- B1 – in this kit the front handles do not have key lock cylinders.
- B2 – in a box with this marking, the front handles are with larvae.
Everyone makes the choice between them themselves, someone needs the most beautiful appearance, then your choice is box B1, the absence of lock cylinders gives a cleaner bow, there is no pit and no shiny metal part, to which the eye immediately clings.
B2 provides greater reliability, if suddenly something happens to the car alarm or the battery runs out, access to the car can be obtained using the key, unlike the B1 version, where in this case you will have to climb into the car through the trunk.
Handle selection
General view of external door handles
Choosing a pen is quite simple, if you don’t take Euro pens. All spare parts of this nature are produced only by the manufacturer, or rather AvtoVAZ. So, let's look at the articles:
- 2109-6105180 – original catalog number of the inner door handle.
- 2108-6105177 – article number of the outer door handle.
Causes of malfunction
There can be several reasons for a door handle malfunction. So, the motorist himself can damage the element during operation, or outsiders can do it. Let's consider the main reasons why the product will have to be removed:
- Road accident . This is perhaps the most common reason. So, damage to the door will be a reason to remove the door handle. Also, damage to the external element can lead to such actions.
- Handle breakage due to wear . Usually, this is a breakdown of the plastic part, a break due to frequent opening or excessive pressure using brute force.
- Actions of third parties that led to the breakdown of the element.
