Replacement of the rear bumper for Renault Logan 2
The rear bumper consists of a decorative trim, an energy-absorbing element and a reinforcement. As a rule, only the outer decorative trim is deformed from a slight impact, which can be replaced separately.
It is more convenient to do the work with an assistant.
1. Prepare the car for work.2. Remove the mudguards of the rear wheels and unscrew the bolts securing the bumper trim (see here).3. Using a TORXT30 wrench, unscrew the five screws of the upper fastening of the rear bumper trim (the two right screws are located symmetrically to the left).
4. Using a 10 mm wrench, unscrew the three bolts of the lower fastening of the rear bumper trim.
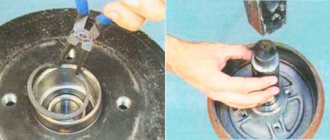
5. Remove the left rear light (see here).6. Use a slotted screwdriver to pull out the holder lock.
. and extract it.
7. Disconnect the left side of the bumper trim from the side holders.
8. We perform similar operations on the right side.9. Remove the bumper trim-10. If necessary, remove the energy-absorbing element of the bumper amplifier.
Renault Logan rear bumper replacement
Hello. In the last post we changed the front bumper, today we will tell you how to replace the rear bumper on a first generation Renault Logan.
- Torx T30, T20
- jack
- wheel bolt wrench
- spatula for clips
- knob
- head ten
- extension
Step-by-step instruction
1. Using Torx T30, unscrew the three upper screws securing the rear bumper.
Do not unscrew the middle screw all the way, then you will understand why.
2. Jack up and remove the rear wheel.
Using Torx T20, unscrew the four screws that secure the mudguard to the rear bumper.
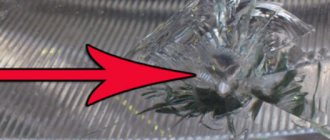
Using a spatula, we pick out the two clips that secure the fender liner and unscrew them by hand. Next, move the fender liner to the side to gain access to the bumper mounting bolt.
In the photo the clips have already been removed
Unscrew the bumper mounting bolt with a 10 mm socket.
After unscrewing the bolt, pull the edge of the bumper away from the latches towards you.
We carry out this procedure on both sides.
3. From the bottom of the bumper, unscrew the three bolts using a ten-point socket.
4. Press on the ear on the right and pull down the license plate light. Move the ear aside and remove the power connector from the lampshade.
5. Unscrew the screw that you left in the first step of work and remove the rear bumper of your Logan towards you.
We carry out the necessary work and install everything in the reverse order.
Reasons for sagging rear bumper Renault Logan
1. It is important that the bumper guides are in place.
2. Make sure that the side bumper holder is in place. The clips on them often break off and then it stands crooked.
The latches on the holder itself also break off.
The side holder affects the rear bumper clearances on the sides.
3. Well, probably the most common problem is problems with the gap under the rear lights. To eliminate a large gap, you need to place pieces of rubber along the edges of the lower rear bumper mounting strip. When you tighten the three lower mounting bolts, the bumper will rise due to the rubber, it will prop it up. It is better to add rubber after putting on the bumper.
Rubber must be placed in the marked places Gap after the rubber backing
Video lesson
Down with the shields
Remove the shield installed on the left. It is mounted on self-tapping screws, as well as on two pistons (see photo).
Find five fasteners
For self-tapping screws you need a Torx T20 key. You will also need a flathead screwdriver. It’s better to do the work from a hole, but craftsmen remove the bumper from the curb; Logan’s ground clearance allows you to get to the fastenings without a lift.
The spacer screw is unscrewed from the middle (central) piston, but not completely, but by 2-3 turns. The piston is pulled down by the head of the screw, and nothing else is required. The second piston, located on the edge, is pressed out with a screwdriver (see photo).
Screwdriver – between the shield and the body
The simplest thing left is to unscrew three self-tapping screws. Take a Torx wrench and you'll be fine.
Dealing with the fender liner from the edge of the bumper
Near the bumper on each fender liner there are two self-tapping screws. A Torx T20 key will help solve the problem. And then the most difficult thing begins - you will need to bend the fender liner!
Bumper function on Renault Logan
This element of a modern four-wheeled vehicle has two main functions:
- Protective;
- Aerodynamic.
In the first case, this part of the car protects the vehicle from minor damage, which occurs much more often than serious road accidents. It is much easier to replace the front and rear bumpers of a Renault Logan car with new elements than to correct other, more serious damage to the car, for example, deformation of its body during an unauthorized collision with something.
The second function of this element is no less important - specially created shapes increase downforce, which allows the car to behave better at high speeds, and also prevents the formation of a vortex flow behind the car while it is moving.
Reasons for dismantling
The reasons for dismantling the front bumper on a Logan are known to almost everyone, but they all contribute to learning how to dismantle body parts yourself. Let's consider what pushes the owner to perform this simple operation:
- Part damage. This can happen due to an accident or deformation when reversing.
- Another reason may be that the bumper itself was not damaged when damaged, but the rear panel was either deformed and requires restoration.
- Painting the body, when it is carried out comprehensively, also requires removing the buffer.
- Tuning or upgrading the rear bumper will also require dismantling the part.
- Installing accessories such as parking sensors will force the owner to remove the buffer.
- Other reasons.
There are not many reasons for removing the bumper; this is usually done after road accidents that caused damage to the part.
Basic information about the bumper
The bumper is an energy-absorbing device of any car in the form of a bar. It performs the function of protecting the car from severe damage during minor road accidents . This is an integral part of the body, which must perform not only a protective function, but also look harmonious. Such harmony is achieved thanks to modern materials. Most often, the bent edges of the bumper serve as spoilers, which increase downforce and prevent the appearance of a vortex behind the edge.
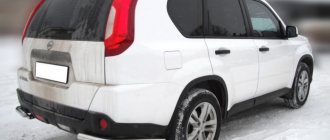
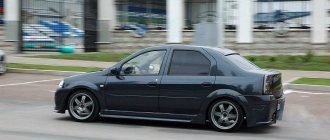
Rear bumper Renault Logan
Procedure for removing and replacing bumpers
Removing and replacing parts like the front bumper:
- We unscrew the three screws that secure the front bumper and the lower part of the engine mudguard (on the right);
- Unscrew the two lower sections of the mudguards (left);
- We disconnect one piston at a time, which fastens the bracket to the body;
- We unscrew the 3 screws that are fixed to the front fenders and the body in the front wheel arches;
- Unscrew the 4 screws that secure the casing to the car radiator frame;
- Unpin it;
- Install the new front bumper in reverse order.
Removing and replacing parts such as the rear bumper:
- Disconnect the piston that secures this part;
- Remove the wheel arch liners;
- On both sides of the car, unscrew two screws that secure the fastening to the rear fender liners;
- We unscrew one screw at a time that secures it to the rear wheel arches;
- Open the rear trunk and unscrew the 3 screws in the trunk opening, which provide external fixation;
- Unfasten the rear bumper;
- Install the new bumper in the rear.
Eliminating sagging front and rear bumpers
What to do if the front bumper is sagging?
To eliminate sagging, it is necessary to make two additional fasteners of the desired shape in advance. Aluminum corners are great for making them. After making the fasteners, you need to remove the front bumper. Next, adjust and install them; if necessary, you can cut off the original plastic mount. After this, install and assemble the front bumper.
Quite often, car enthusiasts are faced with the problem of sagging rear bumper of Renault Logan. It does not need to be removed to perform this procedure.
So, the algorithm of actions:
- Unscrew the upper screw of the wheel arch;
- Unscrew the bolt that is attached to the wing;
- Unfasten and replace the bolts that secure it to the M8;
- Remove the white pins that hold this trim;
- Correct the holes and replace the pistons with bolts.
Self-recovery
Of course, it is easiest to repair an unpainted bumper. In addition, scratches on it are almost invisible, so basically only large defects such as cracks are eliminated. One way to restore a bumper is gluing. To do this, you will first need glue and sandpaper. You can purchase a repair kit that includes, in addition to these components, a hardener.
Most often, bumpers are glued with epoxy glue, but Renault Logan owners say that this substance does not interact well with the plastic of the bumper, so they recommend additionally reinforcing it with fiberglass in several layers.
Work begins by treating the damaged area with coarse sandpaper, after which it is degreased. Then, glass fiber fragments pre-impregnated with epoxy glue are placed on the crack, one on top of the other, taking breaks for the polymerization of each of them. In addition, each layer of material must be sanded with sandpaper after polymerization.
Each next layer should be 30-50% larger in area than the previous one. Instead of fiberglass, you can use a plastic or metal mesh to strengthen the bumper, securing it on the back side. The plastic mesh is soldered, and the metal mesh is heated and pressed. If the bumper is painted, you will need to paint it afterwards. A simpler repair method is to staple the crack together.
As you can see, the work considered is very complex and lengthy, so it may be more advisable to replace the bumper with a new one. Moreover, replacement is a simple procedure, and the cost of a new part is not much higher than the cost of materials that will be required for repairs.
How to remove the front bumper
The process of removing a body part on a front-wheel drive Renault Logan is performed in the following sequence:
- Remove the underbody protective element; it is integral with the front bumper. To dismantle you need to unscrew the screws. 3 on each side. An alternative option is to remove two fasteners. In this case, the protection is removed along with the body part.
- Separate the body kit from the fender liner. The procedure is performed with a flat screwdriver. The clips, clamps, bracket and pistons are pressed out one by one. Using a T20 Torx wrench, you need to unscrew two screws near the right and left wheels.
- After completing the previous step, the fender liner will need to be moved slightly to the side. This must be done carefully, as there is a high risk of cracks. After completing the operation, the lower mounting bolt of the body kit becomes noticeable. The head is “10”, it needs to be unscrewed. Similar actions are performed around the other wheel. After dismantling the fasteners, the ends of the element are removed from engagement by lightly moving to the side.
- Unscrew the three lower mounting screws that are located at the front, at the bottom of the car. The procedure is performed with a Torx T30 key.
- Now, in order to remove the front bumper from a Renault Logan car, you will need to remove four more fasteners. They are located directly under the hood of the vehicle and are unscrewed using Torx T30.
- The completion of the operation to replace the front bumper on a Renault Logan car is the removal of the body kit. To do this, you need to grab the edges of the element and pull it slightly towards you.
Plastic clips and fasteners on Renault Logan 2 are quite fragile. You need to be especially careful when removing the body kit, otherwise this part will need to be repaired or replaced. In addition, if it is equipped with fog lights, they must be disconnected from the central electrical connector located in front of the left wheel in the lower part of the body. The procedure is performed before dismantling. In this case, you need to remove the terminals from the battery, thereby completely de-energizing the vehicle.
Removal process
First, you need to decide on the location of the repair. To do this, you will definitely need a pit or a lift. Next, we drive the car into place. It is worth understanding that dismantling will take from 45 to 60 minutes, depending on the abilities of the car enthusiast, as well as his skills and abilities.
So, let's look at the step-by-step process of removing the part:
- First of all, you need to remove the fender liners from the bumper. Using 10mm sockets, unscrew the screws securing the rear part of the fender liner on the right side, and then on the left.
- There are screws under the fender liner that secure the bumper to the body. They need to be removed.
- The next difficult step is dismantling the lights. Without this, it becomes impossible to remove the bumper.
- We unscrew the screws that secure the bumper to the amplifier.
- Between the sealing rubber of the trunk and the bumper there are 4 screws that need to be removed; they secure the buffer to the rear panel.
- Carefully, using a plastic screwdriver, remove the side parts of the bumper from the clamps.
- Press the edges of the front part of the rear bumper away from the fender.
- With a slight downward and backward movement, we dismantle the buffer.
- Assembly, as always, is carried out in reverse order.
Now the bumper is removed, and you can carry out the remaining manipulations.