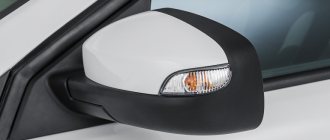
The side rear view mirrors of the Lada Priora are made with high quality construction, but over time they begin to cause discomfort to the driver - they rattle and freeze in the cold. In addition, they can be supplemented with duplicate turn signals. If you have such an idea, then you will have to disassemble the mirrors. And now we will tell you how to do it correctly.
Disassembling a mirror on a Priora
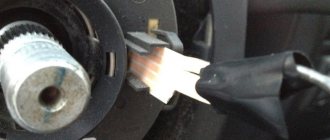
First, remove the entire mirror structure. To do this, unscrew several mounting bolts in the interior. Once removed, place a flathead and Phillips screwdriver nearby, you will need them later. Press down on the bottom of the mirror. This is necessary in order to create a gap between the top of the mirror and the body. Take a flathead screwdriver and insert it into this slot. There are fasteners there that need to be unfastened. After the glass is freed, disconnect the wires from it.
That's not all. There is an element inside that allows you to adjust the mirrors. It must be removed by unscrewing several bolts using a Phillips screwdriver. Let us remind you that in the previous article we told you how to change the oil in a Priora engine with your own hands.
Disassembling the LADA Priora mirror - video
Now you have the space and opportunity to improve your side rearview mirror. You can put foam there to eliminate rattling when driving, you can cut holes and insert turn signals, or you can install a heating element that will allow you to see the situation behind the car even in severe frost. Some go further, paint the mirror body in a variety of colors, and tint the mirror itself. This is not an absolute necessity, but if you want to do this, please do so. Fantasy is limitless, the main thing is not to break this element, as it is very important for your safety when moving.
How to disassemble the rear view mirror on a Priora
Lada Priora hatchback Snowball ›Logbook› How to first disassemble a mirror (via email)
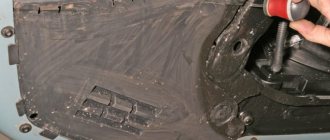
I think it will be useful for many to have my photo report on how the mirror is processed. It all started with the fact that these mirrors crackled when the music was turned on. The doors were glued together with noise. And I got that bounce. It turns out that without knowing it, you can easily break the mirrors when disassembling them.
1. The handles are deflected from the bottom of the mirror A space appears at the top. You need to insert a screwdriver into it, see photo
2. Inside there are latches with which the mirror is attached to the electric drive.
They should be carefully bent with a screwdriver, then the mirror will separate from the base of the drive.
Then I unscrewed all visible bolts and completely disassembled the mirror
to get to the locking spring, he decided to tighten it with a nut. the breakdown probably resulted from its weakening.
And just in case, I put a noise between the mirror connection and the mounting base.
Removal and complete disassembly of LADA Priora mirrors
Detailed description of disassembling the mirror
motorized and heated, how to remove mirror element and overlay.
how to disassemble the Lada Prior mirror
Video review of self-service mirror element on the exterior mirror rear view
Everything was then reassembled and placed back into the water.
The idea is to add repeaters to these circles, like in the kits
Only in combination with electrically adjustable seat with memory buttons*.
The rear view mirrors tilt down, allowing the driver to see, for example, the edge of the road when parking.
Engage reverse gear and press the L or R button.
Please note that you may need to click the button 2 times if the button has already been selected. When the rearview mirror is tilted, the button flashes. When reverse gear is switched off, the rear view mirror automatically moves approx. after 3 seconds, and returns to its original position after about 8 seconds.
Standard side mirrors - article number and price
For the Lada Priora car, standard parts with electric drive have catalog number 2170-8201017. Price – about 3,100 rubles per set.
Compared to the SE version, they have one design disadvantage. The surface area does not completely cover the mirror, which can also be “usefully” occupied. This shortcoming was corrected with the SE, where the mirror elements were actually made larger.
Heated mirrors on the Priora received a larger mirror element. Thanks to this, the driver does not have to lower them when reversing – even this difficult-to-reach area is visible. For the SE version, repeaters were added to the mirrors. Priora with electric drive, repeater and heating (catalog number 2170-8201021, price - about 3,800 rubles per set) was much more expensive than conventional versions.
Basic faults
Additions to the conventional mirror element make driving even more comfortable. Just in case, the repeater makes it clear to inattentive traffic participants where the driver is going to go. Heating will promptly evaporate moisture - raindrops, and will not leave stains that distort the image. The following malfunctions may occur during operation of the machine:
- The fasteners have become loose. Each part is held in place by several fasteners at different points. They may become so loose that tightening them will be useless. Everything will depend on the severity of the damage. In some cases, replacing the fasteners will be sufficient.
- The heating does not work. Check the connection of the wire blocks. Perhaps it is enough to strengthen the wire connections so that they no longer come loose.
- The electric drive does not work. Adjusting the position of mirror devices while sitting in your seat is much more convenient than doing it manually. Check the wiring.
- Turn signal repeater. If the repeater does not work, it means the signal is not reaching it. The problem, again, is the wiring.
- Broken mirror element. It will be enough to replace it with a new part, but during the replacement you should be extremely careful. It is important to prevent splinters from getting under the cover.
The process of tensioning the timing belt “from start to finish”
We perform all operations on a cold engine. Let's say the belt is now being replaced and the nut on the roller is not tightened. Then just skip "step 1":
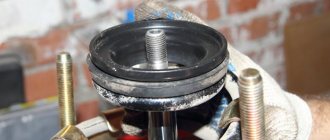
- We take a crocodile clip for the battery and fix the belt on the pulley. Then use a 17mm wrench to loosen the nut (see photo).
- We screw an M8 pin into the threaded hole next to the roller. We screw two nuts onto it. We put a plate on the roller and set the force with a dynamometer - exactly 4 kgf.
- The inner nut on the stud should touch the plate. Screw another nut on top, securing the plate in place.
- Taking the key “17”, tighten the nut on the roller. Recommended force – 33.2-41.1 N*m.
- All that remains is to remove everything unnecessary - the plate and the pin.
On a VAZ-2112 engine, the timing belt tension depends on the force applied to the adjusting key. The force should be 2.0 N*m. And our distance from the axis to the “ear” is 51 mm (see below). Multiply 0.051 by 39.2266 (4 kgf in Newtons) and you will get what you need.
Plate drawing
The plate shown in the drawing is made from steel 2 mm thick. The pattern must be made based on the characteristics of the bending equipment. When bending, the length decreases, which means that the dimensions of the pattern will be larger than 94x75 mm.
Threads for M4 screws are cut in the standard way. Each screw should protrude 7 mm beyond the plane.
How to remove an old mirror element
Everything here is done, although not complicated, but quite neatly. If you rush and make excessive efforts, you can damage the internal fasteners of the element, and then you will definitely have to buy the entire part assembled.
First, we remove the mirror assembly from the car, and only after that can we begin the repair. Then we move one side of the mirror element as far as possible to the side so that you can get inside this structure with a screwdriver.
Now, using a screwdriver or by hand, if you were able to insert it there, we move the element latches to the side, as is clearly shown in the photo below.
The latches are located along the entire circumference, so you need to unlatch them from all sides. After which this part can be easily removed with minimal effort on your part.
To see what the design of this fastener looks like, look at the picture below.
In addition to the hooks (clamps, latches), there are 4 more guides that must match the holes in the case when installing a new element. The new one is somewhat easier to install than it is to remove, so there shouldn’t be any special problems with installation. The main thing is not to use excessive force when fixing the element, and try to press the element itself as evenly as possible so that it does not break.
The price of a new such part for Grant is about 300 rubles, and as mentioned above, it is much cheaper than buying an assembled mirror. There are a few more points that relate to replacing the mirror element:
- the design can be electrically driven
- the element may be heated
Search
Choosing a mirror in Kalina
Kalina mirror often requires replacement. This is justified by the difficulties of the first years of driving and the desire to install a more beautiful part.
Replacing a side mirror is not a complicated process; it is important to be careful and follow a certain method
How to make a worthy choice?
Exterior mirrors are one of the most important and important parts of a car. Without them, it is impossible to look at the situation and move along a busy highway. Side view mirrors often require replacement, which is explained by their greatest “trauma” while driving. Before starting work, you need to choose a balanced version of the mirror part. This could be a similar or more sophisticated mirror in Kalina. If you're having trouble choosing, you'll need to familiarize yourself with the basic setup mechanisms.
There are the following types of mirrors:
Ease of use depends on the choice of mechanism. The articulated mirror element is the most common type. Almost all modern cars do not do this.
The lever control is based on a joystick or lever located inside the cab and is pulled to the side by a narrow cable.
Electronic mirror element. this is a modern mechanism. It is found in new cars equipped with many additional features. Its implementation. comfort and safety.
Main advantages of the electronic mechanism:
- increased appearance;
- anti-glare coating;
- heating;
- Built-in double turn signal.
How to remove
and disassemble the side mirror
by car Lada
Kalina
.
replacing the mirror element with an exterior rear view mirror from Kalina, Grants and Priors
Video review of the self-service mirror element on the external rear view mirror of such cars
Heated mirrors. These are modern developments that simplify the life of every motorist. Increased visibility allows you to better navigate city roads. This option reduces the likelihood of accidents and increases the chances of noticing a dangerous moment. Lastly, the clarity and appearance of this item is much better than the standard part.
The anti-reflective coating on the viburnum mirror allows you to reflect both the sun and bright light. The anti-glare effect ensures good visibility while driving.
Heated mirrors. this is a convenient option. Thanks to this, you don't have to remove snow and ice from the glass. This is a very nice and convenient addition. Finally, there is a built-in signal repeater. This Lada Kalina Mirror element allows everyone to know the traffic about future maneuvers. Which simplifies the trip and makes it safe.
When choosing the best mirror element for Lada Kalina, personal preferences should be taken into account. Of course, do not forget about convenience and safety.
Reasons for replacement and the process itself
Replacing a mirror on a Lada Kalina may be required in the following cases:
- in case of damage to the mirror element, due to a stroke or a decrease in temperature;
- if you want to improve your car;
- in the absence of “parts” (as a result of theft).
How to change a mirror yourself, and what is needed for this? If you have a little skill, you can get the job done easily. The main thing is that you need to consider, disassemble and install it yourself
this is caution. This will prevent damage to the new element and damage to the car body.
When removing an item, you need to unscrew it as much as possible. A gap between the part and its body will indicate this process. In this matter, the main thing is not to damage the motors of the elements. The design itself can be carefully unscrewed with a Phillips screwdriver. It must be unscrewed from the car body and disconnected. The question of how to disassemble a mirror is closed. The next step is to install the new element.
The mirror element itself is located in the center, where it is securely secured with latches. The main thing is that he corrects himself correctly. Apply force and press on the part itself. The side member is then bolted to the car body.
The process is not complicated, the main thing is not to damage the gaskets on the viburnum samples and not to spoil the mirror element yourself.
Post Views: 2
How to properly remove the outside rear view mirror on a Niva Chevrolet
To see it, you need to pull the handle towards you; it is located at the very top of the plastic insert on the door card. After removing the trim, you need to use a screwdriver to pry off the decorative trim from the inside of the door, which is held in place thanks to plastic clips. After these manipulations, you can gain access to the mounting screws.
Before unscrewing the screws, you need to disconnect the pads that supply power to adjust them. We unscrew several screws that are located on the door body to remove the mirror on the Chevrolet Niva with a decorative trim, thanks to which the mirror bracket is attached.
We disconnect the mirror and save the gasket that is located between the door and the bracket. Assembly and installation involves removing the mirror on a Chevrolet Niva in the reverse order, you need to do everything carefully as the structural elements are quite fragile.
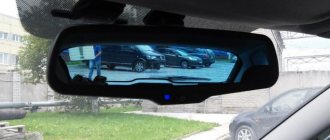
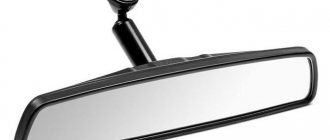
Removing a mirror from a pre-restyling car In cars of early years of production, the interior mirror is attached to the roof with two screws.
Replacing the right side mirror. Niva Chevrolet Replacement of the right side avtoremont The price and type of fastening depends on the year of manufacture of the car. Now we are theoretically savvy, we will remove the mirror on the Chevrolet Niva and try to repair them.
We remove the rear view mirrors on a Chevrolet Niva ourselves. Removing the mirror on both the left and right sides is quite easy. To do this, you need a set of screwdrivers, pliers and half an hour of time. The mirror could be removed faster, but due to the special location of the contact blocks for the adjustment and heating drive, you will have to disassemble almost the entire door trim. Let's be patient and get started. We unscrew all the screws that secure the door card to the door trim.
Unscrew the screws securing the armrest. We send: We remove the speaker and handle.
Glass and rear view mirror on a Chevrolet Niva
After a good mileage, the mirror folding mechanism may rust and then you will also have to dismantle it. Mirror design Structurally, both mirrors consist of: The price of mirrors, depending on the manufacturer, will be from 2.2 to 2.5 thousand per piece.
GM mirror How to disassemble the Asus power supply How to disassemble the power supply from an Asus laptop Video lesson on disassembling and assembling a laptop power supply Step-by-step method for disassembling the power supply from an Asus laptop Many of us have encountered removing a mirror on a Chevrolet Niva with such a problem as the lack of a charging process on the laptop. This can be caused by various factors.
Woah, this can be caused by a broken socket on the very B remove a mirror on a Chevrolet Niva while the presented technical center has a special price for work on replacing timing chains details. Z32SE, for Chevrolet Replacing the Wheel Bearing on Niva Replacing the hub bearings We carry out the work on an inspection ditch or a lift.
Removing the door trim
To gain access to the elements that fix the mirror, you first need to remove the door trim.
The sequence of actions is as follows:
- Removing the key blocking the lock.
- Removing the plugs.
- Sequentially unscrew the screws and screws holding the upholstery.
- To remove the upholstery, you need to insert a flat-head screwdriver wrapped in electrical tape into the groove between the upholstery and the door panel (but it’s better to use a special device). The clamps provide some resistance, but significant force during dismantling is unacceptable.
- The rods of the locking mechanism are removed, the upholstery is moved back to a distance limited by the length of the wires supplying the lifts.
- The wiring is carefully removed, after which the door trim is also dismantled.
Dismantling process
You can limit yourself to a minimum set of tools; the main rule of work is caution and precision in the application of effort. Excessive load should be avoided, as it can aggravate the problem and cause new damage and deformation.
Excessive load should be avoided, as it can aggravate the problem and cause new damage and deformation.
To begin with, you need to disconnect the mirror directly (the procedure is not necessary), for which you remove the lock located on the pillar on the interior side. First, the upper fastener is loosened, and then the two lower ones.
After this, the screws holding the mirror are unscrewed and the wires that provide electrical control of the mirror are disconnected.
For heated mirrors, the wires responsible for supplying electricity to the heating device are also removed. They must first be disconnected from the heating coil. For subsequent connections, soldering is used.
The next set of actions looks like this:
The mirror element is retracted to its extreme position, which creates a small gap.
A flat-head screwdriver is inserted into the gap, and with light force the fixing parts are moved to the side.
- The latches are located around the entire perimeter, which needs to be taken into account.
- The mirror element is removed and replaced with a new, undamaged analogue.
After the new mirror sheet is installed, assembly is carried out in the reverse order.