Side rear view mirrors and interior mirrors are mandatory installations on any car. At the same time, the side mirrors protrude somewhat relative to the body, as a result of which they often break due to minor accidents.
Also, the side mirror can be heated, electrically adjusted, etc. During operation, such solutions fail, which requires replacement or repair of the side mirror.
In such a situation, a side mirror will be required:
- remove from the car (the fastenings are unscrewed);
- remove the mirror element and disassemble the housing;
- replace or repair damaged elements.
It is important to know how to remove the side mirror, as well as how to disassemble the side mirror correctly. Read more in our article.
When do you need to remove the side rear view mirror?
Side mirrors on different cars differ in shape and size, and may have limited or expanded functionality. In this case, the main function is the ability to control the situation around the car.
Modern cars have heated and electrically adjustable mirrors, and quite often an additional turn signal is integrated into them.
Such “electronic” and “mechanical” solutions in mirrors usually fail over time. Also, we should not forget about the traditional breakdowns of the side rear-view mirrors (for example, in a parking lot or as a result of minor accidents).
It often happens that during long-term use it becomes necessary to paint the side mirror after damage from flying stones, etc.
Repair or replace
So, why is it better to repair a broken side rear view mirror rather than buy a new one:
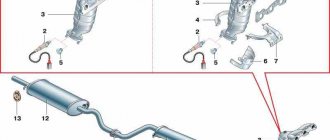
Side mirror mounting diagram
- Original spare parts are very expensive. Of course, if your car is a product of the domestic automobile industry, then there is no need to worry, but owners of foreign cars will be in for a little shock. In addition, mirrors are often sold in twos, which means the amount will double.
- If your car was manufactured abroad or is simply considered a rare model, then you could wait months for a new side view mirror to arrive. The fact is that these parts are not the most popular, so they are usually sold to order.
- If you decide to buy a new spare part, you will need to spend a lot of time on this. First, you will go shopping in search of a mirror, then you need to go to a service station for a replacement. This can also be supplemented by selecting a suitable paint tone and finding a place where you can paint it correctly.
How to remove a rear view mirror
First of all, replacing a side mirror is not always necessary. As a rule, only individual elements are changed or the mirror is repaired. As part of the repair, it may be necessary to replace the mirror element, restore the heating or adjustment functions. However, if the side mirror is severely damaged, then a complete replacement is performed along with the housing assembly.
To remove the side mirror:
- it is necessary to reset the negative terminal from the battery (if there is heating, turn signal indicators and other solutions in the mirrors);
- then you should open the car door;
- then remove the handle for changing the mirror angle (if there is a mechanical adjustment);
- then you will need to locate the mirror mounting bolts and unscrew them.
Typically, such bolts are covered with a decorative cover (removable with a plastic spatula or screwdriver); Please note that during disassembly, if there are rubber seals under panels, trims and other elements, you must carefully remove them, since it will be difficult to find new seals to replace. - Having unscrewed the mirror mounting bolts, do not rush to remove the mirror itself, as you need to remember the position of the cables, connectors, pads, etc. (for example, electric mirrors);
How to secure and how to glue a new one
First we need to decide on the glue that we are going to use.
The main rule: the glue holding the interior mirror to the windshield must be two-component. Yes, there are many varieties of all-purpose glue. But in this case, universal glue will not work. The fact is that two-component glue perfectly withstands sudden temperature changes, high humidity, and most importantly, vibration. Conclusion: the mirror element should not be glued with universal glue.
There is a second option: use light-curing glue. This is a substance that quickly “sets” when exposed to sunlight. This glue can be purchased at specialized auto stores. But it has a serious drawback: to work with it, a powerful ultraviolet lamp is required, without which reliable bonding cannot be achieved.
To keep the mirror securely on the windshield, you must follow the following algorithm:
- Select the location for installing the mirror. It should be glued in the center of the glass, at the same distance from both the passenger and the driver.
- The windshield is cleaned of dirt. First, this is done with a rag, then the surface of the glass is wiped with alcohol.
- The mirror is disassembled as indicated above (after all, in fact, only the bracket on which the mirror will be installed needs to be glued to the glass).
- A thin layer of glue is applied to the bracket and to the windshield.
After this, you must wait at least 15 seconds. Glue is applied to the interior mirror bracket - Then the bracket is installed on the windshield and lightly pressed down manually (and if you decide to install the mirror entirely, without disassembling, then after installation it must be additionally secured with tape, which will support the mirror until the glue sets).
The interior mirror is glued to the windshield - The glue must dry properly, so you cannot drive the car for 24 hours.
If you have successfully dismantled the mirror yourself, then returning it back will not be difficult. As a rule, all actions are performed in reverse order.
it is necessary to choose the right adhesive for attaching the mirror to the windshield
Glue selection
There are three types of compositions for gluing mirrors:
- chemically cured;
- light-curing;
- compositions based on epoxy resin.
Read more: How to repair alloy wheels yourself - tips and tricks
A composition with resins will work well only if it is allowed to dry properly. This usually takes from 10 hours to a day. In this case, the part must be pressed tightly at all times. This approach is not very convenient, so such products are not used in everyday life.
Light-curing mixtures operate when exposed to special ultraviolet lamps. This is one of the most common methods in production. However, if you are not the happy owner of a lamp, you should not purchase such a composition. Sunlight, especially diffused light, is not able to have a sufficient effect.
For these reasons, chemically cured compounds are the most popular. A special hardener starts the polymerization process. As a rule, they consist of the glue itself and an aerosol activator, although one-component compositions are also found.
- household superglue;
- double-sided adhesive tape.
The adhesive component of both materials has such a composition that when used on glass or metal, it will not be able to harden completely. High air temperature inside the cabin or heating of the glass from sunlight will soften it and the mirror will fall off. You can use household adhesives only if the mirror fell completely unexpectedly, and now you need to urgently get to a car service center.
How to disassemble a side rear view mirror
It is necessary to disassemble the mirror to repair it. Often this operation is performed if the mirror element needs to be replaced. In this case, the plastic case does not change. Also, the mirror element must be removed if you plan to paint the side mirror housing.
Disassembling the side mirror is carried out as follows:
- The mirror element in the mirror body is secured with plastic latches (2 or 3 latches on each side). To carefully and safely remove the mirror from the case, it is recommended to heat the plastic latches with a simple household hairdryer. In this case, it is important to distribute the heat over the surface of the mirror, and also not to use high heat with a hair dryer. Ignoring this rule may lead to melting of the housing and latches.
- Once the latches become softer, you can remove the mirror. This is done using plastic spatulas or a flat screwdriver, which is pre-wrapped with electrical tape (protection from scratches on the body and on the mirror itself);
- To remove the mirror, insert a piece of soft rag into the gap between the mirror part and the body, after which you can insert a spatula or screwdriver.
The result is a lever that can be used to move the mirror; Gently working on the mirror element, pull the blade and insert another one. A pair of paddles or another lever will allow you to unclip the mirror from the mount. Usually one side snaps off first, and then the other side comes off in the same way. - Once completely disconnected, it is important not to immediately proceed to removing the mirror, as there may be wires connected to it. The connectors must be carefully disconnected, and then the mirror element must be removed. You will also need to unscrew the bolt securing the central frame of the case;
- The necessary repair or replacement work can now be carried out. When finished, reassemble the side mirror in the reverse order.
Other ways to remove a car mirror
If the side mirror is structurally simple or the mirror element is already damaged and requires replacement, to remove the mirror element it may be sufficient to do the following:
- a soft lining is placed on a flat surface;
- then you should not hit the lining too hard with the mirror body;
As a rule, in this case the mirror element “jumps off” from the latches, without damage (this is important for entire rear-view mirrors that are disassembled for repair). Then all that remains is to remove the element completely and carry out repairs.
We also recommend reading the article on how to remove a radio without keys. From this article you will learn about methods for removing a radio in a car without key removers, as well as what nuances you should pay attention to as part of this procedure.
Please note that this method allows you to understand how to remove the rear view mirror, but will require extreme care during the dismantling process. The reason is that there is always a risk of damaging the mirror or its housing.
However, on simple side mirrors (without heating and electrical adjustments), this method of removing the mirror element can significantly save time and simplify the procedure (if done correctly).
How to dismantle a mirror
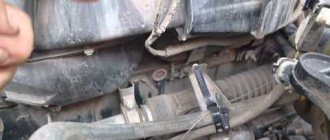
They disassemble the mirror without removing it from the car: the two latches (red) need to be moved aside with a little force, then the guides (marked yellow) must be moved apart using a flat-head screwdriver. Such actions are carried out on four sides until the mirror “hangs” on the heating wires.
That's the problem.
Now you need to remove the decorative trim and unscrew the three screws. After this, very carefully, shaking slightly so that the latch does not break, the mirror is removed.
The connector is disconnected.
You can start troubleshooting.
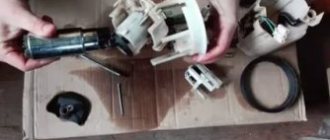
To remove the drive from the housing, just unscrew three screws.
Next comes the turn of the boot and the back cover, which need to be removed. Unfasten the connector.
We also remove the white part, relative to which the element holding the mirror rotates.
Now, in order to extend as much as possible, we move the drive to the side (shown by the arrow), connecting it to the connector on the door and again to the body.
One reason could be that part of the groove has broken off.
To eliminate such a breakdown, it is enough to use a dropper tube that has become “stiff” from petroleum products (gasoline).
We put the tube, with glue pre-applied on it, onto the broken groove and cut it in place. For a more reliable connection with the ball joint, blow on the tube with a hairdryer - under the influence of hot air, its upper part will narrow.
This is what it looks like.
Now all that remains is to reassemble everything carefully in reverse order. The drive is working.
Recommendations
Different car models may have different side mirrors. This means that before removal it is necessary to take into account individual design features in advance. In some cases, it will be necessary to remove decorative trims, panels, etc. Only after this will access to the screws securing the mirror housing be available.
We also recommend reading the article on how to remove the interior rear view mirror in a car. From this article you will learn about the available methods for removing a mirror in a salon, as well as how you can disassemble a salon mirror.
When removing the mirror element, it should be taken into account that the space under the mirror element does not have to be “empty”. As a rule, modern cars have hidden adjustment mechanisms, turn signal indicators and other elements inside the mirror housing. For this reason, replacing a side mirror should be carried out taking into account the design features of the mirrors on the car.
It should be noted that replacing the original mirror element with a cheaper analogue can lead to the fact that the “quality” of the image in the side mirrors, when compared with the original, will be noticeably different. Moreover, even the shade and color of the mirror element may be different compared to the original.
Also, provided there is a heating function, a non-original mirror may take a long time to warm up, the heating zone may be limited (heating does not cover the entire area), etc. To avoid such troubles, experts recommend using only original mirror elements for replacement, even taking into account their higher cost.
Dismantling
How to make a muffler with your own hands?
Do-it-yourself muffler repair without welding You have decided to carry out the dismantling work yourself and then reinstall it. The only question now is how to remove and disassemble the element, so that later everything can be returned to its place without any risks. In the meantime, glass replacement or another procedure will be carried out, depending on the specific situation.
To carry out dismantling work, you need to take:
- curved screwdriver;
- flat screwdriver;
- wrench to match the size of the fasteners;
- hair dryer;
- degreaser;
- rags;
- high-quality glue;
- some free time;
- clean garage;
- good mood.
Add to this set of tools a couple of skillful hands, and everything will go great.
As you understand, rear and interior mirrors are removed differently.
Work in the salon
Let's start with the interior design. A lot depends on what kind of car you are working with.
Automakers use different mounting systems. Therefore, start from the specific situation. So, for example, different fasteners are used on cars such as:
- Deo Lanos;
- VAZ 2110;
- Niva Chevrolet;
- Ford Focus;
- Renault Logan;
- Chevrolet Cruze;
- Lada Priora;
- Lada Kalina;
- Hyundai Solaris, etc.
Still, owners of inexpensive cars mostly do this work on their own.
And here you may encounter glue and suction cups, or bolts and screws. These are the most common installation methods.
Domestic cars mostly come with bolts. Therefore, it will be easy to remove the structure. The plug is removed, the key is taken and the fasteners are unscrewed.
But there are also brackets glued to the glass. Here you will first have to figure out whether it is actually possible to separate the fastening element from the glass. Most often, designers use clamps or rotating mechanisms. If this is not possible, you will have to remove not only the bracket, but also the windshield itself. The glue holds the element very tightly, and therefore it will not be difficult to damage the front cover.
We recommend: Replacing the thermostat Lada 2115 (VAZ 2115)
Please refer to the instruction manual. There you will probably find a hint on what exactly to do in this situation. Sometimes it’s better to visit a car service center, where specialists will do everything carefully and clearly.
Side dismantling
Everything is clear in the cabin. Now you need to dismantle the exterior mirror structure. Left or right, it doesn’t matter much here. What is more important is what type of design is used. The side mirrors are power driven. And it can be mechanical and electrical.
Almost any car is structurally designed to allow access to fasteners through the doors. You just need to remove the casing. Again, look in the manual for your car, since there are no universal instructions on this matter.
If you have a mechanical drive, then:
- The locking bracket of the existing regulator is removed;
- The fastening screws are tightened on the inside of the door;
- The mirror itself is removed.
In the case of an electric drive, everything is somewhat different. You need:
- raise the hood;
- find the battery;
- remove the negative terminal from the battery;
- disconnect the block with wires;
- remove the door trim;
- unscrew the mirror fasteners;
- remove element;
- rejoice at the result.
The last point is especially important. Know how to be enough for yourself even for small achievements.
Disassembly procedure
Once the structure has been removed, disassembly can begin. If it is required, of course. Perhaps you have found a new mirror whose price suits you completely. Then you can skip this point.
If it is necessary to disassemble an element, we start from whether it is internal or external.
The interior mirror is disassembled as follows:
- there is a place where the glass and the body are connected;
- spin is inserted;
- pressed with little force;
- a gap appears;
- use a mediator to pass along the entire length of the gap;
- the body is divided into 2 parts;
- the mirror is removed;
- everything else is located underneath it;
- We carry out the necessary work.
You may also need to disassemble your car side mirror.
It doesn't matter whether left or right
The task here is to remove the reflective element. Be prepared for the fact that the instructions below will not fit your specific car. There are cars on which everything is not quite like that. Sorry here, the guide is not universal.
But it is the following scheme that is suitable for most cars.
- Using a hairdryer, the area between the case and the glass is heated;
- Do not heat to high temperature. Use a household hair dryer on medium power;
- Use a flat-head screwdriver to separate the body into 2 parts;
- Sometimes it is necessary to bend the terminals;
- If you are afraid of damaging the mirror, wrap the instrument with electrical tape;
- On some cars you need to slightly press the mirror to the center and move it to the side;
- The glass is carefully removed;
- Remove the screw from the plastic frame, if there is one;
- Under the frame we see the entire mechanism;
- Use a screwdriver to remove the broken structure and replace it with a new one.
That's it, the work is almost completed. But since we disassembled everything and changed the necessary components, now we need to assemble the structure and install it back on the car.
https://youtube.com/watch?v=MXU1IOJ-Vzs
How to repair a side mirror
There are also breakdowns that occur inside the mechanism of the mirror itself, which is why it may not fold or adjust. You can repair such breakdowns yourself, for which you need to remove it from the car and follow these instructions:
- To remove the rear side view device from the door, you must carefully snap or unscrew the triangle-shaped headset on the back of the door. Usually it is held on by small bolts, in new machines by one or two latches.
- Next, you need to unscrew the bolts that secure the connector for connecting the side mirror.
- We disconnect the contacts that connected the mirror motor to the vehicle’s on-board system and carefully remove the unit.
- Wash the removed part and wipe dry.
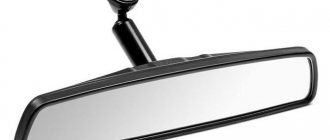
Side mirror
- Using a regular hair dryer, heat the surface for 30-40 seconds until the sealant on the back side becomes soft. Use a non-sharp object to pry the glass and it will come off.
- There is a screw in the center of the protective plastic plate; you need to unscrew it and remove the plate.
- The motor itself, which is responsible for the movements of the mirrors, is located inside and secured with four screws. They need to be carefully unscrewed and the engine removed.
- The next step is to detach the housing from the leg that attaches to the door. Everything is again held together by bolts.
- There you need to unscrew two bolts, and you will get the mechanism that folds the block.
Wash and dry all parts. It is quite natural that a lot of dirt and dust collected on them during the ride. Next, you have to check all connections by continuity and repair damage. The contacts could burn out; it often also happens that during the movement of the planes or their acceptance of the final position (folded or unfolded), the contacts moved away from each other, and the reverse movement could no longer be performed
Pay attention to the fuses, since there are usually two of them in such devices, each responsible for a specific action
Repair of the side mirror motor is carried out according to the nature of the breakdown, but is usually limited to re-soldering or replacing fuses
Next, it is important to assemble the block:
- Install the working engine into the block and secure it with bolts.
- Next, attach the mechanism for moving the mirror plane.
If heating has not been installed previously, then it is at this stage that it can be installed. Please note that if you install heating, be sure to use silicone sealant for fastening, which is more resistant to high temperatures and will not melt from heating.
- Cover everything with a plastic plate and tighten the central bolt.
- Glue the mirror sheet onto the sealant.
https://youtube.com/watch?v=Kxj0fVfCZEk
Having completed the repair, we return to the iron horse and return the repaired side rear view mirror to its place. Do not forget to check the functionality of the part during the assembly process, and also check this point after installing the mirrors on the car.