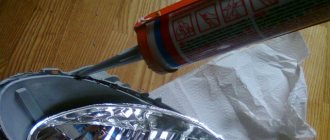
Removal and installation of the headlamp is carried out in the event of its replacement, modification or tuning. The process is not complicated, but it requires removing the front bumper, because... Below it are the lower headlight mounting screws. Let's look at the instructions for replacing a Largus headlight with your own hands.
- Disconnect the wires from the headlight bulbs (1. low/high beam - remove the cover and pull out the block with the wires. 2. remove the turn signal and clearance sockets. 3. if there is a hydraulic corrector - slide the cover along the cable sheath, unclip the latch, turn and remove the actuator mechanism);
- Unscrew the three fastening screws around the perimeter of the headlight (No. 1, 3, 4), using a 10mm wrench, and remove the headlight.
Installing the headlight is done in reverse order. The process of dismantling the headlight is also shown in the video:
A similar procedure is performed on Renault Logan. Have you ever had to remove the headlights on Largus yourself? Were there any difficulties during this operation? Let us remind you that we previously looked at replacing lamps in the headlights of a station wagon and a van.
Key words: headlights Lada Largus
The headlight unit is removed in case of body work or when replacing it. The glass on the Lada Largus headlight block is glued in and if it is damaged, the headlight block is completely replaced (along with it). Replacement operations are shown using the example of the left headlight block. The right headlight unit is replaced in the same way. The main problem when removing the front headlight of a Lada Largus car will be the need to remove the front bumper.
Tuning Largus headlights
Many Lada Largus owners are dissatisfied with its appearance. Although the designers have created a new look, which is strikingly different from previous VAZ models, it is still not original. Largus owners are offered kits for upgrading optics, varying in quality and price.
Instead of standard optics, it is possible to install a more powerful lensed one. It can perform two functions at once: it increases driving safety at night and makes the car more attractive. In some Largus configurations, fog lights (FTL) are also installed at the manufacturer's factory.
Xenon is installed not only in conventional headlights, but also in lenses. You can add “angel eyes” - a signature feature of the exterior of BMW cars. Stores offer block headlights with daytime running lights or additional lights for Lada Largus, which can be installed in their original place without any modifications.
Replacing optics on Largus is an expensive procedure even when installing standard equipment, not to mention lenses or xenon. For this reason, it is recommended to carefully monitor the condition of the headlights and avoid possible mechanical damage in every possible way. It is recommended to use a car in the dark (this is especially true in winter) only if there are properly adjusted lights. This is necessary to ensure that insufficient lighting does not cause a serious accident and threaten the health and life of all passengers.
https://youtube.com/watch?v=YCceEiwyfhM
Lamps for PTF Largus
The fog lights of Lada Largus are equipped with lamps with H11 12v/55W socket. This lamp can be bought at any car store; it is not rare or in short supply, as it is used on most cars not only in the PTF, but also in the low beam. If we talk about choosing lamps for PTF, we should divide the lamps into standard LED lamps and lamps with increased brightness or service life. Also, some car owners install xenon or LED lamps instead of halogen lamps.
Mid and high beam
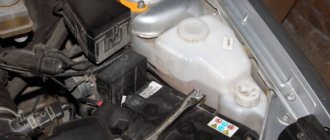
One lamp is responsible for low and high beam. Its resource is 2000-4000 hours. To access the left headlight, remove the battery.
- Turn the cap counterclockwise;
- Remove the cover by releasing the lock.
replacing low and low light bulbs Lada Largus replacing low and low light bulbs Lada Largus
- Remove the socket from the wires by clicking the lock;
- Remove the rubber cover by pulling on the edge.
replacing low and low light bulbs Lada Largus replacing low and low light bulbs Lada Largus
- Disconnect the lamp assembly clamps;
- Remove the headlight.
replacing low and low light bulbs Lada Largus replacing low and low light bulbs Lada Largus
Downloading a book
After successfully completing the payment (by any method) and returning to the KrutilVertel store from the payment system website, you will be taken to the successful payment page:
The book you purchased will be in your personal account, from where you can always download it.
Please note that after making the payment, you need to return back from the payment system website to the KrutilVertel website. If for some reason you did not return back to the site and closed the payment system tab with a message about the successful completion of the payment, please let us know - we will send you a letter indicating access to download the book
If for some reason you did not return back to the site and closed the payment system tab with a message about the successful completion of the payment, please let us know - we will send you a letter indicating access to download the book.
Fog lights
At the request of potential buyers, LADA Largus cars are equipped with fog lights, which are integrated into the lower part of the front bumper.
- Halogen single-filament lamp H11.
- Adjustment screw.
Replacing the lamp
Replacing a burnt-out lamp in the fog lamp of the Lada Largus station wagon begins by dismantling:
- front wheel;
- fender liner installed in the front wheel arch;
By removing the fender liner, we gain access to the niche where the fog lamp is installed.
pressing the latch, disconnect the block with electrical wires;
turn the lamp counterclockwise until it stops and remove it from the headlight housing.
In order to install a working lamp in place, repeat the dismantling process in reverse order.
Replacing the headlight
The operations by which the headlight is accessed are described above. Having reached it, use a Phillips screwdriver to unscrew the three mounting bolts and remove the headlight housing.
The new headlight is placed in a niche specially designed for this purpose; it must be secured using standard fasteners.
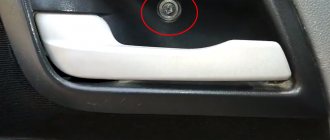
Having secured the headlight, it is necessary to adjust the light beam in the vertical plane. To do this, insert a slotted screwdriver into the hole specially provided in the front bumper and rotate the adjusting screw - clockwise if you need to raise the light beam or counterclockwise if you need to lower it.
Source
Operations for removing the headlight unit Lada Largus
1. Disconnect the wire from the negative terminal of the battery. 2. Remove the front fender liner - the plastic arch protection.
3. Press out the clamp of the turn signal lamp socket wiring harness block. 4. . and disconnect the block from the cartridge
5. Turn the side light bulb socket clockwise (for the right headlight, counterclockwise). 6. . and remove it from the headlamp.
Read more: GOST R 52985 2008
7. Turn the plastic headlight cover 8. . release the cover lock. 9. . and remove the cover..
10. Press the clamp of the harness block 11. . and disconnect the block from the base
12. Remove the protective cover with the headlight corrector 13. Remove the corrector drive cable from the holder. 14. . and disconnect it from the headlight range control unit.
15. Remove the front bumper.
16. Remove the three lamp mounting bolts. block headlights to the radiator frame.
This is how the headlight mounting bolts are located. 17. . and remove the headlight unit.
18. Install the headlight in the reverse order of removal and check that the headlights are adjusted correctly.
Lada Largus is a popular family multi-purpose station wagon, mass production of which was launched by AvtoVAZ PJSC in 2012.
A car of this class is designed to meet the most diverse needs of potential buyers and can be used for both everyday and long-distance trips. At the same time, it feels great in urban conditions and on country roads.
The universal use of this car quite often contributes to damage to the elements of the front optics by stones flying from under the wheels of oncoming or passing vehicles, branches of low-growing bushes, etc.
Replacing damaged head optics and installing new elements is not difficult and can be carried out by almost any car owner, even those without experience in carrying out such work. The only difficulty with this is the need to dismantle the front bumper, where not only fog lights are integrated, but also headlights.
Block lights
Structurally, each block headlight of the LADA Largus station wagon consists of two sections. One contains:
- "marker" lamp (W5W).
- double-filament lamp for low and high beam (type H4);
Nearby is the section in which the PY21W turn signal lamp is located.
The headlight unit is dismantled when it is damaged or needs to be modified (tuning).
Replacing the headlight
Before you begin work related to replacing the headlight, you must:
- Secure the station wagon using the handbrake.
- Remove the key from the ignition.
- Remove the negative wire from the battery terminal.
The dismantling of the headlight block of the LADA Largus station wagon begins by first removing the front bumper. This operation is shown in detail on the video page:
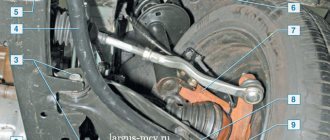
After this, access to the fastening elements in the lower part of the case will open. Next, you need to disconnect the electrical wires:
- going to the H4 type lamp. To do this, remove the cover 3 and disconnect the pads;
- remove the sockets for the direction indicator lamps 5 and indicator lamps 7;
- remove the actuator of the headlight hydraulic corrector (if equipped) from the headlight housing, to do this, slide boot 4 along the cable and unclip the fastening latch.
This is interesting: Chevrolet Cruze sores
after this, you need to unscrew the fastening bolts (items 1, 3 and 4) located around the perimeter of the body part (2);
push the headlight housing forward a little and remove it.
The new headlight unit is installed in the reverse order, maintaining a uniform gap between housing 2 and body parts.
Adjusting the luminous flux
After carrying out any work related to the head optics of the LALA Largus car, it is mandatory to check and adjust (if necessary) the direction of the luminous flux of the switched on lamps. To do this, it is best to contact a specialized service station, equipped with special instruments and staffed by qualified specialists. However, in case of emergency, such an operation can be carried out independently and without the necessary equipment. In practice, there are several ways to check and adjust headlights. You can see one of them by watching the video:
Replacing lamps in a headlight
Among the sudden malfunctions that almost all car owners encounter, one of the first places is the failure of head optics light sources. These include lamps:
- low/high beam;
- direction indicator;
- Dimensions indicator.
All of them are located inside a separate headlight and changing them, if necessary, is not difficult.
Replacing the low/high beam lamp
Change the low/high beam lamp in the LADA Largus headlight in the following order:
remove the protective cover;
disconnect the block with wires;
- pull out the rubber seal;
- pressing on the spring holder, remove it from under the latch;
carefully releasing the holder, carefully remove the burnt out lamp
The new lamp is inserted into the reflector hole and secured using standard fasteners. Then all the removed parts are returned to their places.
Attention! Lada Largus uses halogen light sources, the glass surface of which is not recommended to be touched. To avoid darkening of the flask when heated, it is recommended to hold them by the base
Replacing the turn signal lamp
In order to change a faulty lamp installed in the turn signal compartment, you must:
gently press out the plastic connector retainer;
This is interesting: 7 steps for dismantling and installing silent blocks: detailed instructions using the example of a rear beam
disconnect the connector with the on-board power supply wires;
remove the lamp socket from the headlight socket by turning it clockwise (left lamp) or counterclockwise (right lamp);
By pressing and turning the lamp counterclockwise, we take it out.
The new lamp is installed in the reverse order.
Replacing the indicator lamp
A burnt-out baseless bulb installed in the size indicator is changed as follows:
- disconnect the block with electrical wires from the cartridge;
- turn the socket clockwise (left lamp) or counterclockwise (right lamp) and remove it from the headlight housing;
A new lamp is placed in place of the burnt one.
The cartridge is returned to the standard socket, performing all operations in the reverse order.
Instructions for replacing lamps on Kalina 2
Low beam
Carefully remove the rubber boot from the low beam (it is larger in size)
Disconnect the block from the lamp
Next, press the spring clamp and remove it from the clamps to the side and move it away
We remove the burnt out one and install a new lamp. The H7 Osram lamp is installed from the factory; if you want to install brighter lamps, you can choose the Philips H7 +30.
We reassemble in reverse order.
High beam
Remove the rubber boot from the high beam
Disconnect the block from the lamp (Only the + wire is attached to the lamp)
Press the spring clamp of the lamp and move it to the side
We take out the old lamp and install a new one. Be careful when installing, it can only be installed in one position.
We also perform assembly in reverse order.
Replacing DRL lamps
Take the cartridge and turn it counterclockwise.
Next, remove the socket from the socket, take out the old lamp and install a new one. Toshiba lamps are installed from the factory; it is impossible to buy them in retail stores, so we choose an analogue.
Turn signal lamp
By pressing lightly, turn the cartridge counterclockwise and remove it from the socket
Press the lamp and turn it counterclockwise, pull it out of the socket
We take a new PY21W lamp and install it in the socket
This completes the lamp replacement.
When replacing the low and high beam lamps, it is prohibited to touch the lamps themselves by the bulbs! This will lead to rapid failure of the lamp. The rest of the lamps are incandescent, and this does not threaten them.
The process of adjusting headlights on Kalina
The headlights should only be adjusted with low beam, the PTF should be turned off. Adjusting the headlights of Volkswagen Passat B5. 12.4 repair of headlight range control 14. If you do not have fog lights, then read the material on how to install them.
Before proceeding directly to the adjustment process, you need to refuel the car to a full tank, put on a spare tire, and also call an assistant. Place a helper behind the wheel.
Garage door adjustment process
Thus, it turns out that the car is fully equipped. Ideally, have a standard adjustment marking for headlights on the wall of the garage, but if this is not available, you can use a regular wall.
Removing the front bumper on LADA Largus
The process of removing the bumper is simple and does not require special knowledge. If you follow the instructions, this operation will take about half an hour.
READ How to remove the front bumper of Passat ss
Dismantling process
So, let's look at the step-by-step process of dismantling the front bumper:
- Before you start this simple task, you need to prepare. It is best to place the car on a lift, but at worst, you can use a pit.
- Now let's move on to the dismantling process itself. Remove the lower plastic protective mudguard. To do this, unscrew the fasteners that are located in front. The back and middle parts are attached to plugs that can be removed using a special tool or screwdriver.
- Now, you need to unscrew the front fender liners from the bumper.
- Next, you should find the wire connector that is responsible for the fog lights and disconnect it. It is located in the left arch of the body mudguard.
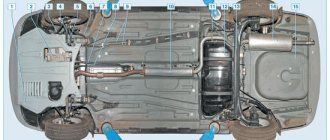
- We unscrew the screws that secure the bumper to the subframe from below.
Three bolts securing the bumper to the subframe
Now the front bumper has been removed from the car, and the necessary manipulations can be carried out.
Fines
As a rule, the fines for converting a vehicle are not too high. Let's list the main ones:
- For the installation of external parts (spoilers, air intakes) a fine of 500 rubles is provided;
- For painting a car without registration, a fine of 500 rubles is imposed;
- For making changes to the steering system, wheels or other systems, the fine will be from 500 rubles, depending on the number of changes;
- For changing the dimensions of a car, a fine of 500 rubles is provided.
As you can see, the fine is small. But there are also other violations. For installing a “Disabled” sign you will have to pay 5,000 rubles, for installing a “Taxi” checkerboard - from 5,000 rubles. But for painting a car in the color of a government service car, the driver faces deprivation of his license for a period of one to one and a half years. If the driver installs a “flashing light” or headlights, the use of which is prohibited, then in addition to a large fine, his license will be taken away - for installing headlights for six months, and for installing a “flashing light” for 18 months.
However, the fine is not the worst thing. If you are caught illegally modifying your vehicle, you will need to do one of two things: either dismantle the improvements and put everything back in place (at your own expense), or register the changes. And in order to register a car with changes, you will need to pass a check at the traffic police, which also costs money (the price depends on many factors). Moreover, if the parts do not meet the standards, you will still be forced to remove them.
Attention
Keep in mind that re-equipment can not only result in fines and problems, but also the inability to pass inspection. And without a technical inspection, it will be impossible to obtain other important papers, for example, a compulsory motor liability insurance policy, without which driving a car will attract even more fines.
Possible reasons for withdrawal
There are not so many circumstances for removing the front bumper on Largus, but they all contribute to learning how to dismantle such parts with your own hands. Let's look at what pushes the owner to undergo this easy operation:
>
- Part damage. This can happen due to an accident or deformation when driving backwards.
- The next prerequisite may be that the bumper was not damaged when damaged, but the rear panel is either deformed and requires restoration.
- Body painting. when it is carried out comprehensively, it also requires the removal of the buffer.
- Tuning or upgrading the rear bumper will also require dismantling the part.
- Installing accessories such as parking sensors will force the owner to remove the buffer.
- Partial removal to install bumper trim .
READ How to remove the front bumper on a Suzuki sx4
Removing the bumper on LADA Largus detailed instructions
There are not many reasons for removing the bumper; this is usually done after road accidents that caused damage to the part.
Low and high beam
One lamp is responsible for low and high beam. Its resource is 2000-4000 hours. To gain access to the left headlight unit, you must remove the battery.
- Turn the lid counterclockwise;
- Remove the cover by releasing the latch.
- Remove the block with wires by unclipping the lock;
- Remove the rubber cover by prying it off by the edge.
- Unscrew the lamp clamp to the side;
- Remove the headlight bulb.
Installing a new lamp in the Largus headlight is carried out in the reverse order. You need to hold the lamp by the base; it is not recommended to touch the bulb with your fingers. If necessary, wipe the flask with a microfiber cloth that does not leave lint. The process of replacing the H4 lamp is also shown in the video:
Legality of tuning
So, the question of whether it is possible to install a spoiler, bumpers, non-original alloy wheels and other body kit and tuning elements, a muffler, a guard and other parts not provided by the factory on a car is regulated by 3 regulations:
- Technical Regulations of the Customs Union on vehicle safety (hereinafter referred to as the “Technical Regulations”),
- Order No. 399 on the procedure for registering vehicles (hereinafter referred to as the “Order”),
- finally, traffic rules.
And we will start with the latest legal act - the Rules clearly tell us that if changes are made to the design of a car without registering them with the traffic police, then we cannot operate such a car.
From June 1, 2021, Government Decree No. 413 comes into force. The procedure for making changes to the design has not changed, but the procedure itself has become clearer and more regulated.
But why should the above tuning elements be changed?! And since this is exactly what the Technical Regulations say. It has a clear definition of making changes:
All that remains is to understand what the components of the car are. And here the regulations have a clear answer to the question:
Also, paragraph 77 says that if the manufacturer has provided for the installation of a certain component or it has passed a conformity assessment as part of the car (safety tests), then its installation is possible:
Thus, in order to answer the question about the legality and fine for a muffler, bumpers, alloy wheels, roof fairings, tow bar, roof rack and other tuning elements, we need to understand 2 things: are they provided for or not by design, do they influence they are on road safety.
But there is another important auto subtlety - the Technical Regulations contain an exhaustive list of components regulated by it. Does this mean that if some component is not regulated by this legal act, then it can be installed in any case, and it is no longer a component according to the letter of the law?
This is where disputes often arise between car lawyers. And the logic should still be followed: the regulations clearly prescribe what a design change is and that the components must pass tests as part of the car and be certified, and even if, for example, a spoiler is not regulated by the regulations (and also, on the one hand, is not component, since it is not included in the list of components; on the other hand, by definition of a design change, it is still prohibited), this still does not mean that it can be installed.
Now let's look at each of the tuning elements - whether it can be installed or not according to the law, and below we will look at fines and other risks (they exist), if this is prohibited - the fine is the same and is imposed for changing the design of the vehicle.
You will also be interested in:
- Is athermal tinting prohibited according to GOST and what is the fine?
- Is it possible to install a kenguryatnik on Niva and other cars?
- How to make changes to the design of a car officially?
Replacing a low beam lamp on a Lada Largus
Once you have removed the lamp, you can begin replacing it:
- hold the new lamp by the base;
- To avoid touching the glass flask with bare hands, wear gloves. Why can't you touch the flask? Because traces of fat can lead to rapid burnout. If you need to wipe it down, don't use microfiber cloths;
- secure the base with a spring clip;
- Place the block on the contacts, and then install the plug in place.
That's all. You have changed the lamp, and, as you can see, the process is simple.
When you replace one lamp, replace the second one immediately. You will avoid unexpected burnout and ensure an even glow.
The procedure for adjusting the headlights of Lada Largus
This procedure can be carried out by the car owner independently or by contacting service center specialists. Moreover, it is almost the same on all modifications of such a vehicle. It is carried out both on a completely new car and on one that has already been driven for more than one year.
Preliminary data fixation
Before starting this diagnostic step, the driver should prepare a tool box, a spare tire, and a full tank of fuel. The car is placed on a horizontal surface, and the smoother it is, the more accurate the indicators of the current state of the headlights will be. In addition to this, the engine remains idling and the handbrake is fully depressed.
An artificial wall is installed in front of the car, the height of which is 1.8–2.0 m. Moreover, the distance showing how any headlight on Largus works should not exceed 2.8–3.2 m. It is worth noting that such a visual barrier can make it yourself from chipboard or similar materials.
This scheme is suitable not only for Largus, but also for other cars
A load weighing 55–70 kg is placed on the driver’s seat. This helps align the lighting line. After this, the distance between the headlights, their height above the road is measured and the average value between them is found. All this is transferred to the wall using chalk, ultimately representing a dot projection with marked edges and centers of the headlights.
The actual adjustment
To start adjusting the lighting, you need to create pressure in the chair, that is, either sit on the seat or put additional weight there. At the same time, slight rocking of the car will help remove vibrations from the body and shock absorbers.
The regulator is moved to a position oriented towards one person. This is precisely why the load was placed on the driver's seat. Then the low beam is turned on and the output is carefully examined with the actual deflection of each headlight beam.
Under the hood there are regulators that allow you to use a screwdriver to level the output of the light beams. They must fully correspond to the points displayed on the artificial wall, both vertically and horizontally.
Checking the correction made
All optics, like each individual headlight of the Lada Largus, are considered adjusted if its rays go directly to their wall projections. Fixing the adjustment and checking the work done is carried out through a test drive. The main thing here is that the light beams of car headlights did not blind other road users.
Headlight malfunctions and how to fix them
There are not many items on the list of headlight headlight breakdowns. This is mainly due to damage to the lantern glass, failure of the corrector or the lamp itself. If the Lada Largus low beam lamp and corrector can be replaced, then the glass is installed only with the headlight assembly. Largus optics do not cause any inconvenience to owners. The most common problem is low beam bulbs burning out.
You can choose and install a good headlight bulb yourself. On the market of automobile spare parts and accessories there are light bulbs from both domestic and foreign manufacturers. Chinese lamps are not of very high quality: they burn out quickly and do not provide sufficient visibility on the road.
Standard halogen light should be yellowish. Many people prefer the so-called pseudo-xenon, which makes the glow white, but in bad weather conditions such lamps are inferior to standard ones. The latter sometimes even outperform LED and xenon optics, which produce a powerful luminous flux, but cost a lot of money and are installed in specialized centers. In fog and rain, halogen lamps demonstrate the highest penetrating ability of the light beam, which ensures their leading position.
Replacing lamps
The operation of replacing the lamp is simple and even beginners can do it. It is carried out as follows:
- The negative terminal is disconnected from the battery.
- A slight turn removes the plug from the back of the headlight.
- The wire block is disconnected from the lamp.
- The latch is removed from the grooves by pressing it with your finger.
The failed lamp is removed and a new one is installed in its place. It is recommended to use gloves when working, as fingerprints on the flask can lead to its premature burnout. The lamp is attached using a latch, a block with wires is connected to it, and a plug is put in place. A terminal is connected to the battery, then the operation of the headlight is checked.
It is recommended to change the bulbs in both headlights at once. This way you will be able to avoid the failure of another light bulb at the wrong time and ensure a uniform glow.
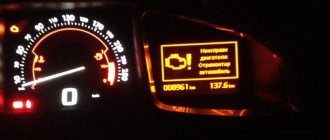
The problem due to which the Lada Largus headlight does not light may not be in the lamps. If replacing them does not bring any results, the fuse may have blown. The mounting block is located in the cabin at the bottom left of the steering column. Replacing fuses is a matter of seconds. Two fuses are responsible for the light. Even if they look intact, the cause of the malfunction may be hidden in poor contact. There is no special relay for headlights in Largus, and therefore the source of the problem may be oxidation of the contacts of the headlight itself.
There are often situations when the headlights do not work due to poor ground contact. In this case, inspection and cleaning of the contact is necessary. If this does not help, contact the service center specialists to identify the causes of the malfunction and eliminate them.
To replace the low/high beam bulbs, you do not need to dismantle the entire headlight or any of its parts, so the process does not take much time. If the headlights are shining, but the light beam is incorrect, the reason is a faulty corrector. Its main task is to lower or raise the luminous flux depending on the location of the car body. If the vehicle is loaded, then without adjustment by the corrector the light will blind oncoming traffic. This part cannot be repaired, which means it is immediately replaced with a new one. This will require disassembling the headlight unit.
Block lights
Structurally, each block headlight of the LADA Largus station wagon consists of two sections. One contains:
- "marker" lamp (W5W).
- double-filament lamp for low and high beam (type H4);
Nearby is the section in which the PY21W turn signal lamp is located.
The headlight unit is dismantled when it is damaged or needs to be modified (tuning).
Replacing the headlight
Before you begin work related to replacing the headlight, you must:
- Secure the station wagon using the handbrake.
- Remove the key from the ignition.
- Remove the negative wire from the battery terminal.
The dismantling of the headlight block of the LADA Largus station wagon begins by first removing the front bumper. This operation is shown in detail on the video page:
After this, access to the fastening elements in the lower part of the case will open. Next, you need to disconnect the electrical wires:
- going to the H4 type lamp. To do this, remove the cover 3 and disconnect the pads;
- remove the sockets for the direction indicator lamps 5 and indicator lamps 7;
- remove the actuator of the headlight hydraulic corrector (if equipped) from the headlight housing, to do this, slide boot 4 along the cable and unclip the fastening latch.
after this, you need to unscrew the fastening bolts (items 1, 3 and 4) located around the perimeter of the body part (2);
push the headlight housing forward a little and remove it.
The new headlight unit is installed in the reverse order, maintaining a uniform gap between housing 2 and body parts.
Adjusting the luminous flux
After carrying out any work related to the head optics of the LALA Largus car, it is mandatory to check and adjust (if necessary) the direction of the luminous flux of the switched on lamps. To do this, it is best to contact a specialized service station, equipped with special instruments and staffed by qualified specialists. However, in case of emergency, such an operation can be carried out independently and without the necessary equipment. In practice, there are several ways to check and adjust headlights. You can see one of them by watching the video:
How to choose a lighting element
The range of lamps for installation in car headlights is very extensive. However, there are two factors that significantly limit your choice:
- the design of the headlamp block does not allow the use of any options you like;
- code requirements that expressly prohibit the installation of any elements other than those originally used by the manufacturer.
In the Lada Largus car, the functions of low and high beam are performed by one double-filament halogen lamp. This is convenient as it allows you to save space under the hood and reduce the size of the headlight unit. One tungsten filament produces a beam of light of greater brightness, directed primarily horizontally (high beam), and the second creates a beam with an opening angle of 30°, of which 10° are directed above the horizontal, and the remaining 20° below it.
The ability to reduce the size of the headlight unit results in the need to change the light bulb when any filament fails, even if the second one works quite reliably. In addition, you always have to change both lamps, left and right, since for high-quality lighting you need a set of two lamps selected according to their characteristics.
Lada Largus lamp base
High and low beam are realized using one light bulb with h4 socket. In addition, the following types of base are used for different positions:
- h11;
- P21/5W;
- PY21W;
- P21W;
- WY5W;
- W5W.
In addition, there is a C3W baseless bulb that illuminates the stove control.
Table of lamps used in Lada Largus
Let's consider what lamps are installed for light signaling on Largus. Front lamps:
| Front lamps | Type | Power, W |
| Low/high beam | H4 | 60/55 |
| Front turn | PY21W | 21 |
| Dimensions | W5W | 5 |
| Fog lights | H11 | 55 |
| Side dimensions | WY5W | 5 |
Rear lamps:
| Rear lamps | Type | Power, W |
| Direction indicators | PY21W | 21 |
| Dimensions and brake signal | P21/5W | 21/5 |
| Fog light | P21W | 21 |
| Reverse | P21W | 21 |
| Additional brake light | P21W | 21 |
| License plate lamp | W5W | 5 |
| Trunk lighting | W5W | 5 |
Interior lighting and service lighting:
| Purpose of the lamp | Type | Power, W |
| Interior lighting | W5W | 5 |
| Individual lighting | W5W | 5 |
| Glove compartment lamp | W5W | 5 |
| Cigarette lighter illumination | W1.2W | 1,2 |
| Illumination of the ventilation, air conditioning and heating unit | W1.2W | 1,2 |
| Hazard switch illumination | W1.2W | 1,2 |
The best n4 lamps for Largus
To install the high/low beam of the Lada Largus, H4 halogen lamps are required, provided by the optics of the headlights. The most popular models:
- Philips X-treme Vision. Bright lamps giving cool white light. This is convenient in good weather, but in fog or snow the lighting efficiency is sharply reduced;
- Philips LongLife EcoVision. Inexpensive models with extended operating time;
- Osram Original Line. All-weather design with extended coverage area;
- Bosch Pure Light. They have bright light and extended service life.
According to users, the best option is Bosch Pure Light, the cheapest and brightest designs. Philips X-treme Vision is too expensive and often fails quickly, in addition, vision 130 models are too often counterfeited by unscrupulous manufacturers from Southeast Asian countries. Osram products represent an average option in terms of characteristics and service life, but when purchasing you need to carefully monitor the supply voltage - many models are designed for 24 V.
What are these rules?
In Russia there are regulations for car owners and the traffic police. It tells you how to operate the machine correctly, what can be changed in it without problems, and what you need a permit for.
But until now there have been no separate rules on exactly how to check and register changes in the design. Expert laboratories used this to get more money from drivers, the traffic police could refuse registration for a far-fetched reason, and drivers did not know what to do if they bought a car with tuning. Changes in the design were still registered, and there was also a procedure for this, but there were not enough clear rules. Now they are.
It seems that any car owner can easily weld a body kit to the car, replace halogen bulbs with xenon ones, or switch the car to gas and drive quietly. But no: changes to the design must be registered. And now it has become clearer how to do this. It’s worth studying the rules before you buy a car with tuning or change something in it at your own discretion. Otherwise, you will have to return it as it was or pay a lot of money.
Nothing new
Last October, the Ministry of Internal Affairs issued a draft resolution approving the Procedure for making changes to the design of wheeled vehicles in use. Fans of tuning believe that, once adopted, the document will simplify the legalization of cars converted and supplemented with non-standard equipment.
However, upon careful examination of the project, it turns out that the existing order remains practically unchanged. The system of going through the authorities is just as complicated, and it still won’t be possible to legalize “direct flow”, spacers of all types and blue headlights. It is not a fact that the installed winch will receive the approval of experts. And the main stumbling block is that in Russia there are only four testing laboratories that are authorized to give expert opinions: in Moscow, St. Petersburg, Yekaterinburg and Nizhny Novgorod (according to the register of the technical regulation department on the website of the Eurasian Economic Commission).
An area in which the imagination of “tuners” is still unlimited is interior design. The controls as such and the seats cannot be changed, but everything else can be changed as desired.
Whatever one may say, lovers of non-standard cars all over the world are driven to the standard route - to the “court” studios. For the BMW brand these are companies such as AC Schnitzer and Alpina, for Mercedes - AMG and Brabus, for AVTOVAZ - Lada Sport, whose products are supplied to factory dealers. The bottom line: everything they offer is certified from the beginning and is not considered alterations, because it was introduced before, and not “after the vehicle is released into circulation.” And this is confirmed by a document - vehicle type approval.
Your own arbitrary technical creativity is not encouraged. The most curious thing is that in the USA and most European countries almost all the same forms of small-scale illegal tuning are practiced as in our country. Since the people’s craving for everything original is ineradicable, why not make money on it? At least we were left with a choice of who to pay.