Characteristics and types of lanterns
The table shows the types of lighting for a mid-size crossover and the markings of the lamps used on the Tuareg.
| Name | Lamp type | Marking | Power | Installation location |
| Low beam | Halogen headlight Bi-xenon headlight LEDs | H7 D1S | 55 35 | Block headlight |
| High beam | Halogen Bi-xenon Bi-xenon | H9 D1S H7 | 65 35 55 | Block headlight |
| Active cornering lighting system | Bixenon Bixenon | D1S H7 | 35 55 | Block headlight |
| Front, rear turn signals | Halogen LEDs | PY21W | 21 | Block headlight Tail lights |
| Front PTF | Halogen Bi-xenon LEDs | H11 | 55 | Front bumper |
| Rear PTF | Halogen LEDs | P21W | 21 | Back light |
| Reverse | Halogen LEDs | H21W | 21 | Tail lights |
| Stern dimensions, brake light | Halogen LEDs | P21/4W | 21/4 | Tail lights |
| License plate light | Halogen LEDs | C5W | 5 | Backdoor |
| DRL | Halogen LEDs | H15 W5W | 5 | Block headlight |
The side turn indicators and third brake light use LED lighting.
How to remove headlights
Crossover owners sometimes have to solve the problem of how to remove the headlight on a Volkswagen Touareg. This operation is necessary when replacing lighting elements, during repairs to the interior of the device, as well as installing a new headlight.
It should be noted that despite the complex design of this light source, removing the Tuareg headlight is easy. To replace you need:
It will take approximately 6 seconds to remove the headlight from the Tuareg. Such lightness attracts lovers of other people's goods, so, unfortunately, there are plenty of cases of theft of crossover lighting units. Let's look at how to protect your car from this negative phenomenon.
How to secure them against theft
The problem of protecting Tuareg headlights has become so acute that car enthusiasts and car service specialists have united to take countermeasures. Typically, the operation of unauthorized removal of a headlight is carried out by attackers using a mounting tool. A slight movement of the hand - and an expensive optical device falls into their hands.
We list ways to protect Tuareg headlights from theft:
There are also options for protecting optical units in the form of installing additional mechanical protection. The plastic glasses of the Tuareg headlights, especially the early years of production, require repair.
Glass becomes cloudy from prolonged use, and the brightness of the light flux is reduced to a minimum. Not always washing their surface with water, cleaning Tuareg headlights with car cosmetics gives the desired result. In this case, grinding and subsequent polishing of the plastic will help.
The headlight is removed as described above. Repairing the plastic on the Tuareg headlight is done using abrasive materials and other handy tools: polishes, drills, clean rags.
DIY adjustment
To create the desired direction of the light flux that does not blind the eyes of oncoming drivers, you need to adjust the headlights on the Tuareg. Let's talk about the procedure using the example of the VW Touareg GP, a popular model in our country.
Before adjusting the headlights of the Tuareg GP restyled version, you need to install the crossover on a level surface.
The fuel tank should be filled to capacity; in extreme cases, ballast of similar weight should be placed in the trunk. During the operation, a person should be seated in the driver's seat or a load weighing 75 kg should be placed. The car must also be left empty and the tire pressure must be at the correct level.
Do-it-yourself adjustment of headlights on a Tuareg GP is carried out as follows:
A similar procedure will help to establish the desired location of the head optics, however, for more precise adjustments, you should contact a car service center. The equipment available there will help you find the best option for the direction of the glow.
Light flow adjustment on VW Touareg GP and other models can be done using the VAG-COM Diagnostic System scanner. This device will help restore the desired operation of lighting devices and reset the error on the control panel. Using a certain algorithm, the headlights will take the desired position.
Tuning Tuareg headlights will make the exterior of the German crossover even more attractive. Carrying out such work will make the car stand out in traffic and enhance the image of its owner.
Removing and installing Volkswagen Touareg headlights
- Repair manuals
- Repair manual for Volkswagen Touareg 2003-2006.
- Removing and installing headlights
| . Front headlight components: 1 – left headlight range control servo drive or right headlight range control servo drive; 2 – mounting bolts; 3 – cap; 4 – left low beam lamp or right low beam lamp; 5 – left high beam lamp or right high beam lamp; 6 – cap; 7 – cap; 8 – lamp socket with handle; 9 – left parking light lamp or right parking light lamp; 10 – for the left front turn signal lamp or the right front turn signal lamp; 11 – headlight; 12 – adjusting sleeve; 13 – mounting bolts; 14 – headlight mount; 15 – fixing loop; 16 – fixing bolt; 17 – installation sleeve; 18 – mounting bolts; 19 – plug connection; 20 – locking bracket; 21 – drive shaft for adjusting the high beam; 22 – drive shaft for adjusting the low and high beam height; 23 – mounting bolts |
| NOTE Check the factors that influence the headlight adjustment and, if necessary, adjust the headlights. |
| NOTE It is not necessary to disconnect the ground from the battery. |
The illustrations show the removal and installation of the left headlight.
Removal
Turn off the ignition and all electrical consumers, remove the ignition key.
Click on the headlight.
| . Retaining bolt |
Turn the locking bolt in the direction of the Open arrow (sticker) until resistance is felt ( ).
| NOTE Turn the bolt without using force, otherwise there is a risk of breaking the locking mechanism. The headlight is pushed forward. |
Pull the headlight out of the fender well until you feel it stop.
| . Locking bracket |
Keep locking bracket 1 pressed and remove the headlight from the body cutout ( ).
Installation
Install the headlight into the guides.
| NOTE The guides must be free of dirt. |
| . Plug |
Check whether plug 1 is firmly secured in the headlight mount before inserting the headlight into the guides ( ).
Carefully push the headlight into the body cutout.
| NOTE A “clear” click should be heard. This means the locking bracket is locked. |
Turn the locking bolt in the direction of the Close arrow (sticker) until resistance is felt ( ).
Lightly press the headlight and turn the bolt further in the direction of the Close arrow (sticker).
The locking bracket should snap into place with an audible click.
Check that the headlight is installed for equal side clearances.
If the gaps between the headlight and the body are uneven, it is necessary to adjust the position of the headlight.
Check the operation of the headlight, including all its functions.
Check the headlight settings and adjust if necessary.
↓ Comments ↓
1. Vehicle operation and maintenance
1.0 Operation and maintenance of the vehicle 1.1. General information 1.2. Keys and door locks, power windows 1.3. Controls and monitoring devices 1.4. Microclimate control 1.5. Seats 1.6. Security systems 1.7. Vehicle maintenance and driving 1.8. Tables
2. Engine
2.0 Engine 2.1. Preliminary checks on the car 2.2. Mechanical part (petrol engines 3.2L) 2.3. Mechanical part (petrol engines 4.2L) 2.4. Mechanical part (diesel engines 5.0L) 2.5. Removing and installing the subframe 2.6. Pressurization system (diesel engines) 2.7. Cooling system (petrol engines) 2.8. Cooling system (diesel engines) 2.9. Lubrication system (petrol engines) 2.10. Lubrication system (diesel engines) 2.11. Injection system (petrol engines) 2.12. Injection system (diesel engines) 2.13. Exhaust gas system 2.14. Fuel supply system (Benin engines) 2.15. Tables
3. Transmission
3. Manual gearbox 08D and transfer case E473 3.0 Transmission 3.1. -speed automatic transmission 09D 3.2. Checking the torque converter 3.4. Cardan shaft 3.5. Drive mechanism 3.6. Tables
4. Chassis
4.0 Chassis 4.1. Wheels and tires 4.2. Front suspension 4.3. Rear suspension 4.4. Tables
5. Steering mechanism
5.0 Steering gear 5.1. Steering mechanism repair
6. Brake system
6.0 Brake system 6.1. General information 6.2. Tables
7. On-board electrical equipment
7. Headlights 7.0 On-board electrical equipment 7.1. General information 7.2. Generator and starter 7.3. Instrument cluster 7.4. Front wiper 7.6. Tables
8. Body
8.0 Body 8.1. External body elements
9. Electrical circuit diagrams
9.0 Electrical circuit diagrams 9.1 Wiring diagram of the climate control system Climatronic 2-C (installed from 05.2005) (part 1) 9.2 Wiring diagram of the climate control system Climatronic 2-C (installed from 05.2005) (part 2) 9.3 Wiring diagram of the climate control system Climatronic 2-C (installed from 05.2005 ) (part 3) 9.4 Wiring diagram of the climate control system Climatronic 2-C (installed from 05.2005) (part 4) 9.5 Wiring diagram of the climate control system Climatronic 2-C (installed from 05.2005) (part 5) 9.6 Wiring diagram of the climate control system Climatronic 2-C (installed from 05.2005 ) (part 6) 9.7 Wiring diagram of the climate control system Climatronic 2-C (installed from 05.2005) (part 7) 9.8 Wiring diagram of the climate control system Climatronic 2-C (installed from 05.2005) (part 
How to remove a headlight on a Tuareg
The Volkswagen Touareg has bi-xenon headlights with gas-discharge lamps. Gas discharge lamps produce both low and high beams at the same time. With the help of an electromechanical regulator, the light is distributed into low and high beams, covering certain areas of the headlight with a flap.
Removing the headlight on the Tuareg
It is not necessary to disconnect the ground from the battery before removing the headlight. Turn off the ignition and all electrical consumers, remove the ignition key.
Press the headlight housing. In this case, the fixing bolt should be turned in the direction of the Open arrow, as shown on the sticker. You should turn it all the way, but without using excessive force so as not to break the locking mechanism.
After completing the described procedures, the headlight should move forward. Pull the headlight out of the fender well until the headlight rests against the retaining bracket. Press down on the locking clip and hold it pressed. At this time, finally remove the headlight from the niche in the body.
Start installing the headlight in its original place by installing the headlight in the guide grooves. Before doing this, make sure that there is no dirt on these grooves and check that the plug is securely fixed in the headlight mount. After inserting the headlight into the guides, carefully push the headlight into its niche. When the headlight is fully recessed, a weak but clear click should be heard, indicating that the locking bracket is fixed.
Turn the fixing bolt towards Close as shown on the sticker. The locking bracket should click into place with an audible click.
After installing the headlight on the Tuareg, check the side clearances: they should be the same around the entire perimeter. If the gaps are not the same, the position of the headlight requires correction. Check the functionality of the installed headlight for all its functions. Check the headlight settings and adjustments.
In order to correct the position of the headlight and correct any side gaps, remove the front bumper cover by unscrewing all the mounting bolts of the bumper cover guide profile.
When the bumper guide profile is removed, the two front mounting bolts are exposed. Loosen them so that the Tuareg headlight, together with its mount, can move freely in the adjusting sleeves. By unscrewing or tightening the adjusting bushings, adjust the gaps.
After adjustment, tighten the headlight mounting bolts to the required torque specified in the factory instructions. After this, check the headlight side clearances again. Install the bumper guide profile.
Check the performance of the headlights for all functions. Check the Tuareg's headlight adjustments and adjust if necessary. That's all the basic manipulations necessary to remove the headlight on the Tuareg. In principle, when you start, it will become intuitively clear how this is done.
Source
How to remove a headlight on a Volkswagen Touareg at home
The first stage of work is to open the car hood to provide access to the headlight fixing elements.
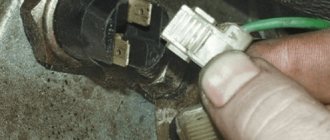
Now you need to disconnect the headlight power terminal block. To do this, press the latch and pull the power supply towards you.
Use your fingers to press the latch-shaped lock that holds the headlight in its seat on the car body, in the direction shown in the photo below.
Press your hand on the outermost part of the headlight until you hear a characteristic click, after which a small gap forms between the headlight and the body.
Now that nothing is stopping us, we can remove the headlight from the car body. Grab the bottom of the headlight with your hand and pull it towards you, as shown in the photo.
headlight
completely dismantled and ready for further work, for example, replacing low beam lamps or installing xenon.
Sources:
https://auto-park24.ru/obsluzhivanie/kak-snyat-faru-na-tuarege.html
Volkswagen Touareg headlight modifications
The Volkswagen Touareg is equipped with bi-xenon headlights with gas-discharge lamps, which provide both high and low beam simultaneously. The principle of operation of the Dynamic Light Assist system is based on the fact that a monochrome video camera with a highly sensitive matrix, located on the mirror inside the cabin, continuously monitors light sources appearing on the road. The camera used in the Touareg is capable of distinguishing the light of street lamps from that of an approaching vehicle by interference . If street lights appear, the system “understands” that the car is within the city and switches to low beam, and if artificial lighting is not detected, high beam automatically turns on. When an oncoming car appears on an unlit highway, the intelligent light distribution system is activated: the low beam continues to illuminate the adjacent section of the road, and the high beam is directed away from the road so as not to blind the driver of oncoming traffic. Thus, at the moment of meeting with another car, the Tuareg illuminates the roadside well and does not create discomfort for other road users. The servo drive responds to the signal coming from the video camera within 350 ms, so the bi-xenon headlights of the Tuareg do not have time to blind the driver driving oncoming vehicles.
The Dynamic Light Assist system allows you to avoid dazzling oncoming drivers without turning off your high beams
The headlights used on the VW Touareg are produced by such manufacturers as:
The most affordable are Chinese-made headlights, which can cost from 9 thousand rubles. Belgian VAN WEZEL headlights are approximately in the same price category. The cost of German Hella headlights depends on the modification and in rubles can be:
VAG headlights are even more expensive:
If the cost of headlights is not of fundamental importance for the owner of a Tuareg, then, of course, it is better to go with the Hella brand. At the same time, Taiwanese inexpensive Depo headlights have proven themselves well and are in demand not only in Russia, but also in Europe.
The cost of headlights for Volkswagen Touareg depends on the manufacturer and modification
To begin with, why remove the headlights?
The need for dismantling may arise in the following cases:
Note! The headlights on the Touareg 1 are very easy to remove; you don’t even need a screwdriver. It's all about the original mount, which consists of a shaft and a plastic clamp that securely holds the front optics of the Volkswagen Touareg. This mount is both a plus and a minus of all Tuaregs. The advantage is that in order to remove the headlight, you do not need to have any tools or experience, just know the sequence of actions. This feature allows you to save on the expensive cost of service station services. The disadvantage is that such a simple mount causes increased interest among criminals who steal these “easily removable” headlights. There are so many cases of theft that victims began to unite in groups and discuss the problem on numerous forums.
Why remove headlights on a Volkswagen Touareg?
When situations may arise in which headlight removal work may be required:
- For polishing Volkswagen Touareg headlights.
- Dismantling headlights, for example, to install xenon or bi-xenon.
- It is also necessary to remove the headlight on a Volkswagen Touareg in order to wash and clean the optical and reflective elements. Owners of Touareg SUVs know about the “diseases” of their four-wheeled friend, so without further ado they will understand why to wash the Touareg headlights.
- Also, dismantling the car's headlights may be necessary in case of car repairs or complete replacement of the headlight unit.
Note! The headlights on the Touareg 1 are very easy to remove; you don’t even need a screwdriver. It's all about the original mount, which consists of a shaft and a plastic clamp that securely holds the front optics of the Volkswagen Touareg. This mount is both a plus and a minus of all Tuaregs. The advantage is that in order to remove
headlight, you don’t need to have any tools or experience, just know the sequence of actions. This feature allows you to save on the expensive cost of service station services. The disadvantage is that such a simple mount causes increased interest among criminals who steal these “easily removable” headlights. There are so many cases of theft that victims began to unite in groups and discuss the problem on numerous forums.
How to remove a headlight on a Volkswagen Touareg 1 at home
1. First of all, open the hood.
2. Then disconnect the headlight power cord. To do this, press the latch and pull the power supply towards you.
3. Using your fingers, press the latch that holds the headlight in the “shaft” in the direction shown in the photo below.
4. Press your hand on the outermost part of the headlight until a characteristic click is heard, after which a small gap forms between the headlight and the body.
5. The gap is clearly visible in the bottom photo.
6. Now that there is nothing in the way, the headlight can be removed. Grab the bottom of the headlight with your hand and pull it towards you, as shown in the photo.
7. The headlight has been completely dismantled and is ready for further work.
Installation is in the reverse order:
1. We put the headlight in place along the plastic slots, then you need to press, as in the case of removal, only this time on the opposite, inner part of the headlight.
2. Next, pull the latch in the opposite direction until you hear a characteristic click, as shown in the picture.
3. Don't forget to connect the power supply.
As you can see, there is nothing complicated. However, without knowing or not following a clear sequence, you can break something somewhere and end up adding several more to one problem. That's all, I hope the article was useful to you. As a thank you to the author, use the social buttons. networks - “Share”. Thank you for your attention, see you again at farainfo.ru.
How to remove a headlight on a Volkswagen Touareg at home
The first stage of work is to open the car hood to provide access to the headlight fixing elements.
Now you need to disconnect the headlight power terminal block. To do this, press the latch and pull the power supply towards you.
Use your fingers to press the latch-shaped lock that holds the headlight in its seat on the car body, in the direction shown in the photo below.
Press your hand on the outermost part of the headlight until you hear a characteristic click, after which a small gap forms between the headlight and the body.
Now that nothing is stopping us, we can remove the headlight from the car body. Grab the bottom of the headlight with your hand and pull it towards you, as shown in the photo.
headlight
completely dismantled and ready for further work, for example, replacing low beam lamps or installing xenon.
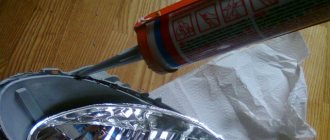
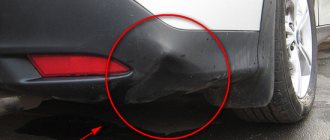
Headlight polishing
Owners of Tuaregs are well aware that after a certain period of use, the car’s headlights can become cloudy and dull, transmit light worse, and generally lose their visual appeal. As a result, the likelihood of an accident increases, and in addition, the market value of the car decreases. A way out of this situation may be to polish the headlights, which can be done without going to a car service center. You can polish your headlights by having on hand:
Having prepared materials and tools, you need to:
Video: polishing VW Touareg headlights
Replacing VW Touareg headlights
Removal of the Tuareg headlights may be required in the following cases:
Volkswagen Touareg headlights are removed as follows.
Reinstalling the headlight is done in the reverse order:
Thus, dismantling and installing Volkswagen Touareg headlights is usually not difficult and can be done even without a screwdriver. This feature of the Tuareg, on the one hand, simplifies the headlight maintenance procedure, and on the other hand, makes lighting devices easy prey for intruders.
Replacing D3S xenon lamps on a VW Touareg 2 without removing headlights and bumper
However, there are no unsolvable problems, and among the craftsmen there will always be someone who can simplify the process, avoiding the need to remove additional elements.
To replace the headlight bulbs on a second-generation Tuareg, you will need a certain amount of manual dexterity and flexibility, as well as a special tool in the form of a cardan adapter and a TORX set.
Actually, replacing the lamps in the headlights of Touareg 2 without removing the headlights and bumper
- Raise the hood, unscrew the two top screws securing the rear cover, behind which the light bulb is located. These are not the screws that hold the headlight on. Be careful as screws that are removed can be easily dropped and lost.
- By pressing the latch securing the rear headlight cover up, remove this cover.
- The cover is removed by removing its lower part from the hook. Here you will have to get used to it; for convenience, I unscrewed one screw securing the air filter housing on the right headlight. After this, by pulling the filter housing a little, you can remove the cover.
- Next, turn off the power to the lamp and take out the lamp itself, turning it half a turn.
- Installing new lamps is done in the reverse order.
This way you can change the light bulbs in the headlights of a Volkswagen Touareg 2 without removing the bumper and radiator grille. This method will allow you to save time and effort, while you definitely won’t break or damage anything.
Headlight theft protection
Theft of headlights and ways to combat them are quite actively discussed on numerous forums of VW Touareg owners, where car enthusiasts share their personal developments and offer their own options for protecting headlights from car burglars. Most often, metal cables, plates, tension devices, and lanyards serve as auxiliary materials and devices . The most popular and reliable method of protection is with the help of cables, which are attached at one end to the ignition unit for xenon lamps, and at the other to the metal structures of the engine compartment. The same thing can be done with turnbuckles and inexpensive metal clamps.
You can protect the headlights from unauthorized removal even with the help of ordinary plastic ties.
Video: one way to protect Tuareg headlights from theft
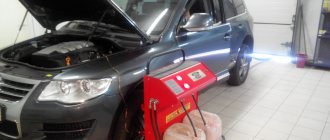
Adaptation and correction of VW Touareg headlights
Volkswagen Touareg headlights are quite sensitive to various kinds of external interference, so after replacing them, an error may appear on the monitor indicating a malfunction in the external lighting control system. The correction is done manually using a screwdriver.
It happens that such correction is not enough, then you can adjust the position sensor itself, which is mounted together with the headlight turn wire. It has an adjusting screw that allows you to move the sensor forward and backward (i.e., calibrate it). To gain access to the sensor, you need to remove the drive. It’s easy to unscrew it, but not easy to pull it out (the sensor gets in the way and clings to the frame). In order to pull it out, you need to turn the rotating frame to one side until it stops and the drive and sensor come out easily. Next, you need to move the sensor in the desired direction with a small margin (so as not to remove the drive again later), the final adjustment can then be made when attaching the drive cable to the rotating frame. To eliminate an error, sometimes you have to disassemble and reassemble the headlight several times and drive the car. If you made a gross mistake during adjustment, the error will appear again immediately when you start the car when testing the headlights. If not roughly, then when turning 90 degrees at speeds above 40 km/h. When driving a car, be sure to check both left and right turns.
Video: adjusting Volkswagen Touareg headlights
Adaptation of headlights is required if, after reinstalling them, the Light Assist system does not work automatically, i.e. the headlights do not respond to changing road conditions . In this case, it is necessary to configure the software part, for which you will need a Vag Com adapter, which connects the car’s local network to an external device, for example, a laptop, via an OBD connector. The laptop must have drivers installed for working with Vag Com and a program used for adaptation, for example, VCDS-Lite, VAG-COM 311 or “Vasya-diagnostician”. In the main menu of the program, you must select the “Troubleshooting” button.
How to remove a headlight on a Touareg
Instructions
It is not necessary to disconnect the ground from the battery before removing the headlight. Turn off the ignition and all electrical consumers, remove the ignition key. Press the headlight housing. In this case, the fixing bolt should be turned in the direction of the Open arrow, as shown on the sticker. You should turn it all the way, but without using excessive force so as not to break the locking mechanism.
After completing the described procedures, the headlight should move forward. Pull the headlight out of the fender well until the headlight rests against the retaining bracket. Press down on the locking clip and hold it pressed. At this time, finally remove the headlight from the niche in the body.
Start installing the headlight in its original place by installing the headlight in the guide grooves. Before doing this, make sure that there is no dirt on these grooves and check that the plug is securely fixed in the headlight mount. After inserting the headlight into the guides, carefully push the headlight into its niche. When the headlight is fully recessed, a weak but clear click should be heard, indicating that the locking bracket is fixed.
Turn the fixing bolt towards Close as shown on the sticker. The locking bracket should click into place with an audible click. After installing the headlight, check the side gaps: they should be the same around the entire perimeter. If the gaps are not the same, the position of the headlight requires correction. Check the functionality of the installed headlight for all its functions. Check the headlight settings and adjustments.
In order to correct the position of the headlight and correct any side gaps, remove the front bumper cover by unscrewing all the mounting bolts of the bumper cover guide profile.
When the bumper guide profile is removed, the two front mounting bolts are exposed. Loosen them so that the headlight and its mount can move freely in the adjusting sleeves.
By unscrewing or tightening the adjusting bushings, adjust the gaps.
After adjustment, tighten the headlight mounting bolts to the required torque specified in the factory instructions. After this, check the headlight side clearances again. Install the bumper guide profile. Check the performance of the headlights for all functions. Check headlight adjustments and adjust if necessary.
Before removing the headlights, you must disconnect the wiring. You can remove the headlight in another way. To do this, you need to disconnect the battery or remove the fuse box, but then you will have to disassemble almost everything that is located directly under the hood. This option for removing the headlight is problematic, so it should be discarded immediately.
There is a much easier and faster way.
The standard headlight is mounted in three places, regardless of whether it is left or right. The first two fasteners can be seen with the naked eye. These are just two bolts with a ten-point wrench in diameter. To do this, you need a wrench or a socket with the number ten, which is used to mark any tool.
A spanner wrench is best suited for this.
The plastic “lock”, which is located at the bottom of the headlight, is the third attachment point. The difficulty is that it is difficult to remove it from the mount. Some car owners, in order to get to the fastener, remove bumpers and fender liners, but this is a rather labor-intensive process. There is a much simpler and more effective way.
To remove the mechanism of the right headlight from the mount, you need to press the lower outer part of the headlight from the inside, which is adjacent to the fender, in the engine compartment next to it, especially since the space available there easily allows this to be done. At the same time, the entire block easily comes out of the mount.
It will be impossible to repeat the above operation with the left headlight, since there is not enough space for this, and the tight arrangement of all these body elements will prevent it from being pulled towards itself.
To remove the headlight, you need to do the following. It is necessary to loosen the clamp of the air duct sleeve and move it to the side, as it will create interference.
Then, you need to grab the top edge of the headlight, loosen it slightly and carefully push it forward 1-1.5 cm. When it moves away, you can take it by the bottom edge and side edges from the outside and carefully pull it to the left and forward. This process is quite labor-intensive, since you need to constantly perform back-and-forth movements, constantly loosening the headlight.
But this is the only way to disengage the lock that holds the headlight.
The most important thing is patience and calm. It is imperative to remember that it is recommended to use only special tools.
The driver must approach the issue of road safety as responsibly as possible.
Incorrectly adjusted headlights can cause an accident due to insufficient illumination of the roadway or dazzling another driver. Is it possible to adjust the headlights yourself?
You will need
- -automobile;
- -a flat section of road or land;
- -absolutely flat wall to correct reflected light;
- -paint for fixing marks on the wall.
Instructions
First of all, prepare the car for the headlight adjustment procedure. Look in the service book for the pressure ratio of the front and rear wheels. Check the proper operation of the lamps. Refuel the car, it is better to fill the entire tank to improve the measurement performance and simulate the situation of the car's behavior on the road. Pay attention to the car's balance.
Experienced motorists try to load the car evenly, or invite an assistant who will voluntarily agree to act as a balancing load. Align the headlights with a grid that needs to be applied to the wall. To do this, place the machine as close to the wall as possible.
Mark a point on the wall opposite the center axis of the machine. Then find the center points of the car's headlights and draw them on the wall as well. Now connect the resulting headlight points with a horizontal line. Draw vertical lines passing through the centers of all points on the wall, including the central axial line that you drew first.
The adjustment process is carried out differently depending on the vehicle model. Basically, it consists of tightening and adjusting the travel of the headlight screws responsible for directing the light beam.
Sometimes you have to adjust the headlights individually, that is, isolate one of them, covering, for example, cardboard or other available material. After the general adjustment, proceed to the second stage - bringing together the horizontal and vertical grid lines.
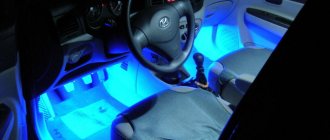
Headlight tuning
You can add exclusivity to your car by tuning the headlights. You can change the appearance of the Tuareg headlights using:
In addition, the headlights can be painted in any color; most often, tuning enthusiasts choose matte black.
Quite often, VW Touareg owners repaint their headlights black
With proper and timely maintenance, the headlights installed on the Volkswagen Touareg will serve the car owner well for many years. It is extremely important to ensure not only stable operating conditions for the headlights, but also to consider the conditions for their safety: the design of the Tuareg's front light fixtures makes them vulnerable to theft. The headlights of the VW Touareg are high-tech devices that, together with the Dynamic Light Assist system, provide intensive driver support and help reduce accidents. Among other things, the headlights look quite modern and dynamic, and if necessary, they can be supplemented with elements of the author’s design.