Checking the fuel pump Lada Kalina/Granta
If after turning the ignition key there is no buzzing sound from the fuel pump, then the first thing to check is the fuel pump fuse and relay. In the Lada Kalina and Lada Granta mounting block, the fuel pump fuse is F21 (15A), and the fuel pump relay is K12. If the fuse is good, do the following:
- Turn on the ignition
- Remove the fuel pump relay
- Apply +12V to pin No. 11 of the diagnostic block, or place a jumper between 87 and 30 relay pins
- Check by ear that the fuel pump is turned on
If the fuel pump does not turn off, then check:
Wiring and contacts between the fuel pump and the diagnostic block/fuel pump relay. To do this, check the voltage at the fuel pump chip using a test lamp or multimeter. There is no connection between the fuel pump and the vehicle ground. Apply the mixture to the fuel pump (located under the rear seat). Fuel pump is faulty
To check it, apply +12V directly to the contacts of the fuel pump (Attention! Remaining gasoline may ignite from a spark!).
In rare cases, the fuel pump does not work due to:
- ECU (controller) malfunction
- alarm malfunctions
Second system: where is it located?
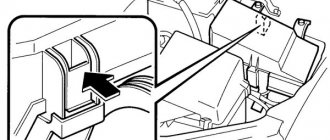
The remaining Kalina fuel pump relays are located on the right side of the dashboard, not far from the air duct, also under a special cover.
First you need to remove the corner screw, then open the cover completely and remove it.
To remove the Kalina fan relay, you need to use a ten-socket socket wrench.
Then you need to carefully remove the wires, remove the unit and the Kalina cooling fan fuse. This is difficult to do, since you need to avoid damaging the wires. Upon completion of removal, the block will look as shown in the picture.
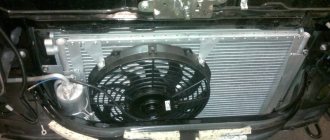
The presented unit includes the following elements: 1. Turning on the cooling fan (low speed); 2. Main relay; 3. Turn on the cooling fan (high speed); 4. Engine cooling system fuse; 5. Fuel pump relay. Now you know where the fuse for the fuel pump on Kalina is located.
Other causes of fuel pump malfunctions
Where is the fuel pump relay and fuse on the viburnum
Quite often, unprofessional installation of additional electrical equipment or security anti-theft systems leads to the fact that the power to the fuel pump is lost due to mixed up contacts or other connection errors.
Finally, let’s add that the gas pump in the gas tank is immersed in gasoline, in which it is actively cooled. The habit of driving with an empty tank can quickly damage the electric motor of the fuel pump, as it burns out.
What functions does the fuel pump relay perform, signs of breakdown. Where is the fuel pump relay installed, how to properly check the fuel pump relay.
Why does the starter turn normally, but the engine does not catch and does not start? Main causes of malfunction, checking fuel supply and ignition systems. Adviсe.
Diagnose faults that may indicate problems with the fuel pump. Self-check of the device, measuring the pressure in the fuel rail.
The causes of whistling and increased noise during operation of the fuel pump are overheating of the pump. How to diagnose and fix the problem yourself. Tips and tricks.
How to change a fuel pump. Location of the fuel pump, releasing pressure in the system, unscrewing the fuel lines, removing the pump, reassembling.
What to do if the car accelerates worse, does not pick up speed, or has failures during acceleration. Why the engine does not pull, how to find the reason for the decrease in power.
Renault Logan fuel pump fuse
The fuse box for a Renault Logan car is the most important part that ensures uninterrupted operation of almost all electronic systems of the car, even heated glass and pump operation. The layout of this unit and measures for prevention and repair should be known to every car enthusiast interested in the long and trouble-free service of his Renault.
Block location and diagram
The fuse block (in it you can also find fuses for the cigarette lighter from the passenger compartment, heated glass, pump operation, and even the stove, washer) is intended to save the car's electrical circuits when the load increases. The Renault unit is located in the housing, in the central panel on the left side. The block is closed with a decorative plastic plug attached to several clips. To detect a problem and identify breakdowns of individual components and assemblies of a given Renault model, the owner will need an accurate diagram of the location of the fuses inside this mounting block; it will also help with replacement.
When dismantling the cover that covers the block, on the reverse side there is a fuse diagram indicating the housing elements, their purpose, and those responsible for a specific system.
According to this diagram, the block contains fuses responsible for the following systems:
- The relay for the fuel pump and other fuel systems is responsible for the uninterrupted operation of the pump. If a malfunction occurs, the pump fuse in the housing, which has a standard rating of 10 amperes, blows out and the fuel pump fuse must be replaced. This fuse is also important for the functionality of the fuel pump.
- The following relays are for the cigarette lighter, generator, washer and heated windshield (the latter is relevant for second-generation Renault Logan cars). Responsible for the uninterrupted operation of the glass heating system, radio and filament, and cigarette lighter in the cabin.
- Wiper design relay.
- Other relays responsible for the main systems of the car.
There is also a replacement diagram with fuses located in the engine compartment under the hood.
In this case, the unit is located to the right of the battery in the engine compartment, in a special housing, not far from the generator. To access it, you need to lift the hood and press the right and left cover latches alternately; after removing it, a diagram of the placement of Renault relays and fuses will also be located on the back side. As a rule, relays and fuses are located separately, and in this case on a Renault Logan car this is no exception.
System check
To check the serviceability and functionality of the glass heating, washer, cigarette lighter from the passenger compartment, pump, generator or other system, to carry out replacement, it is necessary to remove these elements from the housing one by one. This procedure is carried out using special tweezers, otherwise there is a possibility of damage to fragile relays and fuses. If an element, for example, for a gas pump or for a cigarette lighter, has been subject to mechanical stress, this will be noticeable by the melted edges. If a part is melted, this does not mean that it is faulty, it indicates that a short circuit is occurring in one of the nodes.
You can also check the functionality using special devices - testers, or by checking the circuit for an open circuit. Many car enthusiasts install fuses of a higher rating when replacing them when there is a short circuit, but Renault categorically does not recommend this operation, as it can lead to negative consequences.
Prevention
To prevent failure of these elements, you should follow several rules:
- Carefully study the instructions for the additional electrical equipment in the housing (the power of the accessory and its purpose are always indicated there, as in the case of heated glass, cigarette lighter, washer, etc.). This will avoid system overloads.
- Monitor the condition of electrical wiring, electrical equipment and the body. Exposed wires and rust can have fatal consequences.
- Correctly include additional sources of consumption in the network.
Where is the fuse for the fuel pump on viburnum?
Where is the fuel pump fuse on a Chevrolet Niva: where is it located?
The fuses and relays for the fuel pump and engine cooling fan are not located in the main unit, but in the additional unit. Moreover, there are even two of them. One of them is located under the cover near the gearshift lever, just below the ashtray. You can open it by simply prying it with a flat screwdriver:
Let's take a closer look at what it all looks like and which element is responsible for the operation of which device:
The numbers in the picture correspond to the numbering below:
- Main relay power circuit
- Fuel pump
- ECU constant power supply circuit
- ECM diagnostic connector
If one of the fuses fails, remove it with tweezers and insert a new one. The battery must be disconnected while this work is being carried out.
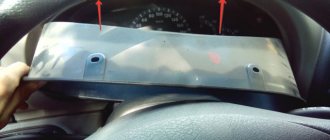
The second additional fuse and relay box is located on the right side of the instrument panel at the very bottom near the heater air duct, under the cover. Look clearly at the photo below:
First, unscrew the screw, which is located in the very industrial corner, and then remove this cover completely.
Now, to remove this relay block, we need a 10mm open-end or socket wrench.
After this, we move the wires to the side and carefully remove the entire block with the relay and fuse. Removing it is quite inconvenient, since rather voluminous wiring harnesses will get in the way. This is what it looks like after removal:
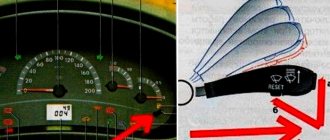
Now let's look at this mounting block in more detail:
- Turning on the engine cooling fan (low speed)
- Main relay
- turning on the engine cooling fan (high speed)
- fan fuse
- fuel pump relay
If one of the above elements fails, remove the burnt one and put a new one in its place. We put everything back in the reverse order.
Before replacing the fuse, the cause of the blown fuse must be determined and eliminated. To avoid failure of elements of the engine control system, do not install fuses with an increased rating or homemade ones. Sometimes the fuse thread remains intact, while its connection inside the fuse is broken. It is impossible to visually determine such a malfunction. In this case, you can assess the condition of the fuse using an ohmmeter. You will find a full description of viburnum fuses below.
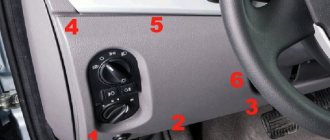
Where is the Kalina relay and fuse mounting block located.
On the left side, behind the exterior lighting control panel.
1. By pulling the tab on the left side of the instrument panel, open the cover of the mounting block.
2. Here is the mounting block itself.
To get a better look at the location of the viburnum fuses, click on the image.
Purpose of viburnum fuses located in the car interior block.
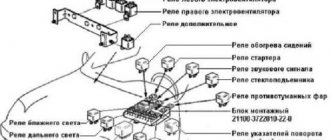
Mounting block of fuses and relays: 1 - installation location of the headlight wiper relay, K1; 2 — headlight high beam relay, K7; 3 — relay for turning on the sound signal K8; 4 — relay for turning on power windows of viburnum doors, K2; 5 — installation location of the fog light relay, K9; 6 — starter relay; 7 — relay for turning on the heated rear window, K10; 8 - additional relay, K4; 9 — seat heating relay, K11; 10 — relay for turning on direction indicators and hazard warning lights, K5; 11 — installation location of the backup viburnum relay, K12; 12 — relay for turning on the windshield wiper and windshield washer, K6; 13 — tweezers for removing fuses and relays with a small housing; 14 — tweezers for removing the relay; 15 - spare fuses; 16 — installation location of the ABS fuse, F28: 17 — electric power steering fuse, F27; 18 - fuses F1-F26
Decoding the relays and fuses in the main block of the Lada Kalina.
Direction indicators (immobilizer control unit, instrument panel, hazard warning switch)
Fuses and relays for the fuel pump and cooling fan are located in the additional unit. Lada Kalina is equipped with two such systems, each of which is necessary for the optimal functioning of certain devices in the car.
Fuses, relays, their location and purpose
| Most power supply circuits for vehicle electrical equipment are protected by fuses. Headlights, electric fan motors, fuel pump and other powerful consumers are connected via a relay. Fuses and relays are installed in mounting blocks, which are located in the car interior on the side of the instrument panel on the left side and in the engine compartment on the left and right sides of the battery. |
The fuses can be removed and checked visually. If you are unable to remove the fuse by hand, you can use special tweezers. A blown fuse can be easily identified by the damaged element. You can also test the fuse for continuity using an ohmmeter or an open circuit tester—if there is no continuity, the fuse is blown. Each fuse is marked with a rating. Please note that the fuse can only be replaced with a fuse of the same rating. Spare fuses are located in the fuse box. If you use a spare fuse, always replace it as soon as possible so that you always have spare fuses of different ratings in the box.
Warning! Never install a fuse of a higher rating or connect wire terminals with improvised means instead of using a fuse, as this may cause damage to the electrical circuit and a fire.
If the fuse is blown, be sure to check the electrical circuit for signs of a short circuit. Check the system for exposed wires or wires with frayed, melted, or burnt insulation. If you replace a fuse before determining what caused it, the new fuse will also blow.
Sometimes a fuse may blow or cause an electrical circuit to open for no apparent reason. Corrosion of the fuse and fuse block terminals can cause damage to the fuse contacts. If this occurs, remove any traces of corrosion using a wire brush or sandpaper, then spray the fuse terminals with electrical contact cleaner.
Features of replacing fuses on the Lada Kalina with your own hands
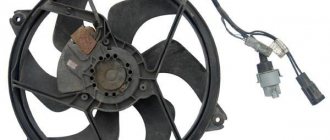
The fuel pump on the VAZ 2114 does not pump
The Lada Kalina has earned a reputation as a comfortable and reliable car. But, like all vehicles, it is not immune to various types of breakdowns. Quite often one or another electrical equipment fails. Some breakdowns are not critical, for example, the cigarette lighter does not work, but there are also those that can completely render your vehicle immobile.
This is, first of all, the failure of such an important component as the fuel pump. It is not always necessary to change the consumer in order to restore its functionality; very often it is enough to replace the fuse and the relay responsible for it to restore its functionality
Car Lada Kalina
Let's say right away that on the Lada Kalina car the electrical circuits are protected by electrical fuses and relays located in several compartments. For example, the fuse for the cigarette lighter is located in the main compartment under the panel, and the fuel pump is located in the additional compartment.
All blocks with electrical fuses are installed in easily accessible and convenient places, so changing and checking protective elements will not cause difficulties even for a novice car enthusiast.
Where is the fuse box?
The largest compartment, which houses most of the fuses and relays, is located on the left side of the instrument panel and is covered with a cover. The second, in which the elements responsible for the power unit control systems are located, is located in the lining of the floor tunnel. This is where the fuel pump fuse is located.
Location of the fuse and relay box on the Lada Kalina
Removal and replacement instructions
Replacing and identifying an unusable element in both the first and second blocks occurs in approximately the same way, so let’s consider the replacement process using the example of the one installed to the left of the dashboard.
Diagram on the back of the cover
Preparation
Be sure to remember that before you carry out work on electrical equipment, it doesn’t matter whether the cigarette lighter or the fuel pump has failed, the first thing you need to do is turn off the power to the system. To do this, turn off the engine and remove the negative terminal of the battery.
This video shows how you can quickly solve a problem with blown fuses on a Lada Kalina.
- We find the location of the block, it’s not difficult - the designers placed it on the left side of the dashboard under the cover.
- Open the lid.
- Using the diagram and table, we establish the location of the protective element we need.
- The block contains tweezers, with the help of which we extract the required element.
- Let's examine it.
- We check with an ohmmeter or lamp.
- If the spiral is burnt out, install a new one of equal value.
- We connect the removed battery terminal.
- We start the car.
- Let's see whether our consumer has earned money or not.
- If everything is in order, then the work is finished. If the consumer does not work or the electrical fuse has blown again, then everything is more serious. It may be necessary to check the circuit or dismantle the consumer and check it.
Layout of relays and electrical fuses
Explanation of the diagram shown in the photo.
The request returned an empty result.
Work with the block, which contains the element protecting the fuel pump and other elements responsible for the operation of the engine, is carried out in a similar way.
The request returned an empty result.
The protective element designed for 15 amperes, responsible for the fuel pump of the Lada Kalina, is designated F2 in the photo. To remove it, you need tweezers. All other work is carried out in the same way as in the large compartment.
Recommendations for use
- If you are a responsible car owner, then be sure to carry with you a set of electrical fuses of various ratings. Perhaps they will help you out at some point.
- Under no circumstances should you install wires or bugs. This can lead not only to failure of the electrical consumer, but also to a fire.
- Replacement only with an element of the same value is acceptable.
- Before work, do not forget to turn off the power to the system.
Sorry, there are no surveys available at this time.
This video shows what danger awaits the driver if he decides to save money and install a cheap Chinese electrical fuse. When a short circuit occurs, the conductive part in it does not burn out, but it simply begins to smoke. Such savings can lead to fire. Buy components and consumables only from reputable stores, otherwise you risk losing your car.
Designation of fuses and relays on Datsun on-Do and mi-Do
Fuse box - this element in the layout of a car means a lot. The electrics of Datsun models, like any budget car, are not too complicated. However, problems can also arise with it. And fuses may well become a source of problems. Therefore, it is recommended that the owner have at least a general understanding of them.
Fuse box with cover removed.
Where is the fuse and relay box located on a Datsun?
You can get to the fuse box directly inside the car. To do this, you need to remove the cover - first you need to pull the bottom, left edge of the cover and release its corner (left). Next, the force is applied to the central, right and upper parts, sequentially.
The procedure for removing the cover of the fuse box located in the passenger compartment
Location of fuses in the Datsun engine compartment
Fuse diagram for Datsun
Sometimes fuses need to be changed. It's easy to do. The main thing is to accurately take into account the type of part, and also to use only those that are intended specifically for your mi-Do and correspond to the specified rating, which can be checked on it, while the number is on the body of the block itself. Otherwise, the car may catch fire. The replacement is not difficult if you rely on the table presented:
| Fuse no. | Denomination (A) | Name of the protected circuit |
| F1 | 15A | Ignition coils |
| Injectors | ||
| Engine control circuit | ||
| Engine cooling fan relay x 3 pcs. | ||
| F2 | 25A | Body systems control unit power supply circuit |
| Driver's door block | ||
| F3 | 15A | Automatic transmission control unit power supply circuit |
| Automatic transmission unit drive | ||
| F4 | 15A | Airbag control unit power circuit |
| F5 | 7.5A | Dashboard |
| Engine control circuit (Cl. 15) | ||
| Electromechanical power steering | ||
| Brake sensor | ||
| Speed sensor | ||
| Automatic transmission selector | ||
| Windshield wiper switch | ||
| Rear window defroster relay | ||
| Windshield defroster relay x 2 pcs. | ||
| Seat heating | ||
| Discharge relay | ||
| Central control unit for body systems | ||
| F6 | 7.5A | Reversing light relay |
| Automatic transmission control unit power supply circuit | ||
| F7 | 7.5A | Canister valve |
| Mass air flow sensor | ||
| Phase sensor | ||
| Oxygen sensor x 2 pcs. | ||
| F8 | 25A | Rear window defroster |
| Heated exterior mirrors | ||
| F9 | 5A | Right rear marker light |
| F10 | 5A | Left rear marker light, license plate light |
| Button backlight | ||
| F11 | 5A | Rear fog light |
| F12 | 10A | Right low beam headlight |
| Electrical corrector for right headlight | ||
| F13 | 10A | Left low beam headlight |
| Electrical corrector for left headlight | ||
| F14 | 10A | Right high beam headlight |
| F15 | 10A | Left high beam headlight |
| F16 | 10A | Right fog lamp |
| F17 | 10A | Left fog lamp |
| F18 | 20A | Heated front seats |
| Cigarette lighter | ||
| F19 | 7.5A | ABS/ESC control unit |
| F20 | 15A | Sound signal |
| F21 | 10A | Fuel pump |
| F22 | 15A | Windshield washer |
| Rear window washer | ||
| Rear window wiper | ||
| F23 | 5A | Instrument panel power circuit |
| Diagnostic connector | ||
| F24 | 7.5A | Air conditioning compressor |
| Automatic climate control system control unit | ||
| F25 | 7.5A | Brake pedal sensor |
| F26 | 25A | Electronic valves ABS/ESC |
| F31 | 30 A | Central control unit for body systems |
| High beam headlight alarm | ||
| Wiper gear motor | ||
| F32 | 30 A | Electric heater fan |
| Automatic climate control system control unit | ||
| FF1 | 50 A | Heated windshield |
| FF2 | 60 A | Fuse between generator and battery |
| FF3 | 60 A | Fuse between generator and battery |
| FF4 | 40 A | Electric heater fans x 2 pcs. |
| FF5 | 50 A | Electromechanical power steering |
| FF6 | 40 A | Electric drive for ABS return pump |
Lada Kalina won't start.
The initial point of control will be the voltage of the connector, which powers the fuel pump from the on-board power supply of the car. Not only should it be equal to 12 V or even slightly exceed this value, but at the same time, while the machine is operating, the noise of the operating device must be clearly audible.
The disadvantage of this control method is the impossibility of detecting an unreliable contact in the electronic circuit for the connector
No matter what kind of loose connection, in the fuse block, fuel pump relay, the acquired 12 V at the terminals upstream of the pump will show the same 12 V. Unfortunately, a working pump will receive only a few volts and will not be able to work normally
Also a malfunction under these circumstances can be a breakdown of the fuel pump relay. This malfunction is easy to diagnose, since special symbols are displayed on the device panel, which allows the driver to see an error when operating this part.
What remains for our client to do? The control relays are located inside the car and, in the event of a malfunction, they highlight themselves with appropriate clicks. It is not difficult to change the fuel pump relay without the help of others; it is enough to recognize the location of its installation by the special symbols printed on it.
Fuel pump parts disassembled
Checking the pressure created consists of monitoring this parameter in the pump pumping mode, when after turning the key for 1.5-2 seconds, it turns on to add fuel to the pipeline system. For Lada Kalina the myth indicator is 0.8-1.2.4 kgf/cm2. If the pressure turns out to be underestimated, then you should look for the cause of this phenomenon, alternately checking each link: filter, mesh, fuel pump. As a result, the part that prevents the rapid build-up of pressure to normal will be replaced.
Instrument panel diagram Kalina 2
1,2 – blocks of the instrument panel wiring harness to the blocks of the front wiring harness; 3, 4 – blocks of the instrument panel wiring harness to the blocks of the rear wiring harness; 5 – lighting control module; 6 – ignition switch; 7 – on-board computer mode switch; 8 – windshield wiper switch; 9 – instrument cluster; 10 – light signaling switch; 11 – trunk lock drive switch; 12 – diagnostic block; 13 – block of the instrument panel wiring harness to the block of the wiring harness of the air supply box; 14 – rear window heating switch; 15 – alarm switch; 16 – brake signal switch; 17 – multimedia system; 19 – rotating device; 20 – driver airbag module; 21 – sound signal switch; 22 – mounting block: K1 – relay for the electric fan of the engine cooling system; K2 – door lock relay; K3 – additional starter relay; K4 – additional relay; K6 – windshield wiper relay; K7 – headlight high beam relay; K8 – sound signal relay; K9 – relay for low beam headlights; K10 – relay for turning on the heated rear window; K11 – main relay; K12 – fuel pump relay; 23 – electric power steering; 24 – cigarette lighter; 25 – lampshade lighting of the glove box; 26 – glove box lighting switch; 27 – block of the instrument panel wiring harness to the block of the ignition system wiring harness; 28 – engine control system controller; 29 – block of the instrument panel wiring harness to the block of the rear wiring harness 4; 30 – electronic accelerator pedal; 31 – additional resistor; 32 – heater electric motor; 33 – solar radiation sensor; 34 – ESC switch; 35 – relay (K13) of the electric fan of the engine cooling system 3; 36 – compressor relay (K16); 37 – relay (K14) for heating the windshield; 38 – relay (K15) for heating the windshield 2; 39 – headlight range control regulator; 40 – clutch pedal position signal switch; 41 – passenger airbag module; 42 – evaporator temperature sensor; 43 – steering angle sensor; 44 – windshield heating element; 46 – windshield heating switch; 47 – central unit of body electronics; 48 – micromotor reducer of the air flow distributor damper; 50 – controller of the automatic climate control system; 51 – micromotor gearbox for mixing air flows; 52 – micromotor gearbox for recirculation damper drive.
How to check relay operation
What is a fuel pump relay? This is a special device that ensures the supply and termination of electrical power to the fuel pump at the command of the electronic control unit (ECU). On vehicles equipped with an automatic transmission system, a relay will be activated when the heavy acceleration mode needs to be activated.
Where is it located? The location of the relay depends on the model and make of the machine. On some vehicles it is located close to the injection control unit. On others, it's under the dashboard near the fuse box. There are other options.
Signs of problems at work
The fuel pump is controlled using a relay as follows: the key inserted into the lock is turned, thus turning on the ignition; After this, the fuel pump runs for about two to three seconds. This is enough to build up pressure in the fuel rail. A click should then be heard, indicating that the relay turns off the mechanism. After this, the pump will operate if two conditions are met: the engine is rotated by the starter at startup and the motor subsequently operates independently. When the ignition is turned off and the engine stops, the relay immediately or after one second turns off the fuel pump.
There are fuel systems in which the fuel pump starts working not when the ignition key is turned, but when the car owner opens the door. This helps to start the engine and create the required pressure inside the fuel system in advance.
Due to malfunctions in the relay, the device is deprived of the necessary power. It may buzz or hum for a very long time. It does not stop working a few moments after reaching the required pressure level in the fuel system. If there is a malfunction in the relay, the engine may not start at all because the pump does not pump fuel. When the car constantly hums or hums, the relay gets stuck and the battery energy is wasted to continuously rotate the pump motor.
How to check it yourself
First of all, you need to find the fuel pump fuse and its relay to check their operation. The relay may become hot and operate untimely or not operate at all due to problems with the fuse.
Checking the fuel pump relay yourself
The simplest test method is to install a working device. Another way is to connect a control light in place of the relay. When the ignition key is turned, the light should light up.
Even during the test, you can install a jumper on the terminals. If after turning the ignition key the pump starts to work, this indicates problems in the operation of the fuel pump control device.
Another method of testing a relay can be considered using the example of the VAZ 2110. The fuel system pump relay in this car is located near the fuse. For diagnostics, you need to take a multimeter or test lamp with a current not exceeding 0.25 A.
After this, you need to measure the current voltage at the terminals of the device one by one
At the same time, it is important to fix the contact going to the mass. This way you can definitely find out whether the relay needs to be replaced
If the light does not light, then the fuse is fine. In this case, you need to examine the wiring leading from the relay to the electronic control unit.
It should not be ruled out that there may be malfunctions in the motor control unit. In addition, you need to know that the relay may malfunction; it may not function normally or become stuck due to malfunction or poor installation of the alarm. The reason for this is that the security and anti-theft interlock devices stop the power supply to the fuel pump.
fuel pump relay viburnum
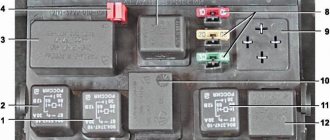
For those who are interested in the question of where the Kalina fuel pump relay is located, it is recommended that you read the article. First of all, it should be noted that the fuel pump relay and fuses are located on the additional, and not on the main unit. In addition, there are two additional blocks. The first is located near the gear lever, under the cover, slightly below the ashtray. This block contains the fuel pump protector.
To open the lid, you don’t need any special tools; you can simply pry it off with a flat-head screwdriver. Before removing and replacing fuses or relays, you must disconnect the battery.
Replacing the fuse is very simple; use special tweezers to remove the part and replace it with a working spare part. In most cases, a fuse malfunction can be determined visually by a burnt thread. In some cases, the thread remains visually intact, but contact with the legs is broken. In such a situation, you can determine the malfunction using an ohmmeter, a test lamp, or by replacing it with a known working fuse.
The fuel pump relay is replaced in the same way on the Lada Kalina model. The second relay and fuse box is located on the dashboard, on the right side, under the cover, almost near the air duct from the stove. Actually, this block contains the fuel pump relay.
To remove the cover, you only need to unscrew one screw. Then pull the cover towards you.
In order to pull out the block, you need to have a 10-mm socket or open-end wrench on hand, which should be used to unscrew the fastening bolts. Replacement, as in the case of a fuse, is extremely simple. The burnt part should be removed and a working relay put in its place. Reassemble in reverse order.
Where is the fuel pump fuse on a Lada Priora car?
In fact, the fuse is not always to blame and should catch all the “bumps”. But if you are still sure or, on the contrary, want to refute your speculations, it is worth studying this issue in detail, with which we will help.
What is a fuse
Yes, you understood correctly, not all car enthusiasts know even this. Especially those who open the hood in order to be convinced once again that this shaitan-machinery is beyond his understanding.
Fuses are small elements that melt when overloaded, thereby breaking the current circuit. Looking in detail at the Priora fuse box, it is easy to see that they consist of a conductive element, which contains several plates made of different materials. It is between them that the fusible inserts are located.
The body is covered with organic glass, and the conductive element itself is part of the general electrical circuit.
The fuses themselves are very cheap for the Lada Priora. One of them costs from 25 to 55 rubles.
Fuse system of Lada Priora car
This car model has some features associated with this unit - there are several safety blocks. Any of them can be located in different places of the car, therefore, hoping to find a specific one, you need to know at least approximately its location, in what part of the unit. This spread was made for reasons of saving wiring, and not for additional safety, as stated in some extended instructions for the machine.
So where is the fuel pump fuse located in the iron puzzle called Lada Priora
Depending on the type of instrument panel in the car, you can determine the location of the required element:
- tall and large - near the front seat at the passenger’s feet;
- europanel with air conditioning - under the adjustment of the stove.
So we found it and checked it. There are two options here:
- It didn't burn. The problem may be in the wiring, because the terminals often oxidize, causing a loss of circuit continuity. The wires can break, then you will have to look for the break area itself. Another problem could be a broken fuel pump relay. Therefore, you should not immediately sin on the fuse.
- Burnt out. Each element of the fuse block is marked "F", which indicates that it is related to a low power level circuit. The current that a fuse can withstand is calculated as follows: divide the power of the device by 220. Therefore, it is better to install domestic ones, because Chinese ones are less durable and burn out quickly.
Replacing a blown fuse
How will we save the sedan if the element has melted? It’s quite simple - the part can be replaced, for which you don’t even have to take the car to a service station.
Having found the required fuse box and noticing that the “lifesaver” of the fuel pump has burned out at work, it needs to be replaced with a new one. But, first of all, it is worth finding out the reason for his condition, and then eliminating it. Most often, this happens due to an electrical circuit failure.
If you simply replace the burnt part with a new one, it will very quickly follow in the footsteps of its melted predecessor into the trash.
The fuel pump fuse is marked F13, and the current conducting through it is 15 A. You will learn detailed instructions for troubleshooting this problem in the video tutorial. The main thing is not to confuse the fuses, otherwise you will have to repair much more than one cheap part later.
There is a special offer on our website. You can get a free consultation with our corporate lawyer by simply submitting your question in the form below.
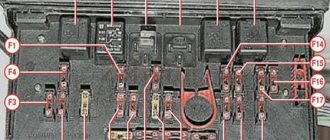
Fuse box in the engine compartment
| № | A | Protected Circuits |
| 1 | 50 | Heated windshield |
| 1 | 30 | Low beam |
| 2 | 60 | Generator |
| 3 | 60 | Generator |
| 4 | 30* 40 | Electric radiator cooling fan |
| 5 | 50 | Electromechanical power steering |
| 6 | 40 | Anti-lock brake control unit |
Similar symptoms not related to the fuel pump
The symptoms that appear due to a lack of fuel in the supply line are quite typical and are very similar to problems with other systems. How to eliminate possible problems using the elimination method:
- Unscrew and inspect the spark plug skirts. When there is not enough fuel, the electrodes remain clean or become covered with a white coating. This is further evidence of a malfunction in the power system.
- Replace spark plugs. If they wear out, they create a similar effect - failures, difficult starting, and a drop in engine power.
- Check the functionality of the throttle position sensor (TPS) and idle air control.
- Measure the compression in all engine cylinders. Due to excessive wear, the naturally aspirated engine is unable to create the required pressure and vacuum; the mixture burns poorly, which is why identical symptoms occur.
When troubleshooting, take into account one important factor - the service life of the fuel pump, which is at least 100 thousand kilometers. The longer the operating period of the unit, the lower the fuel pressure it creates at the outlet. The reason is wear of the membrane and other internal parts. If the pump has served 150 thousand km or more, you should think about purchasing and installing a new spare part.
The Lada-Kalina submersible fuel pump, as in other cars, is necessary to supply gasoline to the combustion chamber of the internal combustion engine. The pump is activated immediately when the ignition is turned on and maintains operating pressure until the car is turned off or the fuel runs out. The fuel pump is part of a module that includes a fuel pressure regulator, which changes the supply parameters when the driver operates the accelerator pedal. The module also contains a sensor that sends data to the dashboard, to the fuel level indicator. In addition, the design of the fuel filter includes a fine-mesh mesh for coarse fuel cleaning.
About the reasons for the failure of the fuel supply system
As noted, in the Lada Kalina model the fuel pump is equipped with an electric drive. This provides a number of specific and important benefits. Here the priority is simplicity in design and reliability, allowing the device to have an impressive service life. We also note the high safety when the fuel supply system stops functioning when the engine is stopped. In order for the pump to “live for a long time”, it requires high-quality gasoline, which also serves as a coolant for the device.
So, more about the main reasons:
- Fuel with quality standards that do not meet standards. This leads to gradual clogging of the filter and incorrect operation of the gasoline supply unit.
- Open circuit in the electrical power supply circuit of the pump. Here the culprit may be not only the fuel pump fuse, which, by the way, should be checked as a priority, but also the fuel pump relay. Also among the reasons may be oxidized contacts of the pump power supply or broken supply wires, which happens much less frequently.
In any case, if the pump does not work, then a thorough diagnosis of the entire fuel supply circuit will be required; you must check the pump fuse, as well as the fuel pump relay.
List of contact relays
If we open the main fuse box of Kalina 2, we will see a set of electrical relay housings. There are no other blocks containing relays in the car. We list the elements used in the “Lux” package (21927/21947):
- K1: radiator fan relay;
- K2: relay switching on door locks;
- K3: additional starter relay;
- K4: additional relay (switches current 50A);
- K6: wiper relay;
- K7: relay that turns on the high beam;
- K8: signal relay;
- K9: relay that turns on the low beam;
- K10: rear window heater relay;
- K11: main ignition relay;
- K12: relay turning on the fuel pump;
- K13: additional relay;
- K14: radiator fan relay 3;
- K15: windshield heater relay 1;
- K16: windshield heater relay 2;
- K17: relay that turns on the air conditioning compressor.
The pliers that you will find in the Kalina 2 fuse box will be of two types. “Large” ones are intended for dismantling relays K1-K6, as well as K13-K17.
You can compare the layout of elements in “Lux” and in “Norm/Standard”:
This is how the relays are located in different configurations, 21927 and 21925
Let's consider the data relevant for the “Normal/Standard” configurations:
- K1-K12: as above;
- K13: radiator fan relay 3;
- K14: windshield heater relay 1;
- K15: windshield heater relay 2;
- K16: air conditioning compressor relay.
The last list is also relevant for Kalina Cross Norma. And in more expensive trim levels of the crossover, the “Lux” scheme will probably be used.