Fuses and relays VAZ 2110 - 2112, electrical diagrams
If some devices on your VAZ 2110 or VAZ 2112 , fuses or relays may be to blame. At the very least, the first thing you need to do is check them, and then draw some conclusions regarding the malfunctions.
Correct diagnosis of many electrical problems will allow you to accurately determine the cause of the inoperability of a particular unit. To find out what the fuses and relays of the VAZ 2110 - 2112 are responsible for and how to find the right one, read this article.
As in many other cars, in the VAZ-2112 and VAZ-2110, when the engine is turned off, the devices are powered directly from the battery. When the engine is running, voltage is supplied to the devices from the generator, which simultaneously charges the battery. If the current exceeds the permissible value or a short circuit occurs, the circuit fuse will blow. Powerful electrical appliances are connected via relays.
Video with reasons for fuse failure
There are additional faults that can cause the device to break down. These include.
- Bad contacts. Over time or heavy use, the connection inside the cigarette lighter may become loose. Incorrect connection of devices leads to loose sockets and poor contact. This can be treated by bending the metal tendrils on the cartridge or by resoldering.
- With age, oxides or rust appear on the cigarette lighter, which has a bad effect on its operation. The situation can be corrected by treating the contact areas with a needle file. It is necessary to clean them and remove all traces of corrosion on the cigarette lighter. Another malfunction of the cigarette lighter on a VAZ is a burnt-out nichrome spiral. It is recommended to replace the device here.
Due to these factors, the protective element can also burn out. The video below will help you figure out where the fuse is located and how to repair the VAZ 2110 cigarette lighter.
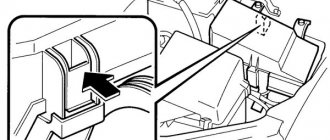
Fuse and relay box
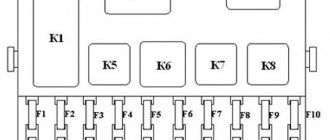
The fuse and relay box is located on the left, lower part of the instrument panel. It is accessible by pressing the button and folding the lid down. To remove fuses, there are special non-conductive pliers in the upper left part of the mounting block.
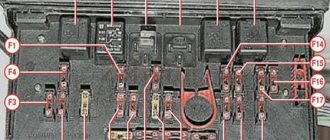
1 - K5 - high beam relay . If the high beams in two headlights do not work, check this relay. If one of the high beam headlights does not work, check fuses F3 and F13, as well as the lamps and the high beam switch.
2 - K4 - low beam relay . If the low beam in both headlights does not work, check this relay. If only one low beam headlight does not work, check fuses F2 and F12, as well as the lamps themselves and the light switch.
3 - K1 - lamp health control relay.
4 - non-conductive tweezers for removing fuses.
5 - power window relay . If your power windows stop working, check this relay. It could also be in fuse F5, or in the window lift drive system itself. To get to the mechanism, you need to remove the door trim. Check the electric motor, the appearance of the gears and the absence of binding of the mechanism.
6 - K3 - turn signal and hazard warning relay . If your turn signals or hazard lights do not work, check this relay and fuse F16, as well as the turn signal lamps themselves and their switch.
7 - starter relay . If the car does not start and the starter does not turn, check this relay. It could also be a dead battery, as well as the starter mechanism itself.
8 - backup fuses.
9 - fog lamp relay . If the fog lights do not work, check this relay and fuses F4 and F14. Also check their connection diagram, the serviceability of the wiring and connectors, as well as the lamps in the headlights and the power button.
10 - K2 - windshield wiper and washer relay . If your windshield wipers or windshield washer are not working, check this relay. Also check the wiper motor, washer pump and washer fluid level in the washer reservoir.
11 - K7 - rear window heating relay . If the heating does not work and the rear window fogs up, check this relay and fuses F8 and F9. Also check the connection contacts to the terminal points of the heating elements (at the edges of the glass at the rear pillars). If everything is in order, but the heating does not work, the issue may be in the wiring (the wires are frayed or something else).
12 - K6 - add. relay, ignition relay . If your ignition does not turn on or is having problems with it, check this relay. This relay protects the ignition switch contacts from burning. Also check the ignition switch itself and the contact group.
13 - row of fuses F1-F10
14 - row of fuses F11-F20
Where is the fuse for the VAZ-2114 radio and which one is responsible for the music in model 2115
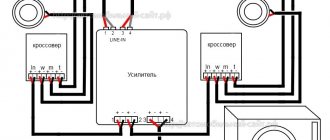
Acoustic equipment installed in cars is connected to the on-board electrical network through protective devices. A blown radio fuse on a VAZ-2114 leads to de-energization of other devices. The car owner should know the main malfunctions of the head audio unit that cause the failure of the fuse link, as well as repair methods. This knowledge will help you independently cope with the problem that arises along the way.
Circuit breakers
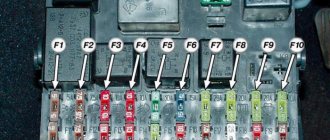
Now let's see which fuses are responsible for what in the same mounting block. I will also give the main reasons for troubleshooting.
F1 (5 A) - license plate lighting lamps, dashboard lighting, side lights on the panel, trunk lamp, left side lights . If any of the listed lamps do not work, check this fuse, as well as the lamps themselves and their contacts. If everything is in order, check the headlight switch button.
F2 (7.5 A) - low beam in the left headlight . If both low beam headlights do not work, also check relay K4 and the lamps themselves. It could also be the light switch and its contacts.
F3 (10 A) - high beam in the left headlight . If both high beam headlights do not work, check the K5 relay, the lamps themselves and the high beam switch knob.
F4 (10 A) - front fog lamp on the right side . If both fog lights do not work, check relay 9 and the headlight bulbs themselves, as well as the switch and its contacts.
F5 (30 A) - window lift motors . If the power windows do not work, check this fuse and relay 5. In winter, check if the windows are frozen, warm them up and clear them of ice if necessary. It could also be the window lift motor, its mechanism and gears; in order to get to it, you need to remove the trim of the desired door.
F6 (15 A) - portable lamp fuse.
There may also be problems with the cigarette lighter. To check, unplug the cigarette lighter from the connector. If this fuse stops burning, then the problem is in the cigarette lighter.
F7 (20 A) - engine cooling fan, sound signal . If the cooling fan does not turn on and the engine overheats, check this fuse. Also check the operation of the fan motor by connecting it directly to the battery. It could also be the coolant temperature sensor or thermostat.
F8 (20 A) - heated rear window (element) . If the heating does not work and the rear window fogs up, check this fuse, fuse F9 and relay K7. Also check the contacts on the terminals of the heating elements, check the wiring, sometimes the wire frays. It could also be the heating switch and its contacts.
F9 (20 A) - recirculation valve, windshield wipers and washer, headlight washer, rear window heating relay coil . If the heating does not work, similar to the previous one. If the windshield wipers or washer do not work, also check relay K2, the fluid level in the washer reservoir, the washer pump, and the wiper motor. Another issue may be their switching handle, its wiring and contacts. The wires may be squashed or frayed and shorted to the housing.
F10 (20 A) - backup fuse.
F11 (5 A) - right side dimensions . If the left side does not work, check fuse F1. If none of the side lights work, check the light switch and its contacts. Also check the dimensions of the lamps themselves.
F12 (7.5 A) - low beam in the right headlight . Similar to fuse F2 for the left headlight.
F13 (10 A) - high beam in the right headlight, high beam lamp on the dashboard . Similar to fuse F3 for the right headlight. If the blue lamp on the panel does not light up when you turn on the high beams, check this fuse, as well as the lamp itself and the wiring to it.
F14 (10 A) - front fog lamp on the left side.
Similar to fuse F4 for the right fog light.
F15 (20 A) - seat heating, trunk locking . If the heated seats do not work, check this fuse and the power button on the dashboard, its contacts and wiring.
F16 (10 A) - direction indicators and hazard warning lights, hazard warning lamp . If the turn signals or hazard lights do not work, also check relay K3 and the lamps in the turn signals themselves, as well as the hazard light switch button.
F17 (7.5 A) - interior lighting, lighting, ignition switch lighting, brake lights, clock, on-board computer . If the brake lights do not work, check this fuse, the lamps themselves, and also the switch installed in the pedal unit.
F18 (25 A) - glove box lighting, heater controller, cigarette lighter . If the cigarette lighter does not work, check this fuse, disassemble the cigarette lighter and check for a short circuit in it, especially on the washer and contacts. Bend them if necessary or replace the entire cigarette lighter. Do not insert non-standard size connectors into it.
F19 (10 A) - door locks, control relay for brake lights and parking lights, turn signals and lamps for turning them on on the panel, reverse lamp, generator winding, control indication of the on-board system, dashboard, clock, on-board computer.
F20 (7.5 A) - rear fog lights.
If the rear fog lights do not work, check this fuse and relay 9. Also check the lamps themselves, wiring, connectors and the switch on the panel.
Never replace blown fuses with fuses of a higher rating (current), this can cause burnout of tracks on the mounting block, failure of devices, etc. In this case, repairs will cost more, so it is better to deal with the problem immediately and fix the problem. If you cannot find what’s wrong on your own, contact a car service; usually such problems are dealt with by electricians, who will not have any difficulty identifying the problem and fixing it.
The purpose of each of the fuses on the car
If you turn over the removed cover, then on its inside you will see a diagram of the location of the relays and fuses in the mounting block (fuse block). On it, all these elements are numbered and designated from F1 to F20. Naturally, everyone is responsible for the performance of various consumers in the vehicle’s electrical network:
- F1 – rear fog light and indicator lamp for turning on the latter (10 A);
- F2 – turn signal breaker relay, VAZ 2114 emergency alarm, turn signals (10 A);
- F3 – front and central interior lighting, trunk, trip computer and brake light bulbs (7.5 A);
- F4 – heated rear window (20 A);
- F5 – sound signal, cooling system fan (20 A);
- F6 – power windows (30 A);
- F7 – electric motor for heater, front window, washer, glove compartment lamp, cigarette lighter (30 A);
- F8, F9 – fog lights, right and left, respectively (7.5 A);
- F10, F11 – left clearance, as well as right, indicator for turning on dimensions, license plate lighting, as well as instrument lighting lamp, ashtrays (7.5 A);
- F12, F13 – right and left low beam, respectively (7.5 A);
- F14, F15 – high beam left and right, respectively (7.5 A);
- F16 – turn signals, dashboard indicators – parking brake, low battery, etc., as well as a trip computer (15 A);
- F17-20 – reserve respectively for 7.5, 10, 30 and 20 A.
We recommend: Which oil is better to fill in the Kia Rio engine
The VAZ 2114 fuse diagram also contains backup fuses for 7.5, 10, 20, and 30 A, located in the lower part of the VAZ 2114 fuse block. Having pulled out the supposedly blown one, you should inspect it visually. If it is clear that the integrity of the thread is broken, then it can be unequivocally stated that the reason for the inoperability of the vehicle equipment lies precisely in the malfunction of the fuses. You can replace the inoperative one with a backup one of the same power according to the data that is presented to you by the diagram on the back of the plastic cover of the mounting block.
VAZ 2112 fuse box
If some devices on your VAZ 2112 car have stopped working, fuses or relays may be to blame. At the very least, the first thing you need to do is check them, and then draw some conclusions regarding the malfunctions. Correct diagnosis of many electrical problems will allow you to accurately determine the cause of the inoperability of a particular unit. To find out what fuses and relays do and how to find the right one, read this article.
Scheme
K1 – relay for monitoring the health of light bulbs; K2 – front wiper relay; K3 – repeater and alarm relay; K4 – low beam relay; K5 – high beam relay; K6 – additional relay; K7 – relay for turning on the heated rear window; K8 – backup relay (not installed on 110 series vehicles);
F1-F20 in the diagram are fuses. The circuits in the car are protected by fuses based on a certain rated current (in A). The battery charging circuit, generator circuit, ignition and engine starting are exceptions.
To replace a faulty fuse, first find the one that has blown, then eliminate the reason why it was damaged and then install a new one. Below is a list of fuses and information on each one.
* Never replace fuses with jumpers, as this may damage some devices.
The timing belt is eating at the link.
F1 - 5A - Lighting lamps: instruments, dimensions on the dashboard, license plates, trunk light, left dimensions F2 - 7.5A - Low beam (left headlight) F3 - 10A - High beam (left headlight) F4 - 10A - Front right fog headlight F5 - 30A - Electric door window motors F6 - 15A - Portable lamp (cigarette lighter) F7 - 20A - Horn, radiator fan F8 - 20A - Rear window heating element F9 - 20A - Windshield wiper and washer F10 - 20A - Reserve F11 — 5A — Side light bulbs on the right side F12 — 7.5A — Low beam (right headlight) F13 — 10A — High beam (right headlight) F14 — 10A — Fog light (left) F15 — 20A — Electric seat heating F16 — 10A — Turn signals, hazard signal F17 - 7.5A - Interior lighting, ignition switch illumination, brake light F18 - 25A - Interior heater, glove compartment light, cigarette lighter F19 - 10A - Relay for monitoring the health of the brake light and side light lamps, blocking the door locks. F20 - 7.5A - Rear fog lights
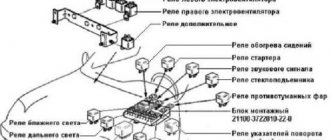
The additional relay box is located on the left side of the passenger's footwell.
Relay and fuse designations:
1. Ignition module 2. Heating, air flow, speed sensors 3. Fuel injectors, pump, relay 4. Fan 5. Fuel pump 6. Ignition
How to find it?
As soon as the window regulators stop responding to button presses, many car owners begin to panic: indeed, electrical repairs are not cheap, not to mention the cost of spare parts for the average foreign car. However, not everything is so dramatic, because the most common reason for window regulator failure is a burnt out element.
Understanding which element is responsible for the operation of the window drive and where it is located is not so easy if you don’t have special documentation at hand. Such documentation means a diagram that indicates all the fusible elements of the vehicle’s electrical circuits and their location in the panel.
Typically, such a shield is located under the instrument panel or, for example, on its end side. Having found out where the required fuse is located and found out what its rated current is, you can safely replace the element with a new one and check the functionality of the power windows on your car.
We recommend: Fuel system VAZ 2107 injector: characteristics, malfunctions, reviews, how to clean and adjust, instructions with photos and videos
In most cases, this procedure solves the problem with the window drive not working. If this does not help, then it is worth checking the integrity of the circuits with a tester and making sure that the element was replaced according to the diagram, and its rating actually matches the required one.
How to get to the right fuse
Almost the entire electrical circuit of the VAZ 2114 is protected by knife-type fusible elements. The most powerful consumers such as headlights, electric fuel pump, etc. are already mounted via a relay. Most fuses can be found in the so-called. fuse box VAZ 2114. However, this diagram has exceptions:
- Next to the battery in the engine compartment there is a fog light relay;
- The fuses for the injection system are mounted under the instrument panel.
No special tools are required to dismantle VAZ 2114 fuses. Therefore, first of all, look at the VAZ 2114 fuse box, which is located under the hood of the car opposite the driver next to the left pillar. In order to open the fuse box, protected by a plastic cover, you need to lightly push a couple of cover latches towards you, lift it and remove it. After this, you will immediately be able to see the modules responsible for the electrical safety of various vehicle systems.
Malfunctions and their elimination
The cause of radio failure in a car is a failure of the fuse or a contact failure due to burning or oxidation of the contacts. To replace the fuse link, you need to open the cover of the distribution box. Removing the fuse from the mounting socket is done with special plastic tweezers, which are stored inside the relay box. The tweezers are placed on the body of the fuse-link, then the element is pulled out with a gentle upward movement. Spare fuse links are stored in the mounting block in separate cells.
If a new fuse fails immediately after an attempt to turn on the head unit or other consumers connected to the circuit, then the cause of the malfunction is a short circuit in the design of the products. A common defect is a loose cigarette lighter socket or a shorted heating coil. The damaged element cannot be repaired; a new cigarette lighter must be installed together with the socket.
In VAZ-2115 cars there is a defect associated with the destruction of conductive paths in the mounting block. The malfunction occurs as a result of moisture getting inside. The repair consists of restoring the circuit by soldering the track; it is recommended to replace the module with a new one.
At the same time, you should check the condition of the water drainage channels and rubber hood seals.
The cause of a blown fuse may be a short circuit that occurs due to a broken cable or rubbing of the insulation on the metal edges of the body. Searching for the break point is carried out visually or using a test light (or multimeter). It is possible to temporarily connect the wires by twisting, but then you need to replace the section of the cord with a new element. If such a replacement is not possible, then the cable fragment is fixed using metal connection sleeves, which are covered with a heat-shrinkable tube.