02/28/2021 2,820 Electrical package
Author: Ivan Baranov
Every modern car is equipped with a washer system designed to clean the windshield and, depending on the car body, the rear window. This system includes various elements, including windshield wiper blades and a washer fluid reservoir (WHC) into which cleaning fluid is filled. Read more about what malfunctions the expansion tank is susceptible to and how to repair it.
[Hide]
Functions of the washer reservoir
The washer reservoir is a container for storing washer fluid and performs the following functions:
- storing a significant supply of washer fluid for longer operation of the windshield washer;
- supplying liquid to the injectors using a pump;
- the ability to control the liquid level using marks on the tank and a built-in sensor;
- use as a housing part for installing a level sensor and pump.
Additionally, we recommend reading our specialist’s article, which describes in detail about the windshield washer.
Washer reservoir design
Windshield washer reservoirs are unified and consist of the following main structural elements:
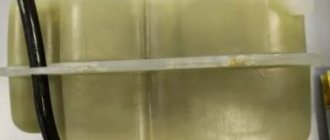
- A housing used to store coolant and mount other parts. The case has a rear neck with a screw cap.
- A pump that supplies fluid to the injectors.
- Many tanks have a washer fluid level sensor.
- Fastening the tank (brackets and clamps).
The tank body on all modern cars is rigid; it can also be solid (one plastic part) or composite (two molded plastic parts that can be disassembled).
The tanks also contain various structural parts, listed below:
- Filler neck into which the screw cap is installed. The lid must be screwed tightly to avoid loss of liquid. However, the lids are often provided with plastic bridles for safety.
- The screw cap itself.
- Holes for mounting a liquid supply pump.
- Hole for mounting a liquid level sensor.
- Washer fluid level marks and vertical grooves.
When repairing a tank, pumps are installed through holes with inserted rubber bushings. The pump installed on top can be fixed with a plastic cap nut. The pumps at the bottom of the tank are held in place by the elasticity of rubber bushings. The tanks are attached to the body either using brackets molded on them, or using separate baskets or clamps.
In the first case, the tank is secured using holding brackets, and in the second, it is inserted into a metal basket or secured to a clamp installed on the car body. The level sensor will notify you in time that the liquid is running low. They are located at the top of the reservoir and connect to an indicator on the car's dashboard.
Types of washer reservoirs
The volume of the tank depends on the model of the car in which it is installed. Most often it ranges from 1.5 to 5.2 liters. A tank with a larger volume needs to be filled less often, but its size most often interferes with its correct installation under the hood. To solve this problem, tanks began to be manufactured in various shaped shapes. Tanks are also classified according to the number and location of pumps:
- Tank with one pump at the top . These are classic containers installed on older models. Now they are mainly used on GAZ, UAZ and trucks.
- Tank with one pump at the bottom of the tank . Such containers are installed on modern cars. The pump is compact and is installed obliquely at the lower edge of one of the side walls.
- Tank with two pumps at the bottom of the tank . Such tanks differ from the previous type only in the presence of an additional pump.
Instructions for replacing and repairing the tank
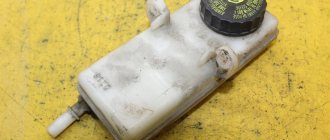
Replacing the washer reservoir is usually done as a result of its failure, which cannot be repaired. In particular, if the CP is cracked and it is no longer possible to restore its integrity.
Using the example of a VAZ 2114 car, let’s look at how to remove the washer reservoir:
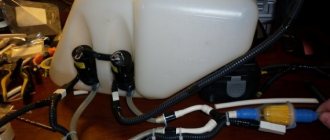
- First open the hood. Before removing the BO, it is necessary to drain all remaining liquid from the container. If the liquid level in the container is high, then unscrew the cap of the washer reservoir, this will reduce the pressure in the system.
- Then the BO is removed from the grooves; to do this, it can be pulled up, and placed in such a way that you can easily dismantle the electric motors.
- You need to disconnect the contacts from the motors, as well as the water supply pipes.
- Next, the electric motors are removed from the container body - for this you can use a regular screwdriver to pry them off (the author of the video is the menstimecom channel).
As you can see, there is nothing complicated in removing BO. It is much more difficult to repair the washer reservoir. If the container is cracked, it is not a fact that it can be repaired, since everything depends on the size of the crack and its location.
Read more: How much does it cost to grind a cylinder head?
If you don’t know how to seal the washer reservoir, then you have several options:
- For gluing, you can use special glue or cold welding. Before applying material to a crack, the BO must be thoroughly washed, and the area to be patched must also be degreased. Glue or cold welding is applied to the crack, while it is necessary to grab a few more millimeters from each edge of the crack. Depending on the type of glue and cold weld, the waiting time for the material to dry can range from 30 minutes to several hours.
- If the crack or hole is small, you can try to treat it with regular sealant. In this case, the repair procedure looks similar - the surface is first washed and then degreased. A certain amount of sealant is applied to the hole, which should completely fill the crack and the space around it.
- Another option that is best suited for larger cracks is the use of special plaster tape. It is also installed on a degreased surface, but before installation the tape should be coated with epoxy, and the material should be applied in several layers until all the cracks are closed.
- If all these options do not help you, then you can use a soldering iron or wood burning machine. With the help of these devices, the structure of the container is softened, which makes it possible to restore its integrity if the damage is minor. Additionally, after treatment with a soldering iron, the damaged area of the BO can be covered with cold welding.
Photo gallery “Removal and repair of the container”
Washer reservoir malfunctions
The most common malfunctions:
- the tubes are disconnected from the pump;
- the electrical power connectors for the sensor and pump are disconnected;
- the pump has failed;
- cracks appeared in the tank.
There are various reasons for replacing the tank. If it gets sharply cold and the frost-resistant liquid has not yet been filled, the container may burst. To avoid this, you need to purchase a frost-resistant liquid with high stability properties. If regular fluid is frozen in the tank, then you should warm up the car and wait until it melts. Next, you need to drain it and fill it with anti-freeze.
Repairing the tank as a whole is possible, but unprofitable due to the fragility of the plastic. Repairs are most often relevant for older car models.
Driving with a non-working windshield washer is prohibited according to traffic regulations.
Therefore, in the event of a breakdown, immediate replacement of the tank is required.
The windshield washer motor does not work: how to fix it
Removing and installing the washer
windshield
3. and remove the windshield wiper drive from the vehicle.
4. Install the windshield wiper drive in the reverse order of removal .
AND INSTALLING THE WINDSCREEN WASHER RESERVOIR AND PUMP
You will need: a 12" wrench, a flat-blade screwdriver.
1. Perhaps the reason is in the motor terminals. Washer motor and replacement of the lower one. Disconnect the wire from the “-” terminal of the battery.
2. Remove the right front wheel.
3. Remove the right front wheel fender liner (see “Removing and installing wheel mud flaps and fender liners,” p. 230).
4. Disconnect the washer
from the connecting fitting.
5. Replacing the timing belt repair Mitsubishi Lancer 9 and remove the washer reservoir from the car. 9. Remove the front washer reservoir .
6. Remove the rear mounting bolt for the washer reservoir.
and unscrew the nut of the stud of the upper fastening
of the washer reservoir
.
7. replacing a brake girl on a Mitsubishi Lancer 9, replacing power steering fluid. Remove the tank from its installation location™
8. press the plastic latch, disconnect it from the washer
block with wires and remove the
washer reservoir from the car.
9. Use a screwdriver to pry off the washer
, remove it from the tank body.
Replace a torn or loose rubber O-ring.
10. and disconnect the hose from the pump fitting.
11. non-standard repair of Mitsubishi Lancer 10, windshield washer system. Replacing the washer motor with a motor from a VAZ 2110. Install the washer
in the
reverse order of removal .
- ELECTRIC FAN CONTROL UNIT
- You will need a key "10".
- For clarity, the work of replacing the electric fan control unit is shown on a removed radiator of the engine cooling system.
1. Disconnect the wire from the “-” terminal of the battery.
3. Disconnect the wiring harness connectors from the control unit terminals.
4. Remove the two bolts securing the control unit to the electric fan housing.
5. and remove the electric fan control unit from the vehicle.
6. Install the electric fan control unit in the reverse order of removal .
ENGINE COOLING RADIATOR FAN MOTOR
Fans of the engine cooling system and air conditioning system are driven by DC electric motors
Device Features
There are new and old motors. The latter can be found on Soviet cars, or on VAZ 2107, 2108, for example.
Most cars, including the VAZ 2109, 2110, 2114, as well as foreign cars Mitsubishi Lancer, Pajero Sport or Ford Focus, already use new types of washer motors (pumps).
The main components of the washer are:
- nozzles;
- pump (motor);
- reservoir with washer fluid.
Nozzles are used to supply water to the windshield of a car. Therefore, they should be positioned so that the outgoing stream of liquid hits the center of the headplate as much as possible. The pump supplies water to the tank. By the way, on some cars, wash water is supplied not only to the windshield, but also to the main headlights in front and behind.
We recommend: How much brake fluid do you need to replace?
It doesn't matter what kind of car you have. It could be a Priora, a Hyundai Accent, some Mazda or Toyota. All the washer motors work on the same principle. Although the device, characteristics and appearance may vary.
Pumps supply water or washer fluid. If the windshield washer does not work, most likely the reservoir or the nozzles themselves are broken. They can be replaced or repaired yourself.
If the pump breaks, the task is a little more difficult. It is important to immediately identify the problem and fix the breakdown. Driving a car, especially in bad weather, when the windshield wiper does not work, is dangerous.
Causes of malfunctions
Don't rush to blame the engine for everything. It may work, but the windshield wiper does not function for other reasons.
Let's look at the key reasons why our wipers stop doing their job.
- Clogged filter or nozzle. Frequent breakdown. Especially for those who use tap water instead of special washer fluid. To solve the problem, you need to dismantle the devices and flush the system. The work is not difficult, but delicate;
- Supply hoses. They wear out over time, lose their tightness, and burst. Everything is simple here. Remove the old hoses and install new ones. Their price is cheap even on foreign cars;
- Incorrect connection. While carrying out some repair work on the wipers themselves or nearby components, you could disassemble the washer system and reassemble it incorrectly. Check connections and correct errors made during assembly;
- Electric motor and pump shaft. It happens that the connection between them is weak or completely broken. What to do? Right. The element needs to be better secured;
- Motor failure. It doesn’t happen that often, but you shouldn’t rule out this option. Before changing a part, try to clean the motor and its brushes, and get rid of all traces of corrosion. Sometimes it helps. If the repair does not produce results, replacement will help.
Here are the main causes of windshield wiper failure. It is not the most complex mechanism in a car, so you can repair it yourself.
Washer failures, their causes and diagnosis
Most often, the cessation of fluid supply is due to clogged filters. Therefore, first of all, clean the system and eliminate the cause of the breakdown - contamination . If it turns out that the motor has stopped working, then you will need to clean its parts from rust and dust.
Replacing the mechanism will only be necessary as a last resort. In some situations, electrical breakdowns occur. This is due to loss of contact on one of the connections. With frequent temperature changes, over time, the motor terminals oxidize, which leads to their complete or partial destruction.
Most often, breakdown occurs due to:
- clogged washer nozzles;
- a broken hose;
- fluid leaks;
- washer switch malfunction;
- Damage to motor terminals.
Tip: First, inspect the windshield washer reservoir and clean the system of dirt, and only after that proceed to cleaning the motor.
The sequence of removing the washer reservoir on a Mitsubishi Lancer 9
- Remove the right front wheel, remove the wheel arch liner, disconnect the fitting, open the reservoir cap and drain the remaining fluid.
- Remove the front mounting bolt.
- Remove the rear mounting bolt.
- Remove the pump connection connector.
- If replacement is necessary, remove the pump from the reservoir.
Replacement
If the old motor has failed, there is no point in trying to repair it somehow. To buy a new part, you will have to spend very little money. And the replacement procedure on most cars is extremely simple.
I will describe the main stages of work associated with replacing this element of the windshield cleaning system of any car.
- Turning off the vehicle's power. A safety measure without which further work makes no sense. Be sure to remove the negative terminal from the car. It's simple but important. Otherwise, you not only risk burning the wiring, but also getting an unpleasant electric shock yourself.
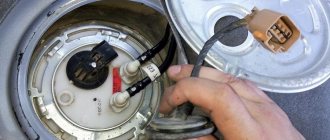
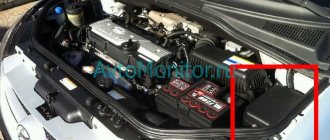
- Search for a motor. It all starts with identifying where your windshield wiper motor is located. It depends on your car. On some cars, just lift the hood and you will immediately see the washer reservoir. The motor itself is located on the reservoir (partially inside) of the windshield wiper, into which the liquid is poured. Do you see the tank? If yes, then you are in luck. If not, then you will have to look for it by removing elements of the engine compartment. On some car models, the tank is hidden so that the fender protection has to be removed.
- Disconnect the connectors with wires from the motor. Then remove the tank itself.
- The hose and fitting are separated from each other. Don't forget to drain the liquid. Filling a new one will not be difficult. Yes, and for prevention it won’t hurt to do it.
- Using a screwdriver, push the intake seal out of the bushing. This will allow you to completely remove the windshield washer motor.
- Don't forget to install a new bushing when reassembling. This often leads to the washer pump itself breaking down. So the old bushing goes to the landfill.
- Reassemble the assembly in reverse order. Here many craftsmen relax, because they consider the work done. In fact, reassembly causes more problems than disassembly. Advice from someone who made similar mistakes. That is, from me. Do not try to remember the location of parts unless you are confident in your memory capabilities. We got distracted by something, forgot, got confused. This happens to everyone, and there is nothing wrong with it. To ensure proper reassembly sequence, you can record, mark, or label the parts in the order in which they are removed. This will make it easier to put everything back together the way it was before.
The instructions are for informational purposes only, as the procedure may differ depending on the car model. Consult your machine's owner's manual for assistance. This is the best visual aid for self-repair.
We recommend: Connecting fog lights to the legendary “Nine”
There is nothing complicated in this work. Even the car owner who prefers to solve most problems with the help of a car service can easily cope with it. Repairs cost several hundred rubles and take a maximum of a few hours.
Thank you for your attention! Subscribe, leave comments, share your own experience in repairs and don’t forget to tell your friends about us! It may also be interesting and useful for them.
Step-by-step replacement instructions
Despite the fact that different car models have distinctive windshield washer design features, the diagnostic and replacement process is similar. The repair will not take you much time. New components, if needed, are inexpensive and will cost you about 500 rubles. The tools you will need are a flathead and Phillips screwdriver and a set of standard wrenches.
- Using the technical manual for your model, we find the exact location of the tank and motor.
- Turn off the power supply.
To do this, disconnect the wires that go to the pump. Disconnect the wires that supply the windshield washer pump - Before removing the tank itself, disconnect the hose and fitting and drain the liquid from the system.
Remove the tank after disconnecting the hose and fitting - Using a screwdriver, push the intake out of the seal sleeve.
- We disconnect the pump from the tank and clean the mechanism with an eraser.
Disconnect the windshield washer pump and clean it
When disassembling the pump, it may be discovered that the bushing has become unusable and needs to be replaced. Such a part is inexpensive and when repairing it is better to purchase it in advance to increase the service life of the mechanism.
How to replace (video tips)
If problems arise with the windshield washer, do not delay repairs. In bad weather, you cannot do without cleaning the windshield, and low visibility often leads to emergency situations on the road. Replacing the motor or cleaning it can be done on your own, it will take very little time.
We recommend: How much brake fluid do you need to replace?