If a car with a lock icon appears on the dashboard, this indicates that there is a problem with the car. Not all errors display the Check Engine message. To find and decipher the error, you can contact a service center where there is special diagnostic equipment. In order not to waste time and money on dealer diagnostics, you should learn to decipher Opel Astra N error codes yourself. This article describes how to carry out diagnostics, obtain error codes, and decipher them without the help of specialists.
Decoding codes
To decipher codes (fault codes for Opel Astra H), it is important to understand the conventional letter designations adopted by the manufacturer. Is it P, B, C or U .
- Code P – operation of the Opel Astra H engine and (or) automatic transmission.
- Code B – “body systems” (airbag, power windows, central locking, etc.).
- Code C – chassis system (chassis).
- Code U is a system of interaction between electronic units (for example, to the CAN bus).
Important: using the diagnostics described above, you only get errors of type P****. Faults of types C****, B**** and U**** can only be read using special diagnostic equipment!
For example, code 000970 is U 000970, that is, U0009 (symptom 70). Its reading (decoding) – no HS-CAN communication, bus shorted.
The second position (number) indicates:
- “0” (zero) – common for OBD II codes (OBD II codes are standardized fault identifiers);
- “1” and “2” (one and two) – year of the manufacturer;
- “3” (three) – reserve.
The third position is the type of fault.
- “1” and “2” (one and two) – fuel system or air supply;
- “3” (three) – ignition system;
- “4” (four) – auxiliary control;
- “5” (five) – idle;
- “6” (six) – ECU or its circuits;
- “7” and “8” – transmission.
Positions 4 and 5 are the serial number of the error.
Description of errors
Reading and decoding errors Opel Astra H
The table below presents a list of some fault codes (codes and their interpretation) for the Opel Astra H in Russian. Of course, this is not a complete list, but just a small part of it. If you do not find the code you need in the table, we recommend using additional resources with a complete and constantly updated list of errors.
| Code | Malfunction |
| R 0011 | The position of the mechanical synchronization of the intake camshaft is outside the working zone. Characteristics. Problems with the synchronization of the intake camshaft. Example: during diagnostics of the Opel Astra H, errors 001166, 001161 occurred. We discard the value (the last 2 digits), we get error P0011. |
| R 0014 | Malfunction of the camshaft position sensor circuit. Example: when 001463 occurs, discard the last 2 digits (in our case this is the value 63), we get error P 0014. Decipher it. |
| R 0070 | Problems with the ambient temperature sensor. |
| R 0105 |
|
| R 0110 |
Example: error 011014 (Opel Astra H) is displayed in the window. We discard the last 2 digits and find the error code P0110 and its interpretation in the table. |
| R 0170 |
Example: during diagnostics, errors 017011, 017012 occurred. We discard the value (the last 2 digits), we get error P0170. |
| R 0180 | Check the fuel temperature sensor. |
| R 0190 | Check the main pressure sensor. High (low) input signal. |
| R 0195 | Check the fan motor. Possibly a power outage. |
| R 0201 | Problems with the fuel injector (cylinder 1). Possible circuit break. |
| R 0202 | Problems with the fuel injector (cylinder 2). Possible circuit break. |
| R 0203 | Problems with the fuel injector (cylinder 3). The circuit may break. |
| R 0204 | Problems with the fuel injector (cylinder 4). Possible circuit break. |
| R 0219 | Exceeding engine speed. |
| R 0220 | There is a problem with pedal (or throttle) position switch B. Low input signal. |
| R 0230 | Problems with the primary circuit of the fuel pump. High (or low) signal. |
| R 0243 | Check the boost pressure valve voltage. |
| R 0365 | Problems with the crankshaft sensor. Example: when diagnosing an Opel Astra H car, we have the numbers 036504. We discard the last 2 (in this case it is 04). We get P 0365. |
| R 0597 | Check the thermostat, the coolant control valve may be stuck. Example: if the numbers 059761 appear, discard the last 2 (in our case it is 61). If you receive error 59761, first add zero, then discard the last 2 digits. We get error P 0597. |
| R 0621 | Check the IPC generator. There may be a malfunction in the L lamp control circuit. One of the signs of a malfunction is that the generator lamp may suddenly light up when the engine is on and also go out unexpectedly. Example: when diagnosing a car, errors 62103, 062104 occurred. We discard the last 2 digits (in the first case, first add 0, and then discard 03 and 04 respectively). We get error P 0621. |
| R 1463 | Malfunction of valve timing adjustment. Example: when diagnosing a car, we have the numbers 1463**. We discard the last two and get error P 1463. |
| P1607 | Problems with the clutch drive position control. Example: when diagnosing a car, we see the numbers 1607** on the display. We discard the last 2 (in this case it is 04). We get error P1607. |
| R 1614 | There is a problem with the connection between the immobilizer and its mark in the key. Example: when the numbers 161450 appear, we discard the last 2 (in our case this is the value 50), we get error P 1614. |
| R 1700 |
Example: when the numbers 170000 appear, we discard the last 2 (in our case this is the value 00), we get an error P 1700. |
| R 1191 |
Example: when diagnosing a car, we have the numbers 119167. We discard the last 2 (that is, 67). We get error P 1191. |
How to correctly decipher error codes Opel Zafira A, B, C
The inscription consists of five characters. The first one is a letter indicating the type of system where the problem is found:
- B - body;
- C - suspension and chassis;
- P - engine, gearbox, sensors and electrical circuits;
- U - digital modules.
The second character, in the form of a number, indicates the specifics of the malfunction. The third is based on the type of failure. And the last two are for the serial number of the problem.
Carrying out car diagnostics yourself
To carry out diagnostics, you need to perform some steps, which differ for vehicles with manual and automatic transmission.
For manual transmission
For a manual transmission, the following sequence of actions should be performed:
- First you need to depress the brake pedal and accelerator at the same time, but not too much.
- Then you should insert the key.
- Next, turn on the ignition, but do not start the engine.
- We wait until the error message appears. This is a code that needs to be deciphered.
Photo gallery
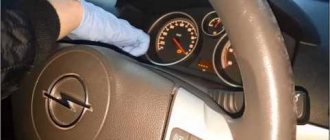
1. Insert the ignition key. 2. Squeeze two pedals.
For automatic transmission
To diagnose an Opel Astra N with automatic transmission, the steps are slightly different:
- First, the ignition key is inserted into the lock.
- Then, as in the case of a manual transmission, we turn on the ignition without starting the engine.
- Press the brake pedal and hold it.
- Set the automatic transmission selector to the Drive (“D”) position.
- Turn off the ignition and remove your foot from the brake pedal.
- In the next step, you again need to press both the brake pedal and the accelerator pedal at the same time, keeping them pressed for a while.
- Turn on the ignition again without starting the power unit.
- Keep the pedals pressed until a message appears on the instrument panel.
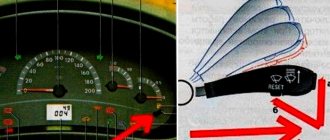
- If the sequence of actions has been followed, the “ECN” message will be displayed with a six-digit error code.
When we depress the pedals, you need to press the brake with medium effort, and press the gas pedal all the way until you hear a click, this is necessary for the limit switches to work (the author of the video is VIDEO ZAG).
If there are several faults, the codes will appear one after another. At the end of the list a code of 6 zeros will be displayed. If zeros appear immediately, this indicates that there is no problem. The fault code is in the first four digits, the last two are encrypted with the meaning of the fault. If the number of digits is 5, then to decrypt you need to add a zero in front.
Diagnostic procedure for Opel Astra H
Not every driver has at his disposal a scanner that allows him to quickly obtain all the information regarding vehicle system malfunctions. To display all errors on the dashboard display, the car owner needs to perform basic steps to display a list of errors without the use of third-party devices.
For Opel Astra H with manual transmission:
- Press the accelerator and brake pedal.
- Wait a few seconds and then start the car engine.
- Without releasing both pedals, wait until the display shows a six-digit number.
For Opel Astra H with automatic transmission, the procedure is slightly different:
- Turn the ignition key to the on position.
- Press the brake pedal with moderate force.
- Set the gearbox selector to “Drive” mode.
- Turn off the ignition by turning the key and release the pedal.
- Then simultaneously press the brake and gas pedals and start the engine.
If the control unit contains several error combinations, they will be displayed one after another. If the computer has not recorded any errors, six zeros will flash on the display. The advantage of this method is accessibility and saving money on diagnostic devices. But this method is somewhat complicated and requires a lot of time. The control panel does not provide decoding of the codes, which means that the owner of the Opel Astra H 1.3, 1.6, 1.8 must independently look for answers to all questions that arise.
Error 062104
Even experienced Opel Astra owners sooner or later wonder: what does error 62104 mean? It occurs with any problems associated with the diode bridge or generator regulator. In some cases, the battery lack of charge indicator may periodically light up. The problem is solved by repairing the voltage regulator. To do this, you need to dismantle the air filter, the attachment belt, move the outer roller to the side and remove the generator itself. Disassemble the regulator and clean all the contacts that attach it to the generator. Reassemble in reverse order and reinstall.
Photo gallery
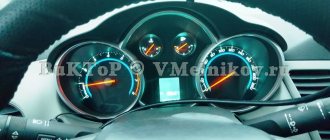
The photo shows examples of error codes in the Opel Astra.
Malfunctions in the functioning of the transmission system
Malfunctions in the functioning of the intake air temperature detection controller
Malfunction in the exhaust camshaft timing system
How to decrypt correctly?
The resulting six-digit codes consist of a fault code (the first four characters) and its meaning (the remaining two). Sometimes a five-digit code appears, in which case you must put a zero in front of the symbols. There are four categories of diagnostic codes, designated by letter.
The letter is not written on the display, it is only available in the error tables and is used to identify the node that has problems in operation:
- letter B indicates problems with electrical components (power windows, various switches, door locks, airbags, etc.);
- the letter C indicates problems in the chassis;
- the letter P indicates errors in the engine and gearbox control units;
- The letter U indicates errors in electronic units (parking sensor control unit, airbag control unit, etc.).
For example, using the code on the instrument cluster ECN 161450, we determine the error number - 1654. According to the table, only one error P1614 can correspond to it - a communication problem between the immobilizer and the chip in the key. The first digit after the letter in the code determines the class of the error.
Combination of Opel Astra with the “Check Engine” indicator on
There are three class options:
- the number 0 indicates a code common to the ODB II diagnostic system;
- numbers 1 and 2 are reserved by the factory to determine the error class;
- number 3 is a reserve number.
When reading errors, keep in mind that the third digit from the beginning in the error code indicates the type of malfunction.
The following error variations are available:
- numbers 1 and 2 refer to the fuel supply system;
- number 3 indicates problems with the ignition circuits;
- number 4 refers to auxiliary components (catalytic converter system or fuel vapor recovery system, etc.);
- number 5 is responsible for engine idle speed sensors;
- number 6 indicates problems with the vehicle’s electrical and electronics;
- numbers 7 and 8 indicate the presence of problems in the transmission control units.
The last two digits in the code indicate the serial number of the error.
The P1614 error discussed above consists of the following component groups:
- P - problem in the engine control unit or gearbox;
- 1 - error code set by the manufacturer;
- 6 - there is a problem in electrical or electronic circuits;
- 14 is the error number.
For Opel Astra H cars with diesel sedan and station wagon, the method of reading and decoding errors is absolutely identical. Due to the specific design of cars with a diesel engine, they may have their own errors (for example, failure of glow plugs).
The main error codes for the Opel Astra H in Russian for XER series gasoline engines and CDTi diesel engines are given in the table:
| Error code | Decoding |
| P0100 - 0104 | Air flow meter problems |
| P0105 - 0109 | Malfunction of the sensor for measuring the mixture pressure in the intake manifold |
| P0110 - 0114 | Incorrect operating parameters of the intake air temperature sensor |
| P0115 - 0119 | Check the cooling system temperature sensor circuits |
| P0120 - 0124 | Problems with the throttle position sensor |
| P0125 - 0126 | Abnormal coolant temperature |
| P0130 - 0135 | Check the first oxygen sensor |
| P0136 - 0141 | Check the second oxygen sensor |
| P0170 - 0172 | Check the composition of the working mixture |
| P0176 - 0179 | Check the working mixture composition sensor |
| P0180 - 0194 | Malfunction of the sensor that measures the fuel temperature |
| P0195 - 0199 | Malfunction of the sensor that measures the oil temperature |
| P0200 - 0204 and P0213 - 0214 | Malfunction of fuel injection nozzles |
| P0215 | Fuel check valve failure |
| P0216 | Erroneous signal in the ignition timing timing circuit |
| P0217 - 0218 | Engine or transmission overheating |
| P0219 | Engine speed controller failure |
| P0220 - 0229 | Throttle unit errors |
| P0230 - 0233 | Fuel pump power problems |
| P0234 | Excessive engine load |
| P0235 - 0250 | Malfunctions in the turbocharger (relevant for diesel engines) |
| P0251 - 0260 | Errors in fuel sensors in pump injectors (for diesel) |
| P0261 - 0272 | Injector malfunctions (for diesel) |
| P0300 - 0304 | Problems with ignition by cylinder |
| P0320 - 0323 | Problems with ignition distribution |
| P0325 - 0334 | Knock sensor errors |
| P0335 - 0339 and P0385 - 0389 | Engine crankshaft position sensor errors |
| P0340 - 0344 | Camshaft Position Sensor Errors |
| P0350 - 0354 | Ignition coil malfunctions |
| P0370 - 0381 | Faulty glow plug circuits (diesel) |
| P0382 and P0400 - 0408 | Exhaust gas recirculation system failure |
| P0410 - 0419 | Problems in the intake manifold |
| P0420 - 0434 | Poor catalytic converter efficiency |
| P0440 - 0455 | Errors in the fuel vapor filtration system |
| P0460 - 0464 | Fuel quantity sensor malfunction |
| P0465 - 0469 | Manifold purge sensor malfunction |
| P0470 - 0479 | Errors in the gas pressure sensor in the exhaust manifold |
| P0480 - 0485 | Cooling fan errors |
| P0500 - 0503 | Speed sensor error |
| P0505 - 0507 | Errors in idle speed parameters |
| P0510 | Throttle limit switch faulty |
| P0520 - 0523 | Malfunction of the sensor that detects oil pressure |
| P0530 - 0534 | Air conditioning system failure |
| P0550 - 0554 | Errors in the power steering system |
| P0560 - 0563 | Incorrect voltage in the electrical on-board network |
| P0565 - 0580 | Malfunction of cruise control devices |
| P0600 - 0609 | Electronic control unit errors |
| P0620 - 0622 | Generator errors |
| P0705 - 0709 | Automatic transmission sensor faulty |
| P0710 - 0714 | The fluid sensor in the automatic transmission is faulty |
| P0715 - 0718 | Incorrect operation of automatic transmission torque converter sensors |
| P0720 - 0727 | Malfunction of the sensor measuring the crankshaft speed |
Sensors
One of the common errors on the Astra GTC is error 011014, which indicates a problem with the air temperature sensor supplied to the engine. The sensor can be replaced immediately or wait a few days, since there are not isolated cases of this error indication disappearing.
Serious problems are indicated by error code 59761 or 059761, indicating a faulty thermostat. In this case, there is a slow warming up of the engine, which does not reach operating temperature even after driving for several tens of kilometers. The problem may be caused by erroneous data from the temperature sensor, so you must first make sure it is working. Late releases of the machine when the thermostat fails may display error P00b3. On diesel Astras, a problem with the thermostat may be indicated by code 011508.
The appearance of error 013604 is accompanied by a noticeable increase in fuel consumption. This error indicates an open circuit in the second oxygen sensor. The problem may be in the wiring of the sensor, in its connector and in the sensor itself. Before purchasing a new sensor, you need to look at the condition of the wires and wiring connectors. Another solution to this problem could be to reflash the engine control unit to Euro 2 standard, since it does not require a second sensor.
Error 006800 was observed on a 2008 Astra, first diagnosed as a problem with the throttle assembly. At the same time, there is some uneven idle speed and slightly increased fuel consumption in this mode. The reason was damage to the plastic valve cover through which air was leaking into the engine crankcase. When replacing a part, it must be taken into account that the engine covers of the 1.8 liter Z18XER and 1.6 liter Z16XER are identical.
Engine problems
One of the most common reasons for the Check Engine light to come on is errors 030101, 030201, 030301 or 030401, indicating cylinder misfires. In this case, there is “triple” of the engine, jerking and increased fuel consumption. This problem is associated with the poor design of the ignition module on the Opel Astra, which often fails. In this case, only replacing it will help.
On high mileage vehicles, error message 212052 may appear. This problem is due to contamination or dampness of the electronic gas pedal. If the Check Engine light comes on sporadically, you can simply wait until the moisture that has gotten into the pedal or on the connectors dries. Otherwise, you will need to disassemble and clean the pedal pad.
On new cars, error 000970 was often recorded, caused by mismatched operation of the vehicle's CAN bus due to the battery being disconnected during transportation. In these cases, the error went away over time. On used cars, along with error 000970, codes 001462 and 001463 appear, indicating problems with the solenoid valves of the engine camshaft phase shifters. If the procedure for cleaning the contacts does not help, then you will have to change these valves along with the camshaft gears.
After replacing the timing belt yourself, it is not uncommon for errors 001161 and 001166 to appear, signaling incorrect valve timing. In this case, it is necessary to recheck the correct installation of the shafts. Sometimes the cause of these errors is incorrect operation of the solenoid valves of the phase regulator (they may appear together with errors 1462 and 1463).
The display of errors on the display of the instrument cluster is clearly shown in the video from the author Mr11vlad11.
Problems with electrical wiring
The most common problem of all Opel Astras is flooding and oxidation of the contacts of the fuse box and the engine control unit. This often appears shortly after washing the left arch of the car and is shown with code 000970. The engine cannot be started. To fix the problem, it is necessary to disconnect the contacts of the blocks and wash them with special cleaning liquids. Then the contacts should be lubricated with a special lubricant that prevents re-oxidation.
On cars with automatic transmission, error 170000 may appear. The appearance of the error is accompanied by poor gear shifting while driving. One of the main reasons for this error is damage or rotting of the wires going to the box selector. But there may be other problems, which can only be identified by a detailed inspection of the automatic transmission components.
A common malfunction is rotting of the generator wiring or burnout of the diode bridge. In this case, the battery lack of charge light comes on and error 062103 appears. The situation can only be corrected by replacing the bridge or damaged wiring and cleaning the oxidized contacts. Sometimes incorrect operation of the diode bridge is indicated by error 062104.
Other problems
On some Astra GTC cars with a 1.8-liter Z18XER engine, error 017011 is observed, indicating that the mixture is too lean. At the same time, there is an increased consumption of gasoline at idle speed - about 2.5 l/h. The reason lies in the damaged membrane of the vacuum brake booster, through which air leaks into the engine. In some cases, at idle, you can hear a quiet hiss of air in the amplifier housing. There is only one way to solve the problem - replacing the vacuum assembly. A close one is error 017012, which can also be interpreted as an excessively lean mixture. In this case, the cause may be a damaged membrane, clogged injection nozzles, or impaired operating parameters of the oxygen sensor.
Reset error
After eliminating the cause of the error, it remains stored for some time in the memory of the control unit. You should not rush to reset the error, since it will soon be overwritten by other data that does not contain erroneous information. A faster reset method is any ODB II tester for vehicle electronics. You can remove yourself only the InSP service indicator, which lights up in the field of the daily mileage counter.
To do this you need to do the following:
- Turn off the ignition, press and hold the daily mileage reset button. After 3 seconds, an interval indication will appear on the display, looking like “InSP 15000” or “InSP 0”.
- While holding the button, press the brake pedal and turn on the ignition.
- Without releasing the button and pedal, wait 10–12 seconds, the display will show “InSP 35000” for gasoline cars and “InSP 50000” for diesel cars. The InSP sign will flash for a while and then disappear.
Do you know how to diagnose errors in your car?
Survey
- Yes
- No
Loading …
Error 210870
Code 210870 can be deciphered as a problem with the ABS sensor. The best way to determine its condition is by checking the electrical circuit. If the test gives a disappointing result, there is nothing left to do but replace the device yourself, or seek help from a specialist. Each driver can complete all the work by adhering to the following procedure:
- Loosen the CV joint nut with a key set to “32”.
- Remove the brake hose clip to further remove the caliper.
- By unscrewing the two “18” bolts, remove the caliper.
- Be careful not to break the brake hose.
- Unscrew the three bolts to remove the hub.
Resetting service intervals
On the mileage display, depending on its value (usually around 8000-10000 km), the inscription InSP appears.
IsP message on panel
This is an indication of the time until service maintenance. How to reset it? Please note that resetting the maintenance interval must be performed correctly to avoid errors in the operation of the vehicle.
- Turn off the ignition.
- After the daily mileage is displayed on the display, press the “reset” button.
- While holding reset, turn on the ignition. Note: The reset button must be held for at least 10 seconds. The screen will first display a flashing InSP indication, then the maximum mileage.
- When the inscriptions stop flashing, it indicates that the maintenance interval has been reset to its initial state.
Error 161450
After removing and installing the battery on a car, error 161450 often appears, symbolizing a problem with the connection between the immobilizer and the ignition key mark. It can be eliminated by subsequently removing the battery with the ignition key installed in the initial position. Some drivers prefer to completely disable the immobilizer, but to carry out this procedure it is necessary in any case to go to a service center to get a universal key. But it is advisable to resort to such a procedure only in extreme cases.
Decoding codes
To understand the Opel Astra N error codes in Russian, you should know the decoding of the letter designations that are accepted by the manufacturer - these include B, C, P and U.
- Code B concerns body structures: electric lifts, central locking, etc.
- Code C refers to the chassis.
- The P code is related to the operation of the engine and (or) gearbox.
- The U code gives information about the operation of electronic components.
You can independently diagnose only engine operating errors, that is, those starting with the letter P. Reading and decoding error codes starting with B, C and U can only be read using special diagnostic equipment. For example, error 000970 means the contacts in the mounting block are shorted.
The number in the second position means:
- 0 - common for OBD II diagnostic connector codes - these are codes that have a standard fault interpretation;
- 1 and 2 – year of manufacture;
- 3 – reserve position.
The number in 3rd place indicates the type of malfunction:
- 1 and 2 - fuel systems or air supply systems;
- 3 - ignition system;
- 4 - additional control;
- 5 — idle mode;
- 6 - ECU or its circuits;
- 7 and 8 - transmission.
The numbers in the 4th and 5th places indicate the error number.
Description of errors
The table below describes some Opel Astra N errors in Russian. If there are no codes in the table, they can be found on an additional resource containing complete and regularly updated information on deciphering error codes.
| Code | Malfunctions |
| P 0100 | Problems in the air flow regulator circuit. |
| R 0101 | The air flow regulator signal does not meet acceptable values. |
| R 0011 | Intake camshaft timing problems. When error 001161 or 001166 is displayed, to obtain the error code, you need to discard the last two digits. |
| R 0014 | Problems with DPRV. When error 001463 appears, to obtain its code you need to discard 63, we get 0014. |
| R 0102-0103 | Problems with the air flow regulator. |
| R 0105-0108 | Malfunction of the air pressure regulator. |
| R 0110-0113 | Malfunction of the incoming air temperature meter. If the message 011014 is displayed, then we get the code by discarding the last two digits - 14. |
| R 0115-0118 | Problems with the coolant temperature regulator. |
| R 0120-0123 | Problems with TPS "A". |
| R 0125 | Low coolant temperature in a closed circuit. |
| R 0130-0167 | Problems with oxygen sensors. |
| R 0170 | Malfunctions with adjusting the amount of fuel, perhaps error messages 017011, 017012 on the instrument panel; discarding the last couple of digits, we get the code. |
| R 0171 | Lean fuel mixture. |
| R 0172 | Fuel mixture too rich. |
| R 0173-0175 | Problems with the fuel mixture of the 2nd cylinder. |
| R 0176-0179 | Emission sensor problem. |
| R 0180-0188 | Problems with fuel temperature meters. |
| R 0190-0194 | Problems with DDT in the fuel rail. |
| R 0195-0199 | Problems with the engine oil temperature regulator. |
| R 0200-0214 | Faulty injector control. |
| R 0217 | The engine is overheating. |
| R 0218 | The transmission is overheating. |
| R 0219 | High engine speed. |
| R 0220-0229 | TPS problems. |
| R 0230-0233 | Problems with fuel pump circuits. |
| R 0235-0242 | Malfunctions of turbocharging pressure sensors. |
| R 0243-0250 | Problems with the turbine exhaust gas shutter solenoid. |
| R 0251-0260 | Faulty turbine injection pump. |
| R 0261-0296 | Problems with injectors. |
| R 0300-0312 | Misfires. |
| R 0320-0323 | Problems with the ignition distributor. |
| R 0325-0329 | Faulty knock sensors. |
| R 0335-0339 | Problems with crankshaft position sensor “A”. |
| R 0340-0344 | Problems with the camshaft sensor. |
| R 0350-0362 | Malfunctions with ignition coils. |
| R 0365 | Crankshaft sensor malfunction. When diagnosing a car in the received message 036504, you need to look at the last two digits to get the code. |
| R 0370-0374 | Timer signal A problem. |
| R 0375-0378 | Problems with signal B of the timer. |
| R 0380-0382 | Ignition problems. |
| R 0385-0389 | Problems with crankshaft position sensor “B”. |
| R 0420-0434 | Problems with catalysts. |
| R 0440-0455 | Problems with managing gasoline parameters. |
| R 0460-0464 | FLS malfunctions. |
| R 0465-0469 | Problems with the purge air flow sensor. |
| R 0470-0479 | Malfunction of the exhaust gas pressure meter. |
| R 0480-0503 | Malfunctions of the car speed controller. |
| R 0505-0507 | IAC problems. |
| R 0520-0523 | Problems with the oil pressure sensor. |
| R 0530-0534 | Malfunction of the air conditioner coolant pressure sensor. |
| R 0550-0554 | Problems with the power steering pressure sensor. |
| R 0560-0563 | Power problems. |
| R 0565-0580 | Problems with the cruise control system. |
| R 0597 | Thermostat malfunction, in this case error 059761 pops up, discard 61, we get the code. |
| R 0600-0609 | Malfunctions in the control unit. |
| R 0621 | There is a problem with the IPC generator or the L lamp control circuit. During diagnostics, error 062103, 062104 occurs; discarding the numbers 04, we get an error code. |
| R 0700-0702 | Transmission problems. |
| R 0705-0709 | Problems with the transmission sensor (PRNDL). |
| R 0710-0714 | Faulty transmission fluid temperature meter. |
| R 0715-0718 | Malfunction of the turbine speed controller. |
| R 0725-0728 | Problems with the engine speed controller. |
| R 0730-0744 | Problems with the gearbox and clutch. |
| R 0745-0789 | Pressure solenoid malfunction. |
| R 1106-1107 | Problems with the intake manifold absolute meter sensor. |
| R 1111-1112 | Problems with the intake air temperature meter voltage. |
| R 1114-1115 | Problems with the coolant temperature meter voltage. |
| R 1120-1125 | TPS malfunctions. |
| R 1160 | Startup blocked when attempting to steal. |
| R 1191 | Problems in the fuel system. Specifically, error 119167 means low fuel pressure. |
| R 1285-1290 | Malfunction of the cylinder head temperature sensor. |
| R 1463 | Problems with valve timing adjustment. |
| R 1500-1502 | Fuel pump relay malfunction. |
| R 1509-1514 | Problems with idle air control control. |
| R 1604-1606 | Problems with the knock control device. |
| R 1607 | Problems with the clutch drive. |
| R 1641-1655 | Malfunctions in the control circuit. |
| R 1614 | If message 161450 appears, then discarding two digits, we get error code 1614, which indicates communication problems between the immobilizer tag in the key and the device itself. |
| R 1663 | Recharge indicator light. |
| R 1671 | Oil change indicator light. |
| R 1672 | Low oil level indicator. |
| R 1690 | Diagnostic lamp error. |
| R 1700 | Problems when switching automatic transmissions, with the transmission control module; the exhaust gas sensor can be used to judge the cleanliness of the exhaust. The code is determined by discarding the last two digits from the error 170000 that appears on the monitor. |
Error 059761
One of the most common errors in the Opel Astra system is 059761. The thing is that the manufacturer decided to equip the Astra with an old-style thermostat, which has many weak points. One such place is the rubber ring. This seal is often corroded by the coolant, which leads to further jamming of the thermostat damper. The same thermostat is installed on the Chevrolet Cruze, but with one single difference - it is modified and does not have an o-ring. Owners of the Opel Astra N, in the event of problems with the thermostat, most often opt for the Cruze copy. Therefore, the most reasonable and expedient action if error 059761 appears is to replace the thermostat.
How to reset?
After fixing a problem in an Opel Astra car, error information can be stored in the memory of the control unit for a certain time.
You cannot simply delete code data from memory without fixing the problem. This will cause the problem to remain, but information about it will not be saved.
The removal procedure is carried out as follows:
- The ignition in the car is turned off.
- The daily mileage reset key is pressed. Three seconds after pressing, the screen will display “InSP 15000” or “InSP 0”.
- Then, while holding this key, you need to press the brake pedal and turn the key in the lock to activate the ignition.
- At the next stage, you must continue to hold the button. The pedal remains depressed for 10-12 seconds, the dashboard screen will display “InSP 35000” when the car is equipped with a gasoline power unit. If the car has a diesel engine, the words “InSP 50000” will appear. The InSP symbols will blink for a few seconds, after which they will disappear from the display.
Instructions for verification
To correctly read fault codes on Opel Astra cars, there are several ways. Diagnostics using an adapter will allow you to get an accurate result, but you will need a laptop and software to perform it. The self-diagnosis procedure is performed without the use of third-party equipment, but when performing it, the type of transmission must be taken into account. The check process will be different for manual and automatic transmissions.
If everything is done correctly during the diagnostic process, the message ECN (Error), as well as combinations of faults, will appear on the display in the dashboard where the mileage is displayed. They are made in the form of six-digit numbers. If there are several problems in the operation of the engine and main systems, the on-board computer will show them in turn. When the fault demonstration procedure is completed, a code of six zeros will appear on the instrument panel. If the diagnostics showed a combination consisting only of zeros, then no problems were identified in the vehicle’s operation.
The first four characters displayed on the device are the fault code, and the remaining two digits are its description. If the diagnostics shows only five digits, then to decipher the malfunction you must add a zero before the code.
Manual transmission
To diagnose a car with a manual or robotic transmission, the following steps are performed:
- The brake and gas pedals are pressed at the same time. The engine is not running and the ignition is turned off. In this position, you need to wait a few seconds.
- The key is installed in the ignition switch.
- The ignition system is activated. The gas and brake pedals remain depressed.
- After a few seconds, a message appears on the dashboard. The error code is presented in the form of numbers. The resulting combinations must be rewritten on a piece of paper and subsequently deciphered.
Automatic transmission
For vehicles with automatic transmission, the diagnostic procedure is performed as follows:
- The key is installed in the lock and the ignition is turned on. The car engine does not start.
- Then your foot is placed on the brake pedal, it must be pressed and held.
- The gear lever is set to mode D - Drive.
- The ignition in the car is turned off, the brake pedal can be released.
- Then the gas and brake pedals are clamped and held.
- The ignition is activated, but the power unit does not start.
- Then you need to wait a few seconds without releasing the pedal.
Diagnostics with adapter
For a more accurate check, you can connect a computer or mobile device to the diagnostic connector. Direct connection of such equipment with the on-board computer is impossible, but there is an option to use universal OBD class adapters. It is desirable that the device supports Bluetooth operation. If diagnostics will be carried out using a mobile device, then software will be required; one of the universal utilities is the Torque application.
After downloading the software, you can begin diagnostics:
- At the first stage, the adapter is installed in the diagnostic connector. In Opel Astra H cars, this output is located on the console between the gear knob and the parking brake lever.
- To activate the adapter, the ignition system is turned on. The device will be powered from the car's electrical network.
- After activation, the Bluetooth function is enabled on the mobile gadget. You need to search for compatible equipment; the adapter itself is indicated by OBD2. The connection procedure is performed using code 1234 or 6789. After synchronization, the software is launched on the device. When the program is activated, it will automatically connect to the adapter and to the vehicle's ECU system.
- The next step will be diagnosis. The program will determine combinations of errors present in the memory of the on-board computer. If necessary, fault codes can be cleared. When the verification procedure is completed, it is recommended to rewrite and save the combinations in order to decrypt them correctly.
The channel “PC Repair!/IT_Comp_As” talked about performing diagnostics using a mobile device and Torque software.
Using the utility, one of the machine operating modes is selected. The car owner can independently change, remove or add the necessary controllers for testing.
With the standard settings of the utility in online mode, you can control the operation of the following parameters:
- the temperature of the intake air or antifreeze;
- number of crankshaft revolutions;
- accelerator pedal position;
- load parameter on the power unit;
- activated speeds;
- data from the oxygen controller and other regulators.
To add other controllers for testing, the following steps are performed:
- You enter the main menu of the utility.
- In the “Settings” window, select the “Manage Extra PIDs” section. The “Add predifined set” key is pressed.
- A list opens where you can select the make of the car. To select an Opel, click on the item “Pontiac/GM/Opel/Vauxhall”. This will allow the car owner to access monitoring of various other parameters.
Universal adapters that work using the Bluetooth protocol allow you to check errors using other equipment in addition to mobile devices. The main thing is that it supports such a communication standard.
Diagnostics with a paper clip
Diagrams of 10- and 16-pin connectors on the Opel Astra
Checking with a paper clip allows you to determine malfunctions in the functioning of the ABS anti-lock braking system. If problems occur in the operation of this unit, a light indicator appears on the control panel and the device itself turns off. To activate the diagnostic mode of this system, you need to close two contacts at the output using a paper clip or a piece of wire. The contact elements to be closed are shown in detail in the photo. The connector itself is located in the engine compartment of the car.
After closing the contacts, the ignition is activated and the light indicator on the device will show the problem code, if it is in memory. If the car is equipped with a sixteen-pin output, then a paper clip or a piece of wire closes elements numbered 5 and 6. If there are no malfunctions in the ABS system, then the Check Engine symbol on the dashboard will blink and go out. If there are problems, the on-board computer will display a four-digit combination in a series of blinks.
There is a short blink in each series of code. A longer pause is used to separate faults from each other. All combinations are repeated three times, and then the next code comes. Failures are displayed on the dashboard in ascending order. After completing the troubleshooting cycle, there will be a pause, and then all the codes will repeat again.
When diagnosing faults in an Opel Astra, you need to close the correct contacts with a paper clip to prevent damage to the on-board computer.
User Konstantin Pr0gra2Mer spoke in detail about diagnosing all systems using a paper clip.
Error 000970
Another also common error coded 000970. In most cases, it tells the driver that the contacts of the engine compartment fuse box and the engine ECU are damaged, most often due to oxidation. The contacts are restored using special Contact 61 lubricant. The procedure in case of malfunction 000970 is as follows:
- The block is disassembled and the ECU comb is removed.
- The cover is removed from the fuse box.
- The contact is completely removed from the front of the block.
- Three screws are released and the holder is removed.
- All contacts are treated with lubricant.
- Similar work is carried out with the ECU.
It is important to carry out the work with the battery removed from the car. We install the battery back and start the car engine. Then the system is checked again for various errors. It is also important to understand that many digital indications of breakdowns are stored in the ECU memory for some time. There is no need to rush and reset it quickly. It is enough just to continue using the vehicle, and soon all pre-existing errors will be overwritten with new data.
Decoding error codes Opel Astra H 1.3, 1.6, 1.8
While operating the vehicle, the “Check Engine” indicator may light up on the instrument panel at any time. The manufacturer has equipped the Opel Astra N with a large number of various sensors to monitor the operation of the most important vehicle systems. These sensors, like other mechanisms, have their own service life. If the “Check Engine” light comes on, it means that a malfunction has occurred in one of the systems, preventing the normal functioning of the vehicle.
To quickly and effectively troubleshoot a problem, you can use a dealer scanner that is able to recognize and decipher errors. Or do the so-called “pedal test”. Let's talk about what error code 059761, 001161, 170000 and other common designations mean.
- Diagnostic procedure for Opel Astra H
- How to decipher errors?
- Error 059761
- Error 001161
- Error 170000
- Error 011517
- Error 001463
- Error 062104
- Error 161450
- Error 210870
- Error 000970
How to Troubleshoot or Reset Trouble Code P2182
Some suggested steps to troubleshoot and fix error code P2182:
- Read all stored data and error codes using an OBD-II scanner. To find out when and under what circumstances error P2182 appeared.
- Clear the error codes from your computer's memory and test drive the vehicle to see if the error reappears.
- Check the coolant level (engine must be cold).
- Visually inspect the electrical wires and connections related to the sensor for looseness or damage. Troubleshoot if necessary.
- If the ECT sensor is faulty, replace it.
- Test the thermostat, if it is faulty, replace it.
- Clear the error code from your computer memory again and test drive the vehicle to find out if the problem is resolved.
Diagnosis and problem solving
The first step in the process of troubleshooting P2182 is to review the Technical Service Bulletins (TSBs). For known problems with a specific vehicle.
Perform a thorough visual inspection to check the wiring for obvious defects such as scratches, scuffs, exposed wires, or burn marks. Next, you should check the connectors and connections for safety, corrosion and damage to the contacts.
Be sure to carefully check the integrity of the wire harnesses and secure any loose wires. If you find a burnt wire, solder it and make sure it is properly insulated.
Checking the coolant and thermostat
Make sure the coolant level is correct, both in the radiator (when cold) and in the coolant overflow reservoir. Make sure there are no leaks and that the sealing cap is working properly.
If there is not enough coolant in the system, the engine may not warm up properly. Because if the temperature sensor is not in contact with the coolant, it will not read the temperature.
Using a non-contact thermometer or scan tool with real-time data streaming, check to see if the engine is warming up properly. Typically, the upper radiator hose should remain relatively cool until the thermostat opens. After which it will heat up quickly.
If the thermostat is open, coolant will flow continuously, preventing the engine from reaching operating temperature. This may also be the reason for the P2182 trouble code.
Using a thermometer or scan tool, check the engine temperature after 10-15 minutes of operation. If the temperature does not reach operating temperature, check the ECT sensor.
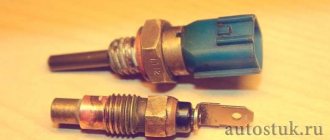
Checking the coolant temperature sensor (ECT)
Visually check the sensor for damage to the wiring or connector and repair if necessary. Then connect the OBD2 scanner, if the engine temperature is excessively high, about 140°C, it is not normal.
Disconnect the sensor on the engine and see if the readings drop by, for example, 10°C. If so, then the sensor is most likely faulty, shorted internally, causing a low resistance signal to be sent to the PCM.
But, if you want to be completely sure that it is the sensor and not the wiring, you can run a test. Check the sensor's resistance to ground using an ohmmeter. The resistance of a normal sensor will vary slightly depending on the vehicle.
But basically, if the motor temperature is around 95 degrees Celsius, then the resistance will be around 200 ohms. At a temperature of about -20°C, the resistance will be more than 10,000 Ohms.
This test will help you determine if the sensor resistance matches the engine temperature. If it doesn't match your engine temperature, then you probably have a bad sensor.