How to connect a camera, phone and steering wheel buttons to a 2 DIN radio
How to connect a 2 DIN radio with aliexpress in a car
DIN stands for "Deutsche Industriele Norme" - or "German Industrial Standards". The standard dimensions of a radio tape recorder installed in the car's standard socket. These standards are used by all manufacturers of cars and car radios (or almost all), at least all Chinese radios supplied to us from aliexpress, all of them are assembled according to 1 DIN standards, and more often - 2 DIN. By the way, 1 DIN is the size of the radio, the width x height of which is 180x50mm. 2 DIN - 180x100mm, with the installation depth of all DINs being 160mm. There is also a very rarely used standard for radio dimensions 1.5 DIN - 180x75mm. But finding such a radio is very rare, so today we will consider the usual size of a multimedia player - 2 DIN.
So, in order for us to connect such a radio, if we previously had a 1 DIN radio in the car, we will have to remove the old radio and install the ears on which the radio is attached under the dashboard from the new radio (these are most often included with the radio, but always please specify). In addition to the ears, we will also need a frame sized 2 DIN, which will no longer be included with the radio. It must be purchased separately for each vehicle. It is very advisable to treat the places of fastening and contact of the plastic of such a frame with an anti-creaking composition, otherwise not very pleasant squeaks will be produced in the cabin; they will not appear immediately, but over time.
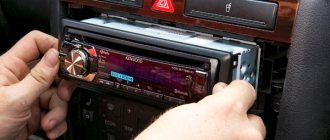
So, with the installation of the radio, everything is more or less clear (for those who are not very clear, watch the video of installing the 2 din radio below). Now we need to look at the connection diagrams for the 2 din radio, and also figure out its pinout.
Connection diagrams for 2 DIN radio
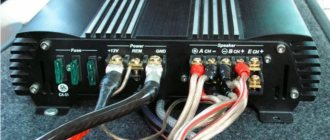
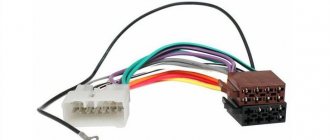
Most Chinese 2 din radios from Aliexpress are connected to the car via an ISO - Euro connector. This is the most universal connector and the easiest to connect to almost any car. And the pinout is quite logical and simple.
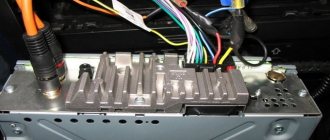
Pinout of ISO - Euro connector of Chinese 2 din radio from aliexpress (example - Podofo - 7018B). Similar radios with an ISO connector will have the same pinout.
Designation of wires of a Chinese 2 din radio
But there are other connectors often used on Chinese radios. I suggest you familiarize yourself with their pinout and subsequent connection
Pinout of 2 din radio from China
The meaning of the 2 din connectors of the radio
Meaning of 2 din radio wires
Connecting tulips 2 din radio
You can read more about the pinout of the ISO-Euro connector and connecting Podofo radios and similar ones on the pages of our website.
Video - examples of connecting 2 DIN radios
Connection diagrams are, of course, good, but it’s much more clear to see how someone has already gone before you by connecting a 2-din radio to a standard place and made a fairly sensible video about it. So, I suggest you familiarize yourself with the most outstanding works of connecting radio tape recorders that are only available in the YouTube collection.
Connecting a 2 din radio using the example of a Lada Priora
Connecting a 2 din radio in a Kia Rio or Hyundai Solaris
Connecting a 2 din radio in Renault Logan or Sandero
Connecting a 2 din radio in a Toyota Corolla 120
From the videos it follows that there is nothing particularly complicated, except for partial disassembly of the car’s dashboard, connecting a 2 din radio to its standard location is no different. You just need to buy everything you need, understand the connection diagram and pinout of the radio, as well as the wires, and slowly connect everything. This process will not present any problems for any more or less handy person.
Rear View Camera
There is no need to talk about the usefulness of this equipment. The rear view camera is an invaluable assistant for novice car enthusiasts who, as a rule, experience difficulties when performing parking actions.
Depending on the type (location and method) of installation, there are several types of rear view cameras:
- Standard installed cameras. In places strictly specified by the car manufacturer;
- Universal devices. The location is chosen by the driver himself;
- Wired;
- Wireless rear view cameras.
As an example, we use a universal wired camera and a Chinese 2 din radio.
Select the installation location. License plate frame, luggage compartment handle, etc. It is not recommended to place a camera inside the rear window.
We lay the cable connecting the camera and the GO. A five-meter long wire is included with the device.
Connect the camera to power. Any of the reversing lights acts as a source. Be sure to use a fuse in this circuit.
We connect the camera to the player via a tulip (connector). A separate exit is provided for this. If it is absent, the device is connected via the “video” input.
We adjust the picture and camera location.
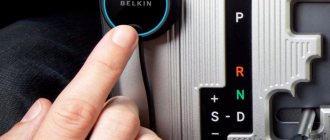
Multifunctional steering wheel
This name means connecting a Chinese radio to the steering wheel of a car. That is, it is possible to control the standard player directly from the steering wheel.
To make this connection you will need:
- Steering wheel with built-in control buttons or a niche for their placement;
- Car radio;
- Two ISO adapters;
- Adapter devices for the antenna and combining the steering wheel buttons with the radio.
Let’s say right away that the process of connecting a multimedia system and adapting it with a multifunction steering wheel is not a complicated process, but it is painstaking and requires certain skills. This is explained by the fact that very often the pinouts of such connections between the car radio and the steering wheel do not match, although they are specified in the instructions. And therefore, we advise, if possible, to contact a specialized center that deals with this type of installation.
Havel h6 radio tape recorder Tesla. A bunch of wires, no diagrams, no instructions. You have an article for simple radio tape recorders. It's a pity, I was hoping to find my scheme.
D day! Can you tell me where I can find user manuals for the Chinese? particularly interested in SilverStrong Android 8.0-8.1 car DVD 2Din universal DSP android Panel IPS OctaCore Car GPS 7 inches Car Stereo Autoradio Navi 706! I took it to Ali! Thank you.
Hello everyone dear friends! Sooner or later, every car enthusiast thinks about replacing his standard radio to expand functionality and improve appearance. But the price for a decent option is very steep. Aliexpress will come to the rescue in this situation with its abundance of goods. Of course, you shouldn’t expect mega high sound quality or a professional equalizer. Basically, on devices from China, the equalizer is three or four bands. Despite this, there are plenty of good options for the best money. I've reviewed a bunch of options and reviews and am ready to present you with my top. Yes, when ordering any radio, you should check with the seller about the model of your car. You may need an adapter that the seller can include in the kit.
BEST 2 DIN RADIO RECORDS
3rd place PODOFO 7010B
This radio is good proof that the Chinese can do good and high-quality work for reasonable money. Although the device does not have excessive capabilities, the basic functionality is provided at a decent level. All major formats are supported, so there will be no problems with audio and video playback, and the 7-inch screen produces a picture that is pleasing to the eye in HD resolution. And it is worth noting that many users note very high sound quality. The radio screen can be connected to the phone as a second display and after that you can display GPS maps on it, since the device does not have a built-in module. When ordering, you can add a rear view camera, which works well both day and night. Among the shortcomings, users note a weak microphone, which, in principle, is not often used.
2nd place BONROAD C1160706A
The BONROAD company supplies its radios with a huge selection of adapter frames of different sizes; this radio will become like a native one in almost any modern car. In fact, this is a full-fledged Android 7.1.2 tablet with all the attendant functionality: Wi-Fi, Bluetooth, 3G, 4G, and of course video playback in HD format. Unlike the first budget radio, this one has GPS and Glonass installed. The device contains Navitel cards, they may not work. But everything can be easily solved by reinstalling and replacing it with any other navigator; you can also install any applications convenient for you. Everything is very simple to do, since it is Android. Of the minuses, it is worth noting that this radio takes a long time to load, from ignition to operation it takes about two minutes.
1st place JOYING JY-UM135N2
The Joying radio combines in one device a stylish design, high-quality Hands Free, impeccable navigation, as well as a 7-inch display with a screen resolution of 1024*600. A set of wires and instructions are also included, so there will be no problems with installation. Plus, the kit includes a remote control that is built into the steering wheel to control the music. And to play music, you can use one of the two slots for Micro SD cards or play music from your smartphone. The device supports multitasking, so there will be no problems combining navigation and playing music. Joying boasts quick starts, literally 2 seconds after ignition. Among the shortcomings, it is worth noting the lack of a slot for a SIM card. So you will have to use maps online through Wi-Fi distribution from your smartphone.
BEST 1 DIN RADIO RECORDS
4th place ROADBUF 5983
If you are a connoisseur of classic radios without a lot of additional functions, you should definitely pay attention to this model. Functionality is limited: FM radio, MP3 player, LED display showing a digital clock. The radio also has USB and AUX connectors and a slot for memory cards. On the one hand, a small set of functions. But for lovers of minimalism it can serve as an advantage; also a bonus of such a solution is the low price of the radio.
3rd place WT0031
In this nameless radio, it is worth noting the impeccable operation of Bluetooth, which makes it ideal for listening to music from your phone and using Hands Free. When using Hands Free, it is worth noting the absence of background noise, audibility is very good, so an additional microphone is not needed and you can talk on the phone while driving without any problems. Even during a call, the incoming number is displayed on the display. This radio has a slot for a memory card and a USB connector, as well as a standard AUX output. Based on the reviews, the disadvantages include the lack of bass and wheezing speakers. However, if you are not going to turn up the volume all the way, then you can safely take this option.
2nd place HIEI SX-5513
The first thing that stands out about this radio is its kind of retro design, the front panel is made of aluminum and plastic. The radio has very good sound quality. When listening to music from a smartphone or answering calls while driving, there are no complaints about Bluetooth operation. True, an additional microphone will not hurt for a conversation. Otherwise it has the same functionality as the model above. Among the minuses, it is worth noting the constantly running clock, which cannot be turned off or switched to 24-hour mode. Therefore, to avoid draining the battery, you must turn off the radio manually.
1 place HIEI JSD-520
This four-channel radio has an output power of 60W, which is in fact one of the best indicators on Aliexpress for this class of radio. This is confirmed by a large number of reviews. Almost everyone praises the sound quality. It has a three-band equalizer with presets for different genres of music. You can play music from memory cards, flash drives, via AUX or via a smartphone connected via Bluetooth. In this case, the name of the song will be displayed on the display. Hands free also works at a decent level. And the most pleasant bonus for all this is that you won’t have to pay much.
BEST PULL-OUT RADIO RECORDS
3rd place POLARLANDER 9601
Radios with a retractable screen look very cool and have wide functionality. That is why they are considered to be very expensive, since they can be classified as a premium segment. But even among this class of radios you can find options at an affordable price. One of them is this model. This model has a MOSFET 45W*4 sound amplifier, Bluetooth, remote control on the steering wheel, also supports a rear view camera and much more. A special feature is the interface in Russian
2nd place RHYTHM 1 DIN CAR RADIO
This radio is an upgraded version of the previous one, GPS is added, sound quality and equalizer are improved, the display, in turn, does not have an automatic drive, like on the previous model. On the one hand, of course, you need to add additional effort every time you start the radio. But this solution also has the advantage of increased reliability when compared with automation. Otherwise, it has standard functionality for similar models. Naturally, there are options for installing a rear view camera. The seller can choose one of four options. You can additionally order it as a separate lot.
1 Place PODOFO MCX-1705AD
I have already mentioned this company above. This manufacturer’s line also includes radios with an automatically retractable screen. The best of them is MCX-1705AD. The model is made with high quality and has a 7-inch touchscreen display; on the radio, instead of some strange operating systems, the familiar Android is installed. The manufacturer assures that the radio has the eighth version, but it is possible that when ordering you will receive an earlier version. The decision to install Android opens up endless possibilities for personalizing the device with various applications, and supporting multitasking will make it easier to use.
Thank you all for your attention, I hope you found something for yourself from this collection. Have a good mood and happy shopping.
The size of the radio exceeds the dimensions of a 1din device, which immediately catches your eye.
As practice shows, 50 W of power is enough for normal sound quality. After finishing playing a given recording, it will be played from the beginning. There are just plastic latches. 2DIN radio from Aliexpress. Installation + diagram It would be possible to connect additional devices, such as a rear view camera. Power is supplied to the amplifier when the player is turned on and is maintained while the radio is operating.
Work is carried out and then it is returned to its place. I also forgot to write - there is an icon on the screen that allows you to change the brightness of the screen - day and night. But this device has a dimmer - which changes the brightness automatically when the dimensions are turned on. Recommendations for purchasing Chinese-made radios In the case when the purchase is made through an online store, first of all read the reviews of people who have already purchased this brand of car radio in this particular store.
How to set up an Android radio: basic recommendations
Today, Android is undoubtedly the most popular operating system in the world. More than one billion installations! The numbers speak for themselves. Android-based OS can be installed on any computer device. This could be a wristwatch, tablet, iPhone, and so on.
Setting up an Android radio
The popularity of this program is explained very simply. Android is simply packed with all sorts of functions, options, and not-so-necessary programs. And also easy to use and configure. In our article we will talk about one of the devices equipped with the Android 4.4.4 operating system, a radio tape recorder for a VW car. More precisely about the basic settings of some options.
Setting up an Android radio
How to translate button labels on an Android car radio
On many head units running on the Android OS, there are several physical or touch buttons and “twists” on the front panel and display.
The most common controls are those with the following designations:
- VOL - “twist” volume control, it is also a button to turn the device on/off (press and hold);
- TUNE - “twist” for switching radio channels, pressing the button opens the equalizer menu;
- SRC - switch to the main menu;
- HOME or “house” icon - return to the main screen;
- GPS - GPS navigation (an additional remote module is required to communicate with the satellite);
- BT - turn on/off Bluetooth mode (used to control Hands-free hands-free communication);
- DVD — switch to disc playback mode;
- MUTE - button to completely mute the sound;
- NAVI — switch to navigator mode;
- BAND — button to turn on the “Radio” mode, also used to switch radio frequencies;
- RST - button to completely reset current settings;
- Eject - CD eject button.
The buttons located on the front panel of the Android radio can be reconfigured (reassigned) independently, giving them new functions. This is not difficult to do.
So, to configure the buttons on a Chinese radio on Android IQ NAVI, you need to follow these steps:
- Go to the main menu of the car radio, select the Settings section (gear icon);
- Select the “Advanced Settings” tab;
- Enter the service password - 123456;
- In the menu that opens, select “Front panel buttons”;
- A kind of table of dark and light cells will appear on the screen. Light colors indicate buttons that already perform some function, light colors indicate free buttons;
- To begin reprogramming the physical buttons on the front panel, press the Start button;
- To start setting up from scratch, click the “Clear” button;
- Then we proceed to program the buttons one by one: Press the MUTE function on the screen (the cell will be highlighted in white), select and press the corresponding button on the front panel. Select the “Pick up handset” function on the screen, press the BT button or any other button of your choice. Similarly, we assign functions for all other buttons;
- To assign another action to an already programmed button (it will be performed with a long press), select the function already assigned to this button on the screen and hold it for 2 seconds. A dialog box will open next to the cell, in which we select “Long press” and then select the desired function from the proposed list.
- To reconfigure the “twist” buttons, you need to select any cell on the screen that says “Free” and select one of the proposed options from the list. To assign an additional function, hold down the corresponding cell and select a new action from the proposed list.
- Press the “END” button to complete programming and save the settings, go to the main menu and check how the reconfigured buttons work. Ready!
Setting up an auto player on the Android 4.4.4 platform
For those who have already encountered the above-mentioned OS when installed on any computer device, setting up the radio on Android 4.4.4 after installing it in the car will not arise. However, like those who encounter this program for the first time. The reason for this is the printed, text instructions supplied with the equipment with detailed information and recommendations for installation and configuration. The settings menu is in Russian, understandable even to a child. And as a last resort, there are many online forums dedicated to this topic - on step-by-step implementation of the settings for Android radio 4.4.4.
We will not touch on ordinary functions, such as changing wallpaper, volume, date, time, etc., which are typical even for ordinary phones, but will analyze some specific settings of the car radio. Such as:
- settings for developers on the Android radio.
- settings for connecting car radios to the Internet.
- Android engineering menu
In all Android devices, there is a hidden item in the settings - a guide for developers. With it, you can adjust the animation speed, enable a function that shows where the screen was touched, and much more. It should be noted right away that this section is unlikely to be particularly useful to the average user. Because it was created for developers and programmers.
- We go to the standard auto player menu.
- Select the settings item, activate it and go down to the very bottom of the column to the line about the radio.
- After turning it on, we also find the item below - the assembly number.
- We make seven clicks. Don't be afraid to make a mistake in the number of touches. After each contact, the display shows information about the number remaining to make.
- At the end of these actions, the Android OS will inform you that you have become the proud owner of the developer status!
- Now in the settings of the section - systems, the item - developer is open for you.
Features of the section for developers
You decide for yourself whether to use the opportunities provided in this section or not. We will simply repeat the warning included in the program:
These options are for developers only. Incorrect use may result in malfunction of the device!
If you are confident in your abilities as a programmer, the need for intervention, and are not afraid of the consequences, welcome to the world of new opportunities. Now you can:
- Block the possibility of backup by an unauthorized person by setting the copy password to use mode.
- Enable active screen mode.
- Protect your memory card from viruses. When enabled, all programs will be required to ask you for permission to access the map.
- Improve USB compatibility with PC.
- Indicate touch points on the radio screen.
- Show the latest monitor and GPU updates.
Car radios without a plug determine the pinout
The following option can be considered a more complex problem. When the connector to the board is simply missing, along with the documentation. What to do in this case? There is one working way to solve this problem. The chip for connecting the car radio may be lost, the location of the pins is inaccessible, but the correct circuit can be determined.
Car radio connectors
This can be done in any radio, both elite ones - JVC, Pioneer, Sony, and branded ones, for example, Toyota. It is easier to determine the location of pins on a radio of a well-known brand than on an unknown one. The same situation is with domestic VAZs. The pinout can be found freely on the Internet.
The problem is with car radios with an exotic manufacturer and the same exotic connector. Moreover, in some cases, the connector may differ not only between models, but also between batches. For these purposes, you will need a multimeter, which you will need to connect and “ring” the contacts.
Determining the power wires
First you need to find the power wires: “yellow” and “black”. The yellow wire is found as follows. In most cases, the “yellow” and “black” power pins are larger in diameter and stand out well from the others. But sometimes this may not be the case.
Power cables
The “negative” one is usually looped onto the body of the car radio, respectively, if one contact of the multimeter is connected to the body, the other to the terminal. “Minus” will ring the contact. The other one will be a “plus”.
Finding the control red wire
To find the control “red” wire, you will need to connect a 500-800 Ohm resistor. Also use a 12 V power supply, connect the negative wire to the case, the positive wire to the plus defined in the paragraph above. Turn on the power supply. Then connect one resistor output to positive, the other to all remaining contacts, but on the board due to the limited length of the resistor. The car radio will turn on at the desired contact.
Conclusions to the speakers
Next you need to find the leads going to the speakers. Usually they are displayed on contacts:
- front left, front right;
- rear left, rear right.
We are talking about paired contacts at the beginning or end of the connector. On the plan you need to find the amplifier chip. Speaker leads can be determined by the width of the tracks; they are usually one of the widest. Using a multimeter, you can determine which speaker is right and which is left. This is well commented on in the video, which shows all the mentioned elements of the microcircuit and clearly explains the nature of the connector and how to restore it.
Multimeter
Peculiarities
So, let's summarize. First of all, there is always the opportunity to use a Euro connector and forget about the difficulties of switching from a unique circuit. If it is missing, the location of the contacts is determined empirically by ringing the contacts. First there is power, then the control wire, then the speakers. After identifying all the contacts, the chip for connecting the radio is made independently.
Branded car radios such as Toyota or JVC have all types of plugs publicly available. An ISO adapter can also be purchased for connection to them.
Connectors for car radios
Conclusion
Using the described method, you can safely connect a radio without a chip; this makes it possible to revive almost any device without a plug. This feature helps you save on the purchase of more expensive models that are not sold complete. The restoration process will not cause difficulties even for people without experience in the field of electrical engineering and electronics. You can connect everything yourself, this is a huge advantage of the proposed method.
We invite you to watch the full video on this topic; after watching, any feature on a Pioneer or Toyota radio will become clear.
Connecting a VW car radio to the Internet
For car players on Android OS, the Internet login settings are quite unified. We offer you recommendations using the example of a standard radio for a Volkswagen car. Online setup of the VW Android radio with firmware 4.4.4 is done as follows:
- Insert the modem with the purchased SIM card of any mobile operator convenient for you into the USB connector designated for it.
- Then, on the device screen we find the settings item.
- Select - wireless networks.
- Mobile network.
- APN access point partition.
- By pressing - menu, we go to - new access point.
- We name this point as we wish and store the parameters of the cellular operator in memory.
- We save the entered data.
- Activate APN.
- Reboot the car radio computer.
Installation and configuration of the Internet connection on the standard sound-reproducing device of the Volkswagen car is completed.
A table with codes and parameters of mobile operators in your region can be previously found on the website by logging in from another device. Or receive such information at the time of purchasing a SIM card.
Configuration of other gadgets provided for connecting the car's control panel based on the Android 4,4,4 operating system is carried out according to the manufacturer's instructions that are necessarily attached to them.
Connecting a USB modem to the radio is more or less clear, but not entirely convenient. Tell me, maybe they produce Android radios where SIM cards are inserted like into a smartphone or tablet?
The article is very well written and detailed. I was able to figure out and set up my phone and synchronize media files with the car radio. I couldn’t figure it out on my own, and I didn’t even suspect that there was such a possibility.
Source
Antenna connection
Having a radio in the car, some car enthusiasts prefer to listen to music or watch videos. But many drivers like to listen to their favorite radio stations while on the road, which is why every car audio system has an FM tuner. An external antenna is required for its normal operation. Experts recommend installing an active module that ensures stable reception of radio stations. The antenna is powered from the car network via the radio.
Chinese audio devices are equipped with a special output labeled ANT. Depending on the settings, power may be supplied to the antenna when the radio is turned on or only to the radio. The antenna cable is connected to a special socket located on the back wall of the device. The receiving part is located on the windshield. The active antenna is connected with 3 wires:
In the case of installing a simple receiving device, an antenna adapter containing an amplifier is additionally used to improve the quality of the received signal. In radios with a GPS module, an active GPS receiver is used, which ensures stable operation of both the navigator and the radio. Connects similarly to an active antenna for a car radio.
Settings for connecting car radios to the Internet
With the start of sales of radio tape recorders that have the ability to connect to the Internet via a plug-in USB modem, we began to be asked questions about how to correctly configure Internet connection parameters. In this article we provide answers to these questions.
When installing the radio in a car, route the cable with the USB connector for the modem into the glove compartment of the car to have access to the modem without disassembling the panel. You never know - suddenly you decide to change the operator if another one has better tariffs. In W2 series radios, this is a gray cord on the rear panel of the device that cannot be pulled out of the radio. If you lead both USB cables (for the modem and for the flash drive) to the same place, mark them somehow so as not to confuse them later.
Well, the radio is installed and connected. It's time to sit down at home at your computer and slowly choose the right tariff for yourself from one of the cellular operators. Such that the Internet was in the required “doses” at normal speeds, and a modem was included, and the purchase of this necessary accessory would not strain your pocket. We test Internet access on Huawei E150, E160G, E1750 and E1550 modems
, purchased from the MTS operator.
According to the manufacturer, the devices currently support most Huawei modems. ZTE modems are not yet supported
- pay attention to the brand of the modem when purchasing it from an operator. For example, Beeline often sells ZTE modems. If nuances arise with other modems, write to us about it - we’ll try to help you figure it out.
How to install
Some cars are equipped with 2-DIN sockets. The device is secured using metal brackets or a mounting casing screwed to the dashboard with self-tapping screws. Installation of a 2DIN radio is performed as follows:
Some vehicles come with a 1 DIN audio system. It is installed in a full-size mounting socket through an adapter frame. Part of this element is occupied by a disc pocket equipped with a lid. After finalizing the frame, you can install a double-din radio. There are 2 options for installing equipment:
Transition frames for installation
Using an adapter frame helps to correctly install non-standard-sized equipment to replace a 1 DIN radio. The part is not included with the player; it must be purchased separately. Some models of transition frames take up a large part of the console, which is considered the main disadvantage. The factory-installed mounting element is difficult to remove. Installing a new radio is complicated by the lack of the required size in the frame, which leaves gaps.
When purchasing parts, take into account the car model and body type. Frames from different brands vary in quality. There are no mounting elements for some types of machines. In this case, an existing part is modified or a new one is made to order.
Size and types of car radios
Universal radios have a standard size, it can be 1 – DIN (height 5 cm, width 18 cm) and 2 DIN. (height 10 cm, width 18 cm.) If you change the radio from large to small (from 1 – DIN, to 2 – DIN), you will need to buy a special pocket that will cover the missing din. In terms of connection, these radios all have the same connector, its name is ISO or it is also called a Euro connector.
Standard radios are installed on cars from the factory and have a non-standard size; in this case, there are two options for installing the radio. The first is the simplest, you purchase the same standard radio and install it, it fits in size and connects to the standard connectors. But the cost of these radio tape recorders is often inadequate. And if you find a budget option, then with 100% probability it will be from China, which is not particularly famous for its sound quality and reliability.
The second option is to install a “Universal” radio in place of the standard one, but for this you will need an adapter frame, which is an adapter from the standard sizes of the radio to the universal ones, i.e. 1 or 2-DIN. the frame plays a decorative role, covering extra holes.
If your 2 din radio has an LCD display, then you can connect a rear view camera to it, and we discussed in detail how to do this in the article “connecting a rear view camera”
Hint for TOYOTA owners. In most cars of this brand, the standard radio has a size of 10 by 20 cm. In this case, you can look for “Spacers for Toyota radios”, they are 1 cm in size and you can easily install a standard-sized radio, i.e. 2 – DIN, to install 1 – DIN you will still need to buy an additional pocket.
Developer Mode
Any SHG on Android is equipped with an additional interface for developers. It, as the name suggests, was introduced specifically for programmers.
Nevertheless, a huge number of useful options are available to the average user:
- Blocking backups by third parties by protecting them with a separate password.
- Enable/disable active display mode.
- Protecting internal memory from virus software. When installing each program, the system will ask for permission to gain access. A useful thing for motorists who prefer to use software from unverified sources.
- Improved compatibility with personal computer.
- Displaying finger contact points on the device screen;
- Demonstration of the latest updates for the graphics core and monitor.
And this is not a complete list of the possibilities that open up to the driver with such a setup of a 2 din radio. For example, to improve performance, you can change the animation settings when scrolling through menus, or disable it completely, freeing up additional RAM.
Source