The vehicle coating provides not only a presentable appearance, but also additional protection. But, like other materials, the paint surface has a limited service life. Under the influence of loads, minor damage gradually appears on it. Therefore, it will be useful for car owners to know how to paint over a scratch on a damaged car with their own hands.
Different ways to remove grooves
Small cobwebs on a car's paintwork can be removed without touching up the defect, but using the polishing method. To do this, use abrasive or wax polishes. The first type of composition removes a very thin layer of varnish until the scratch disappears, so it cannot be used frequently so as not to remove the entire protective layer from the undamaged area. Wax polishes fill the cobwebs, but after two or three washes the procedure will have to be repeated again and again.
If the protection in the form of a varnish layer or enamel is damaged, then the grooves can be covered with a wax or gel pencil; in this case, touch-up is not required. Special products in tubes or in the form of pencils are also used in cases where it is necessary to mask scuffs of the paintwork.
There is an anti-scratch product on sale in the form of special brushes for removing coating defects, which can be used to cover fairly deep grooves. The composition contains fiberglass, so its use does not require preliminary priming.
Remember that this product can only be used once, as the paint dries very quickly after opening the tube.
If the depth of the groove reaches the ground or metal, then in order to remove it, a more complex repair of the damaged area is necessary - painting over the scratches on the car. To do this, prepare the following tools and materials:
- sandpaper P1500, P2000;
- polishing paste;
- a grinding machine or drill with a set of discs;
- putty;
- rubber or plastic spatulas;
- primer;
- auto enamel color of your car;
- protective varnish;
- surface degreasing composition;
- brush, spray gun or roller.
Let's figure out how to paint over a scratch on a car with your own hands using these tools. By following step-by-step instructions, you can remove defects in your car's paintwork yourself, saving significant money.
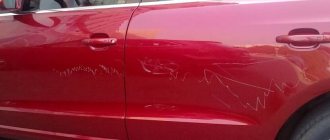
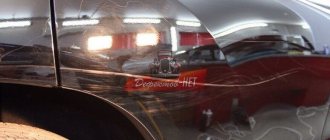
Where do scratches come from under door handles?
The reason for the appearance of scratches under door handles is the constant settling of grains of sand, dust, and dirt on the car door while the vehicle is moving. This process occurs constantly, regardless of the time of year and weather. By touching the door handle dozens of times every day, the driver activates abrasive microparticles that settle on the door in the form of dirt. Therefore, in order for scratches under the handle to appear as late as possible, you should wash the car more often, but even so it is impossible to completely insure the car against occurrence.
Local application products - fast, cheap and easy
Another way to restore a body is to use special automotive products aimed at masking and completely removing scratches. This group of products includes wax and gel correctors, as well as specific pencils. The color palette of the products presented is very wide, you can easily choose the pencil that perfectly matches the shade of your car.
The main advantages of using these tools include:
- Ease of work.
- High speed of the process.
- Low cost of goods.
The main disadvantage of correctors is that, as you can guess from the name, they do not so much restore scratches as simply mask them. The consequence of this is the need to periodically update the shaded layer. At first, the drying composition perfectly hides any damage to the car, but over time, the paint begins to crack and deteriorate, which leads to the reuse of pencils.
We recommend: Motor oils and everything you need to know about motor oils
The automotive goods market can please us with many other interesting products that allow us to paint any minor body defects in the shortest possible time. Degreasers, special wipes, car varnishes, masking polymers - all these products make it possible to get rid of minor damage, as well as additionally protect the car body, preventing the possibility of rust.
Removing deep scratches
You can disguise such defects using a marker matched to the body color. If this does not work, you will have to act more thoroughly. For this you will need:
regular paint;
several types of primer;
alcohol;
thin brush;
special kit for removing scratches.
The step-by-step process is as follows:
1. The car body is thoroughly washed. This process should not be neglected; it directly affects the result. Damage is treated with an alcohol base. Further work is carried out in a clean, dry room.
2. Then a primer is applied to the scratch and left to dry.
3. Next, you can begin painting the damage. This is done with a thin brush with soft bristles, but you must not step beyond the boundaries of the defect. The paint is left until completely dry.
4. After this, varnish is applied. In the same way, without overstepping the boundaries. After a few hours, when the varnish is completely dry, the car can be used for its intended purpose.
5. A month later, the surface is polished with paste and wax.
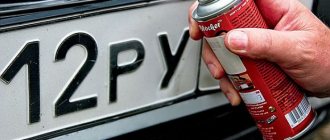
Removing scratches on the body with a Fix it Pro pencil
If there is only superficial damage to the varnish coating, then there is an excellent way to remove such scratches that does not require specific skills and can be done by any amateur - this is a special pencil for removing scratches Fix it Pro.
After just a few uses, the Fix it Pro pencil will not leave any traces of scratches on the surface of the body. The main advantages of the Fix it Pro pencil are:
- Simplicity and ease of use;
- It matches any car color;
- Almost instantly removes small scratches and chips;
- Fix it Pro can be used multiple times;
- A very affordable price and an opportunity to save on a visit to a car service center.
However, in fairness, it is worth noting that small scratches can be easily removed not only with a pencil. According to “experienced” motorists, RENUMAX compositions cope more effectively with scratches and other minor damage to a car’s paintwork.
And given the low cost and ease of use, RENUMAX can confidently be called one of the most popular means for removing scratches on a car body without painting.
But still, miracles do not happen and you should remember that both the Fix it Pro pencil and the RENUMAX product will help restore ONLY the varnish coating of the car, and not the paint.
Preparation for polishing
To successfully polish a car body from scratches with your own hands, you should take care to create optimal conditions for the work.
- the surface of the machine must be absolutely clean and dry;
- Polishing should be carried out in a closed, clean room with good ventilation and no dust;
- It makes sense to take care of high-quality artificial lighting. To achieve the best result, you should clearly see the surface of the car from all angles.
Before carrying out the procedure, you will need to remove all dents, and apply special tape to significant scratches and chips. If deep polishing of scratches is planned, the damage is processed separately.
Important! You should not polish in direct sunlight, as the polish dries out instantly, and this leads to stains and stains.
Only by following the above rules can you polish your iron horse no worse than in car dealerships, and at the same time win significantly financially.
How to paint over a scratch on a car
No matter how careful the driver is, scratches will still appear on the car. Damage of this type is divided into several groups depending on a number of signs:
- minor scratches of the first level that damaged the paintwork;
- medium scratches of the second level, damaging the top layer and primer;
- deep scratches of the third level, damaging all layers of the coating, including metal.
Special tools are used to paint scratches on a car. But to understand what kind of device you will need to restore the surface, you need to determine the type of scratch.
There are also several types of damage repair methods:
- spot;
- polishing;
- using a brush;
- using a can of spray paint;
- with a full renovation.
In most cases, no labor-intensive effort is required to remove the scratch. To do this, it is not necessary to contact a service center - you can paint over the scratch on the damaged area yourself.
Spot painting
Spot painting is also known as retouching. This method involves several ways to restore the surface of a car, depending on the level of damage.
Most often, this type of painting is used to remove level 1 scratches that have damaged the paintwork. When performing spot painting, the locations of scratches are determined, after which painting is carried out. The task is completed independently using marker pencils.
If there are second-level scratches on the coating that have damaged the paintwork and primer, local agents are used. These include a polymer chalk pencil and a paint brush. It is recommended to apply the paint in several layers.
Paint a scratch only in clean and dry areas. You need to wait until the surface dries before applying the next coat of paint.
Polishing
If there are scratches, painting is not always necessary. In some cases, polishing is sufficient. This method is only suitable if it is necessary to remove shallow scratches. To determine their presence, you need to wet the surface and wait until it dries. After this, the scratches will appear on their own.
We recommend: What is body straightening and how to do it yourself
You can remove the scratch by polishing it yourself or at a car wash. It requires a special wax paste. The substance fills the scratch, causing it to disappear. But it should be borne in mind that polishing provides a temporary effect. Therefore, in order to maintain the paintwork in a new condition, it is necessary to periodically repeat this action.
Damage to the paint layer
Simply remove medium-depth scratches using a restoration pencil:
- the car is washed;
- the damaged area is degreased;
- defects are carefully covered up without touching undamaged areas;
- leave for a day for the paint to dry;
- The restored surface is rubbed with a rubber sponge.
Timely care using protective and restorative agents allows you to prevent corrosion of the hood, maintain the original attractive appearance of the car, and will cost much less than repainting.
Preparing the surface area for painting
Painting over scratches on a car begins with the process of preparing the damaged area of the paintwork, which can be reduced to the following sequence of actions.
- Sanding the damaged area. First you need to remove dirt and, if present, rust. For sanding, use a sander or sandpaper. Rub the area down to the metal or scratch depth level. The result should be a flat, smooth surface. Begin the initial sanding using P1500 sandpaper. Sand the intact paintwork around the working area with finer grit P2000 paper. Do the cleaning carefully and rationally, not forgetting that the larger the area you cover, the more you will need to paint.
- The prepared area on the car body must be degreased with white spirit, xylene or gasoline.
- Apply a layer of putty. You can use polyester putty along with a hardener. Mix the hardener and putty and apply the mixture to the work area. When working with the material, use the instructions for the specific composition. It is important to correctly observe the proportions of mixing the components, otherwise the putty may harden before being applied to the car body.
- After the putty has dried, sand it to a smooth surface.
- Your next step is to apply a primer. For local repair of car body paintwork, it is better to use the composition in aerosol packaging, which will give a good quality result and speed up the priming process. You can also use the compositions in jars, applying them with a brush.
- The dried primer layer must be sanded wet with fine-grained sandpaper.
At this point, the preparation of the car body is completed and the next step is directly painting over the scratches on the car.
Stages of deep polishing of a car body
In order to get rid of significant scratches on the car body, the deep polishing method is used. It is necessary to have certain skills and be armed with knowledge about the procedure in order to get a truly high-quality result. In addition, the process takes a long time, but changing the appearance of the car for the better is worth it.
First you need to prepare tools for deep (abrasive) polishing:
- Pastes of various types - abrasive, non-abrasive and with a medium content of abrasive particles.
- Polishing machine.
- Polishing wheels.
- Sandpaper P2000 and P2500.
- Soft rubber scraper.
- Any soft, lint-free cloth.
- Water in a spray bottle.
Abrasive polishing of a car surface should be carried out in stages:
- cut the sandpaper into small pieces and soak in water to soften it;
- rub the scratched areas with sandpaper, while using a scraper and water to remove the cleaned particles from the surface;
- Sprinkle the area to be treated with water and apply a polishing machine with the hardest wheel (white) to it. Before turning on the equipment, apply and evenly distribute a highly abrasive compound on the wheel;
- After polishing all areas, wash the car with car shampoo.
The grinding machine must be selected taking into account the ability to easily regulate the speed. Polishing a car should begin at the lowest speed of the machine - 900 per minute, then the speed should be increased to 2000 rpm.
Then the same area of the body is polished again, but using a non-abrasive compound and a softer wheel on a polishing machine.
Important! During the polishing process, you should never put too much pressure on the machine - this can lead to damage to the paintwork.
The work process should proceed smoothly and calmly, without unnecessary fuss and haste. Particular care must be taken when processing edges and corners of the body. After polishing an area, you need to thoroughly wipe it with a damp cloth, evaluate the result of the work, and only then proceed to other areas. In this way, the entire body is gradually polished.
The polishing machine moves completely effortlessly across the surface of the car as long as there is a sufficient amount of paste and water on the disc. In case of overheating, it is necessary to turn off the equipment, let it cool down and only then apply water and continue working.
After washing the car with car shampoo, let it dry and then apply a protective polishing compound that does not contain abrasive particles. But wax will also work. It can simply be dripped onto the body and distributed with light movements without rubbing. After drying, you need to remove excess wax with a soft napkin or rag.
Properly carried out deep polishing of scratches on a car body with your own hands guarantees the return of the car to a practically new appearance and gives a second, if not a third life to the paintwork on the surface.
Restoring the paint layer - preparation and main steps
Experienced motorists know very well that any damage to the car body can be repaired. Especially when it comes to such minor problems as scratches. Even without minimal experience in handling such damage, anyone can paint over a scratch on a car with their own hands, without visiting service stations. This saves time and, more importantly, money, since the result will be the same in any case.
Before painting a car, it is necessary to obtain some theoretical knowledge, in particular about the layers of the body surface. So, the following is the order, starting from the top:
- A layer of varnish.
- The base layer is enamel.
- Primer.
- Phosphate.
- Sheet steel is the deepest, last layer of the car body.
Depending on the layer damaged by contact with foreign bodies, the technology of restoration and restoration may differ significantly. The simplest, for obvious reasons, are scratches that only damage the paintwork. In this case, the operation to remove the damage may take a couple of minutes.
If during a trip you accidentally hit the fence and made a deep enough chip that touched the steel, then you will need to put in much more effort. But, we repeat, any damage of this nature, regardless of its depth, can be corrected at home.