How to independently remove the trim from the doors of a Ford Focus 1, 2 and 3
Many owners of foreign cars prefer to contact service centers in case of any malfunctions, and owners of Ford Focus cars are no exception in this regard. However, the car owner can easily fix some faults on his own, without resorting to the expensive services of specialists. Properly removing the door trim is one of the problems that even a novice driver can resolve. The main thing is to know how it's done.
Sheathing fastening
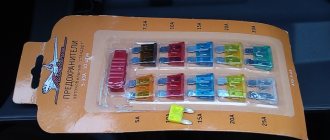
The fastening clip has serial number C-MAX 1257376. For complete reinstallation on one door you will need 5 clips, the cost of one clip is from 25 rubles. It is better to start unfastening the clips from the door lock.
On Ford Focus 3 station wagons, a sixth latch can be installed on the rear door in the right or left corner, respectively, as an additional safety element. Service station technicians and drivers who have reinstalled the trim recommend not using hard tools when working with plastic; it is better to seal the edge of the screwdriver with tape or use a thin rag as a gasket. With high resistance to direct impacts, the sheathing material cracks into fractures.
With the correct order, the driver will need no more than 15 minutes to dismantle the plastic and the same amount to install the panels.
Why remove the door trim on a Ford Focus 3?
You may need to disassemble the door trim on your Ford Focus 3 for a number of reasons. The main ones are two:
- repair;
- tuning Ford Focus 3.
That is, the doors are disassembled if something is broken in them, or the owner of the car decides to improve its appearance, quality or certain characteristics. For example, as you know, Ford Focus 3 does not have a very high level of noise insulation, and in order to increase it, you need to get to the metal from the inside. In addition, when installing or replacing an audio system, the speakers of which are usually located in the front doors, the procedure is also relevant.
What is door trim and its purpose?
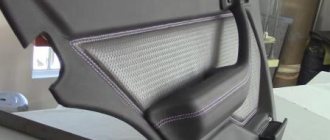
The door panels on the Ford Focus sedan station wagon and hatchback of the first generation were made of durable but thin plastic. The material had good resistance to mechanical damage and did not crack from frost. The owners noted a characteristic creaking of the trim in the armrest area.
The interior of the third Focus uses higher quality materials - high-strength plastic and eco-leather. The doors are lined with color-matched plastic panels. Purpose:
- ensuring sound insulation of the cabin;
- protection of electrical cables from mechanical damage and rapid operational wear;
- technical review when checking electrical cables;
- decorative function, soft plastic is not only reliable, but aesthetically pleasing and beautiful.
The layout principle of the door pockets on Focus 3 is identical to the first generation. Removal and installation of new front door panels remains the same for any body type. The only difference in the third generation is the new clips or trim fasteners, which are reshaped and made of a hard polymer.
Dismantling
It is quite possible to dismantle the casing yourself. Many drivers encounter difficulties due to incorrect work procedures. Removing the door trim on a Ford Focus 3 is necessary in cases where:
- rear or front door glass needs to be replaced;
- The power window does not work;
- the door lock does not close well or is faulty;
- The driver's speaker stopped working;
- It is necessary to improve the sound insulation of the cabin.
When reinstalling, you need to purchase a set of clips. The clamps are intended for single fastening. If you reuse the part, the tightness of the material is broken, the panels do not hold well, and they can creak when the motor vibrates. To quickly disassemble the casing, you will need the following tools:
- crosshead screwdriver;
- steel wire, with a diameter of 0.8 mm:
- flat screwdriver;
- plastic ruler;
- 10mm socket wrench with crank.
Sequencing
The analysis takes place with the door open, step by step:
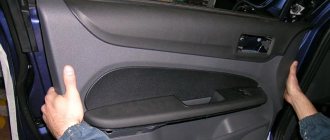
- Pry up the armrest with a flat-head screwdriver and pull out the panel.
- Using a Phillips screwdriver, unscrew the two screws located under the panel.
- Use a flat screwdriver or a plastic ruler to pry the frame of the door handle and pull the part straight towards you.
- Remove the protective cap of the reflector and unscrew the screw.
- Remove the door lock handle socket.
- Unscrew the screw located under the cover.
- Pull out the power window connector located under the frame and disconnect the block. For the back door, use wire and remove the handle.
- Pry the lower corner of the casing from below with a screwdriver and move it away from you until the clip clicks.
- If you try to remove the clip with a screwdriver, you may scratch the casing or crack the plastic.
- Without removing the screwdriver from under the panel, run the tool around the entire perimeter and unclip all five; on the 2nd generation restyling version there are six latches.
Half the time the clips will have broken side skirts. It is recommended to remove all fasteners and install new ones in their place.
Removing the rear door trim is carried out in the same way as the front door; you need to start work from the top panel of the armrest and window regulator.
- Pry the window handle trim and pull it towards you; the part is installed on the latch.
- Unscrew the two screws that are located under the panel and pull out the handle.
- Remove the door handle trim and unscrew the screw.
- Pry up the casing with a screwdriver and unclip the clips.
How to remove a Ford Focus door trim
Tools needed to remove the trim:
- Flathead screwdriver.
- Insulating tape.
- Pliers.
- Long head on "8".
- Key TORX T25 (asterisk)
- Clips.
Front door
Step-by-step instruction:
- The first thing a person should do is lower the window.
- Next you need to “get rid” of the speaker grid. It is quite easy to remove; you just need to pull it towards you. You will have to apply a little more force, because it is attached with latches. Don't be alarmed if you hear any sound, know that these are clamps.
- Then take a special key called “T25” (“asterisk”) and unscrew the fastening screws.
Front door
Tip: Check each part for condition, there is a high probability that it needs to be changed. Examine it well, if its physical characteristics are satisfactory, then place it in a specially prepared place.
- Then you need to remove the seal from the door. This process requires caution. Remove carefully so as not to damage the staples.
Important points
- Since the trim is held on by plastic clips, it will have to literally be torn off from the door. It is impossible to reach the latches with any tool, since they are too far away. This means that during dismantling one or more clips will break (this is almost inevitable). This means that before disassembling the trim, you should definitely purchase a new set of door latches at the nearest Ford Focus brand store;
- When dismantling the material of the front doors, you should remember that there is one plug under the handle of the passenger front door (for the window regulator), and there are two on the driver’s side. An additional plug is connected to the control unit for the exterior rear view mirrors;
- The wire used to remove the locking ring of the window lifter handle must be steel, not copper. To remove the stopper you will have to apply a lot of force, so the soft wire hook will simply straighten out;
- hooking a locking ring is not as easy as it might seem at first glance. The stopper is located far away, so that it is practically invisible through the gap. As a result, you will have to act by touch. The best way: the hook is pushed into the resulting gap as far as it will go and held motionless, and the window lifter handle slowly rotates until the hook catches on the locking ring.
So, removing the trim from the doors of a Ford Focus is a task that even a novice driver can do. And you shouldn’t worry too much about broken latches: perhaps no one has ever managed to remove the casing without damaging them.
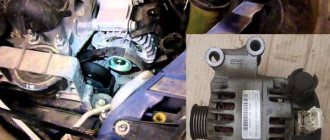
Replacement of external handle and lock
This procedure is performed in cases where the outside handle of the driver's door stops working normally. The same can be said for the castle. The process of removing them from Ford is quite simple and does not require much qualification from the technician.
Let's get to work. To begin with, using the technology described above, we remove the casing. Open the door and remove the rubber plug from the hole at its end. Next, using a T25 socket wrench, unscrew the bolt securing the lock and remove the lock itself, disconnecting the power connector from its electrical unit. We take out the lock cylinder.
Let's move on to removing the handle. On Ford it is removed by moving it towards the removed lock cylinder. We replace, if necessary, the gaskets on the handle. We insert the new handle, cylinder and the lock itself into place. We do everything in reverse order. We install the casing, not forgetting to connect all available electrical connectors. We check the functionality.
Soundproofing floor Ford Focus 3
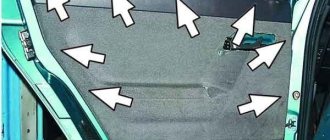
Let's move on to the most voluminous element of the car - the floor. Under the floor covering we see bare metal. But! Under the driver’s feet there is a very large, dense layer of felt, which initially protects the interior very well from the roar of the engine, as well as such small irritants as pebbles and sand. However, we won’t waste time on trifles and will glue a layer of vibration insulation under this felt.
A photograph cannot convey the feeling of the work process. This is labor-intensive, titanic work that will make the car quiet and pleasant. We covered the entire floor with an even layer of SGM M2 vibration damper. And yet, this is only half the story.
The regulations require a layer of noise absorber to be placed on top of the vibration insulation, which secures the work done. With a layer of Splen we complete the soundproofing of the floor of the Ford Focus 3 and move on to the trunk.
Removal from Ford Focus 3
Front door
- The corner is carefully pryed off with a flat plate or ruler.
Using a plastic ruler, remove the corner of the trim
The plastic panel is removed from the door handle
The marked bolts are unscrewed from their sockets
Procedure for removing the front door trim
Removing the front door trim on a Ford Focus 3 is as follows:
- Use a spatula to pry off the electronic unit responsible for controlling the power windows and adjusting the position of the mirrors.
- Remove the block.
- Disconnect the wires by removing the terminals.
- Unscrew the two mounting screws.
- Use a screwdriver to pry and remove the plug from the door handle. It is located behind the handle in the recess.
- Use a thin screwdriver to unclip the reflector at the bottom.
- Use a screwdriver to pry it out and remove the plug from the side (if you look at the trim from the end of the open door).
- Unscrew the three bolts found (under the handle, reflector and plug).
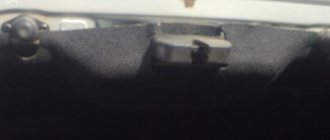
- Remove the buzzer in the corner of the window on the door.
- Disconnect it from the wires.
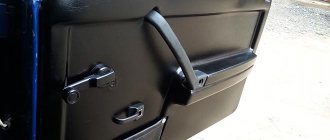
- Using a plastic spatula or your hands, carefully prying, remove the door trim, starting from the bottom.
- After dismantling the trim, unclip the door handle fasteners and remove it.
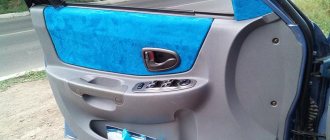
- The casing has been removed. The door is now accessible from the inside.
According to experienced owners of Ford Focus 3, all the pistons that secure the door parts are quite strong and do not break, however, it is not recommended to use undue effort to detach the trim.
What tools and materials will you need?
The main tool will be the arms that grow from the shoulders. One wrong move or excessive force will cause the card to break or be severely damaged. You will need a thin flathead screwdriver, several sizes of Phillips screwdrivers, a torx screwdriver (TORX T25), a powerful knife (may not be useful, but it is better to have one), as well as a special tool for carefully dismantling plastic parts.
A special tool for removing the card must meet the following characteristics:
- the material must be soft; it is best to make such a device from plastic or plexiglass;
- it is necessary that one of the edges of this device is thin (plexiglass can be carefully sharpened);
- the sizes may be different, but it is best to have one sharp and narrow edge, and the other long edge;
- The product should not break during the work process, otherwise it will scratch the card details.
To remove the door trim of a Ford Focus 2, a set of polymer spatulas is suitable. You can use some types of plastic scrapers to clean your windshield. Such devices will help you quickly cope with dismantling work and largely protect your car from damage. You should not pry the plastic with a metal screwdriver. This will damage it. At a minimum, there will be unpleasant traces that will be very difficult to hide in the future.
Necessary tool
In order to successfully remove the door trim, you may need the following tools and accessories:
- set of torx bits;
- a set of plastic spatulas or at least a plastic ruler;
- thin flat screwdrivers;
- metal ruler or thin spatula.
If the procedure is carried out with the aim of replacing or installing any parts or assemblies, then, accordingly, you should not forget to prepare the necessary kits.
Before starting the dismantling procedure, it is recommended to remove the negative voltage on the battery to avoid accidental short circuits or other problems with the electrical circuit.
Do-it-yourself operation algorithm
So, we present to your attention an algorithm for soundproofing doors as the main zone that helps improve acoustic characteristics and reduce the overall noise penetrating into the interior.
Parsing
The process begins with disassembling the door:
- The outer door trim is removed. It is believed that this is the most difficult stage in the work, because you need to remember the location of each screw in order to facilitate reassembly.
Note. You don’t have to remove the mechanisms responsible for opening and closing the door and the window regulator. They will not interfere with soundproofing, but putting them back is quite difficult.
Cleaning
- After the doors have been disassembled, it is necessary to thoroughly clean the panel surfaces (where processing begins) from dirt and dust;
- After this, you need to treat the surface with White Spirit. This is a good degreaser, but you shouldn't get too carried away with it. It can corrode the paint, which will ultimately lead to the appearance of an extra source of corrosion.
Note. White Spirit will help clean the outer surface of the door and remove anti-corrosion treatment. But it is recommended not to treat the lower part of the door - it is better to leave the anti-corrosive agent in this place.
Main stage
Let's move on to pasting:
- First, we place the vibration damper on the door panel (the part on the road side). As a rule, today they use Vibroplast Gold or similar materials.
Soundproofing the ceiling of Ford Focus 3
Under the ceiling lining we see three thin, but what is there... pathetic layers of unknown purpose. For what purpose, but as sound insulation, this material is completely useless. However, we will leave it for one simple reason: the space between the ceiling and the sheathing is catastrophically small and is only enough for one layer of felt.
We glue acoustic felt into two very large sheets - an ideal noise-absorbing material that is used, among other things, in construction. There is not much external noise on the ceiling, mainly the sound of raindrops, which a layer of felt will cope with perfectly.
Production costs
Soundproofing car doors
One can only guess why the manufacturer did not take care of the quality condition of his car. No, the rest of the car is as good as the envy of its competitors in the middle class. If you manage to choose a model with decent equipment, then the owner of such a foreign car has nothing to complain about, again, not counting the level of sound insulation. But this problem can be easily solved; it is enough just to roll certain surfaces in materials with noise-absorbing and vibration-isolating properties.
How to properly soundproof car doors
But why, after all, didn’t the automaker take care of this, thereby shifting all worries onto the shoulders of the owner? The answer is most likely due to the fact that not every modern manufacturer is ready to spend a lot of money. And this is due not only to the cost of materials, but also to the weight of the car, which affects extra costs in production and the final cost. And in our time, not all car factories can afford this in the harsh race for the consumer. As a result, every car owner of not only a middle-class model, but also a business-class one, is faced with problems related to sound insulation.
Sound insulation of the trunk and wheel arches of the third Focus
The car manufacturer took care of the comfort of passengers and glued the wheel arches with a layer of felt. We know from experience that this is not enough. It is the rear arches that are the noisiest part of any passenger car.
We remove the standard felt and degrease the surface of the arches.
We glue the vibration isolation joint to joint so that there are no gaps. At the same time, do not forget to make holes for the wiring.
We chose Spleen as the second layer for the arches, which perfectly complements the first layer. To the owner’s delight, the noise from the wheels has now noticeably decreased.
We glue the bottom of the trunk with vibration insulation, having previously degreased the surface.
Like the arches, we finish the work with a layer of noise absorber. We tried hard not to leave a single gap or gap, so that there was no noise at all from the rear of the car.
We put the casing in place - everything fits! This means we didn’t glue too much, when the skin would have to be fastened “under tension”.
Removal
1. Remove the “A” pillar trim panels. For more information, refer to the A-Pillar Trim Panel chapter in this section.
2. Disconnect and unfasten the interior lighting wiring harness and the washer tube from the “A” pillar.
3. Remove the “C” pillar trim panels. For more information, refer to the C-Pillar Trim Panel chapter in this section.
4. Remove the sun visors.
5. Remove the sun visor mounting clips.
Vehicles without a sliding sunroof
6. Disconnect the interior lamp.
7. Unplug the electrical connectors and remove the interior lamp.
8. Remove the interior lamp frame.
Vehicles with a mechanically operated sunroof.
9. Using a suitable screwdriver, remove the interior light bulb from the overhead console.
10. Unplug the electrical connectors and remove the interior lamp.
11. Remove the sunroof control handle.
12. Remove the overhead console.
Vehicles with electric sunroof
13. CAUTION: To avoid damage, the overhead console trim panel should only be pulled down enough to release the mounting clips.
14. Remove the overhead console trim panel.
- Disconnect the electrical connector from the sunroof power switch.
15. Using a suitable screwdriver, remove the interior light bulb from the overhead console.
16. Unplug the electrical connectors and remove the interior lamp.
17. Detach the overhead console from the roof panel.
- Remove the mounting screws.
18. Remove the overhead console.
- 1. Disconnect the front mounting clips.
- 2. Disconnect the side mounting clips.
- 3. Push the overhead console forward to release the rear mounting clips.
Vehicles with a sliding sunroof
19. Remove the sunroof seal.
Cars manufactured before 03/2000
20. Remove the passenger handrails.
- 1. Open the screw covers.
- 2. Remove the mounting screws.
Cars produced since 03/2000
21. Open the covers on the passenger handrails.
22. Using a suitable 6mm flat head screwdriver, remove the passenger handrails.
- Turn the screwdriver 90 degrees to release the mounting clips.
4-door and 5-door versions and “Station wagon”
23. Remove the headliner trim panels.
24. Disconnect the rear interior lamp.
25. Disconnect the electrical connectors and remove the rear interior lamp.
26. Remove the “D” pillar trim panels.
27. CAUTION: Remove the trim panel at a 45-degree angle to avoid damaging the trim panel clips.
Remove the headliner trim panels.
28. Remove the rear headliner mounting clips.
29. Disconnect the rear washer tube from the headliner.
3-door, 5-door version and “Station wagon”
30. Remove the headliner through the rear tailgate opening.
31. NOTE: Tilt the passenger seatback to make removing the headliner easier.
Remove the headliner through the passenger door opening.