Sheathing installation
The fabric sheet should be removed after removing the fasteners on the back. Actions step by step:
- A new piece of material is attached. First, the outer side of the panel is lubricated, a cloth is applied and smoothed well.
- The edges are fixed at the back with hardware. It is better to use a construction stapler. The panel must be left alone for an hour so that the glue sets and the material spreads across the card.
- If there is a car radio, then a niche is cut for the speaker. At the back, around the rim of the hole, a special plate is attached to which the column is attached.
- The lower fixing pins are attached and the electrical wiring is connected.
- After the handle is in place and secured with bolts, the top fasteners are fastened.
- The overhead fragment is installed, the mounting screws are screwed in and the plugs are attached.
We must not forget about the mandatory treatment of internal elements with an anti-corrosion agent and silicone lubricant; they are performed as a preventative measure. It is advisable to carry out these actions at least twice a year: before the onset of winter and in the spring.
Pivoting front door glass
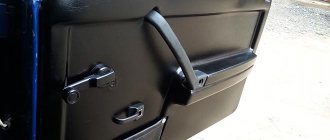
The rotary glass, which serves for ventilation of the front part of the body, is a separate unit, which is attached to the door frame with two self-tapping screws screwed into brackets 9, and to the door sill with one screw screwed into a fixed nut 3. The rotary glass of the front door is pressed together with the rubber - a new gasket into the rotating frame and holds firmly in it.
The rotating glass frame is equipped with a friction mechanism that locks the glass in any position, even with strong pressure from the oncoming air flow.
The ease of movement of the glass, which should turn with little hand effort, and the reliability of its fixation depend on how tight the spring 6 is, creating friction between the washer 7, put on the lower axis 5 of the turning frame, and the bracket 4 of the glass mounting frame.
Since the pivoting glass is assembled into one unit along with the installation frame and the window dividing post, if it is necessary to adjust the spring tension, the entire unit must be removed from the door, which can only be done after removing the armrest, internal door handles and its upholstery.
In the closed state, when the glass handle 11 is held by the latch 12, the glass frame and its open edge must be tightly pressed along the entire contour to the rubber seals 1 and 8.
The window handle has a locking device with a button 10, which prevents the locked handle from turning upward (from a horizontal position) and opening the window from the outside of the car using any hook. When you press the button from inside the body, the glass handle rotates freely. When lowered to the horizontal position, the handle locks without pressing the button.
Door seal
All four doors have a double seal to protect the interior of the body from water and dust. The first seal is external, carried out by a continuous seal 2 made of sponge rubber, glued to the door along its entire perimeter, including the upper frames of the door 7. At the lock chord of the front door, the seal is additionally pressed with a steel lining.
The second seal 4 is internal, made in the form of an elastic, also continuous rubber profile, attached to the doorway of the body. In the lower part of the doorway, in the threshold area, the seal 4 is pressed against the flange of the opening by the threshold lining 8.
The rotating window glass is equipped with rubber seals 1 and 8. The sliding glass 5 is sealed with pile grooves 6 along which the glass slides, as well as with an internal pile seal 2 on the window sill 3 of the door and an external rubber seal 6 clamped in the lower decorative lining 7 of the door.
The effectiveness of the main outer door seal depends primarily on the tension (adjusted by the position of the lock latch on the pillar) at which the door closes with a slight push, and the sponge seals are deformed to the point that there are no gaps between them and the door. To do this, check the tight fit of the door seals to its opening by rubbing the seals with chalk. When the door slams, there should be a chalk imprint on the body.
If, with a well-adjusted door tension and correct operation of the lock, the chalk imprint is missing, then in these places you need to carefully separate the seal from the door and place a rubber pad of the required thickness under it on the glue
We independently remove the door trim from the Lada Priora
Sometimes an annoying squeak appears inside the car. As a rule, either the dashboard or the door trim creaks. No car is immune from this, and Lada Priora is no exception. To get rid of the squeak, you will have to remove the door trim. We will talk about how to do this with your own hands in this article.
When dismantling is necessary
- The car owner decided to get rid of the squeaking noise that occurs when driving by gluing the door panels from the inside.
- It was decided to increase the sound insulation of the cabin by placing a layer of sound-absorbing material under the door trim.
- One or more mechanisms located under the trim have failed (primarily this applies to window regulators, door locks and handles).
Removal sequence
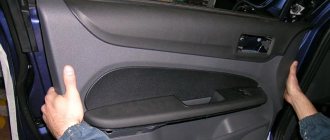
The front door on the driver's side opens and the rubber panel above the power window buttons is removed. Under the protective panel there are two self-tapping screws, which can be unscrewed using a Phillips screwdriver. This pair of screws must be unscrewed
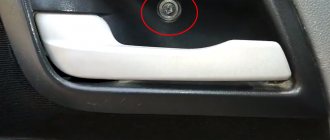
In the niche of the handle there is another self-tapping screw, which is also unscrewed with a Phillips screwdriver. It is unscrewed with a Phillips screwdriver
Three screws are removed from the bottom of the door. The door lock release button is turned counterclockwise several times and removed. There is a locking pin underneath it. It is neatly recessed down, under the door trim. The latch turns counterclockwise
Now the trim panel is held in place only by plastic latches located along its entire perimeter
The panel is carefully pulled back, and the tip of a flat-head screwdriver is inserted under it. Using this screwdriver, the latches are opened one by one. After opening all the latches, the panel is carefully lifted up so that its upper edge comes out of the window glass groove
As soon as the top edge is free, the panel is removed and the wire from which the window regulator is powered is disconnected. The trim panel is completely removed
All of the above procedures are repeated for the front passenger door.
This is interesting: Engine cooling system and its operation
How to remove from the back
Above is the sequence of actions when removing the trim from the front doors of a Lada Priora car. The steps for removing the trim from the rear doors are similar. There is only one nuance: there will be 2 more plastic latches on the rear panels.
Other nuances
During dismantling, the casing can be easily scratched. To prevent this from happening, it is recommended to wrap the tip of a flat-head screwdriver with electrical tape.
Two turns will be enough. Practice shows: no matter how carefully the car owner acts when opening the latches, one or more of them will still break, because the plastic is very fragile. So it makes sense to purchase a set of spare latches in advance
And when purchasing, you must definitely clarify that the latches are needed for the Priora, and not for the Kalina (they look exactly the same, but the latches for the Priora are 1.5 mm longer).
As you can see, there is nothing overly complicated in dismantling the door panels.
All that is required is the ability to carefully handle a screwdriver. The most important thing is not to forget to disconnect the power cord for the power window. It is thin and breaks easily, and most often it breaks at the root, right at the connector, which seriously complicates its restoration.
Preparing the machine for work, necessary tools
The vehicle must be driven into a garage or bay (inspection is not required. Only when repairing other transport units) and secured in place, supporting the wheels to prevent slipping. It is allowed to carry out repairs outdoors in warm, calm weather on a flat asphalt or concrete surface. Be sure to find a mounting box with compartments so you don’t confuse what was removed and where.
For the dismantled cladding, free space will be required to put it aside until the end of all repairs. This way it will be completely preserved. it can be cleaned from the inside before reassembly. Be sure to stock up on clamps, which may crack when removing the casing (a kit for this work should be on hand).
You should also disconnect the battery (negative terminal) to avoid short circuiting components under the housing. Any parts removed from the upholstery can also be stored away from the vehicle to avoid being accidentally tripped upon. The following instructions apply to all Lada Granta cars without changing owners.
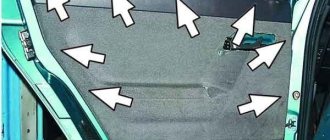
Fastening elements are located along the lower perimeter (three bolts of ten each), as well as eight plugs throughout the door card. To complete all the work you will need:
READ How to Remove Mazda 5 Tail Light
, a discarded credit card, or similar flat tool can be used;
Trimming and Clamping Tool Set
Depending on the situation and task at hand, additional tools may be required.
In general, the process of removing trim from a car door, including the door , is not as difficult as it seems. The main thing is not to damage it during disassembly. The principle of operation is similar depending on brands and models.
How to disassemble the trunk lid on a hatchback and station wagon
To unscrew the fasteners on a station wagon or hatchback, remove the trim and disassemble the luggage compartment lid, you will need a standard set of tools. The rear hatch is held in place by 4 clips, 2 retainers and a metal tab with two brackets. Step-by-step algorithm of actions:
- The connectors for the power window buttons are disconnected.
- To remove the handle, two latches are unscrewed. They must first be unlocked.
- The latches are removed. To do this, the panel is pulled along the entire contour.
- After removing the staples, the trim around the locking mechanism is pulled out.
- The panel is detached from the glass side. This action is performed along the entire perimeter, moving towards the castle.
Replacement of Lada Granta door handles
- Use a screwdriver to pry off the inner trim of the rear view mirror;
- Remove (unscrew) the door lock lock;
- Remove the plug by prying it with an awl or any other sharp object;
- Unscrew the screw securing the door armrest.
- Pull back the inner handle of the lock and unscrew the screw. Remove the handle;
- We unscrew the bolt securing the armrest, which is located in the niche;
- Unscrew two more pocket screws;
- We insert a long slotted screwdriver between the trim and the door, one by one snapping off the clips along the entire perimeter of the trim. We remove the upholstery from the door...
Disconnect the two wiring harness connectors from the power window unit. The door trim is held on by 8 pistons (clips). Remember their location, then removal will be much easier.
Main functions
Holders, stoppers and restrictive elements installed in the interior guarantee reliable and comfortable use of door leaves. Any door can be opened slightly or left completely open. This prevents possible injuries and ensures complete safety for children.
According to the necessary functions, limiting mechanisms are divided into groups for fixing the position of the doors:
- Locking. The process is ensured by such types as limiters or latches. If you use them, you will no longer be able to open the door from the outside.
- Partial, that is, incomplete opening. Stopping devices stop the movement of the canvas, leaving the opening half-open.
- Full closure. Typically, the role of locking doors in this position is performed by floor mechanisms and door closers.
- Both limiting and holding the door in a certain position (universal devices with magnetic properties are needed).
Why do the doors fly off the casing?
Most often, the front or front door trims are removed to reach the interior cavities where the power windows are installed. Although there are other situations during the life of the vehicle when it is necessary to take off
frame:
- install speakers built into door cards;
- in case of failure of electric window buttons;
- for disassembling glass for tinting or replacement;
- For repairing or lubricating windows;
- Replace worn or scratched panels over many years of machine use.
- Lada Kalina entrance door maps
- It is also impossible to do without removing the cladding during body work, when you need to weld rotten elements, update a paint machine, or carry out anti-corrosion treatment.
The note. Many motorists remove the gasket to add additional vibration and sound insulation to the body.
Preparing for disassembly
Unscrew the fastenings and take off
Door trim, you need to prepare a simple set of tools:
- a screwdriver with slots in the shape of a cross;
- long flat screwdriver;
- sharpened tool, for example, sewing.
Door disassembly tool
How to Remove Nissan Qashqai Wipers
Kia Dashboard Doesn't Work
How to Remove the Trunk Button Ford Focus 2
A former employee shares what it's like to work for Tesla
Since the door card of the Lada Kalina car rests on plastic clips (otherwise - clips, plugs), there are warnings about operating conditions.
It is strongly not recommended to disassemble door freezers when the plastic becomes brittle and breaks easily. Therefore, there is a risk of breaking all the clips when removing the decorative panel.
Replacement door handle Lada Kalina
disassembling and gluing vinyl boots Kalina
2 hatchbacks.
There are no summer residency requirements; remove skin even outdoors. There is only one recommendation: in windy weather it is better to drive the car into the garage, otherwise it will cause a lot of dust when opening the doors.
This is what a door card latch looks like
Advice. In cars over 5 years old, the plastic from which the locks are made dries out and becomes brittle. Separating the Trim from the Door With a machine like this, you're bound to ruin some of the clips.
Instructions for removing cladding in Kalina
The first three operations are the same for all Lada Kalina doors. The exception is the hatchback hatch in hatchback and station wagon bodies; the disassembly procedure is much simpler. How to remove the front and rear door trim on a Kalina Lada. Here's what to do:
- Unscrew and remove the lock cover designed to lock the door lock inside.
- Using a Phillips screwdriver, remove the 4 screws that secure the music speaker.
- Remove the speaker and disconnect it from the speaker.
Unlocking the blocker and acoustics
- Replacing Shock Absorbers Toyota Camry 30
- How to Lock a Skoda Octavia Without a Battery
- Replacement Rear Door Handle Kalina
- How to Disassemble the Rear View Mirror of a Kia Sportage
- Which Diesel Engine is Suitable for Moskvich 2141
Advice. The acoustics can be attached either to the door card itself or to the metal frame of the door. If, after removing the speaker, you stick to the first option, it is better to repeat it when installing the mounts, drilling holes for the screws. The acoustics should be installed on the door, not on the trim.
Front passenger door
Here the decorative panel is supported by 8 clips, 2 screws for attaching the internal handle and two screws located under the plastic pocket. The disassembly algorithm looks like this:
Carefully support the awl with the edge of the plastic plug that covers the screw in the door handle, gave it away. Remove the screw with the second cover in the same way. Remove both handle screws. Pull the handle to open the door, turn the locking screw and remove the lever
Then succeed in taking off the whole pen. Remove the 2 screws at the bottom of the door card, under the plastic pocket. Take a flathead screwdriver and support the top right corner of the trim panel to close the first latch. Grasp the skin with your fingers and remove the rest of the cap by hand. After removing the panel from the door, disconnect the wires coming from the power button. how to remove the door trim from the viburnum on the carriage door (rear). To do this, turn the screwdriver on the protrusion of the connector and pull the block out of the button assembly. Dismantling of the cladding is completed.
What is door trim and its purpose?
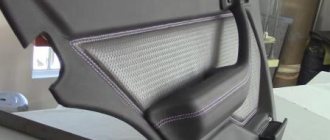
Renault Megane belongs to the budget class of cars. The upholstery is plastic with textile inserts. The door card uses the same material and a pocket covered with textiles. After 2015, coupe and sedan models use expensive material in the interior, the panels are covered with eco-leather, and soft plastic is similar to natural leather and may have a rough surface like slate.
Purpose of door trim:
READ How to Remove Solaris Rear View Mirror
Sequence of actions when disassembling the card on the front door of Renault Megane
Before work, you must remove the negative terminal from the battery. Further procedure:
Drivers and mechanics at service stations note that disassembling the doors of the Megan line. the most labor-intensive of all the kits from the French manufacturer. The door card is held in place by only six bolts, but they all have different diameters, so you need to prepare four Phillips screwdrivers.
How to remove the rear door trim of Renault Megane 2
The window lift hooks engage the trim in the center of the panel. Three hooks are attached alternately to the trunk door panel. When installing, first insert the window regulator hooks into the panel, and then correct its position.
Ford Mondeo Black Monderlak › Logbook › 015. Shvi doors. Removing the casing.
I've been waiting for the warm season for a long time. And so, sitting in the country, I decided it was time. It's time to make noise on the doors!
So, I’ll show you, using the front passenger door as an example, how to disassemble it. The rest of the doors can be disassembled in the same way: We pry off the plastic plug on the door handle (I pry it off with a screwdriver at the top). We see a screw under the plug. We unscrew it.
View with cap removed
This is what the plug with fasteners looks like.
After unscrewing the screw, lightly pull the plastic cover from the front. The power window button will start to come out. Pull it out and disconnect the connector.
Cover fastenings.
The cover can then be easily removed.
Without plastic cover.
Next step. We need to unscrew 6 screws around the perimeter of the door. Their location is shown in the photo below:
Once
Two
Three
Four
Five
Six
Nothing complicated, let's move on... Remove the decorative plug from the door handle, prying it off with some plastic. I used a card.
Carefully pry it off so as not to leave marks.
Exterior view of the trim to see the attachment points.
Under the removed cover, unscrew the 2 screws holding the handle.
The final stage for the front door is removing the podium under the tweeter. To do this, we begin to move it to the rear of the car. The photo shows the fastenings, everything will be clear:
Shifted podium with squeaker
Well, disconnect the connector from the tweeter.
Now there is nothing holding the door trim, we slightly lift it up to remove it from the hook along its entire length in the area of the glass velvet.
Under the door card we see an unknown block (I think it’s somehow connected with the window regulator or the cz, although I don’t know):
unknown block)
We unscrew its 3 bolts.
Front speaker:
For some reason, the center of the front right speaker was jammed, but this did not affect the music in any way... But I still moved it to the door behind the driver.
Unscrew the 3 fastening screws and carefully remove the column. Additionally, it is held in place by 2 latches. I accidentally broke one. To make it easier to get it, we tear off the standard noise and stick our hand into the door hole, where we feel for the latch and press it.
We tear off the standard Shumka.
Everyone has their own soundproofing process.
I glued the following materials in sequence: Interior (as seen from the interior):
— Sheet (0.75×0.53) Vibroplast Silver 2
— Half sheet (1×0.625m)
8mm foil-coated splen
over the entire area.
The pasting was done in pieces that fit into the door hole. I left about 5 centimeters unpasted at the bottom so as not to cover the drainage holes. Even though the bottom of the door was smeared with Movil, I sprayed it one more time. Addition: I used Kerry Movil, so here it is.
After treating the bottom of the door, a pungent gasoline-acetone smell (or whatever this Movil is diluted with) was present in the cabin for the next several months. So I don’t recommend treating anything in the salon with Movil (at least from this company), a can of paint would be better. Internal pasting
External part (view from the salon):
— Sheet (0.75×0.53) Vibroplast Silver 2
— Half sheet (1×0.625m)
Splen 4mm
, glued together in one sheet.
— Standard sound insulation When applying the vibration insulation sticker, don’t forget to leave a recess for the pocket on the door card, otherwise you’ll have to tear off and build up a piece of the Vibra vibration later
. In this photo, I didn’t leave a cavity for the door card pocket, I had to redo it a little
Splen 4mm
With standard Shumka. Yes, don’t forget to install it, like I did... =)
Bitoplast 5mm was stuck on it
and cut to size. I put everything back together in reverse order. Everything went together without any problems, because... first cleared the holes for the mounting screws.
Covering the cladding with bitoplast
I also glued some kind of plastic thing in the front doors, coming from the outside door handle. And he foamed the braid of the door opening cable so that it would not rattle (see photo “Internal tape”).
I'm happy with the effect, now nothing rattles when listening to music (these plastic parts in the door (see above) rattled when driving and listening to music). The door began to close more silently, and when opening the metal rattle disappeared. It seemed to me that the sound had moved into the trunk.
Addition:
Based on the materials on the door, it took me: 8 sheets of Vibroplast Silver 2 (sheet weight 2 kg) (1406 RUR) 2 sheets (1×1.25) ISOLONTAPE 3008B with foil (750.5 RUR) 2 sheets (1×1.25) ISOLONTAPE 3004B (370.5 RUR) 4 sheet (1×0.75) Bitoplast 5mm (1420)
Additional recommendations from car enthusiasts
To save money, some car enthusiasts prefer to use metal screws as panel fastening elements. Using a special riveter, a threaded rivet made of hard metal is fixed to the door. A screw is inserted from the side of the casing and, using a regular screwdriver or hexagon, the screw is screwed into the rivet. To make the fastening look more neat, you can use regular plugs.
Fastening the door trim with clips or screws is reliable and repairable. When purchasing new fasteners, you should study the features of fastening the panel of the car model being repaired.
How to remove the rear and other door trim on a Lada Kalina
The car door trim, officially called the door panel, is most often removed to access the window lift mechanism for repair or lubrication.
Much less often, this operation is carried out to install speakers, install noise and vibration insulation, replace facing panels or perform body work. But in any case, sooner or later, almost every car owner has to dismantle the door trim.
Dismantling the rear and other door trim on the Lada Kalina
When removing the trim, the division into front and rear doors is not accidental. Although at first the process is identical for them, then some differences begin to appear.
What tools will you need?
To unscrew the fasteners and remove the door trim, simple tools are required in the form of:
- Phillips screwdriver;
- flat and long screwdriver;
- sharp awl.
Step-by-step description of the process
The first three stages are similar for both front and rear doors:
- Use your fingers to unscrew and remove the latch that locks the door lock from the inside.
- Using a Phillips screwdriver, you need to unscrew the 4 screws that secure the audio speaker.
- Then it should be removed and the wires disconnected from it.
Removing the door lock, speaker and disconnecting them is mandatory for all doors
To dismantle the trim on the front right door, it is necessary to free the decorative panel from 8 clips, 2 mounting screws holding the inner handle, and 2 screws located under the plastic pocket. Then follows:
- Using an awl, pry off the plastic plug under which there is a screw in the door handle. In a similar way, remove the second plug and unscrew both screws (3).
- Pull the handle that opens the doors towards you, then unscrew the fastening screw, remove the lever and then the entire handle.
- Under the plastic pocket at the bottom of the door, unscrew the 2 screws (2).
- Using a flat-head screwdriver, pry the lower right part of the decorative panel (5) to disengage the first latch. Holding the panel in your hand, use your other hand to release the remaining latches.
- Separating the panel from the door, disconnect the wiring connecting the electric lift button and its mechanism.
To do this, use a screwdriver to pry up the detachable tongue and remove the block from the button block. To remove the front passenger door trim, several fasteners must be removed.
The decorative panel from the driver's door is removed in the same way as from the passenger door. However, there are some minor differences:
- To facilitate removal of the trim, it is necessary to remove the plastic panel that covers the rear view mirror adjustment lever.
On the driver's door, among other things, it is necessary to remove the rear view mirror panel - One of the armrest mounting screws should be found under the plug (2), while the second (4) is recessed into the recess of the handle.
- The door opening handle is located above the armrest and is detached by unscrewing the fastening screw.
- The plastic panel can be easily removed with your fingers.
- The rear view mirror adjustment panel is removed using a flat screwdriver, prying it up from below.
If the car is equipped with electric mirror control, the adjustment lever is replaced with a plug. Here you need to release these fastenings
Removing the trim from the rear doors, which is secured with 10 plastic clips and 2 mounting screws, proceeds as follows:
- First of all, the handle of the mechanical window lifter (7) is dismantled, for which the plastic half-ring (5) is pryed off with an awl, which fixes the lever on the axis. After removing the half ring, the handle can be easily removed.
- 2 plastic plugs are removed from the door handle (3) and the fastening screws (1) are unscrewed.
- Using a flat-head screwdriver, the lower far part of the decorative panel is pulled out, after which the first latch is snapped out.
- Then the remaining clips are released from the panel supported by one hand with the other.
To remove the trim on the rear doors, you need to release these fasteners
Removing the front seat slide
We move the seat slide so that the bolts securing the slide to the seat frame are visible through the technological holes in the slide.
Using a 8mm socket, unscrew the bolts securing the slide to the seat frame.
Removing the panel on Lada Kalina 2
Remove the slide assembly with the longitudinal movement mechanism lever
We remove the end of the lever shaft of the longitudinal movement mechanism from the hole in the inner slide and from the hole in the outer slide
A spring is installed between the lever and the outer herrings. Similarly, we remove and disassemble the front passenger seat.
We assemble and install the front seat in the reverse order.
Before installing the lever shaft into the hole of the outer slide, first put a spring on the shaft and place the short mustache of 1 spring on the latch, then, squeezing the long mustache of 2 springs (can be tied with wire), insert the shaft into the hole of the slide so that this mustache goes under the slide .
Rules for removing and installing casing
Although the process is not difficult, there are points to consider when performing these operations:
- Before removing the door panel, it must be freed from all elements (except the clips) that may hold it in place. These include speakers, door handle surrounds and power window control buttons. Only after this can the pistons for fastening the casing be removed.
- Depending on the design of the pistons, various dismantling tools are used. In no case should you neglect the use of pullers, as you can damage the fasteners.
- After all the necessary work has been completed, we begin to reinstall the panel. First of all, you need to connect all the wires suitable for the panel so as not to remove it again. If the work did not involve changing the design of the door or trim, then it is necessary to match all the holes on the panel with the holes in the door and use clips to securely fix the panel in place.
- It is much more difficult if the repair work has led to the door being deformed, making it impossible to match all the holes. In this case, you will have to drill new holes in the door, since if you change the location of the pistons in the panel, the old holes will remain and will be clearly visible.
Preparatory work
To dismantle the rear door trim on Kalina, you must have the following tools with you:
- Phillips slotted screwdriver.
- Long flat screwdriver.
- Any pointed tool, such as an awl.
It is worth noting that there are certain restrictions when carrying out work to remove the Kalina rear door trim. Due to the fact that the door card of this car is fixed using plastic clips, work on dismantling the lining cannot be carried out at sub-zero temperatures, since under such conditions the plastic is most susceptible to destruction. By ignoring this fact, the car owner risks damaging all the fasteners. To avoid such consequences, experts recommend carrying out work on removing the rear door trim in a heated specialized room.
In the warm season, there are no special requirements, except for windy weather, when dust can enter the cabin.
It is worth paying attention to the fact that in Kalina, with a service life of more than five years, the clips begin to dry out and break. In this case, it is recommended to purchase new latches in advance, of which there are 10 in the rear door.
Removing the rear door trim
The rear door structures are secured with 10 plastic holders and 2 screws. The first fasteners hold the door panel, and the second fasteners hold the handles. Disassembly technique:
The handle of the mechanical window lifter is being removed.
It is important to note that this element is held in place by a plastic half ring. It is carefully pryed up with an awl. The plugs on the door handle are removed, then the fasteners are unscrewed. The lower far corner of the panel is pulled back, and then the first piston is removed. Hold the door card with your hand and remove the remaining clips. The covering is changing.
There are differences between Kalina 1st and 2nd generation. In the first case, the opening handle lever is unscrewed, but in the second option this is not required, since it is screwed directly to the door.
Removal from passenger door
Once the music system is removed, you can begin the main part of the repair. You need to remove the door trim on Kalina in the passenger seat in a certain sequence:
- The decorative panel is removed. To do this, unscrew 8 clips and 2 screws. The inner handle is held on by two self-tapping screws.
- An awl is used to pry up the edge of the plug for removal. There are two of them, so you need to remove both.
- The opening mechanism is pulled back to remove the securing screw. After this, two screws are unscrewed from the inside of the handle. They are located opposite the cavity of the plastic pocket.
- One edge of the panel is pryed off; you can use a screwdriver to do this. When it becomes possible to grab the edge, all that remains is to pull the element towards you.
- The wires from the electric window lifter are disconnected, the block is removed.
To avoid scratching the panel with a screwdriver, wrap the tool in a soft cloth.
Changing the front door trim
To dismantle the plastic door card, you need to prepare a Phillips and flathead screwdriver, as well as a set of clips that hold the part in place. For the driver's door, the actions will be as follows:
- Unscrew the lock lock handle “1”;
- After removing the plug, completely unscrew screw “2”;
- Unscrew all screws “4” and “5”;
- Using a flathead screwdriver like a wedge, you can dismantle it starting from the bottom corner at the front;
- At the last stage, disconnect the connector of the wires going to the key module.
All the elements named above are indicated in the following figure:
Front left door of Kalina-2
For the right door you need to follow a different sequence:
- Unscrew the lock handle “4”;
- Completely remove the Phillips screws “2” by unscrewing them;
- After removing the door handle trim, unscrew screws “3”. Then handle “1” can be removed completely;
- Dismantle the upholstery in the same way as point “4”, as indicated in the list above.
All that remains is to wish you success. Installation is carried out in reverse order. All designations related to the list are indicated in the photo below.
Front right door of Kalina-2
Removing the trunk lid (door) trim on Kalina Hatchback
If you need access to the rear trim fasteners, the opening lock or the rear wiper gearmotor, you will have to first remove the rear door trim (trunk lid).
In general, the casing is held on by clips and two bolts in the area of the opening handle; apparently the bolts are made so that when using the handle the casing does not come off. Using a Phillips screwdriver, unscrew the two bolts shown in the figure.
We remove the handle.
Now carefully snap out the clips from the glass side. And remove the cover in the direction of the glass. Do not try to detach the casing from the lock side; you will break the latches.
On the side of the lock there are inserted latches that are easy to break.
When installing the casing back, it is advisable to replace all the clips: four regular ones (like those on doors) and 2 special black ones (which are inserted after reinstalling the casing).
We assemble in reverse order.
Instructions for removing the cladding on Kalina
The first three operations are performed the same way for all Lada Kalina doors. The exception is the trunk hatches of hatchback and station wagon cars, where the disassembly procedure is much simpler. Here's what to do:
By hand, unscrew and pull out the cap of the latch designed to lock the door lock from the inside. Using a Phillips screwdriver, remove the 4 screws holding the music system speaker. Remove the speaker and disconnect the wires from it.
Unscrewing the blocker and acoustics
Advice. The acoustics can be attached either to the door card itself or to the metal door frame. If, after removing the speaker, you observe the first option, then during assembly it is better to redo the fasteners by drilling holes for self-tapping screws. The acoustics should be mounted to the door, not to the upholstery.
Attaching the speaker to the casing is wrong
The further procedure of work differs depending on the location of the door that you are disassembling.
Front passenger door
Here the decorative panel is held on by 8 clips, 2 screws securing the internal handle and two self-tapping screws located under the plastic pocket. The algorithm for dismantling it is as follows:
Using an awl, carefully pry the edge of the plastic plug hiding the screw in the door handle and remove it. Remove the second screw cover in the same way. Remove both handle screws. Pull the door opening handle towards you, unscrew the fastening screw and remove the lever. After which you will be able to remove the entire handle. Unscrew the 2 screws at the bottom of the door card, under the plastic pocket. Take a flat head screwdriver and pry the top right corner of the trim panel to disengage the first tab. Grab the casing with your fingers and release the remaining pistons manually. After separating the panel from the door, disconnect the wires coming from the power window button. To do this, pry the connector tab with a screwdriver and pull the block out of the button block. Dismantling of the cladding has been completed.
Passenger side panel removed
Advice. When prying up the edge of the door card with a flat-head screwdriver, you should place a rag under it so as not to scratch the paintwork on the inside.
Nuances of disassembling the driver's door
On this side, the decorative panel is removed in the same order as on the passenger side. But due to small differences in the design, it is necessary to take into account the following nuances:
- To make the trim easier to remove, you need to remove the plastic panel covering the rear-view mirror adjustment lever;
- the first screw for securing the armrest is located under the plug, and the second is in the recess of the handle;
- the door opening handle is located on top of the armrest and is removed after unscrewing the fastening screw.
The plastic socket for the mirror drive can be easily removed by hand
The panel on the rear view mirror adjustment is removed using a flat screwdriver, which is used to pry it off from below. On vehicles equipped with electrically controlled mirrors, there is no adjustment lever, and instead there is a plug on the panel.
On the driver's side, the screw is hidden in the armrest
Reference. Some drivers unknowingly try to pick out this plug to disconnect the panel. The action is useless, since the element is easily removed by hand, but unsuccessful attempts leave unsightly scratches on it.
Screw securing the lever for opening the door
Rear door trim
Here the upholstery is pressed to the door by 10 plastic clips and 2 screws securing the handle. The disassembly technology is as follows:
- The first step is to remove the mechanical window lifter handle. Use an awl to pry up the plastic half-ring that secures the lever to the axle. Pull it out and remove the handle.
- Pull out the 2 plastic plugs on the door handle and remove the fastening screws. After this, the element will be easily removed.
- Using a flat-head screwdriver, pull out the lower far corner of the decorative panel and snap out the first piston.
- Grab the door card with your hand and remove it, releasing the remaining clips along the contour. The casing has been successfully dismantled.
Scheme for dismantling the decorative panel
Note
Please note that the opening handle lever on Kalina 1 will have to be unscrewed and removed, but on Kalina 2 there is no need to remove it, since it is screwed directly to the door and is in no way connected to the decorative panel
To remove the window lifter handle, you need to pull out the half ring
Otherwise, the upholstery on the doors of the second generation Lada Kalina car is removed in the same way, there are no differences.
This is what the removed rear door trim of Kalina looks like
Removing the power windows
Let's start with the front mechanisms
Before proceeding with repairs, it is necessary to dismantle the defective device. But in order to remove the window regulator, you will first have to remove the door trim.
So, for work we need:
- key for 10
- molar tape.
Now let's get down to business.
- The first step is to lift the glass all the way and secure it at the highest point with tape.
- Then, using a wrench, remove the two bolts that hold the glass in place (1 in the picture). Also, you need to unscrew the bolt of the inner handle of the lock.
- The next step is to disconnect the device motor and wires (2 in the figure).
- We unscrew all the nuts on the device (there are 11 of them in total) and remove the window regulator (2 in the figure).
The front window lifters have been removed, let's proceed to dismantling the rear ones (if the problem lies in them too).
Here we need:
- two keys, 10 and 8
- masking tape.
- Just as in the case of the front window lifters, raise the glass all the way and secure it with tape.
- Using a size 8 wrench, unscrew the three nuts securing the mechanism.
- Take a 10mm wrench and remove 2 bolts and 3 nuts.
- Now it will be easy to pull the device out through the hole at the bottom of the rear door.
Dismantling has been completed. Carefully examine the condition of the device; if it cannot be repaired, replace it with a new one.
What is it and why is it needed
Door position clamps are devices that are installed on or near the door leaf in order to limit its movement in a certain direction. Structurally, these elements can be different, since their design depends on their purpose.
The simplest example is an ordinary rod that was inserted into the floor in the path of the doors. He only allowed it to open to a certain angle. Door stops are used for various purposes:
Protection from injury. The main purpose of using holders is to protect people from accidental slamming of doors. This is especially true if there are small children in the house who will not be able to open the door from the inside if it accidentally closes. They also protect the person entering from accidental blows. This can happen due to the fact that someone from the inside suddenly opens the door or the panels simply begin to move under the influence of a draft.
Such mechanisms are perfect for interior structures.
- Protecting furniture from damage. Very often, a closet, bedside table or mirror may be located in the path of the door leaf. If it is opened, the impact can destroy the structure or simply damage the decorative layer. Therefore, it is better to install the lock and forget about this phenomenon.
- Protection of door hardware. If the doors are opened to the maximum angle, this proportionally increases the load on the hinges, so many install limiters so as not to think about this phenomenon and preserve the fittings for a long time.
Why is the door trim removed?
Most often, the trim of the rear or front doors is dismantled in order to get to the internal cavities where the window lift mechanisms are installed. Although during the entire period of operation of the car there are other situations when it is necessary to remove the trim:
- for installing acoustic speakers built into door cards;
- in case of failure of the electric window lift buttons;
- for dismantling glass for the purpose of tinting or replacement;
- to repair or lubricate window lift mechanisms;
- to replace facing panels that have become worn or scratched over the years of use of the machine.