05/16/2021 2,518 VAZ 2110
Author: Ivan Baranov
On cars of the “tenth” family, a one-piece plastic “dashboard” is used, which includes control indicators, climate control and air ducts. Dismantling and disassembling the structure is necessary in cases where the instrument panel of the VAZ 2110 does not work, as well as for installing additional equipment and sound insulation.
[Hide]
The dashboard does not work.
The problem is this: the display stopped working (tachometer, speedometer, temperature, fuel, reverse gear indicator), the interior lighting when opening the doors, and the central locking. Error 14 is on - speed sensor. what could have happened????
Nissan Presage 1999 KA24, U30
Check the board itself or the fuses. Either the scoreboard is covered, or there is no power supply to it. The error on the speed sensor comes out because the signal from the sensor to the engine control units. and the machine goes through the instrument panel. The battery is also charged through the instrument panel, more precisely through the charging indicator lamp. Once I started the car without a panel, after half an hour it died out due to a dead battery. Look at the instrument panel itself, fuses, check all connectors and power circuits. According to symptoms, you have lost power to the instrument panel.
Presag 1999, KA 24DE, 2WD now with LSD (was) Presage 2008, QR25, 2WD Vladivostok
Checked all fuses intact
Nissan Presage 1999 KA24, U30
Look at the main connector, it’s so big, somewhere at the passenger’s feet, it has a clamp. I have a designer one, one half was damaged during transportation and it came off, the tachometer, speedometer didn’t work, and I don’t remember anything else. I tied everything off with electrical tape and everything works.
PRESAGE YD25DDTI 98G 4WD
In short, when you put it on the alarm with the door open, everything remains to work, you put it on the alarm with the door closed, the central locking closes, and after removing it from the whitefish, nothing works again. There is a capacitor on the tidy board, you bridge it for a second and everything works again until the next alarm. And when you put it on a whitefish with a running engine, nothing disappears either; after removal, everything works.
Nissan Presage 1999 KA24, U30
Buddy!!!!!! HELP!!!!!!!! Tell me what the problem is, I have a similar situation!!!!!!! I drove, drove, drove and arrived, I don’t know what to do next, I went to all the diagnostics, gave a lot of money, no one, nothing, and no way!!!!! Some say that the panel is full, others the power supply is not working, and still others say that the block has fallen out!!!!!!!! Tell me, dear man, how to defeat this infection!!!!!! PLEASE. Otherwise, WOSHPE PINZETS, I’ll soon take it to the trash heap!!!!!!
Posted by
OchcarikBuddy!!!!!! HELP!!!!!!!! Tell me what the problem is, I have a similar situation!!!!!!! I drove, drove, drove and arrived, I don’t know what to do next, I went to all the diagnostics, gave a lot of money, no one, nothing, and no way!!!!! Some say that the panel is full, others the power supply is not working, and still others say that the block has fallen out!!!!!!!! Tell me, dear man, how to defeat this infection!!!!!! PLEASE. Otherwise, WOSHPE PINZETS, I’ll soon take it to the trash heap!!!!!!
I changed the tidy and everything is buzzing, they have a controller in the tidy.... Fucking Japs
Nissan Presage 1999 KA24, U30
How much does your tidy cost? Because I can’t find anything at all in the Urals, but they don’t take it to order. Why dont know
Posted by
OchcarikHow much does your tidy cost? Because I can’t find anything at all in the Urals, but they don’t take it to order. Why dont know
I need to find out the photo of the tidy, post it.
Nissan Presage 1999 KA24, U30
Car Pressage 1999 Body U30 engine KA24. Problem. The Tachometer, Speedometer, Fuel Level Sensor, Temperature Sensor do NOT work on the dashboard, the open door and headlight warning lights do not sound, and the central locking has also stopped working. After much research, I found out that if you disconnect the brown chip from the device and plug it back in, the functionality of all these controllers is restored. But it is restored exactly until you remove the ignition key. After the key is pulled out and does not return to the lock within 1-3 minutes, all faults reappear. If the key is not pulled out (I tried leaving it in the lock overnight), the device works properly. It does not matter in what position the key is in the lock. The main thing is not to pull it out. The question is how to treat this sore.
Does the engine start when the panel is not working? You need to study electrical circuits - if you are not good with wires, replace the panel from some donor.
Nissan Presage 2002 TU30 QR25DE 2WD LPG
Check the two fuses in the passenger compartment under the steering wheel. The leftmost column is the topmost. And the second column from the right is the fuse in the middle. You have a problem with the power supply to your instrument panel. If the fuses themselves are intact, then the panel needs to be replaced. The key in the lock closes a small circuit to the buzzer of the key left in the lock. This results in an artificially created power circuit. There may be a breakdown in the instrument panel circuitry. Most likely the panel is thrown out
Presag 1999, KA 24DE, 2WD now with LSD (was) Presage 2008, QR25, 2WD Vladivostok
people help with advice. Nissan Terrano2 1994 changed the bulbs to LEDs, drove for a month and then it started. First, the light on the door that was not closed came on, I reached into the limit switches - everything was ok, then, like a Christmas tree, everything began to blink, it blinked for two days and with the lights on, one diode on the tachometer remained on, well, I thought that the LEDs were loose, and I climbed... I checked the diodes, put them back, now one on the speedometer is on. The instruments themselves (fuel and temperature show). Now opening the doors. does not light up at all, the emergency light is on the left diode. WHERE TO CLIMB, ADVICE
Hi all! and I have a Presage 2000 Ka 24 de front-wheel drive. I bought myself an optitron a long time ago and there it was written in felt-tip pen TU-30 i.e. from Basarika, and it doesn’t show the temperature. The arrow rises and falls when the ignition is turned on. I found from the diagram that the pinout was slightly different and changed the wires, but it didn’t help. I abandoned this matter, and yesterday it dawned on me, maybe if I stretch the wire from the temperature sensor and attach it to one of the three bolts that have terminals on the temperature scale needle. The crux of the matter is the socket will not burn out? I even think that this terminal on the device can be isolated from the circuit. or, for example, buy a temperature sensor, cut the pipe and a separate temperature sensor and apply voltage from it to the arrow. tell.
Nissan Pressage 2000, 2WD, KA24DE
Does the “optitron” device itself work on your Pressage? Or is it just the temperature sensor not showing?
Nissan PRESAGE U30 1999 KA-24 DE engine (now VQ-30DE), LPG
Tu 30 is not a bassara, it is a restyled presage with a qr25 internal combustion engine. The qr25 has one temperature sensor and it goes directly to the internal combustion engine control unit. And from it a signal goes to the instrument panel. And not like on the ka24 there are two sensors, one on the computer and the other on the instrument panel. The panel from qr25 will not show the temperature on qr24
Presag 1999, KA 24DE, 2WD now with LSD (was) Presage 2008, QR25, 2WD Vladivostok
please tell me, I’ve already looked through everything, maybe someone has encountered a similar situation. Nissan Tiana 2006 After starting the engine, the dashboard works for about 3 seconds, then all the indicators drop to 0! what could it be???
The problem may be caused by a ground wire
Sometimes situations arise when the needles on instruments behave completely inappropriately, jumping sharply from the minimum to the maximum mark and vice versa. In the vast majority of cases, the cause of this malfunction is the lack of normal contact with ground. There is nothing difficult in fixing this problem. First of all, you should find the fastening of the ground wire connecting the instrument panel to the partition that separates the interior from the engine compartment. It can be detected by removing the car radio from its standard socket.
However, there is one caveat here. If an alarm was installed on the car, then the fastening of the mass wire could well be moved to some other place. However, as a rule, the car owner is warned about such actions. In most cases, the fastening of the mass wire is moved to the area where the driver’s left foot is located, placing it behind the interior trim.
By the way, a situation where the arrows on the instruments begin to “jump” can also arise after installing the radio. In order to do this, you need to unscrew the ground wire coming from the dashboard. It happens that it is then screwed in poorly, and subsequently, due to body vibration, the contact becomes unreliable. To solve the problem, just twist the wire normally. It is worth noting that doing this is not very convenient, so you will have to make some effort.
The cigarette lighter is another possible cause of instrument panel failure. Often various additional devices are connected here. At the same time, many consumers require high current, and because of this, either fuse F19 blows or the cigarette lighter itself fails. The check in this case will be quite simple, provided that the fuse has not burned out, you need to disconnect the cigarette lighter connector.
If this is not the problem, then you will have to look for the cause directly in the instrument panel. It should be pulled out from its standard mounting location as far as possible, but do not disconnect the wires going to the pads. Next, we measure the voltage at the contacts indicated in the diagrams by numbers 6, 9 and 10. Everywhere there should be the same indicator - 12 volts. In addition, you should also check the ground wire on block X1 (white). Also inspect for possible damage to the tracks on the back of the instrument panel that supply electricity to the appropriate consumers.
Characteristics of panel types
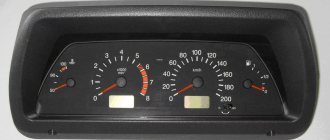
The panel located in front of the driver, containing a set of warning lamps, is called a panel.
It has another name - torpedo and consists of the following components:
- The unit that records the speed of the car – the speedometer.
- A device that keeps track of the number of revolutions - a tachometer.
- Two indicators: coolant temperature and fuel level.
- Indicator lamps of different colors.
- Six separate lamps responsible for illumination.
- A number of backup sockets where lamps can be turned on.
- One red block. On the electrical diagram it has X
- Another white block, marked X
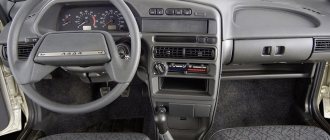
Europanel for VAZ 2110Panel for VAZ 2110 old model
On the VAZ 2110 there are 2 types of dashboards: old model and Europanel.
The differences between them are as follows:
- old panels have a symmetrical arrangement of devices;
- In the Euro device, the fuel gauges and the amount of heating of the coolant are shifted to the right.
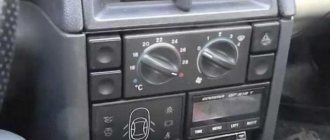
What is a shield
Behind the steering wheel there is a special panel equipped with a set of control and signal light indicators, which is commonly called a panel. This block in domestic and foreign cars is endowed with approximately the same functionality. On its front side there are the following components:
- the main space is reserved for a dial indicator that measures the current speed value;
- To the left of the speedometer there is a tachometer scale, which helps control engine speed;
- there are two smaller dial indicators responsible for displaying information about the temperature of the engine and the fullness of the fuel tank;
- six lamps are built-in to indicate the status of the backlight and pairs for the turn signals;
- all kinds of lamps responsible for the activated emergency lights, battery charge, oil pressure, raised handbrake, Check Engine and several reserve cells.
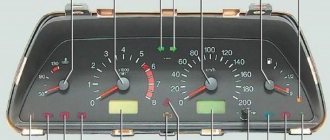
Arrangement
So, what can you see on the instrument panel in this car? The combination consists of several components:
antifreeze temperature indicator in Celsius; tachometer - number of revolutions of the power unit; right and left turn indicators; speedometer - vehicle speed; fuel reserve - volume of fuel in the tank; image of a gas station - signal about the need to refuel; control indicator for starting dimensions; brake fluid level indicator; starting high beam headlights; knob for adjusting the clock; display showing the total and daily mileage; hazard warning indicator; screen with a clock; battery charge level; check engine - indicates an engine malfunction; indicator indicating the handbrake is turned on; oil pressure level; light bulb air damper - available exclusively on carburetor engines.
Diagram of the instrument cluster of a “high” panel with an on-board control system
VAZ-2109.ru » Electrical equipment diagrams for VAZ 2109 » Diagram of the instrument cluster of the “high” panel with an on-board control system The
instrument clusters of the “high” panel and the “European panel” are equipped with an on-board control system. This combination of instruments includes: a speedometer with daily and total distance meters, a coolant temperature indicator, a fuel level indicator, a tachometer, 13 warning lamps and an on-board control system (OBS) unit.
Diagram of the instrument cluster of a VAZ 2109 with a “high” panel with an on-board control system (manufactured before 1996):
1 - relay-breaker for the parking brake warning lamp2 - tachometer with voltage stabilizer3 - instrument cluster illumination lamp4 - temperature indicator5 - BSK control unit6 - fuel level indicator7 - resistor 50 Ohm, 5 W8 - "CHECK ENGINE" indicator lamp for the toxicity reduction system9 - control headlight high beam lamp10 - side light indicator lamp11 - backup indicator lamp12 - seat belt warning indicator13 - left turn indicator indicator indicator14 - resistor 470 Ohm, 0.25 W15 - electronic voltmeter16 - right turn indicator indicator indicator17 - emergency oil pressure indicator indicator18 — fuel reserve warning light 19 — carburetor air damper warning light 20 — “CHECK ENGINE” warning light for the fuel injection system 21 — parking brake warning light Diagram of the VAZ 2109 instrument cluster with a “high” panel with an on-board control system (manufactured after 1996):
1 - tachometer2 - instrument cluster illumination lamp3 - temperature gauge4 - BSK control unit5 - fuel level indicator6 - "CHECK ENGINE" indicator lamp for the toxicity reduction system7 - headlight high beam indicator lamp8 - side light indicator lamp9 - reserve indicator lamp10 - unfastened indicator lamp seat belts11 - left turn indicator indicator lamp12 - battery charge indicator lamp13 - right turn indicator indicator lamp14 - emergency oil pressure indicator lamp15 - fuel reserve indicator lamp16 - carburetor air damper indicator lamp17 - "CHECK ENGINE" indicator lamp for the fuel injection system18 - control lamp parking brake lampB1 - 91 kOhm resistorB2 - 50 Ohm resistor, 5 WPinout of connectors for the VAZ 2109 instrument cluster with on-board control system
Address (purpose) of the plug
Reserved output Reserved output To the seat belt relay Fuse “5” for instrument protection (“+” for the direction indicator and hazard warning relay relay — — To fuse “7” for the protection of interior and exterior lighting lamps To fuse “14” for the left high beam protection headlights Reserve terminal To the fuel level sensor (terminal for the fuel level indicator) To terminal “61” of the generator To the temperature indicator sensor
— Fuse “5” for instrument protection (“+” for powering instruments) To terminal “K” of the ignition coil To the instrument lighting switch To the fuel injection system control unit — To “ground” To the parking brake switch Reserve terminal To the carburetor choke warning lamp switch To the fuel level sensor (terminal for the fuel reserve warning lamp) To the oil pressure warning lamp sensor To terminal “49aR” of the turn signal and hazard warning lamp relay
9-terminal connector (for BSK)
Fuse “5” for instrument protection (“+” power supply) To terminal “50” of the ignition switch To “ground” To the washer fluid level sensor To the oil level sensor To the coolant level sensor To the brake fluid level sensor To the brake lining wear sensors To terminal “ 3" lamp health monitoring relay
Causes and Troubleshooting of the Control Panel
When the instrument panel does not work on a VAZ 2110, this may be due to its complete failure or a malfunction of individual indicators. In special cases, along with the lighting fixtures, the left-side side lights and the rear license plate illumination stop working. The reason is the failure of the fusible element.
Fuse problems
Failure to operate the instrument panel occurs if the ampere fuse has blown. It occupies 15th place in the mounting block and is marked F6. If this happens, it is necessary to look for the reason for its failure. Simply replacing the element with a new one will not solve the problem. We can say with confidence that it will also burn out immediately. The cause is a short circuit in the circuit. It is necessary to find and eliminate it.
Chaotic movement of arrows on the instrument panel
It happens that the dashboard on a VAZ 2110 does not work, the arrows on the tidy jump and behave unpredictably. Within a few seconds they show either the maximum or minimum value. This means that it is necessary to check the contact with ground. This applies to the tachometer and fuel gauge. The ground wire fastening connects the instrument panel to the partition that separates the engine compartment from the interior space. To find this place, the radio is removed.
If an alarm is installed, such fasteners are transferred behind the interior trim, to the place where the driver’s left foot is located. When purchasing a car, this information is provided to the driver.
Sometimes the arrows start jumping after installing the radio. This happens because the tidy wire was not securely fastened. While the vehicle is moving, contact is lost. To eliminate such a breakdown, you just need to secure it more securely. After this, the arrows will display the correct information and stop jumping.
Cigarette lighter failure
It happens that the instrument panel of a VAZ 2110 does not work due to the cigarette lighter. Its socket is often used to connect various devices of higher power. This is where phones are charged, tablets or other equipment are turned on. There is a significant amount of current consumption. As a result, fuse f6 blows.
If the fuse is working, you should look for another reason. To do this, you need to unscrew the shield mount and pull it out. The wires leading to it are left in place. The voltage is checked at the contacts, which are numbered in the diagram: 6,9,10. The voltage everywhere should be 12 volts. The wire leading to ground, which is located on block X1, is checked. Its color is white.
Problems with the speedometer
If the instrument panel does not work on a VAZ 2110, this may be due to a broken speedometer.
This is expressed in the following manifestations:
- the arrow is completely motionless;
- trembling of the arrow followed by its stop;
- The speedometer operates only until the engine is completely warmed up.
The VAZ 2110 with injection nozzles has an electronic speedometer. If the device fails, then it simply needs to be replaced.
However, more often the reason is different:
- The signal to the speedometer comes from the sensor. A possible reason for its absence is contamination of the device. Then it is removed, washed and dried.
- Lack of good contact. The wiring is visible throughout.
- When the sensor itself fails, it is replaced.
Calculation of the quenching capacitor
If a capacitor is connected to an alternating current circuit, it will flow through it, but depending on the capacitance and frequency of the current, its voltage will decrease by some amount. For calculation use the following formula:
where Xc is the capacitance of the capacitor (OM);
f – frequency of current in the network (in our case 50 Hz);
C – capacitance of the capacitor in (μF);
For calculations, this formula is not entirely convenient, so in practice they most often resort to the following - empirical, which allows for the selection of a capacitor with sufficient accuracy.
C=(4.45*I)/(U-Ud)
Initial data: Uc –220 V; Usd –2 V; Isd –20 mA;
We find the capacitance of the capacitor C = (4.45 * 20)/(220-2) = 0.408 µF, from the range of nominal capacitances E24 we select the nearest smaller one 0.39 µF. But when choosing a capacitor, it is also necessary to take into account its operating voltage; it must be no less than Uc*1.41.
The fact is that in an alternating current circuit it is customary to distinguish between effective and effective voltage. If the current shape is sinusoidal, then the effective voltage is 1.41 times greater than the effective voltage. This means that the capacitor must have a minimum operating voltage of 220 * 1.41 = 310 V. And since there is no such rating, the nearest higher one will be 400 V.
For these purposes, you can use a film capacitor of the K73-17 type; its dimensions and weight allow it to be placed in the switch housing.
Why the panel on the VAZ 2114 does not work
On every car, there is such a thing as: an instrument panel. It helps the driver determine the current speed of movement, the number of kilometers traveled, the speed of rotation of the crankshaft, and on more modern models, the level of necessary fluids and the condition of some systems. On a VAZ 2114 car, the instrument panel includes four dial indicators, twelve indicator lights, and two small screens.
For better visibility of the signs, especially at night, a backlight is installed that illuminates the entire shield. As practice shows, the instruments on the dashboard, including the backlight, break down quite rarely, but still, what should you do if this suddenly happens to your VAZ 2114?
Main conclusions
If the instrument panel backlight on a VAZ 2114 car does not light up, most likely the light bulb has burned out or the LEDs have failed. However, there are several other possible causes for this problem:
- The wiring is damaged.
- Oxides have formed at the contact points.
- The safety side has failed.
- The electrical circuit burned out.
To establish the exact reason why the backlight does not light, you must, following the instructions, carefully disassemble the instrument panel and sequentially ring the entire circuit using a tester. The found faulty element, depending on the degree of damage, must be repaired or replaced with a new one.
Procedure for diagnosing and troubleshooting problems
When the instrument panel does not work on a VAZ 2110, you should, at the first stage, carry out diagnostics.
It consists of the following:
- all lamps are inspected and burned out ones are replaced with new elements;
- using a multimeter, check all wiring for breaks or bad contacts;
- if oxidized areas are found, they are cleaned;
- all fuses are inspected and burned out parts are replaced with new products;
- All existing devices are tested.
Checking fuel level and temperature gauges
To check the correct fuel level and temperature readings, you must do the following:
- The ignition turns on.
- A separate piece of wire connects the positive terminal of the device to ground. If the arrow begins to move, you should inspect the wiring in the sensor-indicator section.
- If the temperature indicator detects overheating, it is disconnected from the sensor. A drop in the arrow indicates the need to replace the sensor. If the device continues to read off scale, it means the wiring or the indicator itself is faulty.
- To check the device, it is removed. Its positive terminal is connected to the positive of the battery, and the negative terminal to the negative. The arrow should show zero. If there is any deviation, the indicator requires replacement.
You should know that the testing process is carried out on a specially equipped stand. Then the results are compared with the standard. Then the paths are inspected. In case of breaks, the contact is restored with solder. If this process is not possible, the device must be replaced.
Precautions during operation
While performing work, you should adhere to the following recommendations:
- if the fuse is being replaced, the ignition is turned off;
- be careful when testing so that the wires do not short out;
- if soldering is carried out, then a low-power soldering iron with a thin tip is used;
- When working with connectors, no great effort is applied.
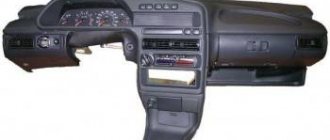
Device
The entire instrument cluster is mounted on the panel with two bolts and consists partly of mechanical and partly of electronic components.
The electronic component of a regular panel is a speedometer and tachometer, but some cars from the VAZ 2110 model range already have an electronic panel. Also, there must be indicators: coolant temperature, availability, fuel level, as well as warning lights, of which there are 12 installed on the VAZ 2110.
All device connections are stored in a printed circuit board, which is mounted on the back of the case.
This material will help you figure out the pinout of the instrument panel of the VAZ 2110:
Dashboard of VAZ 2110 disassembled
Signs of trouble
As mentioned above, the reasons why the dashboard does not light up are electrical circuits. But where exactly? For example, in:
- fuse;
- wiring;
- damage to the board;
- problem with the fuse box.
You can also look for a fault in the backlight bulbs and their electrical circuits.
It is up to the owner to decide whether to take the car to a service center or do it yourself. If the choice fell on the second option, the problem must be found and fixed.
Dial indicators
In some cases, the arrows do not work or behave with sharp jumps, falling to the minimum and rising to the maximum values arbitrarily. The culprit for this behavior is weak contact in the electrical circuit with ground.
Typically, the “negative” wire from the instrument panel is fixed to the instrument bulkhead separating the engine compartment from the interior. It will be possible to detect it after removing the radio from its socket. It is worth considering that for cars with a non-standard alarm system installed, for the convenience of attaching such a wire with ground, the contact area was moved to another more comfortable place. Often at stations, specialists hide it behind the interior lining, where the driver’s left foot stands.
A contact problem can also be caused by the ground cable from the radio. A defect occurs when the instrument panel wire is loosely fixed. When the car moves, the contact is shortened, which provokes a breakdown. It is enough to simply provide a more reliable fixation to the ground contact.
The reason is the fuse
It is recommended to start your search with this element, because in most cases the fault lies here. If this component is “involved,” then first you have to figure out which of all the fuses is responsible for the dashboard lighting, find out its location and replace it with new ones.
After the fuse has been changed, you need to check how the instrument panel functions. If there is no light, then the cause needs to be looked for further.
Let's sum it up
The lack of lighting on the heater control panel does not affect the technical characteristics of the car, however, it causes significant inconvenience for the driver. Searching for an unlit heater switch at night distracts the driver's attention from the road and can become an indirect cause of an emergency.
If the backlight of the stove regulator does not work, it is necessary to replace the bulbs. Even a novice driver can cope with this task. To improve the appearance of the heater controls, use LED elements instead of conventional light bulbs, and the appearance of the device will delight you with warmth and comfort in the car interior.
Removing the old and installing a new panel
The process of replacing a Europanel does not require inviting highly qualified craftsmen.
Accompanied by preliminary preparation:
- battery power is turned off;
- The steering wheel and the facing part of the column are removed;
- sometimes the seats come out.
Removing the old panel
Dismantling instructions:
- The shields located at the feet of people sitting in front are dismantled.
- The curved plug is removed from under the handbrake;
- The window regulator cover is removed and the cigarette lighter connector is removed.
- The cover is removed from the gearbox lever. The air ducts going to the rear seats are removed.
- The plastic covers of the roof pillars are removed. The radio is pulled out.
- The plugs are removed from the top of the panel. The nuts that appear are unscrewed.
- Then the bolts located along the contour of the lower edge, as well as at the feet of the driver and passenger, are unscrewed;
- The mounting block is dismantled and the plastic casing is removed.
Installation of a new panel sample
Both panels have different dimensions, therefore, installation is carried out using 3 methods:
- a new instrument cluster is adjusted to the existing panel dimensions;
- the panel is being completely replaced with a new sample;
- Installation of the Euro-plate is underway.
The latter method is rarely used. This is due to the fact that installation requires combining the wiring. Work is being carried out on a panel removed from the car.
If the panel on a VAZ 2110 does not work, you need to check the condition of each indicator. Make sure the safety elements are reliable. Next move on to checking the sensors. If a breakdown is detected, repair it. If the unit cannot be repaired, replace it.
Installation of a new instrument panel on a VAZ 2110
Due to the different geometry of the combination of the new and old sample, three installation methods are possible:
- with adjustment of a new type of combination to the dimensions of the instrument panel;
- installation of a completely new instrument panel;
- with the installation of the so-called Euro pad (an extremely rare case, since the part is not on sale).
The fitting procedure is as follows:
- Trim the mask along the bottom edge. Trimming is done with a knife, soldering iron tip or other tool. The upper part is adjusted by heating with hot air.
- Putty the transitions of the mask, using the new devices as a template.
- Sand the transitions, sealing possible defects with putty.
- Perform final surface grinding.
- Coat the part with primer and paint it in the desired color.
- Install parts on the car.
Photos of the process of fine-tuning the VAZ 2110 mask for installation of a new sample combination.
Installation of the Euro trim is carried out on the removed instrument panel. Instead of the removed old shield from the VAZ 2110, it is possible to install a part from Priora. But for all components to work properly, you will need to connect parts of the old and new wiring, which is a difficult task.
Device connection diagram
The wire connection is shown in the diagram. Since factory wiring adapters are not available, owners make homemade harnesses. To assemble it, you will need a plug for the new dashboard and two plugs removed from the old type combination.
Standard connection diagram for a new “tidy”
What to do if there is no charge, weak charge (battery is discharged)?
If the battery of your VAZ 2107 is discharged, then one of three elements may be “to blame”: the generator, the voltage regulator, and the connections between them. Determining “who is to blame” can be very simple, even without additional devices. How this article will help.
We carry out testing using standard equipment
To monitor the operation of the generator on the “seven” there are two instruments: a voltmeter and a control light on the instrument panel. With their help, you can track the cause of your troubles.
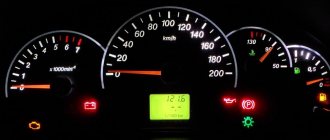
1) Turn on the ignition without turning on the starter
and look at the warning light. It should shine at full intensity, as in the photo. The voltmeter needle, normally, stands on the white part of the scale (photo). Let's say everything is OK - go to point 2 - start the engine.
The battery charge control lamp is on
Position of the voltmeter needle before starting the engine (ignition on)
The lamp does not light, the voltmeter needle remains at zero when the ignition is turned on.
Check fuse No. 10 in the mounting block. 99% of the time it will be burnt out. In this case, all other lamps on the instrument panel will also be de-energized. Replace it with the same one and test again. If the fuse burns out again, you need to look for the cause, that is, a short circuit. We check whether the wires from the generator are disconnected, whether the insulation is frayed somewhere, etc. Diagram 3 at this link
The lamp does not light up, the voltmeter needle shows normal
We check the wires on the generator to see if the wire has come loose from terminal “61”. If everything is normal there, you need to check whether there is a “plus” on this wire using a test lamp, an indicator screwdriver or a multimeter.
Terminal “61” of the VAZ-2107 generator
If there is a “plus” , we check the “tablet” (aka “chocolate”) and the generator.
The backlight of the VAZ 2114 instrument panel does not light up - how to find the reason
My dashboard after repair
A couple of weeks ago, my instrument panel lights started blinking over bumps and holes. I understand what needs to be done, but there is no one, there is no husband. There are friends who help me with repairing my swallow, but now they all have a lot of their own problems. They say wait until the weekend, we'll look at your car. And I don't like to wait. Of course, you can take it to a service station, but there is no money. And in general, the car is not new, there is no desire to go all out over such trifles.
While I was pulling the rubber, the panel went out completely. Now there is no place to put it off. But friends still have no time. Okay, I think I'll fix it myself. It’s a pity that there is no warm garage, and it’s already cold outside. But you still need to do it.
I decided to look for a solution to the problem on the Internet on forums. Having climbed a sufficient number of them and checked all the fuses, I realized that I needed to disassemble the panel. On the first day, after sitting in the car for an hour and wiping off all the dust, I decided to leave this matter for tomorrow.
All I could make out
The next day, after unscrewing four bolts, I decided to surf the Internet again. And I found an interesting article there about the fact that there is a gearbox to the left of the steering wheel (I think I wrote it correctly), which can burn out and cause the backlight to go out. To bring the backlight back to life, you just need to disconnect the chip and short it with a copper wire. I think it’s as simple as shelling pears.
This is what the gearbox looks like
This method works for me. I decided to act.
This is how I inserted the wire
I prepared the wire and unscrewed the gearbox. I unhooked the chip. I inserted the wire and voila. The backlight is on. My happiness knew no bounds. I decided to go to my sister and share my success.
But as soon as I stepped on the gas, everything went out, only the turn signals and the low and high beam headlights remained on. I quickly pulled out the wire. I changed 2 fuses f3 and f16, everything worked again. Only the backlight remains silent.
Sources
- zen.yandex.ru/media/id/5daed27623bf4800b0e52749/ne-gorit-podsvetka-paneli-priborov-vaz-2114-kak-ia-nashla-reshenie-problemy-5dba65bb5ba2b500ad20a9c1
- ladaautos.ru/vaz-2114/pochemu-ne-gorit-panel-priborov-vaz-2114-i-chto-delat.html
- drive2.ru/l/8744467/
- remont-inomarki.ru/pribornaja-panel-vaz-2114.html