Added Mar 30, 2015 to Dashboards
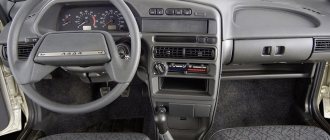
VAZ 2170 is a fairly popular car from the domestic automobile industry. It is popular both among ordinary car enthusiasts and among professional tuners who are involved in radical improvements in all parameters: appearance, interior, driving performance.
In this article we will talk about the process of removing the instrument panel, as well as dismantling the instrument panel itself, that is, the dashboard. There is no need to explain why this may be needed: either for repairs or for tuning. By the way, regarding tuning, as an addition to this guide, we recommend that you read the article: modification of the Priora dashboard.
How to remove and install the instrument panel on Lada Priora
This article is for those who plan to independently remove and disassemble the instrument panel on a LADA Priora car.
When removing the instrument panel, you may have to cut the clamps on the wiring harnesses. Buy clamps in reserve.
In the process of removing the panel, you will need to disconnect the connectors with wires from various devices. Mark the pads relative to each other to avoid confusion when assembling the panel.
To perform work on removing the panel you will need: an 8 socket wrench, a 10 socket wrench, and a set of screwdrivers.
What lamps are installed in the Priora dashboard
Depending on the year of manufacture, Lada Priora can be equipped with both lamps with a conventional socket and with a VDO socket. To accurately determine the lamps, you must first remove the shield and determine the type of socket. The lamps in the sockets are the same, however, from the factory, the lamp mustaches are soldered to the socket and to replace the lamp, you need to unsolder or pull out the old one and install a new lamp in its place, while soldering the mustaches.
However, you can take a simpler route by purchasing ready-made lamps with sockets. Note that the lamps are installed in them without soldering the mustaches. That is, if the lamps burn out further, you simply change the lamp and that’s it.
Step-by-step instruction
1. Set the steering wheel to the lower position.
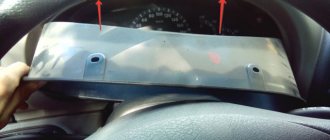
2. Next we need to remove the instrument panel trim. It is secured with four Phillips screws.
Unscrew the 2 screws on top.
In order to get to the lower mounting screws, you need to remove the plastic from the bottom of the steering wheel.
To remove, turn the three latches counterclockwise half a turn.
After turning the clamps from above, pry up the plastic with your hand and remove it.
3. Unscrew the 2 lower screws securing the instrument panel trim.
4. Using both hands, remove the cover. Let's start from the top.
Be careful not to break the latches.
5. Unscrew the 2 screws securing the dashboard using a Phillips screwdriver.
6. After unscrewing the screws, pull the dashboard slightly towards you.
7. Next you need to remove the connector that goes to the dashboard. The connector comes with a clever lock.
Press the latch in the indicated place below with a flat-head screwdriver.
After pressing, use a screwdriver to move the lock back. There is a boss on the latch that a screwdriver hooks onto and you can pull the latch back.
After the lock is removed, the connector can be easily removed from the instrument panel by hand.
8. We remove the instrument panel and perform the necessary operations, for example, replacing the panel backlight lamps.
9. We perform assembly in reverse order.
Video lesson
Stories from our readers
“Fucking basin. "
Hi all!
My name is Mikhail, now I’ll tell you a story about how I managed to exchange my two-wheeler for a 2010 Camry. It all started with the fact that I began to be wildly irritated by the breakdowns of the two-wheeler, it seemed like nothing serious was broken, but damn it, there were so many little things that really started to irritate me. This is where the idea arose that it was time to change the car to a foreign car. The choice fell on the melting Camry of the tenth years. Yes, I had matured morally, but financially I just couldn’t handle it. I’ll say right away that I am against loans and taking a car, especially not a new one, on credit is unreasonable. My salary is 24k a month, so collecting 600-700 thousand is almost impossible for me. I started looking for different ways to make money on the Internet. You can’t imagine how many scams there are, what I haven’t tried: sports betting, network marketing, and even the Vulcan casino, where I successfully lost about 10 thousand ((The only direction in which it seemed to me that I could make money was currency trading on the stock exchange, they call it Forex. But when I started delving into it, I realized that it was very difficult for me. I continued to dig further and came across binary options. The essence is the same as in Forex, but it’s much easier to understand. I started reading forums, studying trading strategies. I tried it on a demo account, then opened a real account. To be honest, I didn’t manage to start earning money right away, until I understood all the mechanics of options, I lost about 3,000 rubles, but as it turned out, it was a precious experience. Now I earn 5-7 thousand rubles a day. I managed to get the car buy after half a year, but in my opinion this is a good result, and it’s not about the car, my life has changed, I naturally quit my job, I have more free time for myself and my family. You’ll laugh, but I work directly on the phone)) If If you want to change your life like me, then here’s what I advise you to do right now: 1. Register on the site 2. Practice on a Demo account (it’s free). 3. As soon as you get something on the Demo account, top up your REAL ACCOUNT and go to REAL MONEY! I also advise you to download the application to your phone, it’s much more convenient to work from your phone. Download here.
The principle of operation of the circuit: the relay, with its normally closed contacts, closes the tidy button. When you turn on the ignition, the circuit starts working after half a second, and then turns on the relay, which opens the button.
To illustrate the operation of the circuit, a hanging circuit was assembled.
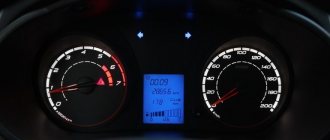
This test of arrows and dashboard indicators is already available on all modern models. The only thing is that it acts differently on different samples. For example, there may be 1 pass of the arrows, or three, or until the button is pressed, or even a pass only up to half the scales. The speed of the instrument panel arrows also depends on the manufacturer and version of the device.
Removing and installing the dashboard of a Lada Priora car
You will need: 8" and 10" socket wrenches, flat and Phillips blade screwdrivers.
1. Disconnect the wire from the negative terminal of the battery.
2. Remove the steering wheel.
3. Remove the steering column trim.
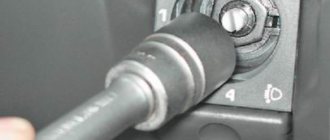
4. Remove the steering column switches.
5. Remove the floor tunnel linings.
6. Remove the instrument cluster.
Remove the right and left screws securing the center console of the instrument panel.
Use a screwdriver to pry off the heated side window nozzles on the right and left.
Using a 10mm socket wrench, unscrew the two nuts on the upper fastening of the instrument panel on the left and right
Turn the three latches and remove the fuse and relay box cover
Remove the four screws securing the instrument panel amplifier
Remove the two screws securing the instrument panel from the bottom left and bottom right.
Remove the screw securing the instrument panel to the left of the steering column
Remove the fastening screw located on the right under the instrument panel
Using a size 8 wrench, unscrew the bolt securing the ground wires of the instrument panel to the body bracket
Slide the instrument panel wiring harness clamps to the right
Disconnect the three harness pads from the pads mounted on the bracket
Disconnect the ignition switch (lock) wiring harness connector.
Disconnect the wiring harness connectors from the electric power steering
Using a 10mm wrench, unscrew the nut securing the ground wire of the instrument panel harness from the bracket for the electronic units
Removing and installing the dashboard of a Lada Priora car
You will need: 8" and 10" socket wrenches, flat and Phillips blade screwdrivers.
1. Disconnect the wire from the negative terminal of the battery.
2. Remove the steering wheel.
3. Remove the steering column trim.
4. Remove the steering column switches.
5. Remove the floor tunnel linings.
6. Remove the instrument cluster.
Remove the right and left screws securing the center console of the instrument panel.
Use a screwdriver to pry off the heated side window nozzles on the right and left.
Using a 10mm socket wrench, unscrew the two nuts on the upper fastening of the instrument panel on the left and right
Turn the three latches and remove the fuse and relay box cover
Remove the four screws securing the instrument panel amplifier
Remove the two screws securing the instrument panel from the bottom left and bottom right.
Remove the screw securing the instrument panel to the left of the steering column
Remove the fastening screw located on the right under the instrument panel
Using a size 8 wrench, unscrew the bolt securing the ground wires of the instrument panel to the body bracket
Slide the instrument panel wiring harness clamps to the right
Disconnect the three harness pads from the pads mounted on the bracket
Disconnect the ignition switch (lock) wiring harness connector.
Disconnect the wiring harness connectors from the electric power steering
Using a 10mm wrench, unscrew the nut securing the ground wire of the instrument panel harness from the bracket for the electronic units
Slide the pad lock
Disconnect the instrument panel harness from the ignition system harness.
Disconnect the instrument panel harness connector from the power accessories control unit.
Disconnect the instrument panel harness connector from the airbag control unit
Remove the instrument panel and remove it from the passenger compartment
Install the instrument panel in the reverse order of removal.
How to disassemble a vape smoke
An electronic cigarette is an automated device that, like all pieces of equipment, can fail due to improper use and long service life. You can repair an e-cigarette either in a specialized workshop or on your own, which, in fact, is what many vapers do.
But in order to repair such a device, you need to clearly know how to disassemble an electronic cigarette. After all, make one wrong move and the gadget can be thrown into the trash.
Anatomy of an e-cigar
Before disassembling an electronic cigarette, you need to find out on what principle this device works and what spare parts it consists of.
Regardless of the brand of electronic cigarette, its main components are three parts:
To disassemble such a device for the purpose of repair, you need to understand in detail how these parts work.
Atomizer
An atomizer (clinomizer, steam generator, evaporator) is a device responsible for generating vapor from a smoking liquid. The atomizer consists of a wick and a wire wound on it in the shape of a spiral.
https://www.youtube.com/watch?v=hAUU40RfzJ0
The latter can be made of kanthal, nichrome or stainless steel.
The wick is located in a ceramic bowl equipped with holes for air and fastening its contacts. The wick is closed on top by a bridge, which protects the wick from damage and supplies smoking liquid to it.
The bridge and bowl are wrapped in a metal sponge, through which the vaping liquid is transferred from the cartridge to the atomizer. Vaporization begins during the puff.
An electronic current is supplied to the incandescent wire, due to which it is instantly heated to the maximum temperature. At the same time, the smoking liquid in the cartridge boils and turns into steam, which, in fact, is inhaled by the vaper.
This component is a plastic mouthpiece equipped with a capsule soaked in a liquid mixture for vaping.
Simply put, the cartridge contains smoking liquid.
Battery pack
In e-cigarettes, the battery pack can be made in two forms:
- Mechanical. It is activated by supplying current by pressing a button, which must be held until the end of the tightening.
- Auto. Equipped with an LED, due to which, in fact, the blinking of smoldering is simulated. In addition, the battery is also equipped with a pressure sensor, through which the steam generator is turned on when the steamer takes a puff.
What is required to disassemble an e-cigarette?
Now that we have understood the “insides” of electronic cigarettes, we can begin to consider the question of how to disassemble an electronic cigarette.
To implement this task you will need the following set of tools:
- small tweezers;
- pliers;
- a plastic tube of smaller diameter compared to the device itself;
- needle;
- thin drill;
- a small hammer with a rubber tip.
Taking it apart piece by piece
You need to be very careful when disassembling, as well as assembling, electronic cigarettes. The further performance of the gadget depends on this.
So, to disassemble the e-cigarette, you must follow the following step-by-step instructions:
- Spinning up the electronic cigarette. We take tweezers and use them to tighten the contact using gentle movements.
- We remove the cartridge for the smoking mixture from the device.
- Next you need to bend the battery pack away from the evaporator.
This must be done extremely carefully, with smooth movements - bend and unbend the device in the place where the battery and atomizer are connected to each other. We continue to perform similar manipulations until there is a gap between the thread and the body part of the e-cigarette. This may take a lot of time, however, there is no need to rush. Remember, you are dealing with a gadget that works like most automatic gadgets. And one wrong move can lead to damage to the vaping device. - After a successful attempt, you need to remove the case.
This must be done very carefully so as not to damage the fragile connecting wires. At this stage, you can replace the battery pack if someone does not know how to disassemble the battery of a vaping device. Sometimes it happens that the outer part of the body is removed first, while the body itself remains attached to the atomizer.In this case, you need to put the part back on and continue to make bending movements until the evaporator and the main body are disconnected. When the thread appears, you need to insert a plastic pipe from the side of the container for smoking liquid and carefully knock out the “insides” of the evaporator with a hammer. Just don’t put a lot of effort into this, because such manipulations can deform and break the gadget.
- The next step is to remove the bottom plastic washer.
We take out the existing wiring - if they are “set” on glue, then, using a needle, carefully clean the gluing areas. If the connecting wires are completely glued, then they can only be removed with pliers, and the holes filled with glue can be cleaned with a drill. - At the bottom of the metal tape there are circles that need to be removed.
The tape is wound on the bridge, so first of all you need to unwind the tape and only then remove the bridge. - We take out the spiral, pulling the wires from the battery pack. If the winding on the atomizer is severely damaged, then you need to remove it using tweezers from the side of the container for smoking liquid.
Source: https://brosaem.online/kak-razobrat-vejp-smok-2/
Removing the instrument panel
We carry out work to replace the instrument panel, panel wiring harness and elements of the heating and ventilation system. Disconnect the wire terminal from the negative terminal of the battery. We remove the steering column switches (see “Removing the steering column switches, switch connector and spiral cable drum device”). Remove the cover of the fuse box (see “Replacing fuses and relays”). We disconnect the wire blocks from the ignition switch (see “Removing the ignition switch, replacing the contact group and immobilizer coil”). We disconnect the wire blocks from the electric power steering control unit (see “Removing the steering column”). Remove the floor tunnel lining (see “Removing the floor tunnel lining”). Overcoming the resistance of plastic latches...
...remove the left front pillar trim. Similarly, remove the upholstery of the right front pillar.
Using the blade of a slotted screwdriver, placing soft material under it, pry off the glass blower nozzle of the left door. Similarly, remove the blower nozzle on the right side.
Using a 10mm socket, unscrew the nut for the upper fastening of the instrument panel, located in the cavity under the door glass blower nozzle. Similarly, unscrew the nut on the right side.
Using a 10mm socket, unscrew the bolt securing the ground wire ends of the instrument panel.
We disconnect the wiring harness connectors of the instrument panel from the wiring harness connectors located on the bracket above the fuse mounting block...
...and the wire block located on the right end of the bracket.
Disconnect the engine control wiring harness block from the instrument panel wiring harness block...
...and use a 10mm head to unscrew the nut securing the end of the ground wire. We disconnect the middle block of the instrument panel wiring harness from the electrical accessories control unit (see “Removing the electrical accessories remote control system controller”).