Why is cleaning necessary and its frequency?
When the ventilation system is clogged, an emulsion containing soot and oil residues settles inside the engine, resulting in the creation of excess pressure, leading to damage to the seals. This leads to loss of sealing and oil leaks, which can be seen during an external inspection of the engine block. Crankcase gases are gases from engine cylinders that are not discharged through the exhaust valve, but are squeezed out into the crankcase through the gaps of the pistons and piston rings when the engine is running. This process occurs especially intensively in worn-out engines with high mileage. For VAZ 2101-2107, these are mileages of 80-100 thousand km.
If the crankcase ventilation is not cleaned in a timely manner, the operation of the fuel supply system will be affected. In carburetor engines, the air filter and the carburetor itself become dirty; in injection engines, the throttle assembly, inlet pipe and sensors become dirty. All this leads to a decrease in power, problems with operation, and in some cases a complete stop of the engine. To avoid this, additional elements are introduced into the ventilation system to clean crankcase gases from emulsions containing oil.
If the crankcase ventilation system is not cleaned in a timely manner, the hoses crack due to excess pressure. This causes excess air to be sucked into the engine. Carburetor engines are not so sensitive to this problem, but in injection systems the quality of the mixture sharply deteriorates, the stability of the engine is disrupted and its power is reduced.
The best option is to clean the crankcase ventilation on a VAZ classic immediately before changing the oil. This frequency allows you to keep the system in order, change cracked hoses on time, extend the life of the engine, and reduce fuel consumption without loss of power.
Video: How to disassemble and clean the breather, crankcase ventilation
Preventative work
Some motorists are wondering: why clean the breather? This is done in order to avoid problems with the operation of car components; it is necessary to clean the breather in a timely manner. Such actions will allow you to maintain the permissible pressure level, and as a result, stable and trouble-free operation of the car. It is recommended to carry out cleaning at every technical inspection (MOT), and in some cases even more often. The cleaning process itself looks like this:
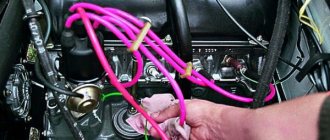
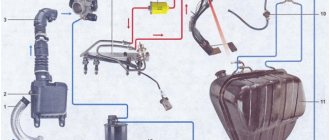
- Removing the pipes and hose. All pipes and hoses coming from the “breathing valve” are removed; in some models you will also need to remove the air filter housing;
- removing the breather cover;
- cleaning work. Now you can begin cleaning the valve cap and tube.
- installation work. Assembly is carried out in reverse order.
This is how cleaning is done. The procedure is quite simple, and you can do it yourself with your own hands, without the need to visit a service center.
Based on all the above information, it is time to draw conclusions. The breather in a car engine plays an important role for its stable and normal operation. And in order to avoid problems with its operation, it is necessary to carry out preventive cleaning of accumulated oil in a timely manner. If this is done in a timely manner, then there will be no problems with the operation of the engine.
Necessary tool
To clean the breather on a VAZ engine, check and replace the hoses, you don’t need any special skills or specialized equipment; a standard kit is enough. To complete the work you will need:
- set of keys No. 7-13;
- flat and Phillips screwdrivers;
- washing liquid, kerosene will do;
- container where washing will take place;
- rags;
- breather gasket;
- heat-resistant silicone-based sealant;
- if necessary, a set of new hoses will be required - separately for the carburetor and injector.
This tool can be found in any garage, so there are no problems with its selection. It is better to take rags that do not separate into individual elements, since during washing they can get into the engine.
Breather in bridges
There is also oil inside the axles connecting the wheels, and for their normal operation and maintaining optimal pressure, a breather is also provided. This mechanism acts as protection against dirt and moisture getting inside while the car is moving. If the valve is significantly clogged, the oil inside the bridge will leak. In order to prevent this, you should clean the breather and check that its cover moves in all directions.
Completing of the work
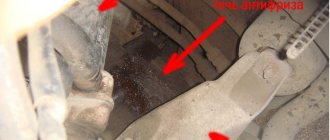
Cleaning the breather on the VAZ 2101-VAZ 2107 is carried out during a scheduled engine oil change. Unscheduled cleaning should be done if oil begins to leak through the gaskets or the outlet hoses are cracked, which indicates an increase in gas pressure in the crankcase. The crankcase exhaust hoses are disconnected, one of which goes to the carburetor, and the second to the air filter. Next, the nut holding the breather is unscrewed, for which the dipstick for checking the oil level in the engine is first removed. After removing the cover, sediment formed as a result of engine operation can be seen in the opened space. It can almost completely block the lumen, significantly complicating the movement of crankcase gases, which leads to an increase in pressure in the system.
After removing the lid, the opened glass must be thoroughly washed; at its bottom, a 13 nut holding the pin will appear, which can be carefully unscrewed with an open-end wrench. If problems arise with this, you can screw two 13mm nuts onto the top of the stud, which need to be counterlocked. Then, using these nuts, carefully, so as not to break them, the pin is unscrewed.
The glass, as a rule, sticks to the place of attachment, so it is better to tear it off with two small pliers, grabbing it by the edges. The removed parts of the breather must be placed in a container of sufficient volume filled with kerosene, gasoline or other washing liquid. A trimmed plastic bottle with a volume of 5-6 liters is perfect.
While the glass is being washed, the place where the breather is attached is thoroughly cleaned with a rag containing cleaning liquid. When working, you need to be very careful so that dirt and rag particles do not get inside the engine. The hole where the pin is screwed in should not be cleaned too thoroughly so that dirt does not get into the engine from it. After cleaning, there should be no soot or other deposits left on the surface of the breather.
SIGNS OF OIL RUTTER.
There are not many of them. In a carburetor engine, these may be leaks of lubricant inside the air filter housing and significant traces of oil on the filter element itself.
As for injection engines, the problem manifests itself in the form of deposits on the throttle body and the internal surfaces of the intake manifold. In this case, there may be a drop in engine power and an increase in fuel consumption.
System assembly
After cleaning the breather is completed, you need to assemble the crankcase ventilation system. When installing the glass in place, you need to carefully align its tube with the seat. Next, a pin is screwed in, which is tightened with an open-end wrench to 13.
Before installing the breather cover, a paronite oil pan gasket is placed on the seat, which prevents gases from escaping from the system. After each disassembly of the breather, it is better to replace it, additionally treating the seating area with heat-resistant silicone, which will increase the reliability of the connection. The breather is put with a cut on the hole in the glass tube to form a channel for installing the oil level dipstick. A washer and a special nut with a rounded head are put on the stud, which is clamped with a wrench; when tightening, you do not need to pinch the nut so as not to strip the thread.
After this, the hose is put on the carburetor and the main hose. It must be inspected first, and if it is cracked, it is better to replace it with a new one to avoid excess air being sucked in. At the entrance to the air filter or in the hose itself, experts advise placing a special metal brush called a flame arrester.
It retains oil well, which may be contained in crankcase gases and enter the air filter, clogging it. As a result, the quality of the air-fuel mixture decreases and engine stability is lost. This is especially important for cars with high engine mileage; used oil and emulsion are deposited on it and flow back into the crankcase. When choosing this part, it is better to consult with specialists so that the wire from which it is made is of high quality and does not break, getting into the crankcase.
What is a breather and its main purpose?
Engine breather, what is it?
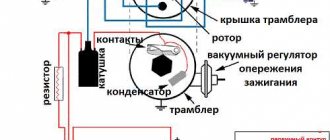
In order to answer this question, you need to understand its purpose. A breather (breathing valve) is a device through which a closed container communicates with the atmosphere, thereby maintaining the required pressure. During the operation of the engine, various gases accumulate in it, and if they are not released in time, then the operation of the internal combustion engine may stop, and the breather is responsible for this. In other words, it maintains the required pressure inside the engine crankcase. By itself, it performs the function of a valve, which, at increased pressure, bleeds air from the engine. In a car, this device is installed in the following places:
Now it’s worth considering the installation location in more detail.
The engine is breathing
The breather is designed to relieve excess pressure from the crankcase, ventilate it and remove gases generated during its operation. If there is a malfunction, smoke begins to pour out of all engine openings. Oil consumption increases sharply.
There can be three reasons for this problem:
- The ventilation system is dirty . Due to the fact that a blockage has formed in the ventilation, the pressure is not released in time. Gradually, gases accumulate and when the pressure reaches a critical value, a sharp release of accumulated gases occurs. The tube that connects the breather to the manifold flies out. As a result, the driver hears a loud bang. Sometimes the gases can rupture the valve cover, break engine parts and even tear out the pan. To correct the situation, you need to flush the ventilation system using a special additive. You can also disassemble the breather yourself and clean the filter using gasoline.
- Occurrence of piston rings. Gases begin to penetrate into the crankcase, from where, due to increased pressure, they find outlets in various cracks. Oil begins to squeeze out through the dipstick or flows into the combustion chamber. The “check” lights up on the dashboard. In this case, you need to check the compression and diagnose the condition of the engine. If at least one “boiler” shows less than 11 points, it is necessary to disassemble the engine and look for damage.
- Damage to cylinder liners. If the two previous possible causes are not confirmed, look for the cause in the cylinder-piston group. If the liners are damaged, you need to grind the cylinders and install new pistons.
The engine gets very hot
It is worth noting that a carburetor engine encounters this problem much less often than an injection engine. Even on hot summer days it holds the temperature well and does not exceed 96 degrees. Why does the engine get hot?
- The thermostat malfunctions. As they say, the valve “caught the wedge.” This can be checked very simply: you need to touch the bottom of the thermostat with your hand. If it is cold, then the problem is in the thermostat valve. Another sign of a non-working thermostat: the radiator outlet is very overheated. As a result, this valve is kept closed, the liquid does not enter the radiator and boils. If in this state it penetrates into the piston part, as well as into the oil sump, this can lead to critical engine failure. Therefore, if a malfunction is detected, you need to turn off the engine and replace the thermostat with a working one.
- The appearance of an air lock in the radiator pipes. To eliminate this problem you will have to bleed the entire system.
- The radiator is clogged. To avoid this problem, you need to clean the radiator regularly, especially during the hot summer season. You also need to use only high-quality coolant to avoid clogging the radiator from the inside.
- You can also pay attention to whether the fan is broken.
- Another common reason that the VAZ 2106 engine may overheat is a breakdown of the water pump. Often there is a leak in the pump. You can check the operation of this part as follows: at engine operating temperature, sharply squeeze the inlet pipe on the radiator. In this case, the working pump produces a noticeable pulsation. It also doesn’t hurt to check the pump seal, which starts to leak from time to time.
The engine smokes
Usually a small amount of smoke comes out of the exhaust pipe. However, sometimes there come moments when thick smoke can literally pour out of your six. To understand what the problem is, you need to pay attention to its color.
- Transparent color. Transparent or slightly white smoke that is almost invisible. It's not even smoke, but rather steam. It occurs because the system has not yet warmed up. This is especially noticeable in winter after the car has been sitting in the yard all night. There's nothing wrong with that. After the system warms up, the steam will practically disappear.
- Black color. This phenomenon looks quite scary. One of the reasons may be the usual overload of the motor with heavy weight. Try unloading the trunk if you have placed something particularly heavy in it. However, most often this problem does not arise for VAZ 2106 owners due to the small size of the vehicle. Therefore, also pay attention to how the mixture formation process proceeds. Most likely there is too much fuel entering the engine. The result is not only black smoke, but also increased fuel consumption. Try changing the air filter. You also need to measure the compression. Check the condition of the cylinders and whether the engine control sensors are working correctly. Check the spark plugs to see if they have a black coating on them, which may indicate the need to repair the engine.
- White color. Unlike the clear smoke described above, this smoke has a thick white tint and does not disappear as the engine warms up. It indicates that there is a malfunction in the cooling system. This is a sure sign that urgent measures need to be taken, because a breakdown can lead to a major overhaul of the engine. Check the candles to see if they have developed a coating similar to what appears on a kettle due to scale. If this happens, it means water is getting into the cylinders.
- Bluish color. The reasons for this phenomenon can be various breakdowns. For example, you can check the serviceability of the valve stem seals. If they are damaged, oil may leak and enter the idle engine. You will also have to check the oil rings. Due to their wear, excess oil may flow into the cylinders.