How to apply a sticker
In this example, I will describe 2 main methods of gluing small applique stickers. At the bottom of the page I will post a video showing all the methods for gluing all types of stickers. In 10 minutes you will learn everything you need to know. I recommend watching the video once to be aware. This may be useful to you. So, in the example you see 2 application stickers. One of them is made in a mirror.
We will separate the first sticker from the backing and glue it right away. This method is suitable for small stickers. We pry up the corner of the sticker to grab the mounting film and separate it together with the application from the backing. The surface to be applied should already be dry and clean.
The mounting film has a weak adhesive layer so that it can be easily removed from the surface, leaving the application. In this case, such glue is used to remove the application from the substrate. We film the whole thing.
Then we select a place for gluing and, slightly pulling, apply it to the surface. Tension is necessary so that the sticker lays without waves or bubbles. This is the most important moment of gluing. At this point you can use water. Usually large stickers are glued to the water when the surface is not level. At this size there is no need for water.
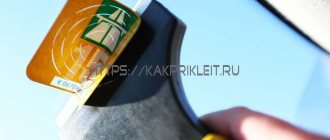
Then press the sticker evenly from the center to the edges. To do this, it is convenient to use a squeegee with a felt layer (as in the photo) or a plastic card wrapped in fabric. The fabric helps the squeegee slide, and when gluing a printed sticker, it will not spoil its top layer with ink. Printed stickers can only be applied to fabric; hard objects will damage the surface.
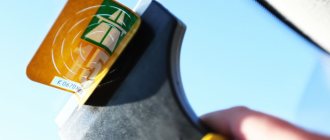
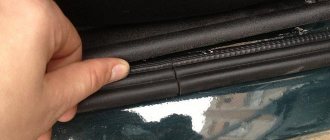
We glue the next sticker using a different method. We separate only part of the mounting layer, and bend the edge of the substrate inward. The free edge of the mounting layer will hold the sticker. You can peel off other corners or use tape to secure and position the sticker.
If the sticker is positioned the way we need it, separate all the other corners (or tape) and begin to pull out the backing. At the same time, roll out the release sticker.
We pull out the entire backing to the end, evenly pressing the sticker to the surface.
Smooth and press well. Remove the mounting layer.
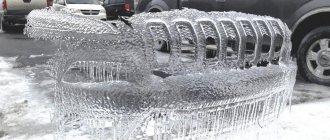
The final look of our stickers. Because one of them is glued from the inside of the glass in a mirror image, it turned out as needed. Why glue the sticker in a mirror? So that it is inside the cabin and not exposed to any influences. In the photo, the sticker pasted on the inside looks whiter, but when used this way in a car, the effect is the opposite. The fact is that car windows have their own transparency and are often slightly tinted. This will cause the sticker to appear grey. It will also stick to the heating lines and may damage them when removed. We do not recommend gluing stickers from the inside.
Source
We understand the variety of choices - film options for cars
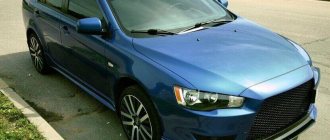
Reflective vinyl glows when the light is pointed at.
The number of vinyl coverings on the market makes most car enthusiasts' eyes widen. But in fact, vinyl films are quite easy to divide into several groups.
Most often, division occurs based on the texture of the film. There are matte and glossy coatings. Naturally, each of them can have its own unique color, which ultimately gives several hundred options. Light-accumulating stickers are also quite well represented on the market. This type of coating differs from other vinyl stickers in that it accumulates energy during the day, which allows it to glow in the dark. Reflective stickers have a different task - to reflect the light of lanterns and headlights.
And although the use of such film on cars is not always advisable for safety reasons, such film finds its application in the manufacture of numerous advertising products. A separate group includes high-quality car films, which are characterized by excellent water resistance and color stability, which is important if you plan to place the sticker on the car body for a long time. In addition, such films can be glued to each other, which results in an almost unlimited number of shades.
All about car windshield and rear window stickers
Stickers on a car windshield allow the driver to identify his personal vehicle. The stickers are durable and weatherproof. They will help hide the cracks, and if desired, you can remove them without effort.
Drawings are used for different purposes:
Stickers as a way of advertising
One of the ways of marketing has become advertising stickers of various subjects. This could be company logos, contact information, a brief description of the service, or part of an advertising slogan. The more impressive the image on the glass, the greater the chances of attracting new customers and increasing income. Luminous images are becoming increasingly popular. The drawings are visible in the dark, which attracts the attention of passers-by and drivers. This is often used by taxis and delivery services.
Informativeness and originality
Stickers can carry useful information, for example, informing that there is an inexperienced car owner, a child, a car is for sale, or the driver is driving on studded tires - these are examples of the use of informative stickers.
Is a fine possible?
When stickers on a car block the view, the driver will be fined. Violation of technical regulations and the collection of traffic rules is punishable by administrative measures. A traffic police officer can issue a warning if the driver does not immediately get rid of the sticker on the car glass, but the police officer has the right to choose a different preventive measure. The minimum fine for a windshield sticker is 500 rubles, the maximum penalty is confiscation of license plates until the driver removes the stickers on the car.
Stickerbombing. Auto application technology
“Sticker bombing” is a new direction in automotive design. Increasingly, on city streets you can see cars with a bright and distinctive appearance, and this incomprehensible expression has already appeared in the vocabulary of car enthusiasts.
Stickerbombing
This movement was started by the so-called “bombers” - street artists who paint graffiti.
Of course, a design on a car is not created using multi-layered applications and painting over the design with paint - this would be a pointless, expensive process. Decorating a car involves layer-by-layer gluing of ready-made stickers - stickers of relatively small sizes. In truth, these are creative car stickers that you can buy ready-made or come up with yourself and print them out.
Stickerbombing of the front bumper
They will last a long time on almost everything: in the interior (panel, trim, trim), on the roof, sills, gas tank hatches, side mirrors and even on rims.
The gluing process itself is called “bombing”.
How to remove a sticker
To remove stickers from car glass, it is better to select a special product that will not destroy the surface. Home remedies cannot be used, they will damage the surface, and it will be even more difficult to remove the sticker from the glass. There are special chemical compounds on sale that will remove the sticker and dissolve any remaining adhesive from the surface:
It doesn’t matter what you decide to use to remove the sticker from the car window - the chemicals are aggressive, so you need to wear rubber gloves when cleaning the glass. At the end of the procedure, wash off the remaining product from the glass with plain water.
Car stickers are beautiful and unusual, but if they interfere with road safety, then think twice before deciding to place the design you like. The main thing is to comply with the rules of the Technical Regulations.
Source
Stickers on the windows or car body must be applied according to technology. There are two such methods - “dry” and “wet”. The first one is best used for small stickers, and the second one for canvases with a large area. As for the question of how to remove stickers from a car, special tools and compounds are used for this - a hair dryer, gasoline and other means. Which ones exactly - you will find out further by reading the article to the end.
Do-it-yourself car wrapping
Let's start with the fact that the car owner can apply the film in two ways: on dry and wet surfaces. The choice is up to the driver, but it is better to rely on your own accuracy and speed.
To achieve a good result, you should work with an assistant. The pasting process involves following the following rules and recommendations:
- Smooth the material from flat surfaces, working towards the edge.
- In order for the film to fit perfectly on bends and indentations, it is made elastic by heating it to a certain temperature.
- Do not stretch the material too much.
- If air is detected under the film, you should try to smooth the material using a squeegee.
Do-it-yourself car wrapping
Tools and materials for wrapping a car with film
Pasting a car dry or wet cannot be done without special materials and tools. To work successfully, the master will need:
- car film;
- dry, soft, lint-free cloth;
- stationery knife and scissors;
- a professional hairdryer, but you can also use a regular hairdryer;
- plastic or felt squeegee;
- sprayer with soap solution (surface treatment using clean water is difficult);
- masking tape;
- degreaser (white spirit works great).
If the film is very large, it is better to work with an assistant.
Felt squeegee
Which films are easier to glue?
On the auto goods market, the car owner can purchase cast or calendered film. It is believed that the first type is most suitable for vehicles, as it is perfectly applied to recesses and bends.
In addition to the type of film, the quality and technology of gluing depends on the method of application - dry or wet. The first method is considered difficult and the work should be done very quickly, since the film instantly sticks to the surface of the car, and errors cannot be eliminated. Despite this, the coating is applied in one go and lasts for a long time.
Calculation of film for car wrapping and its cost
Car wrapping requires careful preparation. Before starting work, you should calculate the volume of material. This must be done taking into account a number of factors, including the car model, type of film, level of knowledge and qualifications of the technician.
Car wrapping with film
For small vehicles, it is recommended to purchase material whose width is at least 137 cm; for other cars, 152 cm will be enough. To cover the body of a sedan, the master will need about 17–19 m of film; for an SUV you will need at least 23–30 m; for station wagons and crossovers – 18–23 m.
Preparing a car for vinyl wrapping
For successful work, the surface of the car must be carefully prepared, namely: washed, cleaned and degreased. To wash the body, use a special shampoo or any detergent. Alcohol and solvent will help get rid of stains, insect marks and grains of sand stuck to the surface. A perfectly clean body can be obtained by polishing the car.
And finally, you can start marking the film. For the procedure you will need a stationery knife and scissors. Having applied the material to the surface, you need to mark the size line and make other necessary marks.
Preparing a car for vinyl wrapping
Primer, soap solution, cutting
To prepare a soap solution you will need detergent and water. Proportion 1:10. The detergent will ensure comfortable application of the material. Car wrapping with vinyl film in car dealerships is done using a primer. The need to use it arises in hard-to-reach places where the material needs to be tensioned; along the edges of the part where the film is wrapped and in case the adhesive layer has received fingerprints from the master, deteriorating its properties.
Cutting the film begins with the bumpers: front and rear. As a rule, bumpers are about three meters in length. A tape measure is ideal for accurately measuring the wings and “skirt”. You need to cut the film sparingly, using every centimeter. When cutting out the material for the arch, the remains can be folded or used on another surface, for example, a threshold or mirrors. When cutting doors, it is recommended to make a small margin.
How to put a sticker on a car
Depending on the material of the sticker, its size, and where you plan to stick it, the methods for this process may vary. There are so-called “dry” and “wet” pasting methods . Let's start with the last one. If you plan to glue vinyl film over a large area, then for this you will need the following materials:
Using soap solution and hair dryer
It is worth paying attention to the environment in which the work is carried out. The room temperature should not be lower than +10°C, the air should be dust-free, and there should be no drafts. The further operation takes place in several stages. The first of them involves surface preparation, the second - fitting, the third - application, the fourth is the gluing itself and the elimination of defects. All work is performed according to the following algorithm:
For the first few days (up to about 10) after sticking, it is not advisable to wash the car . It will take some time for the glue to dry completely.
Next, we will analyze the “dry” method using the example of a sticker on a car window. To do this you will need:
The work is carried out according to the following algorithm:
“Dry” gluing method
Stickers on the side of the car are installed in the same way. The main thing is to always act carefully and not rush. However, car owners often wonder not only about applying, but also about removing the sticker from the surface of the car, as well as any adhesive residue from it.
Pasting method
Pre-treatment of the car's surface will help you attach stickers to your car correctly with your own hands. It needs to be washed to remove dirt, all kinds of stains and dust. If dirt remains on the car, it will be visible under a very thin film.
After this, you need to try the blank on your car and determine the boundaries of its gluing. Please note that the edges of the workpiece will be cut off with a stationery knife or wrapped when gluing, so take the workpiece with a margin of a few centimeters. By the way, you can glue a large workpiece not immediately, but in parts.
The further algorithm of actions is as follows:
- Place the workpiece on the surface of the car. After this, if the product is large, cut it at the junction of the car parts, pressing it to the surface. The product must be cut along the gaps between the machine parts;
- place the sticker with the vinyl side down to remove the paper backing by picking it up with a knife or other object;
- wet the adhesive side of the film, as well as the area of the car where you plan to place it. If you are using the dry gluing method, simply start gluing the workpiece onto a dry surface;
- Place the product on the prepared area. Check for correct gluing. Until the product is completely dry, you can change its location. To do this, you will need to completely peel it off and start sticking it again (do not move it);
- To secure the workpiece long-lasting, use a spatula (squeegee) made of rubber or felt. Start smoothing from the center, removing any moisture and air bubbles that have formed from under the surface. The movements should be zigzag (no matter in which direction). After this you will need to work on the second side of the sticker. To avoid having to re-glue the products multiple times, first secure only the flat areas.
- After smoothing out the flat areas, start working with moldings, spoilers and other parts of the car, the design of which may complicate gluing.
Car vinyl for car hood
How to remove a sticker from a car
Using a hair dryer to remove the sticker
Let us examine in detail how to remove a sticker from the glass of a car or its body. First of all, you need to know that there are different types of stickers, but the most popular among motorists are vinyl ones.
We need to start the story with the features of vinyl stickers. The fact is that they are produced on the basis of vinyl (a chemical compound that is resistant to moisture, temperature changes, and so on), which has excellent performance properties, durability, strength, and resistance to external influences. The stickers are disposable, and their adhesive is designed to last for 2.3 years. After this, it polymerizes, and the sticker itself shrinks. In addition, its surface is often covered with cracks, and when you try to tear it off, it breaks off in small pieces.
Another common type of stickers is paper-based. They are cheaper, but are not resistant to moisture and temperature changes. However, they are often used for gluing on the inside of glass.
A popular way to remove a sticker from a car body is to heat it with a hair dryer . At high temperatures, the material becomes soft, and if it is not very cracked, then there is a high probability that it can be removed in one piece. The metal must be heated evenly. As it cools, it is necessary to periodically maintain the temperature. Remember that the higher the temperature of the metal, the less likely it is that glue residue will remain on the surface. However, do not overdo it, otherwise you may damage the car's paintwork.
Methods of applying a sticker to a car
Video:
There are several ways to wrap cars, but in a regular garage it is better to use either the dry or wet method.
Pasting on a dry body is more difficult than on a wet body. The fact is that the first method requires special care, accuracy and caution, since nothing can be corrected during the work, i.e. there is no room for error. The wet method of applying stickers to the surface of the body is more practical, since the sticker can be carefully moved, adjusting its position. That is why we will update this method in more detail.
Wet method of applying vinyl stickers
The wet gluing method requires the presence of some kind of solution. For example, you can make a solution yourself by dissolving a liter of any detergent in 10 liters of water. What is the sequence of work? Let's describe in detail:
Video:
- After preparatory work (cleansing the surface to be pasted of dust and dirt), the paper base must be removed from the sticker. It is more convenient to do this on a flat surface, for example, on a table;
- then this sticker must be applied to the car body. This should be done carefully, starting from the middle of the picture and moving towards the edges;
- Use a squeegee to secure the edges of the sticker to prevent it from peeling off. Then you need to warm up the vinyl sticker well with an industrial hair dryer, paying special attention to the folds and irregularities. After this, the sticker is left in this position for half an hour;
- after half an hour, use a felt squeegee to smooth out the pattern, removing all the air remaining under the sticker;
- work is completed when excess trimmings are removed. Allowances can only be left at the folds under the hood, trunk, etc.
Thus, your DIY vinyl car sticker is ready! To achieve maximum effect, you can dry it with a hairdryer and treat the edges with a squeegee.
How to remove glue residue from car surfaces and glass
Residues of glue can be removed by first moistening them with alcohol or alcohol-containing mixtures. Be careful when using different solvents. Read their composition first to make sure that they will not damage the paintwork of your car. In particular, in this case you cannot use acetone-based solvents , as well as acetone itself.
You can also remove vinyl stickers on your car using:
Comparison of different sticker and adhesive removers
After using the listed liquids, do not forget to use foam (soap solution) to wash off any remaining residue. Also, some car owners in such cases remove glue residues using very fine sandpaper (“zero”). However, after this the problem area will need to be polished using polishing paste. In stores you can find a special rubber roller that fits onto a drill. It can also be used to quite effectively remove pre-softened glue.
Results
Applying film to a car is not particularly difficult. This is especially true for small size stickers. Almost any car owner can handle this. It’s another matter if you want to use vinyl stickers on the car throughout the entire body (for example, “carbon-look”). In this case, it is better to seek help from the experts.
As for the question of how to remove a sticker from a car body or the dried glue left behind, then, as practice shows, it is best to use AI-92 gasoline and a hair dryer to heat up the adhesive. Gasoline is much cheaper than other cleaning products, but has a superior solvent action to most of them. However, the choice is yours alone, and we do not claim to be the ultimate truth. We invite you to share your own experiences using cleaning products in the comments.
Source
Our recommendations
If the main sticker does not come off the film, carefully peel it off using a knife and attach it to the body. Once you have an evenly taped surface, you will need to go over it again with a squeegee to remove any remaining air bubbles and moisture. If necessary, use a needle or syringe to poke a hole in the vinyl and remove any air.
After the above steps, warm the surface with a hairdryer to ensure a good fit. Fold the film over the joints, if necessary.
After this, leave the car for several hours. The sticker will be completely fixed within 24 hours.
Author: Baranov Vitaly Petrovich
Education: secondary specialized. Specialty: car mechanic. Professional diagnostics, repair, maintenance of passenger cars of foreign production 2000-2015. Extensive experience working with Japanese and German cars.
How to apply a sticker to glass and car body
Let's take a closer look at external car tuning using car stickers!
Depending on the purpose, the following types of stickers are distinguished:
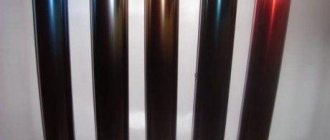
Films (glossy and matte) are also divided into:
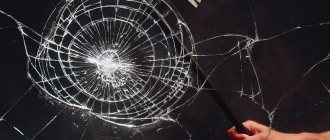
Shockproof film for car glass
Armored film on glass protects a vehicle from mechanical influences and the effects of brute physical force. But this does not mean that such material will protect the surface of the car from firearms. In other words, it is an anti-shock film that provides longer glass life and protection.
Damage to car glass
How to apply a sticker to a car - step-by-step instructions
For self-gluing you will need the following tools:
The temperature indoors or outdoors should not be lower than +10C. It is not advisable to carry out work in rainy, humid weather.
1.Spray glass cleaner on the glass and wipe dry with a rag.
2.Next, attach the fastening film to the corners and try the sticker on the glass. To place the sticker evenly, use a tape measure or ruler. We take measurements from all sides and trim.
If the situation is satisfactory, apply a couple more strips of the fastening film. Instead of mounting film, you can use regular mounting tape. To make it easier to glue the car sticker, it is better to place the fasteners on the side of the central axis. This will allow you to apply one half of the sticker first, and then the second without creases.
3. Unfasten the fastener on one side and begin to remove the backing from the sticker . We bend the edge of the backing and begin to carefully remove it. We do this until the middle of the sticker.
4.Glue half of the sticker and iron it with a plastic card, moving from the center to the edge. If “bubbles” appear, the unsmoothed part can be peeled off and corrected.
5.Remove the fastening tape, since the sticker is already securely fixed.
6.Remove the paper backing from the second half of the sticker.
7.Glue the second half to the glass and iron it again with a plastic card.
8. Peel off the transparent layer and slowly pull it along the surface. We make sure that all the elements of our drawing remain on the glass.
At the end of the work, we stroke the surface with a plastic card a couple more times.
VIDEO INSTRUCTION
Useful tips
Instructions on how to properly peel off a sticker from a car body
When choosing car stickers, do not skimp - cheap options will not last long, but high-quality ones will not be afraid of cold weather, rain, or snow and will delight you for at least a year and a half.
Source
How to apply a sticker correctly
Start with the main thing: - preparation of the pasting area, - availability of the necessary tools, - cleanliness of the working surfaces.
Note! For different types of stickers, fundamentally different application methods are used:
This is necessary to stick it beautifully
To stick any sticker beautifully, you need to have only a couple of simple devices, know what your sticker consists of and what is the best way to apply it.
What instrument
Any clean piece of natural fabric will do.
Fairy type dishwashing detergent and the like.
Only needed for the “On the water” method. The simplest garden sprayer for spraying water.
You can use a couple of unnecessary plastic cards.
To apply the sticker evenly, you will need to accurately measure the distances.