Antifreeze volume in the car
The first thing you need to know is how much antifreeze can be poured into a VAZ 2107 so that it works stably. For cars of brands such as VAZ 2101, 2105, 2106 and VAZ 2107, the volume of fluid is the same - 9.85 liters, it must be replaced every two years. Replacing antifreeze on a VAZ 2107 occurs in the following way:
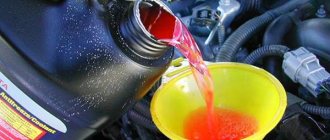
The first thing you need to pay attention to is the cooling system; if it is clogged, it needs to be washed with special products or water. Next, you need to take a spanner wrench and a container of at least ten liters to drain the old car fluid
It is very important that the radiator is cold when replacing, since antifreeze is a harmful substance, and when heated it also becomes very toxic.. https://www.youtube.com/embed/mHA79B8GhnY
The volume of coolant in a VAZ 2107 can reach up to ten liters. Antifreeze is suitable for the engine cooling system, as it prevents heat from entering the engine and cools the radiator. The cooled antifreeze is moved to the car engine using a pump. This process continues until engine operation stops. During operation, antifreeze heats up and loses its positive properties, so it must be changed periodically. The process of heating the antifreeze occurs when the car travels a distance of about 60 thousand kilometers.
Replacement frequency, what antifreeze to fill
According to the manufacturer's recommendation, it is necessary to replace antifreeze or antifreeze on VAZ 2105 cars every 2 years or after a mileage of 60 thousand kilometers. If the car is used in more severe conditions, then it is advisable to replace it more often - every 30-40 thousand kilometers.
In addition to the recommended coolant change intervals, there are other reasons why it is necessary to change the fluid in a car's cooling system:
- Loss of properties. You can check the quality of the antifreeze used using a test strip, which is sold in the same places where the liquid itself is sold. Place the strip in the expansion tank, then pull it out. The strip comes with a color scale, according to which you can understand how much longer the car can be used before replacing the coolant.
- Change in color to red or red. This means that rust has appeared in the composition.
- The appearance of sediments, flakes and dense formations.
In all cases, it is necessary not only to replace, but also to check the entire engine cooling system for serviceability.
As a coolant for the VAZ 2105, you can use good Lukoil antifreeze. Or a lesser-known but high-quality product from Gazprom Neft. When replacing, you can also fill in antifreeze, preferably with G12 approval, it is safer for the entire system. You can also use original Lada G12 antifreeze, which is suitable for all cars of this manufacturer.
How much antifreeze is in the cooling system, volume table
| Model | Engine capacity | How many liters of antifreeze are in the system | Original liquid / analogues |
| VAZ 2105 | 1.5 | 9.8 | Antifreeze Lada G12 |
| Antifreeze Gazpromneft | |||
| Antifreeze Lukoil |
Video “Draining the coolant”
Good afternoon, today we will tell you how to independently replace the coolant in a VAZ-2107 (or any other classic). There is nothing complicated in the procedure for replacing antifreeze in the engine cooling system, the main thing is to adhere to the following recommendations - perform the operation of draining the antifreeze only on a cold engine, you can on a warm one, but in no case on a hot one, this is dangerous, just trying to unscrew the radiator neck cap If it's hot, it can cause burns. So let's get started. We will assume that the engine has already cooled down and we are ready to drain the coolant. We will need a 13 key to unscrew the plug on the block and a 22 key to unscrew the plug or sensor at the bottom of the radiator, depending on the model and configuration of your classic. We also need the antifreeze itself, we used the following coolant:
First of all, unscrew the cap on the radiator neck. Then the antifreeze will drain much faster.
Then unscrew the coolant temperature sensor at the bottom of the radiator:
Or a faucet, depending on the modification of your car (different classic models use different types of radiators)
After the antifreeze has drained from the radiator, or without even waiting for it to finish, unscrew the 13 plug on the block with a wrench:
After all the coolant has drained from both the block and the radiator, we screw back the sensor (plug) and the plug on the block, pull it through carefully, and proceed to filling in new antifreeze. We fill it through the filler neck on the radiator. And here’s another little secret - in order to avoid air locks after filling in new coolant, you need to unscrew and throw off this hose, shown below in the photo:
and pour antifreeze into the system until excess coolant begins to drain from it. That's all, congratulations, you have learned how to change the coolant in your classic, and you have learned how to do this without air locks in the system. If you still have any questions about this procedure, we are waiting for you in our VAZ classic club on the forum.
Sources
- https://zarulemvaz.ru/zamena-tosola-oxlazhdayushhej-zhidkosti-na-vaz-2101-2107/
- https://avtozam.com/vaz/2106/zamena-ohlazhdayushhey-zhizhi/
- https://www.vazdriver.ru/zamena_tosola/zamena_ohlazhdayushchey_zhidkosti_tosola_na_vaz_klassike.html
VAZ 2105 | Typical malfunctions in the engine cooling system
| CAUSE | SOLUTION METHOD |
| Engine overheating (according to temperature gauge) | |
| Low coolant level | Restore the level. |
| Loose fan belt | Adjust the belt tension. |
| Clamping of hoses | Replace hoses. |
| There is no air flow to the radiator | Clean the radiator or remove obstacles (fog lights, etc.) |
| Radiator filler cap is faulty | Replace the plug. |
| Incorrect ignition timing setting | Adjust. |
| Low idle speed | Adjust. |
| Formation of air pockets in the cooling system | Remove the air. |
| Difficult driving conditions | Periodically set the engine to high idle speed to improve cooling. |
| Incorrect installation of cooling system parts | Install the parts. |
| Thermostat is faulty | Replace. |
| Pump roller failure or impeller failure | Replace the pump. |
| Radiator clogged | Flush the radiator. |
| Clogged cooling system channels | Flush the system. |
| Scale deposits in cooling channels | Repair or replace the cylinder block. The scale will be visible when removing parts of the cooling system or when removing channel plugs. |
| Wheels do not release the brakes completely | Have your brakes repaired. |
| Increased friction in engine parts | Repair the engine. |
| Antifreeze concentration exceeds 68% | Restore the normal composition of the coolant. |
| Air seal failure | Repair seals. |
| Sensor or pointer malfunction | Repair or replace the faulty device. |
| Loss of coolant due to leakage or foaming | Change fluid, repair or replace faulty parts. |
| The engine does not warm up to normal temperature | |
| Thermostat is faulty | Replace. |
| Sensor or pointer malfunction | Repair or replace the faulty device. |
| Coolant loss (blowout) | |
| Fluid level is higher than normal | Restore the level. |
| Stopping the engine immediately after driving | Run the engine at fast idle for a short time before stopping. |
| Formation of air pockets in the cooling system (sometimes there is an “eruption” of liquid) | Remove the air. |
| Insufficient antifreeze concentration, resulting in a lower boiling point | Restore the normal composition of the fluid. |
| Antifreeze aging or contamination | Replace the fluid. |
| Leaks due to loose hose clamps, fasteners, drain plugs, faulty hoses or radiator | Perform pressure testing of the system and find leaks and repair. |
| Damage to the cylinder head gasket | Replace the gasket. |
| Cracks in the cylinder head, intake manifold or cylinder block | Replace faulty parts. |
| Radiator filler cap is faulty | Replace the plug. |
| Coolant getting into the oil (cylinder block) | |
| Damage to the cylinder head gasket | Replace the gasket. |
| Cracks in the cylinder head, intake manifold or cylinder block | Replace faulty parts. |
| The fluid level is not restored | |
| Low fluid level | Top up to the FULL mark. |
| Leak in the cooling system | Perform pressure testing of the system and find leaks and repair. |
| The radiator cap does not close tightly, the gasket is damaged or missing | Repair, replace gasket. |
| Radiator cap is faulty | Replace. |
| The expansion tank tube is clogged or leaking | Eliminate defects. |
| The expansion tank vents are clogged | Clean it. |
| Noises | |
| The fan impeller catches on the casing | Adjust the position of the casing, check the condition of the engine mounts. |
| Loose impeller on the pump shaft | Replace the pump. |
| Worn (drive belt slips) | Replace or lubricate the belt with silicone lubricant. |
| Loose fan belt | Adjust the belt tension. |
| Pulley roughness | Replace the pulley. |
| Pump bearing wear | Remove the belt and check that the noise is coming from the pump. Replace the pump. |
| Pulley planes are shifted (belt misalignment) | Check the alignment of the pulley planes. Repair if necessary. |
| No fluid flows into the heater radiator | |
| Deformation of the pump inlet pipe | Eliminate. |
| Kink in heater radiator hoses | Remove kinks or replace hose. |
| Deformation of the heater radiator pipe or channels | Repair or replace the radiator. |
| Thermostat outlet pipe is clogged or pinched | Remove scale or remove squeezing. |
| Clogged suction manifold bypass hole | Clean it. |
| Heater valve is faulty | Replace the faucet. |
| Clogged coolant channel in the suction manifold | Clean or replace the manifold. Immediately after stopping, the engine goes into a state of “thermal run-off” of the fluid. Rare manifestations of this effect are allowed. |
automn.ru
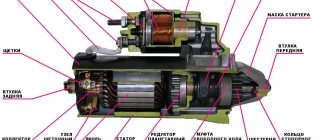
Device
The first place where the fluid begins its flow is the radiator. On VAZ 2106 models, two types of radiators were installed - copper and aluminum. The first one is of higher quality, and if cracks appear on its surface, they can easily be welded. In contrast, any crack on an aluminum part is its certain death.
The radiator figuratively consists of three parts: the upper barrel, the cooling honeycomb and the lower barrel. The upper tank has a filler neck for adding coolant. During operation, hot liquid that has gone through one cycle is collected in this tank. Further, it descends into the lower barrel, through the honeycombs, simultaneously being cooled by a fan. And in the lower tank, the liquid is already completely cooled and ready for use.
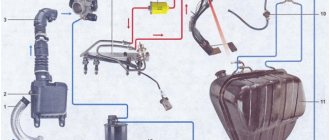
Tubes are connected to the radiator from above and below: two wide and one narrow. A narrow tube connects the radiator to an expansion barrel, designed to allow excess liquid to enter it during heating and expansion. The upper wide tube connects the part to the thermostat, which, in turn, uses a valve to regulate the flow of coolant. Fluid can flow from the thermostat either back to the engine cylinder block or to the radiator.
For forced circulation, the system includes a pump that pumps antifreeze, creating pressure inside the block. Between the cylinders, a specially made void is provided, where this liquid enters.
VAZ 2105 | Cooling system
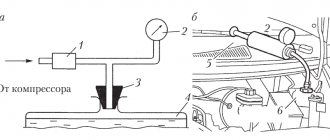
Cooling system design
| 1 – fluid drain pipe from the heater radiator; 2 – pipe for discharging hot liquid from the cylinder head into the heater radiator; 3 – thermostat bypass hose; 4 – outlet pipe of the cooling jacket; 5 – radiator supply hose; 6 – expansion tank; 7 – cooling jacket; 8 – radiator cap; | 9 – radiator tube; 10 – fan casing; 11 – fan; 12 – pulley; 13 – radiator outlet hose; 14 – fan belt; 15 – coolant pump; 16 – hose for supplying coolant to the pump; 17 – thermostat |
The cooling system is liquid, closed type, with forced circulation of liquid, with an expansion tank.
The coolant pump is of centrifugal type, driven from the crankshaft pulley by a V-belt 14.
Fan 11 has a four-blade impeller, which is bolted to hub 5 (see Fig. Longitudinal section of the coolant pump ) of pulley 8, driven by the pump drive belt.
The thermostat with a solid heat-sensitive filler has a main 9 (see Fig. Thermostat ) and a bypass 2 valves. The opening of the main valve begins at a coolant temperature of 77–86 ° C, the stroke of the main valve is at least 6 mm.
The radiator is vertical, tubular-plate, with two rows of tubes and tinned steel plates. The filler plug 8 contains inlet and outlet valves.
automn.ru
The procedure for replacing coolant in
Before you start draining the old coolant, you need to move the heating valve control lever inside the car to the extreme right position (the valve is open Photo No. 1). Unscrew the expansion tank cap and the radiator filler cap.
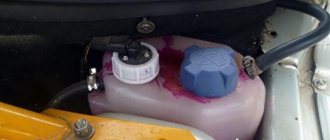
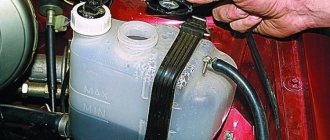
Expansion tank
In the lower corner of the radiator we find the drain plug (photo 2), unscrew it and drain the liquid into a previously prepared container.
On old-style radiators there is no such plug. Instead, using the key set to “30”, you will have to unscrew the fan switch sensor. Also on the engine block, we find it and use the key to “13” to unscrew the drain plug (photo 3).
After the liquid has been drained, screw the drain plugs into place. And in order to avoid the formation of an air lock in the system, use a screwdriver to loosen the clamp and remove the rubber hose from the intake manifold fitting.
That's it, you can fill in antifreeze. As soon as liquid begins to flow out of the fitting, you can put a hose on it and tighten the clamp. Afterwards, completely fill the radiator and tighten the cap. Next, pour antifreeze into the expansion tank, the optimal level is 3-4 cm above the “MIN” mark.
We start the engine and warm it up to operating temperature. After that, turn off the engine and check the coolant level again. If necessary, add antifreeze.
If the car's cooling system is dirty, it should be washed with water or special products. The flushing procedure is the same as when replacing the fluid - drain, fill and dilute, start the engine for a few minutes and drain. And so on several times until you see clean water flowing from the radiator and engine block.
Engine cooling systemThe engine cooling system is liquid, closed type, with forced circulation of liquid. System capacity 9.85 liters.
The cooling system includes: pump 36, radiator, expansion tank 8, thermostat 38, four-blade fan 19 with casing 18, cooling jacket of the block and cylinder head, pipelines and hoses. The system is filled with TOSOL A-40 or TOSOL A-65 coolant - an aqueous solution of TOSOL-A antifreeze (concentrated ethylene glycol with anti-corrosion and anti-foaming additives with a density of 1.12-1.14 g/cm3); TOSOL A-40 is blue in color with a density of 1.075-1.085 g/cm3, has a crystallization onset temperature of 40°C, TOSOL A-65 is red in color with a density of 1.085-1.095 g/cm3, and has a crystallization onset temperature of -65°C. When the engine is cold, the fluid level should be 3-4 cm above the MIN mark on the expansion tank. It is necessary to add distilled water or TOSOL-A antifreeze to the expansion tank, depending on the density of the liquid in the system. Checking the density of the liquid is carried out with a densimeter during vehicle maintenance. To monitor the coolant temperature, a sensor is installed in the cylinder head, and an indicator is located on the instrument panel. Under normal thermal conditions of the engine, the indicator arrow should be located at the beginning of the red field of the scale within +80- +100 ° C. Increased thermal conditions of the engine can be caused by problems in the cooling system (insufficient amount of coolant, weakening of the fan belt tension, thermostat malfunction) or difficult driving conditions (driving on sand, steep, protracted ascent, towing, etc.). Liquid is drained from the cooling system through drain holes closed with plugs: one in the left corner of the lower radiator tank, the other in the cylinder block, on the left in the direction of travel of the car. When the engine is running, the liquid heated in the cooling jacket through the outlet pipe 6 through hoses 5 and 7 enters the radiator or thermostat 38 for cooling, depending on the position of the thermostat valves. The cooled liquid is directed by pump 36 through hose 37 into the cooling jacket.
The car's interior heater is connected to the cooling system. The heated liquid from the cylinder head flows through hose 40 through a tap into the heater radiator and is sucked off by pump 36 through hose 41 and tube 39.
Water pump (pump)
Centrifugal pump. The body 30 and the cover 25 are cast from aluminum alloy. In bearing 24, which is locked in the cover with screw 28, a roller 27 is installed. The roller bearing is double-row, non-separable, without an inner race. The role of the inner race is performed by the roller. The bearing is filled with grease during assembly and is not subsequently lubricated. A cast iron impeller 31 is pressed onto the roller 27 at one end, and the hub 26 of the fan and pump drive pulley is pressed onto the other end. The end of the impeller 31, in contact with the sealing ring, is hardened with high frequency currents to a depth of 3 mm. The pump seal is non-separable and consists of an outer brass race 23, a rubber cuff 29 and an O-ring made of a graphite composition. The sealing ring is pressed through the cuff to the end of the impeller. The oil seal is pressed into the pump cover.
The pump housing 30 has an inlet pipe 32 and a window on the side of the cylinder block for supplying coolant to the pump.
Fan
Fan 19 is four-blade, made of plastic and secured with three bolts to the pump shaft hub together with the drive pulley. The fan blades are made with a variable installation angle along the radius and, to reduce noise, with a variable pitch along the hub. For efficient operation, the fan is located in a casing 18 made of polypropylene. The casing is secured with four bolts to the radiator brackets. The fan is driven from the crankshaft pulley by a V-belt. The belt is tensioned by turning the generator. Under normal tension, the belt deflection at a force of 100 N should be within 10-15 mm.
Radiator and expansion tank
The radiator is tubular-plate with two rows of brass tubes, consists of upper and lower tanks 14 and 33, tubes 16 and tinned cooling plates 17. The radiator is mounted on two rubber supports 21 and secured with four bolts to the front of the body. The radiator filler neck 15 is closed by a plug 11 and connected by a hose 10 to a translucent plastic expansion tank 8. The radiator plug has an inlet 13 and an outlet 12 valve. The inlet valve has a gap (0.5-1.1 mm), through which, when the liquid is heated and cooled, coolant enters and releases into the expansion tank. When the liquid boils or the temperature sharply increases, the throughput of the inlet valve is not enough, and under the influence of increased pressure the valve closes, disconnecting the system from the expansion tank. The exhaust valve 12 opens and part
coolant flows into the expansion tank. The expansion tank is closed with a plug with a rubber valve that operates at pressure close to atmospheric.
Thermostat and cooling system operation
The thermostat serves to maintain the required thermal operating conditions of the engine. The thermostat consists of a body 46, a cover 49, which are rolled together with the seat of the main valve 44, a pipe 41 for inlet of cooled liquid from the radiator, a pipe 47 of the cylinder head bypass hose and a pipe 48 for supplying cooled liquid to the pump. A rubber insert 42 is rolled into the glass, pressed into the main valve 44. The rubber insert contains a polished steel piston 50, which is mounted on a stationary holder. A heat-sensitive solid filler is placed between the walls of the glass and the rubber insert. The main valve 44 is pressed against the seat by a spring. There are two posts attached to the main valve, on which a bypass valve 45 is installed, pressed by a spring. When the coolant temperature is below 80° C, the main valve 44 is closed, the bypass valve 45 is open. In this case, the coolant circulates from the cooling jacket of the cylinder head through hose 5 through the thermostat bypass valve into the pump and then into the cooling jacket of the cylinder block, minus the radiator (the fluid circulates in a small circle). This ensures quick warm-up of the engine. If the liquid temperature is above 94 ° C, the solid filler of the thermostat expands, compresses the rubber insert 42 and pushes out the piston 50, moving the main valve until it is fully open, and the bypass valve until it closes. In this case, the liquid circulates in a large circle: from the cooling jacket of the cylinder head through hose 7 to the radiator and then the cooled liquid through hose 34 through the main thermostat valve enters the pump and cooling jacket. Within the temperature range of 80-94° C, the liquid circulates in small and large circles (the valves are in intermediate positions). The opening value of the main valve ensures the gradual addition of cooled liquid in the radiator and the best thermal operating conditions of the engine. The starting temperature of the main thermostat valve should be in the range of 80.6-81.5 ° C, the valve stroke should be at least 6.0 mm. The simplest check of the thermostat operation can be done by touch directly on the car. After starting a cold engine with a working thermostat, the lower radiator tank begins to heat up when the liquid temperature gauge needle is approximately 3-4 mm from the red zone of the scale, which corresponds to 80-85 ° C.
1. Pipe for discharging hot fluid from the cylinder head to the heater radiator. 2. Air filter. 3. Fluid drain hose from the intake manifold. 4. Carburetor. 5. Thermostat bypass hose. 6. Cooling jacket outlet pipe. 7. Radiator inlet hose. 8. Expansion tank. 9. Tank cap. 10. Hose from the radiator to the expansion tank. 11. Radiator cap. 12. Plug outlet valve. 13. Plug inlet valve. 14. Upper radiator tank. 15. Radiator filler neck. 16. Radiator pipe. 17. Radiator cooling plate. 18. Housing, fan. 19. Fan. 20. Fan and coolant pump drive pulley. 21. Rubber radiator support. 22. Hairpin. 23. Oil seal cage. 24. Pump roller bearing. 25. Pump cover. 26. Fan pulley hub. 27. Pump roller. 28. Locking screw. 29. Oil seal, 30. Pump housing. 31. Pump impeller. 32. Pump inlet pipe. 33. Lower radiator tank. 34. Radiator outlet hose. 35. Fan belt. 36. Coolant pump. 37. Coolant supply hose to the pump. 38. Thermostat. 39. Fluid drain pipe from the heater radiator and carburetor to the coolant pump. 40. Fluid supply hose to the heater radiator. 41. Fluid drain hose from the heater radiator. 42. Insert. 43. Inlet pipe (from the radiator). 44. Main valve. 45. Bypass valve. 46. Thermostat housing. 47. Overflow hose connection. 48. Hose connection for supplying coolant to the pump. 49. Thermostat cover. 50. Piston of the working element.
Read more about VAZ 2105...
Read about all cars and vehicles
Possibility of tuning the VAZ 2107 cooling system
You can increase the efficiency of the VAZ 2107 cooling system in various ways. Someone installs a fan from a Kalina or Priora on the radiator, someone tries to better heat the interior by adding an electric pump from a Gazelle to the system, and someone installs silicone pipes, believing that with them the engine will warm up faster and cool down. However, the feasibility of such tuning is highly questionable. The cooling system of the VAZ 2107 itself is quite well thought out. If all its elements are in good working order, the engine will never overheat in the summer, and in winter the cabin will be warm even without turning on the heater fan
To do this, you only need to periodically pay attention to system maintenance, namely:
- fill only high-quality coolant into the engine;
- change the coolant every 50 thousand km with a complete drain and flushing of the system;
- monitor the coolant level and add it if necessary;
- When topping up, never mix antifreeze with antifreeze;
- When replacing faulty elements, use only high-quality certified parts.
Thus, the cooling system of the VAZ 2107 is quite reliable and simple. However, it also needs periodic maintenance, which even an inexperienced car enthusiast can perform.
Fuse and relay diagram 2105
Until 1988, the fog lamps in the rear lights and the fog lamp warning lamp were protected by fuse 17 of the mounting block. Since 1988, they began to be protected by a separate fuse, which is located in a plastic case in the wiring harness near the car's fog light switch.
Mounting block 2105-3722010-02
Mounting block 2105-3722010-08
Mounting block diagram 2105-3722010-08
K1 Relay for turning on the heated rear window K2 Relay for turning on the headlight washer cleaners K3 Relay for turning on the sound signal (jumper) K4 Relay for turning on the electric fan motor K5 Relay for turning on the high beam headlights K6 Relay for turning on the low beam headlights
Malfunctions and testing of the VAZ-2107 thermostat
Malfunctions:
- does not open at all or opens partially - leads to engine overheating;
- does not close - the engine heats up slowly after a cold start, the engine does not reach operating temperature.
To find out the functionality of the thermostat, you should check at what temperature its main valve begins to open, as well as the stroke of this unit. Since the thermostat itself is mounted in a non-separable housing, this can only be done accurately using special equipment (for example, the BS-106.000 stand).
The simplest check of the VAZ-2107 thermostat can be performed directly on the car by touch.
In the case of a working thermostat, after starting a cold engine, the lower radiator tank should not heat up immediately, but when the arrow on the coolant temperature gauge is 3–4 mm from the red scale zone, which corresponds to 80–85 °C.
If the radiator starts to heat up immediately, this means that the thermostat is not closing. If it’s later, its valve gets stuck. An overheating engine can be evidence of insufficient valve travel when it does not open completely. In all cases, the thermostat must be replaced.
How to drain antifreeze correctly?
In order to drain the antifreeze, it is not enough to simply turn off the taps. To begin with, you need to understand that antifreeze is a toxic substance, which means it can pose a danger to humans if handled incorrectly. In this regard, there are a number of rules that must be followed:
- Under no circumstances should you drain antifreeze onto the floor in your garage or yard. Since this substance is toxic, its fumes can enter the human respiratory system. Do not underestimate the chemical composition of antifreeze. After all, one glass of such “muck” can easily kill a person.
- As you already understand, you should not allow antifreeze to get into your mouth. Many drivers do a very dangerous test when determining the type of liquid poured into the expansion tank: they dip their finger into this tank and then try it with their tongue. If it was sweet, then it is 100% antifreeze, and if not, and it gives off scale, then it is the most ordinary water, which has already been overheated more than once.
- If antifreeze gets into your eyes, hands or other parts of the body, be sure to rinse these areas under running cold water and call a specialist doctor. Do not forget that antifreeze is, first of all, poison for humans, and only then a coolant for the engine.
- After completing work related to repairing the cooling system, you must thoroughly wash your hands. In addition, it is strictly prohibited to eat anything while performing this work.
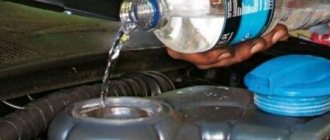
To properly drain the antifreeze, you need to prepare an empty container with a capacity of at least 10 liters. The most desirable condition is the presence of a wide cavity and not a deep bottom. The fact is that there is not enough space under the car in height, but there is enough width. That is why many drivers use the most ordinary aluminum trough for these purposes.
https://youtube.com/watch?v=S4_K9uth77w
As soon as you have prepared everything you need, place the car on a flat surface, or best of all, on an inspection hole and place a trough under the radiator. Open the hood and unscrew the cap from the expansion tank. This is necessary to make it easier for the liquid to come out. After this, unscrew the tap located on the radiator.
If you have an old-style copper radiator installed, then this tap acts as a fan activation sensor and is designed for a 30 wrench. To remove it, you first need to disconnect the contact wires from it and then unscrew it. Now all that remains is to wait until all the coolant has completely drained out of the radiator. To speed up this procedure, you can shake the front of the car.
Next in line is the cylinder block. On the side of the spark plugs there is a special drain bolt of 13, which must also be unscrewed. But before you do this, you must first move the trough under the engine and then unscrew the bolt. Wait until the old antifreeze drains from the engine and move the trough to the side. Screw all drain valves and plugs into place.
Antifreeze or antifreeze for VAZ-2109 and other models
Now let's look at this situation on more modern cars. So, what is better - Antifreeze or antifreeze for the VAZ 2109. Similar questions can also be included here: VAZ-2114 - Antifreeze or antifreeze, VAZ 2115 - Antifreeze or antifreeze.
The situation with these cars is similar to the VAZ-2107 model. That is, antifreeze is standard for these cars, but it is also possible to use antifreeze, but only of certain brands.
Replacing fluid on a VAZ-2110
As for the replacement procedure, let's look at how to replace Antifreeze with VAZ-2110 antifreeze or vice versa:
- The car is installed on the platform and cooled;
- The expansion tank cap is removed, the heater tap is opened, the plugs on the radiator and crankcase are unscrewed, and the waste fluid is drained into a container;
- The plugs are installed in place and flushing liquid or distillate is poured into the system. The engine starts to circulate the fluid;
- The flushing fluid is drained, and then fresh antifreeze or antifreeze is added;
On other specified models, the operation is performed similarly.
And as a result, we note that antifreeze is still better than Antifreeze in its properties, but it also costs more. If you want to take better care of your car, then you should fill it with antifreeze, but only of the appropriate brand. But a feature of our automobile industry is the possibility of system leakage, and replenishing the level of antifreeze can be expensive.
Antifreeze also does a good job, but it needs to be changed more often, but it costs less.
Leaks and problems
Cars of this model sometimes have problems associated with the failure of some parts of the cooling system, such as a thermostat or pump. If they break down, they are replaced as an assembly, fortunately they are not expensive. Also, leaking hoses or a cracked expansion tank are considered a common problem, which also needs to be replaced.
But there is another problem with the VAZ 2105, a leaking heater valve. Because of this, there may be a smell of antifreeze in the cabin, wet floor mats on the front passenger side, or the heater may not work.
In cases of boiling or seething antifreeze in the expansion tank, you need to pay attention to 2 things. This is either an air lock or a broken cylinder block gasket.
When determining the problem, in the first case the stove will blow cold. In the second case, there will be either oil in the antifreeze or light smoke from the exhaust pipe.
December 30, 2011
The car is a VAZ 2105 and the coolant is replaced according to the technical inspection card, which in turn neatly hints that the fluid should be changed every 60,000 km. mileage or every two years of vehicle operation. The basic properties of the liquid, namely its ability to withstand low temperatures, as well as anti-corrosion properties, are achieved by adding inhibitory additives to its composition.
If during operation you notice that the liquid has changed its color from bluish or greenish to an orange tint, then it must be changed without delay in the near future, since this is a direct indication that the additives included in its composition have reacted with others chemicals and have lost their anti-corrosion properties. This usually happens when mixing liquids from different manufacturers with different compositions and characteristics (use liquids recommended by the manufacturer).
The procedure for replacing coolant in a VAZ 2105 is as follows:
- We drive the car onto a viewing hole or overpass and remove the engine protective splash guard. You don’t have to remove the splash guard, but to do this you need to come up with either an extension cord to place under the plug, or a large funnel, otherwise the liquid will spill and get on the skin, but it is poisonous and if it gets on the skin, wash it off with warm soapy water.
- Inside the car, you need to open the heater tap, moving the handle to the extreme position so that the liquid drains from the heating radiator of the five.
- We drain the liquid into a previously prepared container by unscrewing the drain plugs in the lower part of the cylinder block and the radiator. You must first unscrew the cap of the radiator and expansion tank so that a vacuum does not form inside the system.
- We drain all the liquid in this simple way, after which we drain the remainder from the expansion tank by unscrewing its fastening and turning it over. We tighten the drain plugs of the radiator and cylinder block.
We pour new antifreeze through the neck of the radiator to the bottom edge, then screw on the cap and add liquid to the expansion tank to the maximum mark. To prevent an air lock from forming in the system during topping up, it is necessary to periodically squeeze the pipes by hand, like a rubber bulb. At this point, the repair work to replace the coolant in the VAZ 2105 has been completed.
Heat removal mechanism repair
Before you begin repairing the cooling system, you need to find out the volume of liquid poured into it. But even completely draining the old antifreeze, it will not be possible to fully establish the exact figure. To do this, it is still recommended to refer to the vehicle’s operating manual, where all the necessary regulations and parameters are indicated.
The manufacturer assures that the working volume of the VAZ-2106 engine cooling system is nine liters, but it is worth considering that you need to add about a liter to this volume in order to add antifreeze to the expansion tank to the minimum mark. In addition, a thrifty and prudent driver must have a spare liter container of coolant in the trunk.
Cooler drain
Before any operation on the cooling system, you must first allow the engine to cool to avoid serious injury.
Then the liquid filling the system will need to be drained. To do this correctly, you have to figure out how it works. The cooling system has two stages of operation. They can be called cycles and divided into two circles:
- Big.
- Small.
The small circle is limited by the engine itself and some pipes, and it is intended to ensure that the engine quickly reaches the temperature necessary for proper operation
This is important so that the fuel mixture burns more efficiently with a higher efficiency. When the temperature rises to a certain point, a special valve opens, releasing liquid in a large circle
The purpose of this cycle is to directly cool to an acceptable temperature.
The large circle includes a radiator with a fan, which is turned on by a special thermostat and the air flow cools the system and the engine. All liquid is driven by a pump or pump. It also creates the required pressure in the cooling system.
First of all, the antifreeze is drained from the large circle through the radiator, in the left corner of which there is a special drain valve. To do this, you need to prepare a special container with a wide neck. Then a special plug is unscrewed from the engine itself and drainage occurs from the small circle, that is, directly from the engine.
Correct refilling with antifreeze
After completing the necessary work, all drain holes are closed, and the pipes are put in place, and the VAZ-2106 antifreeze is replaced. The liquid that was drained into the container can be reused by carefully filtering it through cheesecloth before doing so. The cooling system is refilled through the expansion tank.
Before refueling, it is necessary to measure the required amount in order to control the filling of the system. After the engine warms up, the liquid will again leave the expansion tank, which will mean filling a large circle with antifreeze. Next, all that remains is to add the missing liquid to the minimum mark. Overflowing above the level is not recommended, since antifreeze expands when heated, and the pipes or expansion tank may not withstand the pressure created by the pump! After refueling is completed, you must ensure that the cooling system is tight and there are no leaks.
The operation of replacing the coolant in a VAZ-2106 is not that complicated, but it will help you save some time, money, and most importantly, you will have confidence that the work was done efficiently.
Repair of VAZ 2105 (Zhiguli): Refilling the cooling system with liquid
- Repair manuals
- Repair manual for VAZ 2105 (Zhiguli) 1980-1992.
- Filling the cooling system with liquid
Refueling is carried out when changing the coolant or after engine repair.
Perform refueling operations in the following order.
| EXECUTION ORDER |
Download information from the page↓ Comments ↓1. Vehicle operation 1.0 Vehicle operation 1.1. Starting the engine 1.2 Controlling the gearbox 1.3 Driving the vehicle 1.4 Braking and parking 1.5 Operating a new vehicle 1.6 Adjusting the ignition timing 1.7 Precautions when operating the vehicle 1.8 Caring for the body 1.9 Storing the vehicle 2. Car maintenance 2.0 Car maintenance 2.1 Maintenance operations 4. Engine 4.0 Engine 4.1 Possible malfunctions, their causes and methods of elimination 4.2 Removing and installing the engine 4.3 Disassembling the engine 4.4 Assembling the engine 4.5 Bench tests of the engine 4.6 Checking the engine on the car 4.7. Cylinder block 4.8. Pistons and connecting rods 4.9. Crankshaft and flywheel 4.10. Cylinder head and valve mechanism 4.11. Camshaft and its drive 4.12. Cooling system 4.13. Lubrication system 4.14. Power system 4.15. Carburetor 2105-1107010 4.16. Carburetor 21051-1107010 5. Transmission 5.0 Transmission 5.1. Clutch 5.2. Gearbox 5.3. Cardan transmission 5.4. Rear axle 6. Chassis 6.0 Chassis 6.1. Front suspension 6.2. Rear suspension 6.3. Shock absorbers 7. Steering 7.0 Steering 7.1 Possible malfunctions, their causes and methods of elimination 7.2. Inspection, check and adjustment of the steering 7.3. Steering gear 7.4 Steering gear rods and ball joints 7.5 Bracket for pendulum arm 8. Brakes 8.0 Brakes 8.1 Possible malfunctions, their causes and methods of elimination 8.2. Checking and adjusting the brakes 8.3 Clutch and brake pedal bracket 8.4 Vacuum booster 8.5. Main cylinder 8.6. Front brakes 8.7. Rear brakes 8.8. Rear brake pressure regulator 8.9. Parking brake 9. Electrical equipment 9.0 Electrical equipment 9.1 Possible malfunctions, their causes and methods of elimination 9.2 Circuits protected by fuses 9.3. Battery 9.4. Generator 9.5. Starter 9.6. Ignition system 9.7. Lighting and light signaling 9.8. Sound signals 9.9. Windshield cleaner 9.11. Heater fan electric motor 9.12. Control devices 9.13. Carburetor pneumatic valve control system 10. Body 10.0 Body 10.1 Possible malfunctions, their causes and methods of elimination 10.2. Doors 10.3. Hood, trunk lid, bumpers 10.4. Body glazing, windshield and headlight glass washers 10.5 Instrument panel 10.6. Seats 10.7. Heater 10.8. Body frame repair 10.9. Paint coatings 10.10. Body anti-corrosion protection 11. Car modifications 11.0 Vehicle modifications 11.1. Features of repair of VAZ-21051 and VAZ-21053 cars 11.2. Features of repair of VAZ-2104 and VAZ-21043 cars 11.3 VAZ-21044 cars with a fuel injection system 11.4. Central fuel injection system design 12. Electrical circuits 12.0 Electrical diagrams 12.1 Interactive electrical diagram of the VAZ-2105 car 12.2 Electrical diagram of the VAZ-2104 car 12.3 Electrical connection diagram of the injection system 12.4 Connection diagram of the instrument cluster 12.5 Connection diagram of the brake system warning lamps 12.6 Connection diagram of the headlight cleaners and washers 12.7 Connection diagram of the heater fan motor 12.8 Diagram inclusion windshield cleaner and washer 12.9 Diagram for switching on direction indicators and hazard warning lights automend.ru |
Principle of operation
The main place in a car is not the driver’s seat or even the steering wheel, but the engine.
It is even called the heart. And this is not without reason, because the correct functioning of this heart directly determines whether the car will go or not. And in order not to destroy such an important technical unit, it is necessary to maintain a certain temperature and cool it in time. The operating principle of this system is quite simple, but at the same time technically well thought out. It is connected by pipes to the engine itself, the radiator and the interior heater
To understand the importance of these elements, you need to know their main functions:
- Maintaining the required temperature.
- Engine cooling.
- Warming up the car interior.
In the first case, for engine operation and proper combustion of the fuel mixture, a certain and stable temperature is required. If it is higher or lower, it has a very bad effect on the engine. In the second case, the engine is protected from overheating, which can lead to deformation of some parts inside.
Types of coolants
To absorb heat and remove it from hot spots in the engine, the system requires coolant. There are several types of cooling liquids:
- Water.
- Antifreeze.
- Antifreeze.
But in the harsh realities of the Russian climate, the use of water as a coolant is impractical.
And it boils away very quickly, having a rather low thermal conductivity. You don’t even need to mention how it affects the occurrence of corrosion. Antifreeze is the most common among domestic car owners, but it has some disadvantages, for example, the formation of an oil film inside the vessels and pipes, which prevents normal heat transfer. Accordingly, heat removal becomes ineffective.
The third option has more pros than cons. Firstly, antifreeze begins to crystallize at very low temperatures, that is, it does not freeze, which is why it got its name. This advantage allows the use of antifreeze even in the Far North. Secondly, the thickness of the oil film formed inside the vessels is very small, thanks to which almost nothing interferes with the transfer of heat. This is achieved due to the fact that antifreeze, unlike antifreeze, is made from organic components.
The main disadvantage of antifreeze is its price, especially if you need to replace the entire fluid. Antifreeze wins here, and it is more rational to use it in car models such as the VAZ-2101 or VAZ-2106. In models of the domestic automobile industry with impressive age and mileage, the cooling system often becomes a sore and vulnerable spot. Therefore, the owners of these cars need to know the principle of operation of the cooler and understand how to repair it, which will help avoid spending on services and auto repairmen.
The thermostat is the boss
Not a very pleasant breakdown, especially if it happens on the road. And if the engine is boiling due to a faulty thermostat, then there is only one way out - to change this element of the system. True, at first you can slightly “reanimate” him; for this you need to apply several sharp blows to his body with something heavy.
But such a “rough” solution may not always help. There will be much more trouble if liquid leaks out of the tank. The thermostat allows the system to switch the circulation of liquid between two circles - large and small. These circles differ in that in the first one a radiator is connected to the cooling process. And if it does not connect, then the liquid boils.
On VAZ 2107 cars, and indeed on all cars of this manufacturer, the thermostat fails in such a way that the antifreeze continues to circulate in a small circle. And even if you turn on the radiator fan with the button, this will not save the situation.
The car still drives poorly, the antifreeze boils, and you won’t be able to immediately understand why this is happening. And the answer is very simple - to increase the life of the thermostat, do not pour running water into the system. Use any antifreeze, in particular antifreeze. The water leaves a large amount of scale, which interferes with the movement of the thermostat element.
Selection of coolant for VAZ 2101 - 2107
First, you need to decide on the type of coolant, as well as the amount that will be sufficient for the car. If you have any questions regarding the quantity, open the instructions, it requires 9.85 liters, which means you need to buy 10 liters of antifreeze or antifreeze. But it’s unlikely that you’ll be able to decide quickly whether antifreeze or antifreeze is better. And then the question arises: “What to fill in?” Antifreeze or antifreeze? There is no consensus.
Personally, I use antifreeze. It has several advantages: it is possible to buy a ready-made solution that can be used immediately. Or concentrate and dilute it with distilled water, in this case it is necessary to maintain a ratio of 50 to 50. There is an article on the site that talks about antifreeze, you can also view information on the Internet.
Regarding the tool... You will need:
a socket wrench set to “13”, a screwdriver, as well as a container into which we will drain the old coolant (a wrench set to “30” may also come in handy).
Replacing the thermostat VAZ-2107
First, the antifreeze is drained from the cooled engine. Using a slotted screwdriver with a thin blade or pliers, loosen the clamp securing the hose supplying antifreeze from the radiator to the thermostat pipe. Disconnect this hose.
Use a Phillips screwdriver or an 8 mm socket wrench to loosen the clamps securing the hoses to the pipes of the cylinder block and pump. Remove the thermostat along with the hoses.
Disconnect the hoses from the thermostat pipes and put them on the new thermostat. Instead of the tape clamps that were on the hoses, they put on worm-drive clamps without tightening them.
The lower pipe of the thermostat is connected to the hose from the radiator. Connect the remaining hoses. All clamps are tightened. Fill in coolant. Start the engine and check for antifreeze leaks and the operation of the new thermostat.
While driving, any engine tends to heat up. The VAZ 2106 engine is no exception. During normal operation of all systems, the operating temperature of the engine should be no more than 85 - 90%. You can find out the temperature using a special sensor located on the instrument panel.
To prevent the engine from overheating, a cooling system is provided. It is filled with antifreeze or antifreeze, which circulates inside the cylinder block, cooling it. You can take a closer look at the cooling system in this article.
Coolant pump (pump)
Centrifugal pump. Housing 1 and cover 6 are made of aluminum alloy. In the double-row ball bearing 2, locked with a screw 5, a pump roller 7 is installed, which acts as the inner race of the bearing. The bearing is filled with lubricant only during assembly and is not subsequently lubricated. The hub 4 of the pump drive pulley 3 is pressed onto the front end of the roller 7, and the pump impeller 9 is pressed onto the rear end. The seal ring 8, made of a graphite composition, is pressed against the end of the impeller, hardened by high-frequency currents to a depth of 2-3 mm. The non-separable oil seal 8 is pressed into the pump cover.
Stages of replacing coolant VAZ 2105
On most classic Lada cars, drainage is provided from the radiator, as well as the engine. But before adding new antifreeze, it is recommended to flush the cooling system to prevent impurities from getting into the new liquid.
During the production of the VAZ 2105, a large number of modifications were produced, which were equipped with various engines. But at the moment the most popular are gasoline versions in carburetor and injector versions.
Before you start replacing the coolant, to avoid getting burned, you need to wait until the engine has completely cooled down. You should also avoid getting antifreeze or antifreeze on the skin, eyes or digestive organs, since the chemical composition of the liquids is toxic.
Coolant drain
Before starting the draining procedure, you should prepare tools, containers for used antifreeze, as well as new liquids for subsequent refilling. If protection is installed under the engine, it can also be removed for convenience.
Next, we perform the procedure for draining the liquid from the VAZ 2105:
- Turn the temperature regulator in the cabin to the maximum position to the right (Fig. 1).
Flushing the cooling system
If there are deposits in the drained liquid or there is a transition from antifreeze to antifreeze, the system should be flushed. To do this you need to do the following:
- Flush the system with plain water through the expansion tank of the VAZ 2105. The plugs must be open;
- tighten the drain plug and bolt;
- fill the system with a flushing agent (you can use Liqui Moly Kuhlerreiniger or Lavr cooling system flush) with distilled water (6-7 liters);
- start the engine. Warm up to 90 degrees;
- leave it idling for 5-10 minutes, depending on the contamination of the system;
- muffle it. Allow the engine to cool to approximately 60 degrees;
- drain the flush using the same steps as removing the old fluid;
- tighten both plugs;
- fill with distilled water to rinse the cooling system;
- start the car and warm up to 90 degrees;
- turn off and let cool to 60 degrees, drain;
- repeat steps 8, 9, 10 and 11 if necessary.
Filling without air pockets
To fill new fluid into the cooling system, you can use the instructions described in the book on car repair and operation. But when doing this, motorists very often end up with air jams.
So, let's start filling it correctly:
- If you have an injector, then remove one of the hoses going to heat the throttle assembly (Fig. 6).
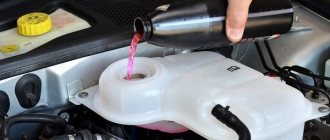
Thus, the filling of coolant without the formation of air pockets is completed. All that remains is to wipe off the spilled antifreeze and wait for the engine to cool. With the car now cooled down, check the level in the expansion tank again and top up if necessary.
Repair of VAZ 2105 (Zhiguli): Cooling system
- Repair manuals
- Repair manual for VAZ 2105 (Zhiguli) 1980-1992.
- Cooling system
Cooling system design
| 1 – fluid drain pipe from the heater radiator; 2 – pipe for discharging hot liquid from the cylinder head into the heater radiator; 3 – thermostat bypass hose; 4 – outlet pipe of the cooling jacket; 5 – radiator supply hose; 6 – expansion tank; 7 – cooling jacket; 8 – radiator cap; | 9 – radiator tube; 10 – fan casing; 11 – fan; 12 – pulley; 13 – radiator outlet hose; 14 – fan belt; 15 – coolant pump; 16 – hose for supplying coolant to the pump; 17 – thermostat |
The cooling system is liquid, closed type, with forced circulation of liquid, with an expansion tank.
The coolant pump is of centrifugal type, driven from the crankshaft pulley by a V-belt 14.
Fan 11 has a four-blade impeller, which is bolted to hub 5 (see Fig. Longitudinal section of the coolant pump ) of pulley 8, driven by the pump drive belt.
The thermostat with a solid heat-sensitive filler has a main 9 (see Fig. Thermostat ) and a bypass 2 valves. The opening of the main valve begins at a coolant temperature of 77–86 ° C, the stroke of the main valve is at least 6 mm.
The radiator is vertical, tubular-plate, with two rows of tubes and tinned steel plates. The filler plug 8 contains inlet and outlet valves.
Download information from the page
↓ Comments ↓
1. Vehicle operation
1.0 Vehicle operation 1.1. Starting the engine 1.2 Controlling the gearbox 1.3 Driving the vehicle 1.4 Braking and parking 1.5 Operating a new vehicle 1.6 Adjusting the ignition timing 1.7 Precautions when operating the vehicle 1.8 Caring for the body 1.9 Storing the vehicle
2. Car maintenance
2.0 Vehicle maintenance 2.1 Maintenance operations
3. General information
3.0 General data 3.1 Technical characteristics of vehicles 3.2. Controls 3.3. Control of interior ventilation and heating 3.4 Tightening torques for threaded connections 3.5 Tools for repair and maintenance 3.6 Used fuels, lubricants and operating fluids 3.7 Basic data for adjustments and monitoring
4. Engine
4.0 Engine 4.1 Possible malfunctions, their causes and methods of elimination 4.2 Removing and installing the engine 4.3 Disassembling the engine 4.4 Assembling the engine 4.5 Bench tests of the engine 4.6 Checking the engine on the car 4.7. Cylinder block 4.8. Pistons and connecting rods 4.9. Crankshaft and flywheel 4.10. Cylinder head and valve mechanism 4.11. Camshaft and its drive 4.12. Cooling system 4.13. Lubrication system 4.14. Power system 4.15. Carburetor 2105-1107010 4.16. Carburetor 21051-1107010
5. Transmission
5.0 Transmission 5.1. Clutch 5.2. Gearbox 5.3. Cardan transmission 5.4. Rear axle
6. Chassis
6.0 Chassis 6.1. Front suspension 6.2. Rear suspension 6.3. Shock absorbers
7. Steering
7.0 Steering 7.1 Possible malfunctions, their causes and methods of elimination 7.2. Inspection, check and adjustment of the steering 7.3. Steering gear 7.4 Steering gear rods and ball joints 7.5 Bracket for pendulum arm
8. Brakes
8.0 Brakes 8.1 Possible malfunctions, their causes and methods of elimination 8.2. Checking and adjusting the brakes 8.3 Clutch and brake pedal bracket 8.4 Vacuum booster 8.5. Main cylinder 8.6. Front brakes 8.7. Rear brakes 8.8. Rear brake pressure regulator 8.9. Parking brake
9. Electrical equipment
9.0 Electrical equipment 9.1 Possible malfunctions, their causes and methods of elimination 9.2 Circuits protected by fuses 9.3. Battery 9.4. Generator 9.5. Starter 9.6. Ignition system 9.7. Lighting and light signaling 9.8. Sound signals 9.9. Windshield cleaner 9.11. Heater fan electric motor 9.12. Control devices 9.13. Carburetor pneumatic valve control system
10. Body
10.0 Body 10.1 Possible malfunctions, their causes and methods of elimination 10.2. Doors 10.3. Hood, trunk lid, bumpers 10.4. Body glazing, windshield and headlight glass washers 10.5 Instrument panel 10.6. Seats 10.7. Heater 10.8. Body frame repair 10.9. Paint coatings 10.10. Body anti-corrosion protection
11. Car modifications
11.0 Vehicle modifications 11.1. Features of repair of VAZ-21051 and VAZ-21053 cars 11.2. Features of repair of VAZ-2104 and VAZ-21043 cars 11.3 VAZ-21044 cars with a fuel injection system 11.4. Central fuel injection system design
12. Electrical circuits
12.0 Electrical diagrams 12.1 Interactive electrical diagram of the VAZ-2105 car 12.2 Electrical diagram of the VAZ-2104 car 12.3 Electrical connection diagram of the injection system 12.4 Connection diagram of the instrument cluster 12.5 Connection diagram of the brake system warning lamps 12.6 Connection diagram of the headlight cleaners and washers 12.7 Connection diagram of the heater fan motor 12.8 Diagram inclusion windshield cleaner and washer 12.9 Diagram for switching on direction indicators and hazard warning lights
automend.ru
Is the problem in the expansion tank?
There may also be a malfunction in it
Please note a few points:
- Are there any cracks in the tank?
- Does the cork allow air to pass freely?
- Are the clamps tightened securely?
- Is the fluid level within acceptable limits?
Only by answering all these questions will it be possible to talk about whether there are any defects in the expansion tank. If there are cracks in it, then antifreeze will leak through them. These are the reasons for the rise in temperature. Injector or carburetor - it doesn’t matter, the expansion tank must be in perfect condition.
The consequence is that you constantly need to top it up, as the level in the expansion tank will begin to drop. A drop in level is the first step towards overheating. Try to keep it between O and MIN.
In this case, only the antifreeze will circulate normally through the system. The reasons for boiling often lie in the little things. For example, the engine boiled after the driver failed to monitor the antifreeze level.