Which cars need to turn on the A/C button on the “heater” in winter, and which ones don’t?
Hello friends.
You can hear a lot of controversy on this topic, and I decided that I also needed to get involved, as they say, to insert my two cents. I think even the lazy person has heard that some car owners and even car mechanics, and sometimes car manufacturers, recommend turning on the air conditioning in winter. And here is one such advice from the manufacturer Renault.
Why are these recommendations given? Many believe that there are at least two reasons for this:
- The first is dehumidification of the air in the cabin, which removes moisture and prevents the windows from fogging, as well as preventing the formation of an unpleasant odor in the cabin heating system
- The second is to prevent the so-called “souring” of the air conditioning compressor clutch, which drives the refrigerant through the system
Each of the above reasons exists, but this cannot be realized on every car. Why, let's figure it out now.
There are two types of compressors
- Many modern cars are equipped with air conditioning compressors that do not have the usual electromagnetic clutch, and in such units there is essentially nothing to “sour”, which means there is no point in turning on the air conditioner in winter for the purpose of “protection against souring.”
- The second type, which implies the presence of an electromagnetic clutch. In this case, enabling the A/C button is preferable to avoid the problems discussed above.
But there is one problem:
Simply starting the compressor by pressing a button will not work at negative temperatures, since the system has a special sensor for this that does not allow this to be done, and this, in principle, is logical. How then?
To start the compressor and let it run for at least 5 minutes, as some of the manufacturers advise, you just need to drive the car into a warm box, garage, or even while washing it indoors, and carry out preventive procedures there.
If in doubt, try turning on the A/C button at sub-zero temperatures and setting the airflow to the coldest possible setting. YES, your button will most likely “turn on”, that is, the backlight will be activated to indicate that it is on, or the A/C icon will be displayed on the display of the climate system unit. But in fact, the compressor will not start, since the temperature sensor will not allow it to turn on.
So, if you want to carry out prevention, put it in a warm place and circulate the refrigerant through the system for 5 minutes; there will definitely be no harm from this, since any unit needs to work from time to time.
How do you know what type of compressor yours is? Visually, this is not always clear, especially if you have never encountered this, so it is better to trust the official operating manual for your car and read what exactly the manufacturer says on this issue.
Would you like to add anything to the article? Then leave your comment below and share your opinion. If the article was useful, like it to support the channel and click on the social media buttons.
If you want to receive even more similar recommendations in your feed, just subscribe to the channel and you will always be aware of the latest and most interesting news from the channel. Thank you, good luck on the roads!
9) PTY-CAT button on Subaru
According to the engineers of the Japanese company, this button is intended for programming the type (type of music genre) of a radio program and for assigning each radio station its own category. But in practice, almost all owners of Subaru cars do not use this key, since the manual says practically nothing about this button, and it is not known how to use it. A typical case is when a car manufacturer equipped a car with the maximum number of buttons, but forgot to indicate in the instructions how to use them and what they are intended for.
Designation of the ACC inscription on the radio
( 4 4.25 out of 5) Loading...
When installing a head unit, car enthusiasts often encounter problems with wire pinout. It’s good if the car owner is well versed in such issues and can independently connect the radio, even with some nuances arising during the installation process. If there is no such experience, then even a small trifle can drive you into a dead end. In this article we will look at what ACC means on a radio and the features of its connection when installing a car radio.
What does ACC mean on the radio?
Power to the car radio is supplied by two wires: power with a voltage of +12V yellow, black with a voltage of -12V. The ACC wire (also called signal wire) acts as a control wire and if it is not powered, the GU will not start. The ACC wire on the radio will be energized when the key is turned in the ignition switch.
The +B power wire has a constant voltage of +12V and allows you to store the necessary information in the car radio's memory (station frequencies, last played track, etc.) Unlike +V with a constant voltage, a signal is supplied to the ACC signal wire only when the head unit is running.
Options for connecting a radio with ACC wire
The first option: the connection method from the cigarette lighter, although it is the simplest, is at the same time not the most optimal type of connection. With this connection, all power wires of the head unit are taken from the cigarette lighter circuit. Scheme in the photo
The cigarette lighter circuit is not designed for additional loads of such power, which ultimately leads to a voltage drop. This especially often occurs when the car radio is under maximum load. Against the backdrop of all the shortcomings, there are also small advantages; the only advantage that can be noted is the ease of connection. This connection option is considered by most craftsmen to be unacceptable and incorrect, and in practical terms it can only be used as temporary measures.
The second option: connect the power +B and signal ACC wires from the ignition switch, and the negative wire comes from the most convenient place. As in the previous version, problems arise with voltage drop and it is worth noting that they manifest themselves even more strongly than when connected from the cigarette lighter. The only positive aspect that remains is the ease of connection, but, as in the previous case, qualified specialists do not recommend connecting the radio in this way.
When connecting using the two methods described above, the following problems are often observed:
- The screen flashes and the head unit turns off completely when turned on at full power;
- when turned off and then turned on, the settings in the car radio are not saved;
- The battery starts to drain quickly, this is especially noticeable when you try to start the car in the morning.
If such problems occur, you should pay attention to the way you connect the head unit, perhaps the reason lies there.
The third method: connect the power wire from the battery through the fuse box, the ACC wire is taken from the ignition switch, and the minus is attached in a convenient and safe place. When connecting the +B wire, it should be connected through a fuse; the fuse can be attached either to the fuse block or separately.
This method is more complex in terms of installation, but more correct in technical terms; it is according to this scheme that most instructions for connecting car radios to these devices are recommended. Among the disadvantages, in addition to the complexity of the connection, it is worth noting the impossibility of operating the power unit with the ignition switch off. This problem is eliminated by introducing additional elements into the connection diagram.
Fourth method: the connection diagram is the same as in the previous method, but here a REM wire and 2 diodes are involved with which we will direct the current in the direction we need.
The principle of operation of this circuit is that when the radio is turned on, the voltage from the REM wire of the amplifier control through diodes goes to the ACC connection and this allows the radio to operate even when the ignition is turned off. The disadvantage of this method is that the car radio can work without your presence, and if this moment is overlooked, then you are guaranteed to have a dead battery.
Fifth method: connection using the central locking alarm control unit.
This method is completely identical to the circuit with two diodes, but here a normally closed five-pin automotive relay is inserted into the gap in the REM wire.
In this type of relay, pin 88, to which one end of the REM wire is connected, is always closed without voltage. We connect the second end of the wire to pin 87. When the contacts are opened, the radio will go out with all settings saved, to start it again you just need to turn the key in the ignition. It is necessary to remove the power wires from the alarm unit to control the central locking and connect them to pins 85 and 86.
When the lock is closed by the central locking alarm unit, a short-term voltage will be applied to the relay, the relay will open and the radio will turn off. But there is one drawback in this scheme: not all radio tape recorders have time to react to a short-term impulse, and to eliminate this problem, you should increase the duration of the alarm block pulse on the alarm unit.
How to connect a radio if there is no ACC wire?
If there is no ACC wire, but you need to connect the radio, you can take one step: connect the power wire to the ACC, which will allow you to use the radio without an ACC wire, but at the same time, the GU will drain the battery much faster. Even a non-working radio will consume many times more energy than when connected to an ACC cable.
Attention!!! When connecting the GU for the first time, be extremely careful when connecting the wires and special attention should be paid to the correct connection of the contacts. Any mistake, be it a bad twist, a short circuit or incorrectly connected contacts, can damage your device.
Climate control 2C-Climatronic
The main difference between the new version of the climate system and Volkswagen is the dual-zone climate control, which led to changes to the device control unit. In particular, both the control panel itself and the methods for setting certain climate control operating modes have undergone changes. Before we describe how to use dual-zone climate control in a Volkswagen car, we will provide a diagram of the location and purpose of the device keys, as well as an indication of the current modes on the climate system display.
- 1 – temperature control button for the driver’s side;
- 2 – a button that enables the automatic mode of maintaining a given microclimate, distributing the air flow forced into the cabin and regulating the fan speed;
- 3 – indicator indicating the user-set temperature on the driver’s side (in the Komfort-Setup service menu it is possible to switch between temperature display in degrees Fahrenheit/Celsius);
- 4 – fan operating mode indicator;
- 5 – button for controlling the fan speed (pressing “+” increases the speed, pressing “–” decreases it);
- keys 6/7/8 are used to select the blowing mode: 6 – blowing the middle part of the cabin, 7 – blowing the upper part of the car, 8 – blowing the foot area;
- 9 – analogous to key 5, but in relation to the right side of the car;
- 10 – indication of fan rotation speed for the right side of the cabin;
- 11 – indicator indicating the user-set temperature on the right side;
- 12 – button to turn on the windshield blowing with outside air to get rid of ice and fogging; when pressed, the previously set recirculation mode is disabled. If the temperature outside the vehicle exceeds +3° C, the car air conditioner automatically turns on to dry the glass, while the fan operates at maximum speed for some time;
- 13 – button for turning on recirculation;
- 14 – key, pressing which activates the automatic recirculation control mode;
- 15 – button for turning on the mode of using residual heat by the climate system;
- 16 – button for turning on the heated rear window;
- 17 – temperature control key for the right side;
- 18 – Climatronic switch off button.
Operation of the climate system in any mode (except for the residual heat mode) is only possible with the ignition on; if the use of air conditioning is required, the ignition on is not enough - you need to start the engine, since the refrigeration unit is powered only from the generator.
10) Engine icon (Check)
Almost every driver at least once in his life has encountered an engine icon called “Check” appearing on the instrument panel. You can find out more about what needs to be done if the “Check” light comes on from our article. Despite the fact that this symbol has an important function, informing the driver that there may be a problem with the engine, it is the most annoying and incomprehensible for any car enthusiast.
After all, there can be any reason for the appearance of the “Check” icon on the instrument panel. Starting from fuel quality and ending with low levels of antifreeze. Most drivers hate this symbol, since it does not provide accurate information about the reasons for its appearance. To establish the reason for the appearance of the “Check”, it will be necessary to carry out a comprehensive diagnosis of many vehicle systems, which will result in unforeseen financial expenses, which naturally causes irritation for any driver. Most of us are accustomed to more accurately identifying the problem when a certain symbol appears on the dashboard.
For example, when the oil icon appears, we know that the engines have low oil levels. When a low brake fluid message appears, we know the problem is in the brake system. But when the “Check” icon appears, the driver will be in the dark until he makes a full diagnosis of the electronic system and checks the car’s engine in a workshop.
Did you like the article? Subscribe to the channel to stay up to date with the most interesting materials
Rules for driving an automatic transmission
Many modern drivers prefer an automatic transmission. This is quite reasonable, because most modern cars are produced with an automatic transmission, and when driving such a car you can concentrate on the road without being distracted by the clutch pedal and changing gears.
However, driving a car with an automatic transmission has its own subtleties and rules, failure to comply with which can cause the car to break down and cause other difficulties. In our article we will try to give detailed recommendations to novice drivers and those who switched from manual to automatic.
Designations
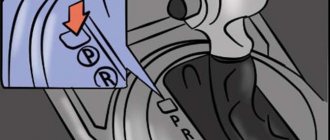
For those who have previously driven a manual car, the letter designations may not seem clear at first glance. However, it is not at all difficult to understand them, because the letters indicate the operating modes of the box, and the first letters of foreign words indicate the action that the driver is going to perform. There may be more or less, but we will now look at the main ones:
- P – parking mode;
- R – reverse;
- N – neutral gear;
- D – main mode, driving mode (in some cars this is “A”);
- Numbers from 2 to 4 – indicate movement in a gear not higher than one of the selected gears;
- L – low gear (in some car models this is “B”);
- M – mechanical gear shift, by moving the lever to “+” or “-”;
- S – sport mode;
- E – economical mode;
- W – winter mode (can be indicated by a snowflake, the word SNOW or HOLD). This mode cannot be turned on in summer, and often used in winter. The box may overheat and burn;
- OD – overdrive;
- KD – low gear, engages independently when you press the gas fully, provides a quick increase in speed.
These are just some of the symbols that you may encounter, and unlike a manual transmission, which you can learn to shift in a couple of days, you will need to become thoroughly familiar with an automatic transmission. The user manual will help you with this.
Before the start
All car owners know that on a manual transmission you need to move the lever to first speed before starting to drive. For an automatic transmission, there is a procedure that will help maintain its performance for a long time, which should be carried out before driving off:
- Before starting the engine, the handle must be in position “P” or “N” . Otherwise, the car may not start or your gearbox will simply break;
- After starting the engine, stand still and move the handle to all possible positions, holding each position for several seconds. This will warm the box up to operating temperature. After that, you should turn on mode “D” and hold the car with the brake for a couple of minutes without touching the gas pedal.
Now the car is ready to start, you can move off.
Movement
Before you start driving, it’s worth understanding a couple of rules related to an automatic transmission and starting to drive on it:
- Before moving the handle from the “P” and “N” positions to the “D” position, press the brake pedal, this will reduce the idle speed. As soon as you feel a characteristic push, you can switch to driving mode and smoothly press the gas;
- You shouldn't start driving hard right after you start driving. The oil is still cold at these moments, and the box can be damaged;
- If you're just getting used to an automatic, try to resist the temptation to stick to the manual. This may damage the transmission if you have just started driving;
Try to drive in “D” or “3” mode when in the city and turn on “OD” mode as little as possible. On climbs and when moving along difficult sections of the road, use “2”.
While driving, it is not allowed to engage the parking and reverse modes until the vehicle comes to a complete stop. Neutral speed can only be switched on in emergency situations when engine braking occurs. If you accidentally switch to one of the unacceptable modes, it is recommended to reduce the speed to idle. Then put the car back into driving mode.
If your car has modes “3”, “2” and “1”, then you can perform engine braking. This is done like this:
- While in mode “3”, release the gas pedal;
- Move the knob to position “2”;
- After reducing the speed to 50 km/h, release the gas again;
- Move the handle to position “1” or “L”.
Please note that, even if you follow all the necessary rules, engine braking on cars with an automatic transmission is less effective than on a manual one. You should not rely on this method again.
To quickly gain speed, when accelerating, you should switch to position “2” and monitor the engine speed. If there is a sports mode, the shortest acceleration time can be achieved in it. Also, when you press the gas pedal to the maximum, the “OD” mode will turn on, which will allow you to gain the greatest number of revolutions within each gear. The mode will turn off when you reach the maximum number of revolutions at maximum speed. It can be turned off by releasing the gas pedal. Please remember that using this mode will shorten the life of the box.
Stop
For short stops, it is necessary to hold the brake, but when moving the lever to the “P” position, it is not necessary to hold the brake. When stopping on roads with a slope, you must put the car on the handbrake, and this should be done before turning on the “P” mode.
When parking for long periods, it is necessary to turn on the “N” mode. It is good for traffic jams on hot days. In neutral gear the box cools down well. Driving a car with an automatic transmission, in conditions where frequent stopping is required, is much easier than a car with a manual transmission.
Towing
There is one important and rather sad aspect that concerns cars with an automatic transmission. Such vehicles can only be towed with the engine running and in neutral. As a rule, in situations where towing is required, the engine no longer works, so the question arises as to whether this can be done.
It is worthwhile to thoroughly familiarize yourself with the instructions for your car and try to find instructions on this matter. In modern cars, towing is possible in “N” mode for a distance of 50 km and at a speed not exceeding 50 km/h. Of course, the best option in such a situation would be to call a tow truck, and if you are not sure that towing is acceptable for your car, you should not risk it. Repairs will cost more than a tow truck.
Is it possible to tow with a car with an automatic transmission? Opinions also differ on this matter, but there are some rules that, if followed, can still be towed automatically:
- The car should weigh no more than your car with an automatic transmission;
- You can only tow in a low gear or in position “2”, while observing the speed limit of no more than 40 km/h;
- If we are talking about a light trailer, then you can tow it without fear of damaging the car;
- Do not resort to towing unless absolutely necessary.
7) Tire pressure icon
A strange icon that may appear on the instrument panel, indicating that one of the car's wheels (or several) has lost pressure. A strange generally accepted designation in our opinion. If the owner of the car does not know the purpose of this symbol, then if a similar icon is displayed on the instrument panel, the driver will have a hard time guessing that the tire pressure sensor reports that there is not enough air pressure in the wheel.
This is the most hated icon among car enthusiasts, although it has informative benefits for the driver. The thing is that often the appearance of a tire pressure icon on the instrument panel is erroneous and does not require urgent wheel repair. It is worth noting that a drop in tire pressure of only 10-15 percent, as a rule, leads to the appearance of this symbol on the dashboard.
But often this symbol means that the car tire is damaged. Therefore, when this icon appears, drivers react with irritation to this, since in any case they will have to check the tire pressure by dropping the pressure in all wheels, since otherwise this symbol will not go out.
1) Washer fluid heating button
A very rare button in modern cars, however, this function is available on the Chevrolet Avalanche LTZ. The button is located at the bottom (the last button in the bottom row). True, most owners of this car will not be able to use this amazing function, as GM, due to identified problems, decided to no longer use heated windshield washer fluid. Although it should be noted that the button in the car works and a warning light lights up on it, which informs and at the same time confuses the driver that the function is enabled and activated. Thus, at this time the manufacturer has deactivated the heating function.
5) iDrive
The world-famous intelligent control system for the infotainment system in BMW cars looks stylish and beautiful at first glance. But, according to reviews from many BMW car owners, it is not so convenient to use. According to experts, designating functions with familiar symbols would be preferable to using labels on buttons. In addition, most of the functions that are controlled by iDrive do not have a designation on the control buttons at all.
Using climate control Climatronic in AUTO mode
To set the most comfortable temperature inside the cabin, you need to use keys 15/16, pressing them once decreases/increases the indicator by one degree. In this case, the set temperature will remain in effect every time the climate system is turned on until the driver changes the settings to others.
It is important to understand that climate control is not able to provide any temperature regime - the upper and lower temperature indicators are limited. Specifically for Climatronic, the lower temperature limit is +18° C (or 64° Fahrenheit), the upper limit is 29° Celsius (86° Fahrenheit). Note that when setting the lower range, the display will display the inscription LO; when indicating a temperature of 29 ° C, the inscription HI will appear.
When setting the temperature limit values, the climate control switches to an operating mode with either the maximum possible generation of heat (turning on only the stove) or cold (air conditioning). Temperature regulation (that is, maintaining it at a certain level) is not performed.
You should also not be surprised if in some cases the Climatronic begins to work not in accordance with user settings. In particular, if the air conditioning system is turned on after the car has been parked for a long time, the airflow will be directed exclusively to the foot area for several seconds. This climate control operation ensures that the windows do not fog up due to the penetration of damp air. As soon as the dehumidification is operational, the Climatronic will return to normal operation.
 Button for turn signals on modern BMWs
Almost all modern BMW cars have a mysterious “BC” button on the turn signal switch, which with its strange two-letter designation will confuse any driver. But upon careful study of the car manual, it turns out that this button is necessary to control various functions in the car. The strangest thing is that German engineers named this button with two letters - BC and placed it on the turn signal switch. No logic.
So, using it, you can switch the display of various information on the dashboard displays, which can display daily mileage, fuel consumption, power reserve, and more. You can also check the car for errors using this button.
