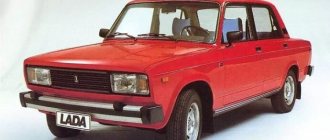
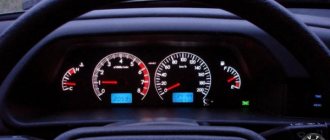
The instrumentation of the VAZ 2110 has remained virtually unchanged. The board displays basic information about the status of on-board systems to the driver in real time. Depending on the configuration, the old-style dashboard has a simplified design than the versions on new cars.
The differences in configurations are also minimal. Cars with engines with 8 valves or 16 are identical. The only difference will be on engines such as injector or carburetor.
The most common “tens” device has only 19 indicators and gauges. Each element is responsible for its own part of the on-board equipment.
DESCRIPTION OF LAMPS AND INDICATORS
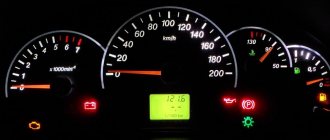
The description of the indicators is deciphered by the numbers marked in the photo:
- 1 – dial indicator of coolant temperature;
- 3-4 – indicator lamps for turn signals;
- 6 – dial indicator of fuel level in the gas tank;
- 7 – if the indicator is constantly on, urgent refueling is needed;
- 8 – if the indicator lights up, it means the dimensions are on;
- 9 – monitoring the condition of the brake system;
- 10 – headlight operation indicator;
- 11 – daily mileage reset;
- 12 – odometer display;
- 13 — emergency lights are on, working in conjunction with turn signals;
- 14 – it is necessary to check the engine;
- 15 – second display, the time and temperature outside are displayed here;
- 16 – correct battery charge;
- 17 – parking brake activated;
- 18 – when you turn on the ignition, it lights up, when you give gas it disappears;
- 19 – only on the dashboard where the carburetor is used, it indicates that the air damper is closing.
Knowing the name of each symbol on the board, you can operate the car more comfortably.
Let's start from the top
Content
(we will go from the far right to the far left):
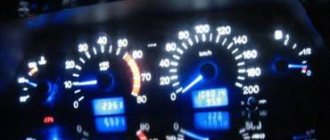
- Large scale with an arrow pointing to it. At the top and bottom there are gas station icons. The top one is white and the bottom one is red. The arrow shows the level of gasoline in the tank; when it drops to a level of about 5-7 liters, the red gas station icon lights up. Important! Do not allow all the fuel in the tank to be depleted. Otherwise, it will damage the fuel pump.
- Close-up image of a speedometer with an arrow. It shows the speed at which the car is currently traveling (km per hour).
- Just above and to the left of the speedometer there are two arrows in different directions - they show the operation of the turning lights.
- The scale is as large as the speedometer - it is called a tachometer and reflects the speed of rotation of the engine crankshaft. (from 0 to 80). Important! The driver needs to monitor the tachometer readings - its needle should not go into the red zone.
- The leftmost scale marks the antifreeze level from 50 to 130. Antifreeze is responsible for cooling a running car engine. If there is a lack of antifreeze (most often it is antifreeze), interruptions will very quickly follow, and then engine failure due to overheating.
Instrument panel VAZ 2110 designations: 1 - coolant temperature indicator; 2 — tachometer; 3 — control lamp for turning on the left turn signal; 4 — control lamp for turning on the right turn signal; 5 — speedometer; 6 — fuel level indicator in the tank; 7 — fuel reserve warning lamp; 8 — control lamp for turning on external lighting; 9 - warning lamp for emergency condition of the working brake system; 10 — control lamp for turning on the high beam headlights; 11 — button for resetting the daily mileage counter and setting the clock; 12 — liquid crystal mileage indicator (odometer); 13 - warning lamp for malfunction of the engine management system; 14 — warning lamp for turning on the hazard warning lights; 15 — liquid crystal display of time and ambient temperature; 16 — battery charge indicator lamp; 17 - control lamp for turning on the parking brake; 18 — warning lamp for insufficient oil pressure; 19 — control lamp for closing the carburetor air damper (for cars with carburetor engines).
ICONS ON THE DASHBOARD OF VAZ 2110: WHAT DO YOU MEAN
Along with the description, all designations require decoding. Knowing the names of the indicators will not provide a complete understanding of the situation. Below, under similar numbers, is the decoding of each sign:
- 3-4 – lamps indicate the turn signals are on;
- 7 – the gas station icon indicates that there are less than 8 liters of fuel left in the tank;
- 8 – symbol confirming the normal operation of the dimensions;
- 9 – exclamation mark indicates incorrect brake operation;
- 10 – dimensions included;
- 13 – emergency stop mode activated;
- 14 – a critical engine failure has been detected, urgent intervention is needed;
- 16 – critical drop in battery charge;
- 17 – handbrake lamp, indicates that the lever is raised;
- 18 – possible oil leakage from the engine crankcase;
- 19 – the symbol indicates the closing of the carburetor damper.
By deciphering the symbols, you can independently determine the essence of the problem and fix the problem.
INSTRUMENT ERROR CODES
Standard errors in car self-diagnosis do not accurately indicate a breakdown. Due to the simplicity of the on-board computer, the device can only indicate the direction where to look for the problem. The decoding of standard errors looks like this:
- 0 – no errors detected – the system is in perfect order;
- 1-2 the voltage in the on-board network is exceeded or too low;
- 3 – malfunction of the float sensor in the gas tank;
- 4/5 malfunction in the antifreeze and ambient temperature sensor circuits, respectively;
- 6 – critical overheating of the power plant, it is necessary to wait for the antifreeze to cool down;
- 7 – not enough oil in the engine crankcase;
- 8 – the problem lies in the brake system;
- 9 – the battery is dead or the part is damaged;
- E – error in the firmware, EEPROM data packet is broken.
It should be taken into account that in some cases, the error code may be two-digit. For example, if 15 is displayed on the display, this may indicate the presence of breakdowns in circuits No. 7 and 8. Having found out what each error means, you can independently determine the source of the problem and correct the breakdown.
Instrument panel layout of VAZ 2110
The instrument panel of the VAZ 2110 is made in the form of a combination of instruments, indicator lamps, and in some modifications with the ability to accommodate an on-board computer. Traditionally, the plastic from which the panel is made is not of the highest quality, therefore, during operation and overheating, its deformation is possible, affecting not so much the appearance as the performance of the devices.
The standard tidy includes four dial gauges, a trip computer display, an odometer reset button and a set of warning lights. The first on the list, the leftmost device is the coolant temperature indicator, it is shown in the diagram under the first number. The pointer device has a division value of approximately 50 degrees. The red stripe marks the zone of critically high temperature at which the coolant may boil. The additional panel contains control lights and an indication of the climate system.
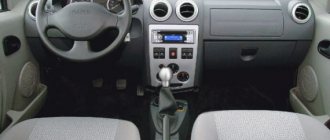
Europanel
Note Some versions of cars of later releases (in particular, models produced) are equipped with a modified instrument panel - the so-called “European panel”.
- Left side deflector.
- Outdoor lighting buttons.
- Instrument cluster.
- Egnition lock.
- Right steering column switch (windshield wipers and washers).
- Hazard warning light button.
- Instrument lighting control knob.
- Immobilizer sensor with indicator.
- Rear window heating switch.
- Plugs (reserve places for installing switches for additional equipment).
- Central deflectors.
- Heater control panel.
- Covers for niches for installing car radios.
- Right side deflector.
- Left steering column switch (direction indicators and headlights).
- Hood release lever.
- Steering wheel.
- Clutch pedal.
- Brake pedal.
- Accelerator pedal.
- Socket for connecting a portable lamp.
- Gear shift lever.
- Ashtray cover.
- Cigarette lighter.
- Glove box.
- Parking brake lever.
- Side light switch.
- Indicator for turning on side lights.
- Indicator for turning on headlights.
- Headlight switch.
- Indicator for turning on the rear fog lights.
- Rear fog lamp switch.
- Plugs (reserve places for installing switches for additional equipment).
- Headlight level control.
- Tachometer.
- Left turn signal indicator.
- Speedometer.
- Right turn signal indicator.
- Coolant temperature gauge.
- Fuel level indicator.
- Left indicator panel.
- Information display.
- Right indicator panel.
- Button for resetting the daily mileage counter and setting the clock.
The instrument panel of the VAZ 2110, as in any car, both imported and Russian, must determine the general condition of the car, and must show all information about: the amount of fuel, engine temperature and the presence (quantity) of engine lubricants.
Further in the article, I will give you a complete description of the VAZ 2110 dashboard and tell you about the description of buttons, lamps, light indicators, and tell you about common errors that may appear on your display while on the road.
Speedometer and tachometer
The speedometer on the instrument panel (2) is a dial instrument, but not with a mechanical drive, as was the case in older cars, but with an electric one. Essentially, it is a voltmeter that responds to an impulse generated in the speedometer sensor, and it is installed in the gearbox. The higher the voltage at the sensor output, the higher the speed the device displays. The factory error is approximately 5 km/h, but it is necessary to take into account the diameter of the wheels, which greatly affect the accuracy of the electric speedometer.
The tachometer on the instrument panel is indicated by the number 5 and it is also an electrical device that responds to an impulse generated by the crankshaft speed sensor. The sensor first transmits the readings to the electronic engine control unit for analysis and correction, after which the pulse is sent to the tachometer control circuit. The red zone of the tachometer scale indicates unacceptably high speeds, at which rapid wear of engine parts, incorrect operation and an increase in coolant temperature are possible. Long-term operation of the engine in the red zone of the tachometer is extremely unacceptable.
The meaning and location of the main instruments on the VAZ panel
The combinations of all instruments on the most popular brand (VAZ-2110) are located directly on the left side of the panel itself. This part of the dashboard is often called a “dashboard” by drivers. The instrument panel also contains switches of various functions and types and a set of indicator lights. They are responsible for controlling the operation of lighting equipment, heaters and other important units.
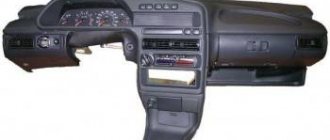
Standard instrument panel on a VAZ-2110 car
First of all, when examining the dashboard, the eye falls on the variety of dial gauges and indicators under them, which are equipped with a small electronic digital window and a set of signal lights with various functions. The main elements here are:
- Sample induction speedometer;
- Tachometer model;
- Pointer type indicator for adjusting the coolant temperature;
- A device for determining the fuel level in the tank.
Let's look at each of the devices in more detail.
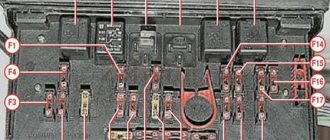
Tip: if light bulbs, indicators and dial gauges do not work, then the problem lies in the wiring. Be sure to check the fuse box on the VAZ-2110.
Symbols in the induction speedometer
Models of induction speedometers receive speed readings from sensors that are located directly in the gearbox structure. It displays the actual speed of the car - the scale ranges from 0 to 200 km/h.
The division value is an indication of 10 km/h. However, the driver must remember that any induction speedometer on the VAZ-2110 will have an acceptable error rate of up to 3-5 km/h.
The lower and central part of the speedometer is equipped with a small window with an electronic display option, which, through 2 lines, transmits the total mileage for the entire period of operation of the vehicle and the current mileage value.
Tachometer symbols
The tachometer is located on the left side of the dashboard. Using this device, the driver receives the current crankshaft speed values. Information enters the tachometer through the on-board computer, which in turn receives these values from sensors on the crankshaft. Often, if the car jerks when you sharply press the gas. The tachometer will show low speed values or will be completely faulty.
On the scale, all divisions are divided into 5 units, and the digitization of values is made into 10 units. The maximum values are limited to 80 units. In order to understand what number of revolutions the car is currently showing, you need to multiply the number on the tachometer by 100. The sector is in the range from 55 to 60 units. shaded in red - this is a signal to the driver that the car will be approaching a critical number of revolutions.
Advice:
When the crankshaft speed approaches the red sector, a sudden stop and engine failure may occur.
The lower middle part of the device, using an electronic display, displays the real temperature of the air surrounding the car and the time.
Designations on the coolant temperature dial gauge
On the left side of the tachometer there is a universal dial indicator that regulates the temperature in the coolant. The device receives signals about current indicators from the corresponding coolant temperature indicator, which is located next to the cylinder head and thermostat structure.
Here, the division value is considered to be 20 degrees, and the general digitization indicators start at a value of 50 units. and end with a division of 130 degrees. The dangerous zone of the device operation is highlighted in red, which starts at a value of 105 degrees. If the instrument needle begins to fall into this zone, the VAZ-2110 engine must be immediately turned off and the car stopped.
If the engine overheats, not only the main set of power unit units may fail, but also the fan switch sensor, as on the VAZ-2107.
Designations in the fuel gauge in the tank
To the right of the speedometer there is an indicator showing the level and general availability of gasoline in the fuel tank of your vehicle. It works using a sensor in the tank, and sends data through the on-board computer to the scale. The indicators of the dial gauge have the following designations:
- 0 - your tank is completely empty (the machine will be able to work for another 15-20 minutes).
- ½ - there is still half a tank of gasoline in the car.
- 1 - the car is filled with a full tank.
Dial indicators on the VAZ 2110 panel
The number 6 indicates the fuel level indicator in the gas tank. The readings of the device are not particularly accurate, but it is logically clear that at mark 0 the tank is practically empty, a few reserve liters of fuel remain, at mark ½ the tank is half full or empty, as you like, and at mark 1 the gas tank is full. The light indication of the fuel level is assigned to control lamp 7, which begins to flash when the vehicle’s range on the remaining fuel is about 100 km, which is approximately 9-9.6 liters. To ensure that the fuel pump does not fail, it is not allowed to completely drain the fuel from the tank.
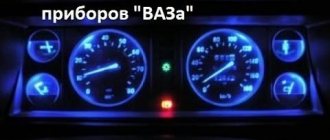
VAZ dashboard lighting - do-it-yourself replacement of lamps
The illumination of the VAZ dashboard plays an important role when the car is moving at night. It is very difficult to find the necessary controls without appropriate lighting, and this is not at all a luxury, unlike the illumination of the wheel rims. This article will discuss why and how to change lamps designed to illuminate the instrument panel and controls of various VAZ models.
Why is it necessary to change the backlight bulbs?
When driving in conditions when it is night outside, the headlight light reflected from the ground has a small blinding effect on the driver, who does not see the readings taken from many of the car’s instruments. These may be: speedometer, tachometer, fuel or coolant level indicators, etc. In addition, various buttons on the instrument panel and levers designed to control the heater air damper become invisible.
Trying to find all these devices and use them in the dark can be quite a dangerous undertaking. This is due to the fact that the driver is distracted for a very long time in order to find this or that button, or to determine, for example, a parameter such as speed.
Malfunction of lamps, as well as their absence, disrupts the overall illumination of the dashboard and complicates the process of driving a car at night. That is why it is important to promptly change burnt-out lamps and monitor their condition. Let's try to figure out how to replace backlight bulbs on various VAZ cars.
How to replace dashboard lamps?
Well, firstly, before carrying out any electrical work in the car, it is necessary to turn off the power to the vehicle’s on-board network. To do this, open the hood and remove the negative terminal of the battery.
How to change light bulbs on a VAZ 2107
Inside the car, use a flat-head screwdriver to pry and pull out the plastic handles on the heater air damper control drive. After this, unscrew the nut located on the small handle designed to reset the daily mileage. Then remove the washer from it and push the handle deep into the instrument panel.
Pull the heater drive control button towards you and remove it from the plug. After this, push the connector deep into the dashboard. The panel must be pulled out starting from the right side. During the dismantling process, unscrew the nut securing the speedometer drive cable, then pull it out and leave it hanging. Remove the vacuum supply hose from the fitting located on the econometer. Finally, pull out all the wire connectors and remove the instrument panel from the dashboard.
During the replacement process, it is possible to install lamps with a different color of luminous flux, however, in no case should you use lamps with too much or too little power in order to avoid other malfunctions.
- After replacing the lamps in the board, installation and assembly of all elements of the shield and panel are carried out in the reverse order.
VAZ 2110 (new model) - changing the backlight with your own hands
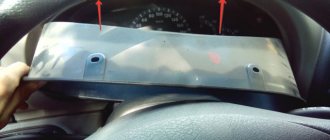
- First of all, you need to unscrew the two screws that secure the decorative trim at the top. This trim is installed directly on the dashboard.
- Pull out the knob for adjusting the backlight and use pliers to unscrew the large nut located under it. After the nut is removed, make sure that the regulator does not go under the panel, since it will be difficult to get it out later.
- In the left corner, near the button for turning on the fog lights, pull out another plug. There is a screw under it that also needs to be unscrewed. After this, pull the decorative trim towards you. As soon as the button connectors appear, disconnect them and pull the cover even further.
- Inside the panel, find two screws that secure the instrument panel from the inside. Unscrew them and pull the instrument panel out. During the removal process, pull out the plug connector from the rear of the instrument panel.
- The lamp sockets are unscrewed by turning them 45-90 degrees. Then the burnt out lamps are unscrewed from the socket. After this, new lamps are installed in place of the old ones, and the dashboard is assembled in the reverse order.
How to remove lamps on Lada Priora
- To make it easier, take a Phillips screwdriver. Unscrew the two screws located in the upper inner part of the instrument panel.
- There is a small plastic panel (or trim) located under the steering column. At the top of the panel, unfasten the latches, and at the bottom, turn three fasteners made of plastic. After the trim is removed, you will see two more screws securing the instrument panel. They also need to be unscrewed.
Now lower the steering wheel down, but do not remove it. Pull the decorative trim towards you. If it does not give in, you can carefully pry it off with a flat screwdriver without damaging the plastic coating. Inside the torpedo you can find two more screws. The instrument panel itself rests on them. Unscrew them, holding them with your hand, so as not to lose washers and screws, which can easily fall inside the torpedo.
At the end, forget to connect the battery terminal. This completes the replacement of the dashboard lamps.
Tidy indicator lamps 2110
Lamps 3 and 4 indicate that the direction indicators on the outside of the vehicle are turned on and they light up and flash immediately after the right or left indicators are turned on. At the end of the maneuver, the power key returns to its original position and the pointer should turn off automatically. If this does not happen, you should look for the reason in the return mechanism of the pointer switch key.
The lamp that deserves special attention is located in the center of the tidy and is indicated by the number 14 in our diagram. This is a warning lamp that signals malfunctions and incorrect operation of the electronic engine management system; it is otherwise called the Check Engine lamp, by analogy with imported cars. When this warning light is activated, computer diagnostics of the engine should be carried out and error codes identified. Some errors are removed by software, while others require intervention in the engine control systems: the power supply system, ignition and other systems that could lead to errors.
Number 12 in the diagram shows the digital odometer display and the daily mileage indicator, which is reset by a button located directly on the instrument panel. The top line shows the total mileage of the car, and the bottom line, which can be reset, shows the mileage for a certain period.
The instrument panel of the VAZ 2110 is a description of the lamps and indicators of which we will complete with simple and familiar warning lamps for any car:
- position 8 indicates the lamp for turning on the outside light;
- lamp number 9 indicates that the brake fluid level in the reservoir is reduced to a minimum;
- high beam - lamp 10;
- triangle under the number 13 - hazard warning lamp;
- position 18, as a rule, remains in reserve, and in cars equipped with airbags, there is a sensor activation lamp in this place.
The remaining warning lamps: handbrake, emergency oil pressure in the lubrication system and critical battery discharge are located in the bottom row in order. Let the hazard lights light up less often on your dashboard, better and cleaner roads for everyone!
Malfunctions and repairs
Instruments or indicators may fail. This could be part of the indicators or even the entire speedometer. VAZ 2110 owners rarely encounter this situation, since the dashboard works properly, especially in domestic cars. Before changing the instrument panel or repairing individual parts, you should make sure that the sensors are working properly - we use the on-board computer.
Inaccurate installation leads to failure of elements. On the instrument panel board, the parts are attached using simple rivets, hence the negative result. The body is constantly subject to vibrations, so the installation simply “falls apart” and breaks appear in the circuit. Repair in this case involves soldering the rivets and thoroughly cleaning the contacts.
- It is necessary to remove the plug; the board does not need to be disconnected from the case.
- The next step is to apply flux to the places on the board with arrows (photo below). Both pads also need to be removed and thoroughly lubricated.
After soldering is completed, the instrument panel can be returned to its place. If you have free time, you can go through the contacts using sandpaper. On older cars they usually oxidize, which can prevent the devices from functioning properly.
You can see how to remove the dashboard in the video below.
Let's be honest - the VAZ 2110 does not have the most beautiful “native” instrument panel, either on the first cars or on the “improved” ones. Therefore, many owners of this model are trying to make it more modern and somehow decorate it (with LEDs, beautiful lights, etc.).
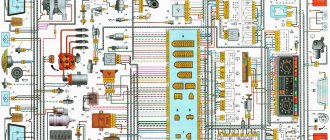
But, before you decide on some kind of upgrade, it is necessary that you have before your eyes the pinout of the instrument panel for the VAZ 2110, otherwise you can simply get lost in a heap of wires, sensors and buttons. Moreover, it will be useful regardless of whether you completely change the panel, or simply make some additions to the dashboard of your VAZ 2110.
Instrument panel VAZ 2110