Location Features
To begin with, it must be said that in most cars the motors are located in the same position, due to which they spin correctly. And, the order of work will be general. To prevent the generator pulley from turning, many recommend using improvised metal means that are inserted into the hole of the pulley and the oil pump.
But it may also happen that the specified pump is placed in such a way that certain parts may be damaged during the process of dismantling the pulley.
Sometimes a crowbar or screwdriver is used
In addition, it is made of aluminum and has very small dimensions, but significant effort must be made in the work. So, you need to be very careful not to break the pulley.
Classic methods
Essentially, standard dismantling methods involve two main methods.
You will need:
- jack to remove the wheel
- tool kit
- hydraulic jack to lift the engine, or replacing it with a “stump”
First way
In the first case, we will have to make significant physical efforts, therefore, you need to clearly focus on your own strength. We are talking about the need to put stones or special stops under the wheels that would not allow them to move during operation. The gearbox should, if possible, be set to maximum gear. The higher it is, the easier it will be for you to cope with the task. In third and lower gears, it will be almost impossible to make a turn with your hands. But everything is unscrewed by hand. To make this task easier for yourself, it is appropriate to use a lever that will reduce the necessary effort. In some cases, the length of the lever can reach one and a half meters.
Getting to the bolt is not always easy
Second way
As for the second method, it involves placing the vehicle in neutral gear. Next, you need to install a suitable sized head on the bolt with a piece of pipe, which, in turn, rests on asphalt or concrete. Ordinary soil will not be able to hold it. But the bolt itself is already loosened by the starter.
This saves a lot of effort and makes it possible to complete the task the first time. The main thing is to take into account the reliable fixation of the pipe so that it does not jump out and damage anything around it.
Be careful not to lose the pulley key
But, in any case, the threads in this nut are correct, so you need to unscrew it counterclockwise, with some exceptions, which we will now look at.
Reverse motion can significantly complicate the dismantling process
But it also happens that the engine works, as they say, “in the other direction.”
We are talking about the fact that the motors are installed with belts to the right. So, they will spin in the opposite direction, that is, counterclockwise. This difference may seem insignificant, but it greatly complicates the search for an answer to the question of how to unscrew the crankshaft pulley.
Moreover, such a procedure may be required every hundred thousand kilometers. We are talking about the need to replace the timing belt. And this does not apply to emergency situations, such as replacing the oil seal or other repair work.
For example, a seventeen bolt can be tightened to a torque of up to one hundred and eighty-five Nm, which can be considered simply a huge indicator.
And to unscrew it you will need even more force. The second method described above will not work, since the starter will spin the motor in the other direction, only tightening the bolt more . Pressing the brake pedal will lead to a similar result, since the transmission will spring back, but the bolt itself will remain in place.
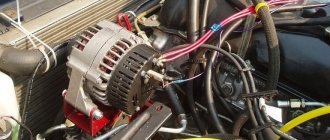
Removing the generator, replacing the pulley and reinstalling it
The article describes in detail the procedure for removing and installing a car generator, as well as replacing the pulley.
A car generator is used to convert mechanical energy into electricity when the vehicle is moving. This current serves as a spark exciter at the spark plugs to ignite the fuel in the engine cylinders, it recharges the car's battery while it is moving, and also allows all electrical equipment in the car to operate.
As you can see, this is a very important mechanism for the electrical equipment of the entire iron “friend”. In case of the slightest malfunction, the generator should be repaired immediately, and to do this, it must first be removed, and then reinstalled - installation, which we will show how this is done correctly using the example of a VAZ 2110 car. On other VAZ models, the procedure is similar and not difficult. To repair this mechanism, you will definitely need a diagram of a car generator, it is presented there for the VAZ 2106 and 2110, as well as the principle of operation.
Tool making
But nothing is impossible, and you can make the appropriate tool yourself. You need to purchase a 54 heating lock nut so that the internal thread diameter is thirty-nine millimeters and the width does not exceed ten millimeters. Now it is important to grind off its edges by one and a half millimeters, and then weld a flat handle, the length of which is near the twenty-centimeter mark. That's all, the tool is completely ready for work.
This is how garage Kulibins do it to save money on buying original keys
Some pulleys have corners that have slightly rounded edges, so that the parts on the nut that are mating can be cut off a little.
Many drivers weld a pre-ground workpiece to a VAZ crankshaft nut wrench to obtain a universal tool suitable for most modern cars. In addition, such a handle is quite convenient to rest on the drive shaft of the front axle wheel.
Having unscrewed the bolt with a standard seventeenth head with an extension and a strong wrench, we continue to work. Don't forget about basic safety rules. So, to prevent the key from jumping off, you need to support the extension cord on a stand that will not jump out and break. Sometimes, even the wheel does not need to be dismantled for such work. Exceptions appear only when the car has tires with a large diameter (as indicated by the inscriptions on the tires) that exceed the standard dimensions. Then they take up more space in the arches. And, you will have to remove them, or use a wrench with a universal joint.
Disassembling the generator, removing and replacing bearings
After dismantling, the Renault Logan 1.6 generator bearing is disassembled and replaced. Typically this process takes 30-40 minutes, for experienced drivers 15-20 minutes.
- Unscrew the mounting bolts of the protective plastic cover of the generator, and then the brush holder.
- Remove the brush holder and regulator relay. During qualified repairs, preventive maintenance and testing of the relay’s functionality are simultaneously carried out. Also inspect the brush holder for malfunctions and the condition of the brushes.
- To disassemble the body into two parts, three bolts are unscrewed. You will need a Phillips screwdriver here. Next, we use a chisel and hammer to “halve” the body.
When dismantling, do not use excessive force, as the fasteners may become coked, and the body itself is made of fragile duralumin aluminum.
- A reliable and proven way to remove a pulley (suitable for BOSCH) is to use an M18 and M10 cut hexagon nut.
• We put several washers inside the pulley, and on top an M18 nut for a 27 wrench; • Insert an M10 hexagon or a bit; • Use a 10mm socket to lock the pulley; • Use a socket wrench 27 to loosen the pulley fastening; • It is recommended to pre-treat the connection with WD-40.
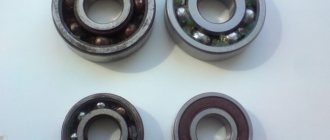
Removing old ball bearings and installing new ones
- After removing the pulley, we knock the rotor shaft out of the ball bearing mounting hole. This method is not safe, as the shaft itself can be damaged.
- A more effective method (shown in four photos below):
• Removing the ball bearing cover; • Clamp the outer race in a vice until it breaks; • Pressing the inner race off the rotor.
- Now you can remove the front p/sh. We press it out of the housing from the reverse side. We use a grip puller.
- The method for removing the rear ball bearing without a puller is demonstrated below. Using one or two open-end wrenches, apply force to the end from below, as shown in the second photo.
- Immediately install the new ball bearing into the cover and tighten the four screws. Then we insert the rotor shaft into the hole, drive it through a wooden attachment or press firmly with our hands.
Before installing new parts, open the rubber seals to check the amount of lubricant. If the volume is not enough (as in the photo), add bearing grease inside.
- We mount the front p/sh on the shaft. To do this, lubricate the seating surfaces and install the part.
- Then, using a socket with a diameter suitable for the inner ring, we press the ball bearing into place.
- Let's begin reassembling the Renault Logan electric generator.
Important Replacement Recommendations
- The pressing force should only be applied to the inner race.
- Keep in mind that inserting the rear bearing of the Renault Logan generator from a new repair kit will require care, otherwise there will be play or distortion.
- We assemble and install in the reverse order. The full process is shown in the video at the end of the article.
Gallery of Lifan car pulleys
The appearance of the pulleys of Lifan cars is useful during dismantling and installation.
Work related to replacing the engine timing belt, crankshaft and camshaft toothed pulleys, the engine front oil seal, as well as the generator drive itself requires dismantling the crankshaft pulley. This element is found on both domestic cars and foreign cars. Actually, most motorists have a question: how to unscrew the crankshaft pulley? And to be even more precise, the fixing bolt on the crankshaft flange, and in which direction to turn the key. Let's consider.
Symptoms and malfunctions
Factors leading to generator failure may include the following:
- the appearance of signs of wear on the brushes;
- fact of closure of the rotor winding;
- loss of operating conditions of the drive pulley;
- increased noise – evidence of wear of a bearing (or 2) on the rotor shaft;
- deterioration of the relay regulator.
This is a typical list of malfunctions that occur and require repair of the generator and its attachments in the Renault Logan model. These breakdowns occur very rarely and after performing the repair procedure they are not able to require attention. Let's move on to analyzing each malfunction individually.
Replacing rear brake pads Renault Logan
Renault Logan left drive oil seal replacement
- Brushes tend to wear out at the same time as the relay regulator. This unit can only be replaced in assembled form. It is not possible to repair these parts due to the nature of their design. The indicated problem tends to occur more often on the 1.4-liter Renault Logan than on other modifications.
- If the rotor winding is closed, then a voltage drop is observed in the network. In this case, a complete replacement of the generator will be required. After installing the new unit, the relay-regulator and brushes must also be replaced.
- When destruction touches the generator pulley, a voltage drop occurs at the terminals. The pulley must be replaced when dismantling the unit itself. Renault Logan has two pulley design options: 5 and 6 grooves.
If a certain stable noise is heard during operation of the Renault Logan engine, then wear of the bearings located on the rotor shaft may be among the likely causes of its occurrence. These two elements must be replaced immediately.
Which way to unscrew the crankshaft pulley?
This question is asked by many car enthusiasts. To prevent the thread from breaking or, even worse, the bolt head from twisting, it will not prevent the driver from figuring out which way to unscrew the crankshaft pulley bolt.
Since the pulley fixing element and flange have a normal right-hand thread, it can be unscrewed in the same way as the rest of the car’s nuts (counterclockwise).
Features of work
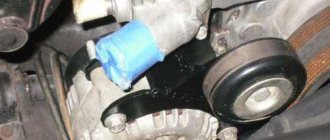
At first glance, there is nothing difficult in simply removing the bolt securing the pulley to the engine crankshaft flange. However, this is not quite true. The crankshaft pulley bolt very rarely unscrews and always sticks. Therefore, there is a risk of breaking it. First we need to get to this pulley. To do this, unscrew the bolt securing the generator to the tension bar. The latter is attached to the engine cylinder block.
The generator is moved towards the engine, and the drive belt is removed from the pulleys. It can be rivulet type or serrated. Now, having reached the desired element, proceed to further actions.
DIY alternator pulley replacement
The pulley is replaced after the above faults are detected. At the same time, this procedure can be performed both with the generator removed and installed. The choice of solution depends on the design of the car. There are models in which it is difficult to replace the pulley due to too little space. Because of this, you need to remove the generator.
Procedure:
1. Open the hood of the car and remove the terminal from the battery. Try to always perform this action, since when working under the hood there is a risk of accidentally shorting something. Short circuits are known to adversely affect the battery.
2. Unscrew the nut on the generator adjustment bar and loosen it from below. After this, move the alternator to the side of the engine and remove the alternator belt so that it is out of the way.
3. After this, unscrew the bottom nut completely and pull out the long generator mounting bolt, then remove the latter.
To remove the generator, you need to twist it a little. The fact is that due to the lack of large spaces, he can get out of there in a completely unusual way. The same goes for its installation.
4. To remove the pulley from the generator, you can use a special tool. However, if you do not have one, then you can use the “folk” method. Pour brake fluid onto the mount. After absorption, unscrew the fastener, locking the rotor. Next, remove the alternator pulley.
5. Install the new pulley and tighten it thoroughly. The generator pulley is tightened to a torque of 80 Nm. If you do not have a torque wrench, you will need to purchase one.
Try to install a pulley of the same diameter, since a pulley with a larger diameter will spin slower and, accordingly, the battery will charge. In addition, engine power will drop noticeably.
6. Install the generator in reverse order.
How to unscrew the crankshaft pulley of a VAZ
On domestic cars of the VAZ “Classic” family, as well as on other cars, the element is removed in the same way. The only difference will be what kind of gearbox is installed on the car in which such work is being done. Which direction should I unscrew the crankshaft pulley bolt? Definitely counterclockwise.
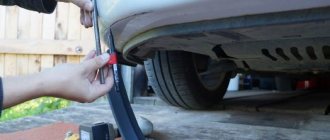
To simplify the task, you can call an assistant, who must engage direct gear (3 or 4) and keep the brake pedal depressed. At the same time, you will unscrew the pulley bolt. If the car is rear-wheel drive, then you can do without an assistant. Just put the car on the handbrake and unscrew the bolt in the same way. The work can be done from the side of the hood or below in the inspection ditch. The main thing is that it is convenient to work. You can also jack up the car and remove the front right wheel.
This will provide good direct access to the crankshaft pulley, which is unscrewed with an extension socket. The mechanism bolt rarely “gives in” immediately and is constantly stuck with threads to the inner hole of the crankshaft flange. Therefore, it is always very difficult to rip it off. If you cannot unscrew the pulley mounting bolt, then a long wrench or pipe can come to the rescue. The element is put on the key. Grasping the very edge of the collar, gathering, as they say, all your strength into a fist, you should try to remove it again. Actually, the longer the lever, the easier it is to work.
How to unscrew the generator pulley nut without a vice
I removed the generator. The pulley needs to be changed. The nut won't come off, it's a problem