How to adjust the headlights of a Niva Chevrolet
LOW BEAM NIVA-CHEVROLET
This will be the distance h on the screen. The photo shows one of these stands.
Professional adjustment of headlights, according to GOST, upon request.
Therefore, such a check should become a rule for all drivers. Rags Adjusting the headlights Check and adjust the headlights with the vehicle equipped:
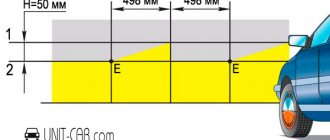
Mark the screen on the wall as shown in Fig.
All you need is a Phillips screwdriver and a shield to cover the headlight. The tire pressure is checked in the car; the instructions may regulate a certain amount of fuel in the tank, as well as the installation of a load on the front seat, which must correspond to the driver’s weight.
DIY headlight adjustment
To put it more simply, the equipment of the machine should correspond to the version in which it is most often used. At the next stage, adjustment involves preparing a site, which in some way replaces the adjustment stand.
You can use the wall of a house or garage, a garage door, or a suitable shield as such a stand.
On it you need to draw a diagram for adjusting the headlights. It has almost the same appearance for all cars and consists of two horizontal lines and three vertical ones. The axis of symmetry of the machine is designated as O; The center of the right and left headlights are indicated by the letters A and B; The number 1 indicates the height above the floor; Under number 2 is the line, which is located below the first by mm, and if a hydraulic corrector is installed in the car, it is already 65 mm lower.
replacing the front headlight — Chevrolet Niva, 1.7 l., 2012 on DRIVE2
Finally got the opportunity to install a new headlight
in return for the victim.
I went to the service center to find out the details and when I heard about the complete removal of the bumper, I realized that I would have to look for everything myself. Agree, it’s stupid to disassemble the whole face because of the headlights, hours on the Internet and reading various rubbish gave a vague idea of what it would be like. And off we go, as they say, the eyes are afraid, but the hands are doing... First, we unscrew the three top bolts holding the radiator grille, you will need a T30 key, which I didn’t have, it was easily replaced with a slotted screwdriver selected to size (you need to unscrew it with a screwdriver carefully so as not to tear off the edges)
this photo is not mine
Then, using the same screwdriver, press the plastic retainer of the headlight trim into the gap between the radiator grille and the trim itself.
this photo is not mine
Carefully, so as not to break the trim, tear it off from the double-sided tape and remove it from the grooves in the bumper, moving it to the side.
Using a T30 wrench (slotted screwdriver), unscrew the two screws securing the bumper to the bumper cross member.
Using a T20 wrench, unscrew the two screws securing the bumper to the wheel arch.
By sliding the bumper forward and down, we gain access to the last fastener of the headlight trim, use a Phillips screwdriver to unscrew the screw and remove the trim.
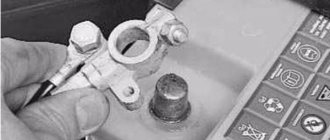
Using a 8mm socket with a 1/4 square, unscrew the two upper headlight mounting bolts.
Having pressed on the headlight, use the same head to unscrew the two lower bolts using a magnetic extension. We disconnect the pads from the headlight and lift it forward and remove it.
I would like to say a huge THANK YOU to the engineers who stuffed the air intake under the headlight, prudently making a “pool” in front of it.
another argument in favor of a snorkel
Reinstall the working headlight in reverse order.
Remove old tape with a sharp knife
and glue new one.
Be sure to adjust the light, well, that’s a completely different story...
Tools:
Before starting adjustment work, you need to put the hydraulic corrector handle in the position where the load is at its minimum. Before this, the car is installed on the site at a distance of 5 meters from the shield or wall.
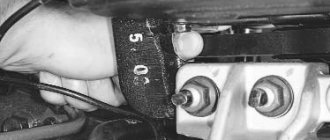
After this, you can start making adjustments. The photo below shows the adjustment screws.
When installing light beams in vertical directions, the screws are 1 and 7 cm. Differences in the number of turns of the screws are allowed, no more than three turns.
Only now they need to be rotated in opposite directions. When screw 1 is turned counterclockwise with one turn, then the second screw 7 is rotated one turn, but clockwise.
By rotating the adjustment screws, you need to achieve such an arrangement of the light beam that the upper horizontal line of the light flux is no higher than the lower horizontal line on the wall or shield.
The inclined line of the light beam should intersect with the lines in the vertical direction at the centers of both headlights.
Parts and consumables:
The light of the second Niva headlight is adjusted in the same way. Place an additional 75 kg weight on the driver's seat.
Mark the screen on the wall as shown in Figure 9. The longitudinal plane of symmetry of the car should pass along line 0 on the screen.
Rock the car sideways so that the suspension springs self-align.
On your vehicle, measure the height of the center of the headlights from the floor. This will be the distance h on the screen. Set the headlight level control on the instrument panel to a position that corresponds to the load of a single-driver vehicle.
Place the car perpendicular to a smooth wall, such as a garage, at a distance of 5 m. Place an additional load weighing 75 kg on the driver's seat. Mark the screen on the wall as shown in Fig.
The longitudinal plane of symmetry of the car should pass along line 0 on the screen. Rock the car sideways so that the suspension springs self-align. On your vehicle, measure the height of the center of the headlights from the floor.
Adjusting Chevrolet Niva headlights
How to properly adjust Chevrolet Niva headlights with your own hands?
We will answer this question and tell you how to correctly adjust the low and high beam headlights, as well as fog lights. Most often, Niva owners are interested in this issue, and for good reason. After all, you can do this yourself, without resorting to outside help. The brighter and better the optics shine, the easier it is to keep the road at night, respond to obstacles in a timely manner, etc. For many growers, the issue of lighting quality comes first and can cause irritation in insufficient lighting. On the one hand, we can agree with this, because what kind of security can we talk about if there is no decent coverage. But on the other hand, some cars have optics installed by the manufacturer themselves, which do not shine with quality and fine-tuning.
This applies to a greater extent to domestic cars. And if the car has a solid mileage, then there is no point in further discussion at all. We know that with every ray of sunlight, optics fade and become duller. The ability to qualitatively reflect the light of lamps in headlights is gradually decreasing.
Moreover, an accident or traffic accident can lead to damage to the body part and the geometry of the frame will be disrupted. Regardless of whether the optics are new or old, they will shine worse.
Replacing the front headlight — Chevrolet Niva, 1.7 l., 2010 on DRIVE2
Hi all! It all started out banal: I was returning from fishing at night and passed through another populated area in the Leningrad region. There are no lighting poles, the road has one lane in each direction, a long straight line, an oncoming car appeared in the distance... We cut off the far one, leaving the near one with its dimensions. Suddenly, just out of nowhere, a woman with a wheelbarrow materialized in front of the hood, leisurely rushing straight towards the moon in the middle of my lane! Just like in horror movies. 8-)) Well, I wasn’t distracted anywhere - I reflexively drove around it in the oncoming lane (the distance to the oncoming car allowed)... Having received a solid boost of energy, I got home. We need to do something about this. I decided to start by adjusting the headlights. During the entire time I owned the car, this procedure was never carried out. Signed up, stopped by, got adjusted (mobile crap on wheels). )) In the end, the light was shining in a hell of a place (even though it didn’t blind anyone you met, it seems). It became much better, but still, something was wrong... I decided to remove the low beam lamps along with the headlights (one of them had burned out). As for the neighbors: there were Narva lamps, they were at least 3 years old (I don’t even remember when I changed them). We go online, study, and settle on the following option: 1. OSRAM 2850WW02B LED marker lamps 2. OSRAM Allseason 64210ALL low beam lamps
Full size
Replacement set
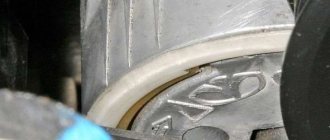
We order, wait, pick up, go to change it. There are no problems with the dimensions (we remove the falling light bulb from the headlight using the Licota device from the previous post). The neighbor is as always: no matter how much he changes, it’s always the same as the first time. Therefore, I completely forgot about the left headlamp unit, which had a jamb with a socket (clamp for the lamp) for the low beam. In the end, with a little more effort, I broke it completely, breaking one of the three mounting legs along the way. Apparently, due to its instability, the lamp shook a lot when moving (which should also have affected the illumination).
Full size
Poor guy... the fracture is in the foreground
A couple of days in thoughts on the topic “How can I fix you back so that you can still hold on?” was not successful. We don’t have time to go to the disassembly sites; Avito didn’t come across anything suitable... So, we take a new left headlight unit. 8-)) On Saturday morning I went to change it. I refreshed my memory of the instructions, let's go... 1. Disconnect the “-” terminal from the battery. 2. Unscrew the 3 bolts securing the radiator grill (T30 key).
Full size
Two of them on the screen 
3. Using a slotted screwdriver, press out the headlight trim (“eyelash”) and remove it from the grooves of the bumper. 4. Unscrew the two bolts securing the bumper to the amplifier.
Full size
5. Unscrew the two screws securing the bumper to the amplifier in the arch (T20 key).
Full size
6. Move the bumper forward and down, unscrew the “eyelash” fasteners and remove it.
Full size
7. Unscrew the two upper headlight mounting bolts.
Full size
8. We are trying to unscrew the two lower headlight mounting bolts. Nevermind. We soak it in WD-40, change the combination of keys and heads, add more WD, go to lunch, come back... Still nothing. 9. Let's go further to destroy. We remove the front bumper to hell...
Full size
Almost taken down. The primed amplifier rusts...
10. We remove the amplifier and get excellent access to these two bolts, but all attempts to at least pull them out of place are in vain... We tear off the edges on them, flattening them
Algorithm for adjusting headlights of Niva Chevrolet
Before starting, you should thoroughly wash all Niva optics. It is necessary to wipe it, and if there are defects or damage, replace it with a new one. The slightest crack or chip will not give the desired result in adjusting the light.
From the inside of the hood we find two adjusting bolts on the body. One is responsible for horizontal adjustment, the second is responsible for vertical adjustment. Alternate twisting will lead to precise alignment of the light beam to the proper level. Sometimes it happens that a few millimeters are missing from the long-awaited level.
In this case, you should place several washers at the base of the housing mount. To do this, you need to dismantle the headlight, put a couple of washers on the plug mounts and install the optics again in their original place. Step-by-step instructions on how to adjust Chevrolet Niva headlights:
- We find a flat area with a flat wall;
- prepare tape and chalk for drawing lines on the wall;
- we drive up to a distance of 2 meters to the wall;
- do not turn off the engine, turn on the low beam;
- squeeze the handbrake for safety;
- set the headlight range control to the middle position, if available;
- Mark the center of the light beam of each headlight with chalk. This can be done either with chalk or in the form of crosses with tape;
- we drive away to a distance of 5 meters;
- We connect the previously obtained points exactly with a line;
- exactly in the middle of the resulting segment we draw a vertical line, indicating the middle of the body part of the technical device;
- below, at a distance of 7 centimeters, draw a line called a secant;
- turn on the low beam;
- in the hood we find adjusting screws in the headlight plastic housing. We begin to twist them little by little so that the light beam lies exactly between the horizontal line and the secant line;
- Now that the low beam is set, let's move on to the high beam. Ideally, the high beam will not have to be adjusted;
- Under normal operating conditions, the lighting quality should improve. If this does not happen, then look for the reason for the violation of the body geometry. There may have been an accident or accident that you don't know about.
Do-it-yourself headlight hydraulic corrector repair for VAZ 21214
Best site news
Depending on how loaded the vehicle is, the headlights can be directed higher or lower. To adjust the light flux, special devices are used - hydrocorrectors. If the car is loaded, the headlights should be turned down so that the flow of light is directed not upward, but onto the road. This ensures the necessary illumination of the road surface and prevents the driver of an oncoming car from being dazzled. In the case of a minimal vehicle load, when the rear part of the frame is raised, the headlights should be turned upward.
Design of headlight hydraulic correctors
As a rule, the following components are included in the design of a hydraulic corrector:
- master cylinder mounted on the dashboard;
- actuator cylinders mounted on the headlights;
- connecting pipelines that are fixed with clamps;
- working fluid with increased frost resistance.
Typically, hydraulic correctors are made in the form of a non-removable structure that cannot be repaired. Therefore, if, for example, the hydraulic corrector of the VAZ-2114 headlights fails, it is repaired by replacing it with a new set.
The manufacturer provides a maximum operating pressure in the normal state of the corrector. To direct the luminous flux of the headlight downwards, the pressure in the system is reduced, as a result of which the actuator cylinder rod is retracted and the optics are rotated downwards. Thus, most of the time the device is under increased pressure.
Quite often, when temperature changes occur, especially in winter, the structure of the seals is damaged due to the poor quality of the rubber, which leads to leakage of the working fluid. In turn, this leads to jamming of the cylinder pistons in one of the positions.
Structurally, all hydraulic correctors that are installed on VAZ vehicles are made according to a similar design, with the exception of some differences in size, layout of cylinder fastenings and pipelines. Today the following modifications of hydraulic correctors are supplied to the market:
- “2105-3718010” - for VAZ 2105-2107;
- “2108-3718010” - for VAZ 2108-21099;
- “2110-3718010” and “2110-3718010-10” - for VAZ 2110-2112;
- “2114-3718010” - for VAZ 2113-2115;
- “21213-3718010” - for 21213 “Niva”.
How to repair a hydraulic corrector on a VAZ 2110 - 2115
Repair of the VAZ-2110 headlight hydraulic corrector is not provided by the manufacturer. Therefore, if it fails, the entire device, complete with pipelines and cylinders, is replaced.
If the angle of inclination of the optics is not adjustable when the vehicle load changes and it is not possible to achieve the optimal luminous flux using the adjusting screws on the headlights, you should check the functionality of the corrector as follows:
- First of all, it is necessary to inspect the device for the integrity of the pipelines and the absence of liquid leakage.
- If after these measures no malfunction is detected, we proceed to checking the performance of the actuator cylinders. To do this, remove them from the headlight unit and measure the stroke of the rods. Normal operation of the cylinders is ensured when the rod stroke is within the range of 6.5-7.5 mm.
- Since repair of the VAZ-2110 headlight range control is not structurally provided for, we replace the non-working device with a new device included in the kit.
Adjusting the headlight range control rod
Sometimes a malfunction of the headlight adjustment system can be caused by a misalignment of the adjustment lever with the lampshade rod. Therefore, if, for example, the hydrocorrector of the VAZ-2112 headlights does not work, do not rush to repair it by replacing it. First, make sure that the connection between the lever and the rod matches the operating position.
Adjusting Niva fog lights
The Niva's fog headlights are also adjusted manually. To do this, we rotate each headlight vertically and horizontally until it meets our standard. Of course, you should first unscrew the mounting bolts a little for practicality and ease of setup.
After completing the procedure, do not forget to tighten the bolts again. Remember that it is strictly forbidden to adjust the light beams so that they blind oncoming drivers. For such an act, you can safely receive an administrative fine for obstructing the driving of oncoming traffic. The fine starts from 500 rubles. The amount is not large, but the human factor plays a greater role here.
Remember the main thing is that if the body of the Chevrolet Niva is not damaged, the optics are intact, then there is no special need to adjust the headlights. Sometimes they resort to tuning when the owner intends to tune the car with non-standard equipment.
In such cases, a new mounting socket can be cut out, optics with a completely new shape can be installed, and new electrical power cables can be pulled. But that's a completely different story.
The video below shows how to adjust the headlights of a Chevrolet Niva with your own hands, taking into account the angle of incidence of the headlights.
In what cases is adjustment required?
When purchasing, you receive a new Niva with perfectly adjusted lighting - light at one point, without glare. But over time, these settings are violated. Poorly adjusted headlights can create significant interference when driving at night, in rain, fog, and in winter. An unexposed light “illuminates” the space in front of the car, thereby creating a negative effect. The light curtain interferes with the driver's view and blinds oncoming cars. Xenon headlights can cause problems for vehicles ahead.
- Adjusting headlights, VAZ 2108, 2109, 21099 cars
What can cause a violation of the factory settings:
- damage to headlights followed by replacement;
- part repair;
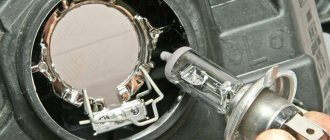
- changing light bulbs;
- installation of halogen and xenon lamps;
- an accident resulting in a violation of the body geometry;
- installing tires of a different height and width;
- replacing front springs;
- repair of the front part of the Niva.
A check will also be required if such a procedure has not been carried out since the date of purchase. Over time, the position of the light beam gets lost. This is caused by frequent driving on uneven roads. If you have difficulty seeing the roadside at night or your friends complain that the Niva’s optics are blinding, it needs to be adjusted.
Checking the optical adjustment is mandatory when purchasing a used car. The previous owner of the Niva could have had an accident, and then had to level the body with putty or adjust the headlights on his own, without the proper mechanic skills.
To determine if the headlights are not adjusted correctly, place the car in front of a wall and turn on the lights. The light rays will be directed in different directions - up, down, or spread to the sides, but not to one point. Such a simple check will be a signal to urgently adjust the headlights. It is quite possible for the driver to set the Niva’s luminous flux correctly independently.
How to adjust the headlights of a Niva Chevrolet
LOW BEAM NIVA-CHEVROLET
This will be the distance h on the screen. The photo shows one of these stands.
Professional adjustment of headlights, according to GOST, upon request.
Therefore, such a check should become a rule for all drivers. Rags Adjusting the headlights Check and adjust the headlights with the vehicle equipped:
Mark the screen on the wall as shown in Fig.
All you need is a Phillips screwdriver and a shield to cover the headlight. The tire pressure is checked in the car; the instructions may regulate a certain amount of fuel in the tank, as well as the installation of a load on the front seat, which must correspond to the driver’s weight.
DIY headlight adjustment
To put it more simply, the equipment of the machine should correspond to the version in which it is most often used. At the next stage, adjustment involves preparing a site, which in some way replaces the adjustment stand.
A few words about adjusting the light on the stand
All vehicle operating instructions recommend making such adjustments on a special stand. However, in some cases this operation can be easily performed independently. In cases where body repairs were carried out to restore the geometry of the body, it is best to contact a service center and perform this procedure using a special stand.
The photo shows one of these stands.
It is a stand that rotates freely in any direction. laser centering of the light beam, a glass lens with a lux meter, and a mirror for precise positioning are placed on it
Tools:
Before starting adjustment work, you need to put the hydraulic corrector handle in the position where the load is at its minimum. Before this, the car is installed on the site at a distance of 5 meters from the shield or wall.
After this, you can start making adjustments. The photo below shows the adjustment screws.
When installing light beams in vertical directions, the screws are 1 and 7 cm. Differences in the number of turns of the screws are allowed, no more than three turns.
Only now they need to be rotated in opposite directions. When screw 1 is turned counterclockwise with one turn, then the second screw 7 is rotated one turn, but clockwise.
By rotating the adjustment screws, you need to achieve such an arrangement of the light beam that the upper horizontal line of the light flux is no higher than the lower horizontal line on the wall or shield.
The inclined line of the light beam should intersect with the lines in the vertical direction at the centers of both headlights.
Parts and consumables:
The light of the second Niva headlight is adjusted in the same way. Place an additional 75 kg weight on the driver's seat.
Mark the screen on the wall as shown in Figure 9. The longitudinal plane of symmetry of the car should pass along line 0 on the screen.
Rock the car sideways so that the suspension springs self-align.
On your vehicle, measure the height of the center of the headlights from the floor. This will be the distance h on the screen. Set the headlight level control on the instrument panel to a position that corresponds to the load of a single-driver vehicle.
Place the car perpendicular to a smooth wall, such as a garage, at a distance of 5 m. Place an additional load weighing 75 kg on the driver's seat. Mark the screen on the wall as shown in Fig.
The longitudinal plane of symmetry of the car should pass along line 0 on the screen. Rock the car sideways so that the suspension springs self-align. On your vehicle, measure the height of the center of the headlights from the floor.
Repair of fog light adjustment on a Chevrolet Niva
Until recently, I didn’t have fog lights; I only drove with the main headlights. Although no, I have a connector on the bumper for the PTF on my Chevrolet Niva, there are even fog lights, but they are rusty and have not worked for me since the purchase. I suddenly changed them for new ones, I just went to the store, bought a spare part, but it turned out that it was much cheaper than I expected, so I decided to buy fog lights with the rest. It turned out that they really help improve visibility, especially in bad weather conditions. And now there is no need to constantly turn on the low beam.
And during a hunting trip, I had to drive in very hard-to-reach places, and that’s where I broke my foglight adjustment. The PTF fasteners were also damaged, but I repaired them the very next day. The adjustment also needs to be fixed, because the bulbs themselves are very bright and, during normal driving, I point them down, but when driving through the forest, when there is not enough light, I lift the PTF up to give more light. We recommend:
I didn’t want to change the entire adjustment system; I needed to come up with some simple repair method. After thinking everything over, I realized that ordinary zip ties can help me with this. I dismantled the fog lights on the car, and replaced the main screw in place of the standard adjusting screw. After this, carefully place a piece of belt on the screw, bend it at the installation site and fasten it to the plastic with a so-called bug. After that, I manually checked whether the adjustment worked. The travel of the fog lights ended up being 5 millimeters. The entire structure was assembled and installed in place.
Now you need to adjust the PTF for civilian driving so that the lighting does not blind oncoming drivers. I made marks on the garage door, parked the car on an even level and turned on the fog lights. Yes, there is a slight flare left. Unfortunately, I did not take into account that the iron fastening of the PTF was also slightly adjusted as a result of the collision with the pit. Here everything is easily solved, you just need to bend the holder correctly with your hands and then the flare will disappear.
Repair of electric headlight range control — Chevrolet Niva, 1.7 l., 2005 on DRIVE2
In general, yesterday I noticed a problem. The right headlight level control unit failed. Not according to Feng Shui, although it is not needed, it needs to be repaired. Fortunately, the headlight has glass instead of plastic and the corrector can be removed without removing the headlight. After smoking the manual, I started removing it. There is nothing complicated: we remove the headlight cover and see the corrector, which we unscrew TORX T20 (two self-tapping screws). Well, to pull out the corrector, you have to try. Remembering everyone and everything, we rest the screwdriver against the reflector and press down on the corrector rod. In general, 2 sets of 15 minutes each - and he gave up))) But it turns out that he still needs to tilt him in order to pull him out. But you can’t tilt it - the mount doesn’t allow it. As a result, the top mount broke (but is holding fine) and I took out the corrector. There are no photos, well, there was no time for photos at all, considering that it was -15 outside. Let's look at:
Made in Germany)))
In general, the variable resistor did not work. A common problem is that the tracks are worn out. They have become fragile over time and are easier to wear out IMHO.
In general, we take it apart and move the sliders to the side a little so that they walk along the untouched area of the track. We put everything back together and put it on the car. By the way, the same correctors are installed on new Priors, Kalinas, on Fords, on Ssang Yong, they say they also have them on Audis and Volts. In general, Bosch headlights have these. There are different lengths of the rods, but we don’t need it - we have our own)) And yes, during installation I had to lift the reflector with a screwdriver while simultaneously tilting the corrector - otherwise it wouldn’t fit. We check and are glad that everything worked out)))
Issue price: 0 ₽ Mileage: 120,000 km